Configure Microsoft Entra Connect cloud sync
Once the Microsoft Entra Cloud Sync prerequisites are met, organizations must complete the following tasks to install Microsoft Entra Connect cloud sync:
- Install the Microsoft Entra Connect provisioning agent.
- Verify the agent is installed.
- Verify the agent is running.
- Configure Microsoft Entra Connect cloud sync provisioning.
Each of these tasks is outlined in the following sections.
Task 1 - Install the Microsoft Entra Connect provisioning agent
This task examines the installation process for the Microsoft Entra Connect provisioning agent and how to initially configure it in the Azure portal.
Note
This unit deals with installing the provisioning agent by using the Microsoft Entra Connect Provisioning Agent wizard. For information on installing the Microsoft Entra Connect provisioning agent by using a command-line interface (CLI), see Install the Microsoft Entra Connect provisioning agent by using a CLI and PowerShell.
You should complete the following steps to install the Microsoft Entra Connect provisioning agent:
Sign in to the server you'll use with enterprise admin permissions.
Sign in to the Azure portal, and then go to Microsoft Entra ID.
On the menu on the left, select Microsoft Entra Connect.
On the Provision from Active Directory window, select Manage Microsoft Entra Cloud Sync.

On the Microsoft Entra Connect cloud sync screen, select the Download agent option that appears in the menu bar at the top of the page.
On the Microsoft Entra provisioning Agent window that appears, select the Accept terms & download button.
Once the agent has completed downloading, select Open file. This option will start the installation.
On the Microsoft Entra Connect Provisioning Agent Package screen, accept the licensing terms and select Install.
On the Welcome to Microsoft Entra Connect provisioning agent configuration wizard page, select Next.
Sign in with your Microsoft Entra Global Administrator account.
On the Configure Service Account page, select either Create gMSA, or Use custom gMSA.

If you allow the agent to create the account, enter the domain administrator credentials to create the group managed service account that will be used to run the agent service and then select Next. The account that's created will be named provAgentgMSA$.
If you specify Use custom gMSA, you'll be prompted to provide this account.
On the Connect Active Directory page, select Next. Your current domain is automatically displayed. If you wish to add more domains, enter them and select Add Directory. Then sign in with an administrator account from that domain.
You can optionally manage the preference of domain controllers the agent will use by selecting Add Directory and then selecting the Select domain controller priority check box. A list of domain controllers will appear. Order the list of domain controllers and then select OK.
On the Agent installation page, confirm the settings and the account that will be created and then select Confirm.
After this operation finishes, a message should appear that indicates the agent installation is complete. Select Exit.
If you still see the initial Microsoft Entra Connect Provisioning Agent Package screen, select Close.
Task 2 - Verify the agent is installed
Agent verification occurs in the Azure portal and on the local server that's running the agent. You should complete this task to verify the agent is being seen by Azure:
Sign in to the Azure portal.
In the navigation pane, select Microsoft Entra ID > Microsoft Entra Connect.
On the Microsoft Entra Connect page, in the center pane, select Manage cloud sync.
On the Microsoft Entra Connect cloud sync screen, select the Review all agents option that appears on the menu bar.
On the On-premises provisioning agents screen, the agents that you installed are displayed. Verify the agent you installed appears and that its Status is active.

Task 3 - Verify the agent is running
On the local server in which the agent is installed, you should then complete this task to verify the agent is running:
Sign in to the server with an administrator account.
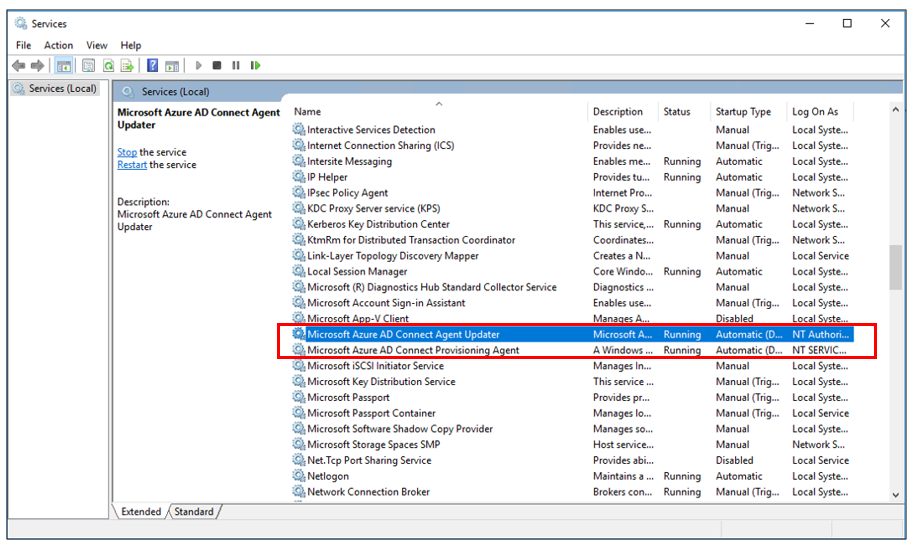
Open Services by going to it or by selecting Start > Run > Services.msc.
Under Services, verify Microsoft Entra Connect Agent Updater and Microsoft Entra Connect Provisioning Agent are present. and that their status is Running.
Task 4 - Configure Microsoft Entra Connect cloud sync provisioning
Once the agent is installed, it must be configured and enabled before it will start synchronizing users. Complete this task to configure the agent:
Sign in to the Azure portal, and then go to Microsoft Entra ID.
On the menu on the left, select Microsoft Entra Connect.
On the Provision from Active Directory window, select Manage Microsoft Entra Cloud Sync.
Select New configuration.
On the New provisioning configuration screen, select the domain you want to sync and whether to enable password hash sync. Select Create.
The Edit cloud sync configuration screen will appear. Update the following sections of this screen to configure the agent:
Scope. Configure whether all users are in scope, or configure scoping filters to provision specific users and groups.
Manage attributes. You can map attributes between your on-premises user/group objects and the objects in Microsoft Entra ID. You can customize the default attribute-mappings according to your business needs. In doing so, you can change or delete existing attribute-mappings, or create new attribute-mappings.
Validate (recommended). Select the Provision a user button. This option verifies that synchronization is working as expected before enabling the configuration. It does so by testing with individual users that you enter after selecting the Provision a user button.
Settings. Enter a Notification email address. This email will be notified when provisioning isn't healthy. It's recommended that you keep the Prevent accidental deletion check box selected. You should also set the Accidental deletion threshold to a number that you wish to be notified about.
Deploy. Select Enable to sync the users and groups that are in scope as defined in the Scope section.

Move the selector to Enable and then select Save.