Exercise - Use OpenTelemetry data in a cloud-native application
In this exercise, you get better visibility of all the data generated by OpenTelemetry in your app. You finish adding diagnostics capability to the Store service. With that in place, you add Prometheus and Grafana to the eShopLite services and look at some of the metrics being captured. The next step is to add Zipkin and view the distributed traces. Finally, you add Application Insights to your app and use it to view the data.
Add Prometheus and Grafana
Prometheus and Grafana provide Docker images that make it easy to add them to your projects. You include them in the docker-compose.yml file, in the root of the solution.
In Visual Studio Code, on the EXPLORER pane, select the docker-compose.yml file.
Add this YAML to the bottom of the file:
  prometheus:
    image: prom/prometheus
    container_name: prometheus
    command:
      - '--config.file=/etc/prometheus/prometheus.yml'
    ports:
      - 9090:9090
    restart: unless-stopped
    volumes:
      - ./prometheus:/etc/prometheus

  grafana:
    image: grafana/grafana
    container_name: grafana
    ports:
      - 3000:3000
    restart: unless-stopped
    environment:
      - GF_SECURITY_ADMIN_USER=admin
      - GF_SECURITY_ADMIN_PASSWORD=grafana
    volumes:
      - ./grafana/datasource:/etc/grafana/provisioning/datasources
The preceding Docker yaml adds two new services, Prometheus and Grafana. The Prometheus section configures a container to respond on port 9090. It maps the prometheus folder expecting a prometheus.yml file. The Grafana section configures a container to respond on port 3000. It maps three folders inside a grafana folder.
Configure Prometheus
Prometheus needs to be configured so that it knows where to collect the metrics. You add a prometheus.yml file to the prometheus folder.
In Visual Studio Code, on the EXPLORER pane, right-click the dotnet-observability folder and then select New Folder.
In the name field, enter prometheus.
On the EXPLORER pane, right-click the prometheus folder and then select New File.
In the name field, enter prometheus.yml.
In the file editor, enter this YAML:
global:
  scrape_interval: 1s

scrape_configs:
  - job_name: 'products'
    static_configs:
      - targets: ['backend:8080']
  - job_name: 'store'
    static_configs:
      - targets: ['frontend:8080']
The preceding YAML configures Prometheus to scrape metrics from the back-end and front-end services. As the app is running in Docker the host names are the service names.
Select Ctrl+S to save the file.
Configure Grafana
Grafana needs to be configured so that it knows where to collect the metrics.
In Visual Studio Code, on the EXPLORER pane, right-click the dotnet-observability folder and then select New Folder.
In the name field, enter grafana.
Right-click the grafana folder and then select New Folder.
In the name field, enter datasource.
Right-click the grafana folder and then select New Folder.
In the name field, enter dashboard.
Expand the grafana folder, right-click the datasource folder, and then select New File.
In the name field, enter datasource.yml.
On the editor tab, enter this YAML:
apiVersion: 1

datasources:
- name: Prometheus
  type: prometheus
  url: http://prometheus:9090
  isDefault: true
  access: proxy
  editable: true
The preceding YAML configures Grafana to use Prometheus as the data source.
Select Ctrl+S to save the file.
Update your ASP.NET Core app to expose metrics for Prometheus
Now, the diagnostics project is only configured to expose metrics to the console. You update the project to expose metrics to Prometheus instead.
In Visual Studio Code, on the TERMINAL pane at the bottom, go to the Diagnostics folder.
Run this command:
cd .\eShopLite\Diagnostics\Remove the
OpenTelemetry.Exporter.Consolepackage:dotnet remove package OpenTelemetry.Exporter.ConsoleAdd the
OpenTelemetry.Exporter.Prometheus.AspNetCorepackage:dotnet add package OpenTelemetry.Exporter.Prometheus.AspNetCore --prereleaseOn the EXPLORER pane, expand the Diagnostics folder and then select DiagnosticServiceCollectionExtensions.cs.
Replace the console exporter
.AddConsoleExporter();with this code:.AddPrometheusExporter();At the bottom of the file, before the last
}, add this code:public static void MapObservability(this IEndpointRouteBuilder routes) { routes.MapPrometheusScrapingEndpoint(); }This code adds a Prometheus scraping endpoint to every service that includes this with their app. This allows Prometheus to scrape metrics from
http://service/metrics.Select Ctrl+S to save the file.
Expose metrics in the Store service
The app is currently only configured to expose metrics for the Products service. You update the app to expose metrics for the Store service too.
On the EXPLORER pane, under SOLUTION EXPLORER, right-click the Store project and then select Add Project Reference.
Select Diagnostics.
On the EXPLORER pane, expand the Store folder and then select Program.cs.
Under the code comment
// Add observability code here, add a call to the Diagnostics method:builder.Services.AddObservability("Store", builder.Configuration);Before the
app.Run()method, add this code:app.MapObservability();This method adds the Prometheus scraping endpoint to the Store service.
Select Ctrl+S to save the file.
On the EXPLORER pane, expand the Product folder and then select Program.cs.
Before the
app.Run()method, add this code:app.MapObservability();This method adds the Prometheus scraping endpoint to the Products service.
Select Ctrl+S to save the file.
Test the new observability features
You now test the new observability features you added to the app.
On the TERMINAL pane at the bottom, go to the dotnet-observability/eShopLite folder.
cd ..Update the apps containers.
dotnet publish /p:PublishProfile=DefaultContainerGo to the dotnet-observability folder, and start the app with Docker:
cd ..
docker compose up
On the PORTS tab, select Open in Browser for Prometheus (9090). If you're running locally in Visual Studio Code, open a browser and, on a new tab, go to the Prometheus app
http://localhost:9090.On the top menu, select Status and then select Targets.

You should see the Products and Store services listed as UP.
On the PORTS tab, select Open in Browser for Grafana (3000). If you're running locally in Visual Studio Code, open a browser and, on a new tab, go to the Grafana app
http://localhost:3000.Enter the username admin.
Enter the password grafana.
Select Create your first dashboard.
Select Import dashboard.
On a new tab, go to GitHub and open the ASP.NET Core dashboard json file.
Copy the Raw file.
Paste the JSON into the Import via dashboard JSON model text box.
Select Load.
In the Prometheus data source dropdown, select Prometheus.
Select Import.
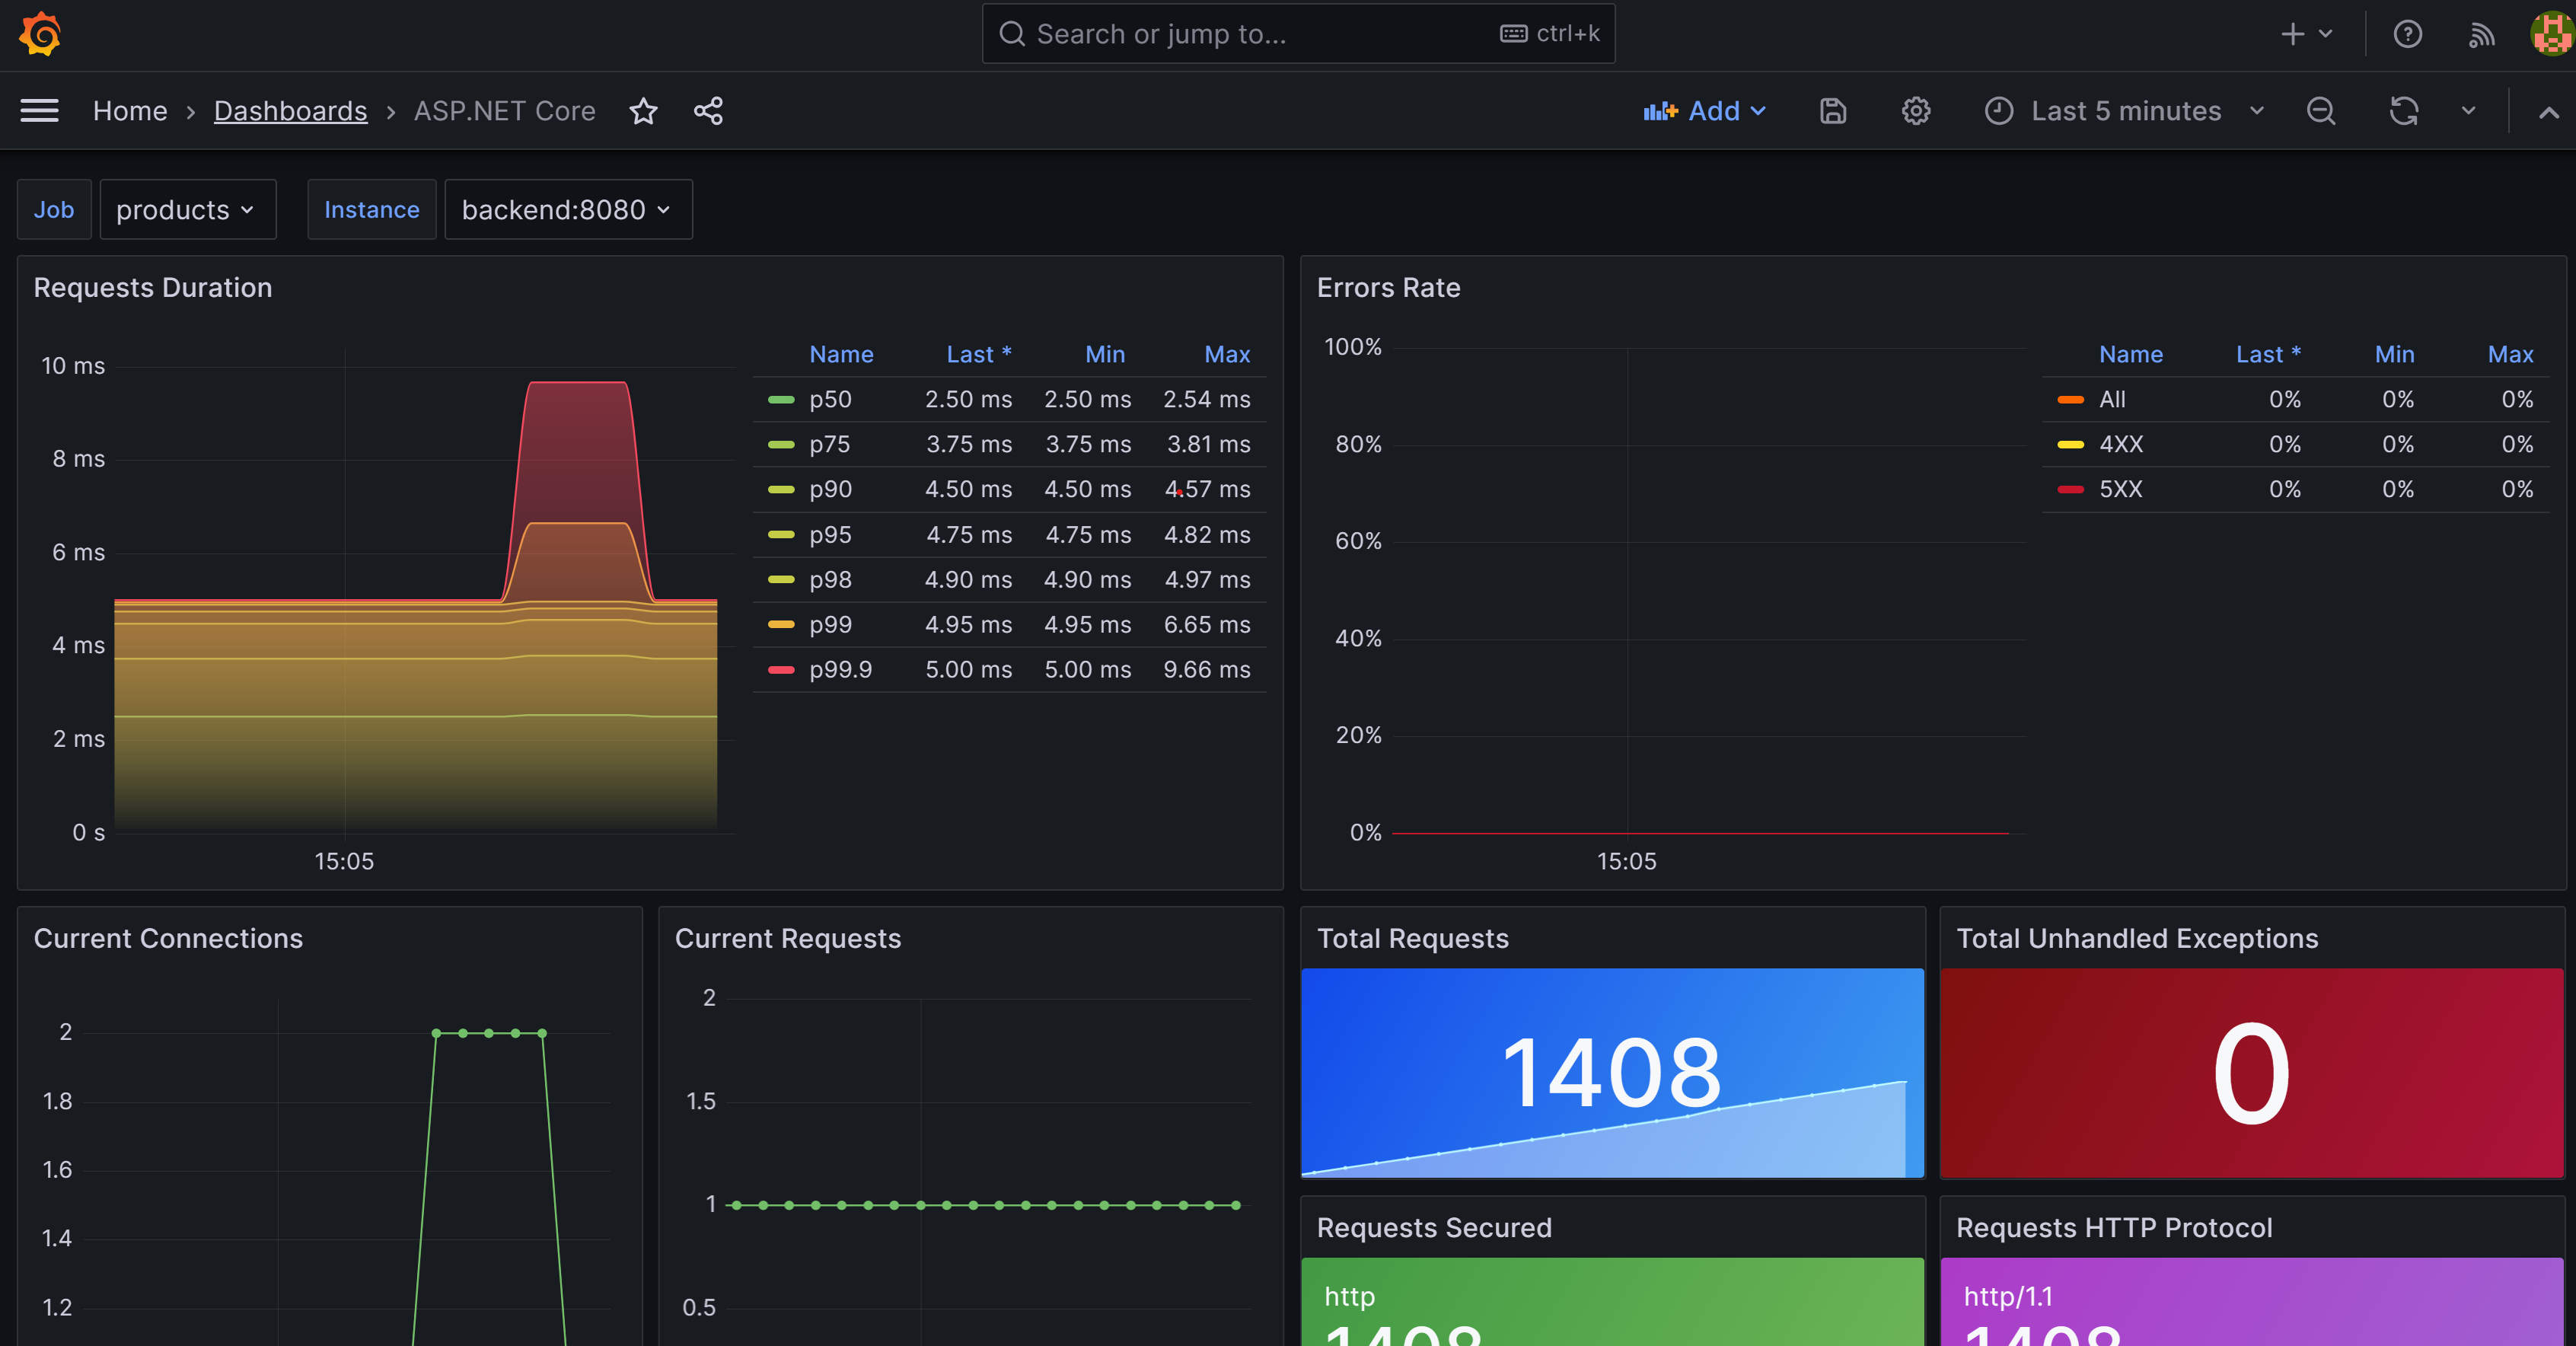
You should see a dashboard showing metrics for the Products and Store services. Select the Job to change between the two services.
On the TERMINAL pane, select Ctrl+C to stop the app.


Add Zipkin
You now extend the tracing capabilities of the app by adding Zipkin. As you did before, you add a Zipkin container to your app and configure it to connect to the OpenTelemetry collector. Then you add the OpenTelemetry Zipkin exporter to your app.
In Visual Studio Code, on the EXPLORER pane, select the docker-compose.yml file inside the dotnet-observability folder.
Add
prometheusandzipkinin thedepends_onfor thefrontend.depends_on: - backend - prometheus - zipkinAdd
prometheusin thedepends_onfor thebackend.depends_on: - prometheusAdd environmental variables for Zipkin to BOTH
frontendandbackend:environment: - ZIPKIN_URL=http://zipkin:9411The two services should look like this:
frontend:
  image: storeimage
  build:
    context: .
    dockerfile: ./eShopLite/Store/Dockerfile
  environment:
    - ProductEndpoint=http://backend:8080
    - ZIPKIN_URL=http://zipkin:9411
  ports:
    - "32000:8080"
  depends_on:
    - backend
    - prometheus
    - zipkin

backend:
  image: productservice
  build:
    context: .
    dockerfile: ./eShopLite/Products/Dockerfile
  environment:
    - ZIPKIN_URL=http://zipkin:9411

  ports:
    - "32001:8080"
  depends_on:
    - prometheus
Add this YAML to the bottom of the file:
  zipkin:
    image: openzipkin/zipkin
    ports:
      - 9411:9411
The preceding YAML adds a Zipkin container to the app. It configures the Zipkin container to respond on port 9411.
Select Ctrl+S to save the file.
On the TERMINAL pane, go to the Diagnostics folder.
cd ./eShopLite/Diagnostics/Add the Zipkin export packages.
dotnet add package OpenTelemetry.Exporter.Zipkin --prereleaseOn the EXPLORER pane, expand the Diagnostics folder and then select DiagnosticServiceCollectionExtensions.cs.
At the bottom of the tracing providers, add Zipkin:
// add the tracing providers
.WithTracing(tracing =>
{
  tracing.SetResourceBuilder(resource)
              .AddAspNetCoreInstrumentation()
              .AddHttpClientInstrumentation()
              .AddSqlClientInstrumentation()
              .AddZipkinExporter(zipkin =>
              {
                var zipkinUrl = configuration["ZIPKIN_URL"] ?? "http://zipkin:9411";
                zipkin.Endpoint = new Uri($"{zipkinUrl}/api/v2/spans");
              });
});
Select Ctrl+S to save the file.
On the TERMINAL pane at the bottom, go to the dotnet-observability/eShopLite folder.
cd ..Update the apps containers.
dotnet publish /p:PublishProfile=DefaultContainerGo to the dotnet-observability folder, and start the app with Docker:
cd ..
docker compose up
On the PORTS tab, select Open in Browser for Prometheus (9090). If you're running locally in Visual Studio Code, open a new browser tab and go to the Zipkin app
http://localhost:9411.On the menu, select Dependencies.

On the TERMINAL pane, select Ctrl+C to stop the app.
Add Application Insights
The last step is to add Application Insights to your app.
Create the Application Insights resource in Azure
In Visual Studio Code, on the TERMINAL pane, sign in to Azure.
az login --use-device-codeView your selected Azure subscription.
az account show -o tableIf the wrong subscription is selected, select the correct one by using the az account set command.
Add the extension for Application Insights.
az extension add -n application-insightsCreate an Application Insights resource.
az monitor app-insights component create --app eShopLiteInsights --location eastus --kind web -g eShopLiteYou should see this output:
{
  "appId": "fb6e1af0-7556-469d-a31f-85e4550c8fde",
  "applicationId": "eShopLiteInsights",
  "applicationType": "web",
  "connectionString": "InstrumentationKey=00000000-0000-0000-0000-000000000000;IngestionEndpoint=https://eastus-2.in.applicationinsights.azure.com/;LiveEndpoint=https://eastus.livediagnostics.monitor.azure.com/",
  "creationDate": "2023-11-10T16:50:00.950726+00:00",
  "disableIpMasking": null,
  "etag": "\"3a02952a-0000-0100-0000-654e5f380000\"",
  "flowType": "Bluefield",
  "hockeyAppId": null,
  "hockeyAppToken": null,
  "id": "/subscriptions/7eebce2a-0884-4df2-8d1d-2a3c051e47fe/resourceGroups/eShopLite/providers/microsoft.insights/components/eShopLiteInsights",
  "immediatePurgeDataOn30Days": null,
  "ingestionMode": "ApplicationInsights",
  "instrumentationKey": "00000000-0000-0000-0000-000000000000",
  "kind": "web",
  "location": "eastus",
  "name": "eShopLiteInsights",
  "privateLinkScopedResources": null,
  "provisioningState": "Succeeded",
  "publicNetworkAccessForIngestion": "Enabled",
  "publicNetworkAccessForQuery": "Enabled",
  "requestSource": "rest",
  "resourceGroup": "eShopLite",
  "retentionInDays": 90,
  "samplingPercentage": null,
  "tags": {},
  "tenantId": "7eebce2a-0884-4df2-8d1d-2a3c051e47fe",
  "type": "microsoft.insights/components"
}
From the preceding returned JSON, copy the
connectionString, excluding the ". For example:InstrumentationKey=b851fa75-85a2-42f7-bb6f-413725d9d8ba;IngestionEndpoint=https://eastus-2.in.applicationinsights.azure.com/;LiveEndpoint=https://eastus.livediagnostics.monitor.azure.com/In Visual Studio Code, on the EXPLORER pane, select the docker-compose.yml file.
You add an environment variable that the diagnostics project uses to connect to Application Insights. Add this YAML to the Store service:
environment:
  - APPLICATIONINSIGHTS_CONNECTION_STRING=InstrumentationKey=b851fa75-85a2-42f7-bb6f-413725d9d8ba;IngestionEndpoint=https://eastus-2.in.applicationinsights.azure.com/;LiveEndpoint=https://eastus.livediagnostics.monitor.azure.com/
Replace the preceding connection string with the one you copied from the Azure CLI.
Repeat these steps for the Products service. The final YAML should look like this:
  frontend:
    image: storeimage
    build:
      context: .
      dockerfile: ./eShopLite/Store/Dockerfile
    environment:
      - ProductEndpoint=http://backend:8080
      - ZIPKIN_URL=http://zipkin:9411
      - APPLICATIONINSIGHTS_CONNECTION_STRING=InstrumentationKey=b851fa75-85a2-42f7-bb6f-413725d9d8ba;IngestionEndpoint=https://eastus-2.in.applicationinsights.azure.com/;LiveEndpoint=https://eastus.livediagnostics.monitor.azure.com/
    ports:
      - "32000:8080"
    depends_on:
      - backend
      - prometheus
      - zipkin

  backend:
    image: productservice
    build:
      context: .
      dockerfile: ./eShopLite/Products/Dockerfile
    environment:
      - ZIPKIN_URL=http://zipkin:9411
      - APPLICATIONINSIGHTS_CONNECTION_STRING=InstrumentationKey=b851fa75-85a2-42f7-bb6f-413725d9d8ba;IngestionEndpoint=https://eastus-2.in.applicationinsights.azure.com/;LiveEndpoint=https://eastus.livediagnostics.monitor.azure.com/
Select Ctrl+S to save the file.
On the TERMINAL pane, go to the Diagnostics folder.
cd .\eShopLite\Diagnostics\Add the Application Insights exporter package.
dotnet add package Azure.Monitor.OpenTelemetry.AspNetCore --prereleaseOn the EXPLORE pane, select the Diagnostics folder and then select DiagnosticServiceCollectionExtensions.cs.
At the top of the file, add this
usingstatement:using Azure.Monitor.OpenTelemetry.AspNetCore;Below
var otelBuilder = services.AddOpenTelemetry();, add this code:if (!string.IsNullOrEmpty(configuration["APPLICATIONINSIGHTS_CONNECTION_STRING"])) { otelBuilder.UseAzureMonitor(); }Select Ctrl+S to save the file.
On the TERMINAL pane at the bottom, go to the dotnet-observability/eShopLite folder.
cd ..Update the apps containers.
dotnet publish /p:PublishProfile=DefaultContainerGo to the dotnet-observability folder, and start the app with Docker:
cd ..
docker compose up
Sign in to the Azure portal with the same credentials you used to sign in to the Azure CLI.
In the Azure portal, select Resource groups.
Select the eShopLite resource group.
Select the eShopLiteInsights Application Insights resource.
Select the Application Dashboard.
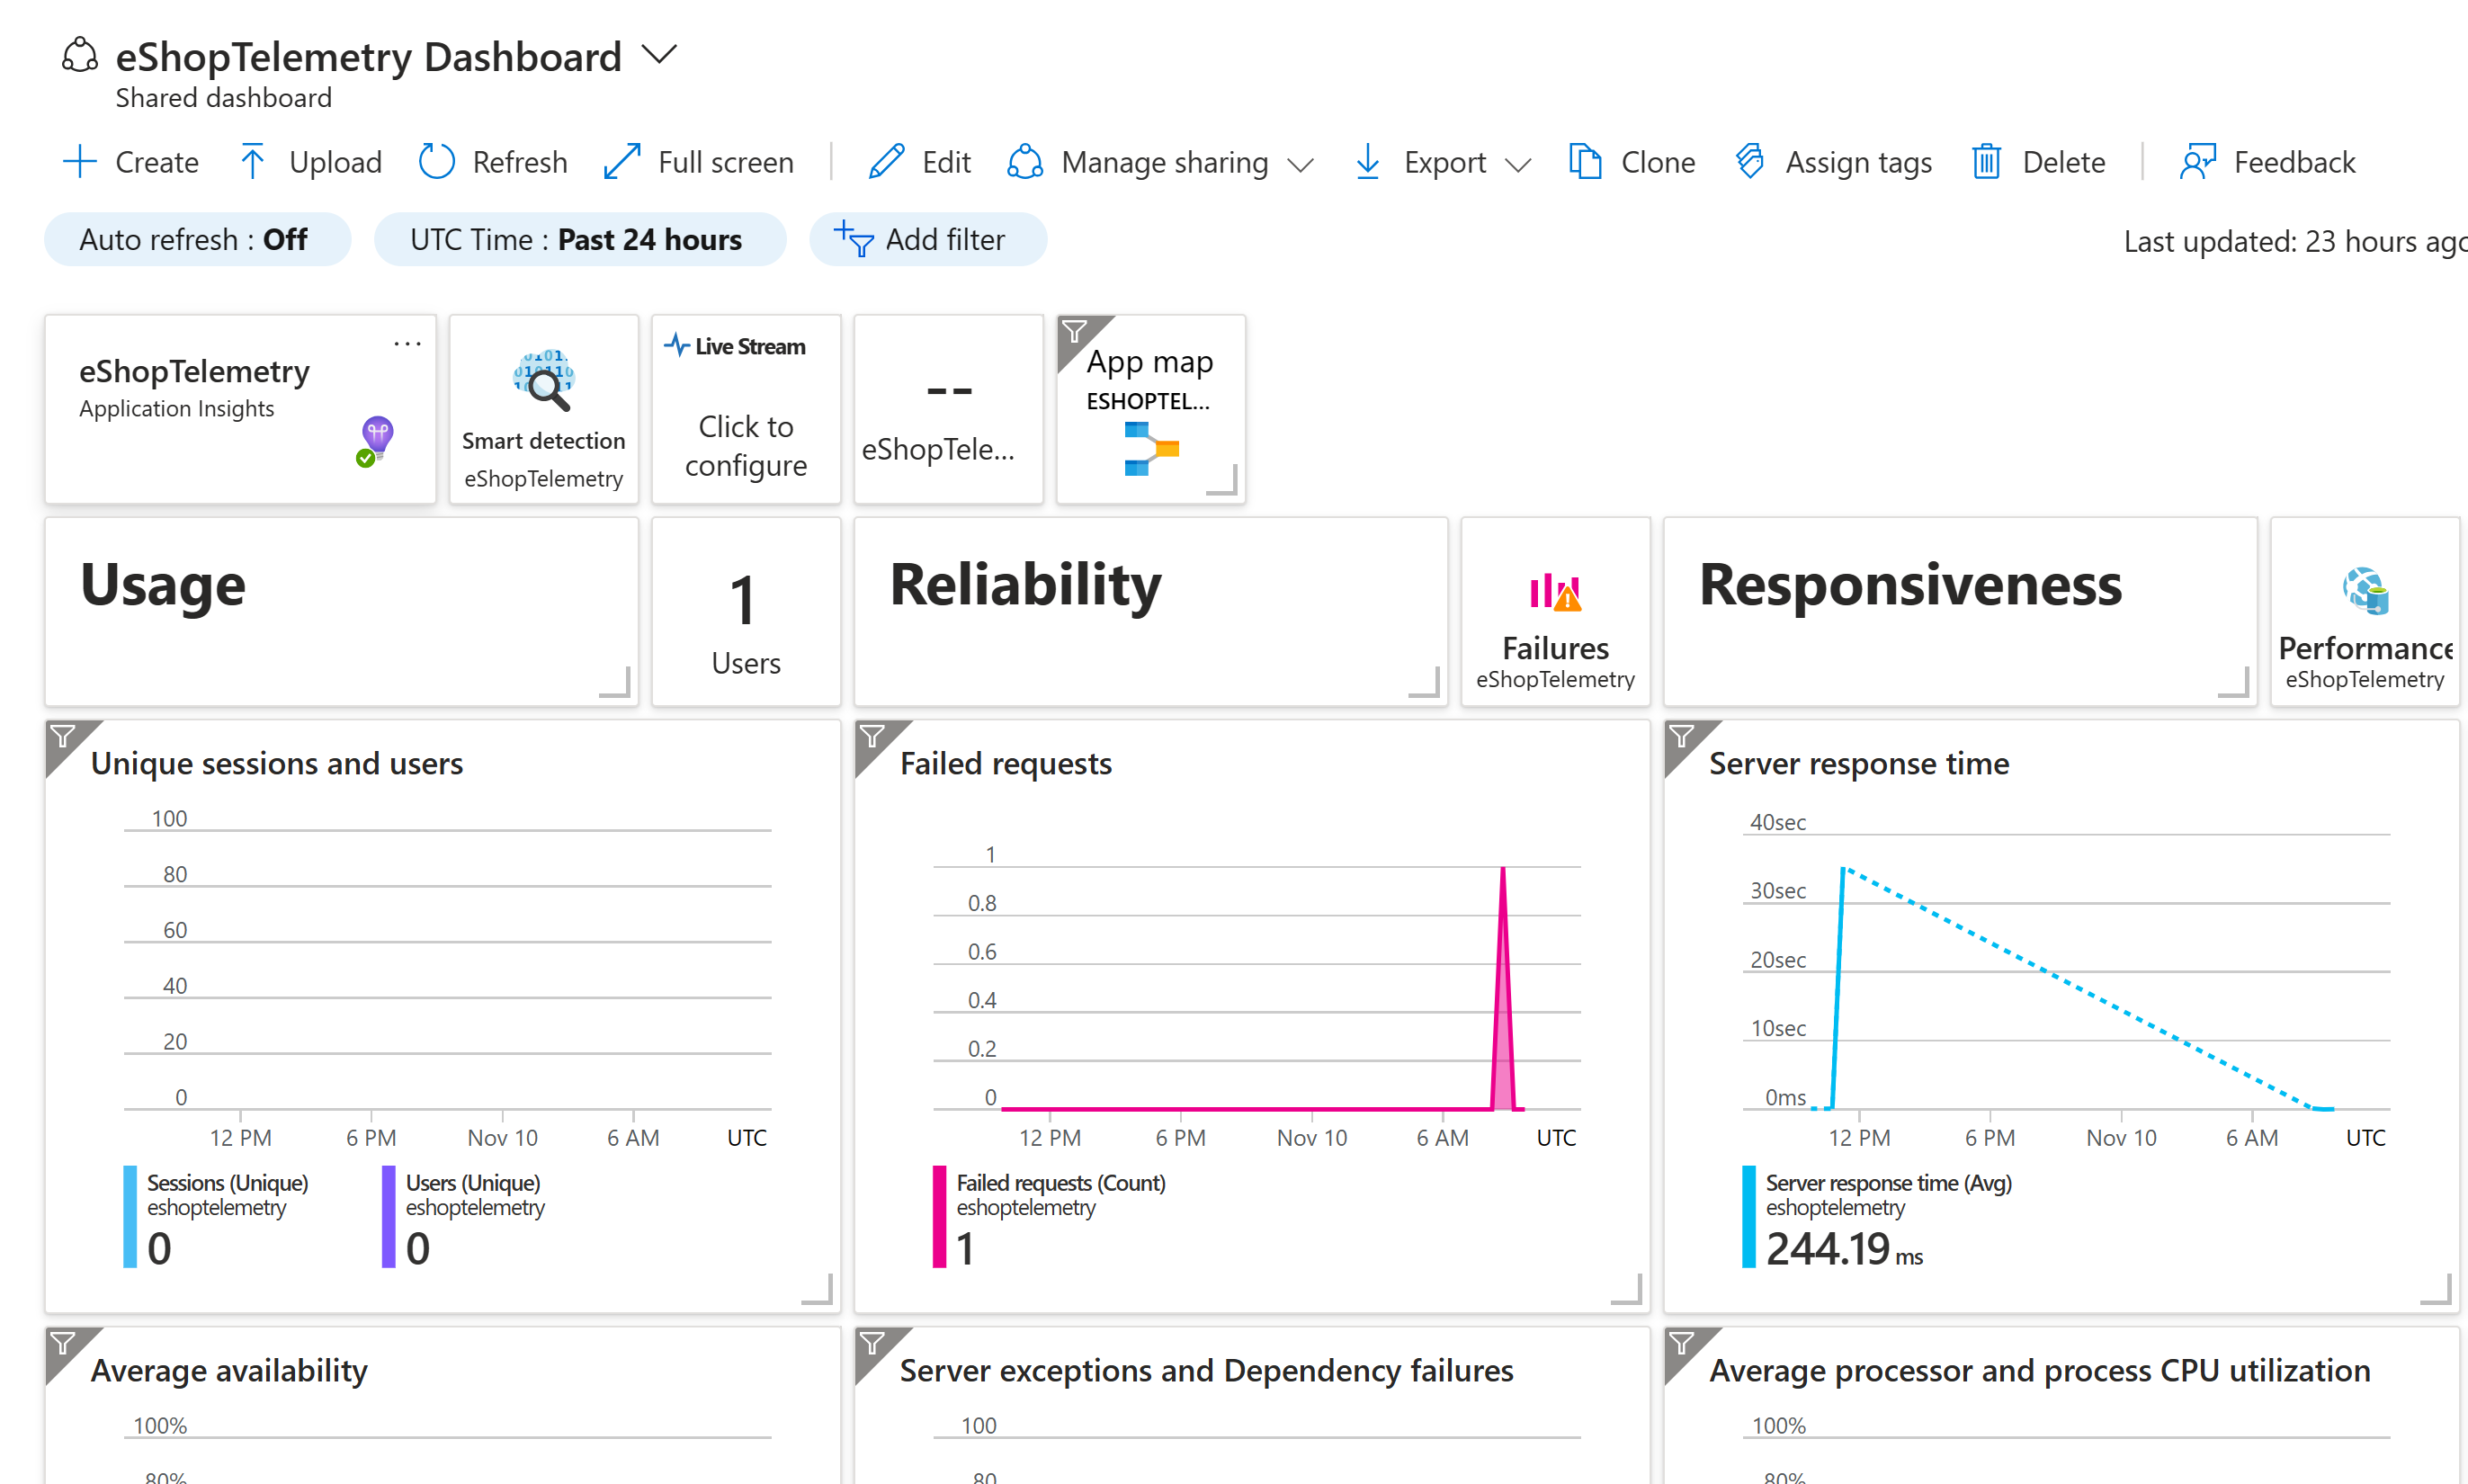
To see changes to metrics, go to the eShopLite app and change stock. Then refresh the Application Insights dashboard.
On the TERMINAL pane, press Ctrl+C to stop the app.
