Manage insider risk management forensic evidence
Introduction to insider risk management forensic evidence
Insider risk management forensic evidence provides security teams with visual context during investigations, helping them better understand and respond to potential data risks. With customizable event triggers and built-in user privacy protection controls, forensic evidence enables visual activity capturing across devices. It offers features like visual capturing, customizable triggers, user-centric policy targeting, and strong role-based access controls. Forensic evidence integrates seamlessly with existing insider risk management features and requires dual authorization for policy creation.
Key features include:
- Visual capturing of security-related user activities
- Customizable triggers and capturing options
- User-centric policy targeting
- Strong role-based access controls
- Deep integration with insider risk management features
- Trial capacity (up to 20 GB) for captured clips
Forensic evidence also ensures user privacy by requiring multiple levels of approval for activating the capturing feature. Device and configuration requirements can be found in the device and configuration requirements section.
Capturing options and workflow
There are two capturing options for forensic evidence policies:
- Specific activities: Captures activity only when a triggering event brings an approved user into scope for the policy and when policy indicator conditions are detected for the user.
- All activities: Captures any activity performed by users, regardless of triggering events or policy indicators.
The overall workflow for detecting, investigating, and remediating alerts that contain clip capturing follows the same basic steps as other insider risk management policies. However, there are some notable differences for forensic evidence:
- Users subject to capturing must have explicit capturing requests and approvals.
- Devices must be onboarded and have the Microsoft Purview client installed.
Configure and Manage Forensic Evidence
Configuring forensic evidence in your organization is similar to configuring other policies from insider risk management policy templates. In general, you follow the same basic configuration steps to set up forensic evidence, but there are a few areas that need feature-specific configuration actions before you get started with the basic configuration steps.
Configure forensic evidence
| Step | Description |
|---|---|
| 1. Confirm your subscription and configure data storage access | Confirm your insider risk management subscription and add the domain compliancedrive.microsoft.com to your firewall allowlist. |
| 2. Configure supported devices | Onboard user devices to the Microsoft Purview compliance portal and install the Microsoft Purview Client on eligible devices. |
| 3. Configure settings | Enable forensic evidence capturing, configure capturing parameters, bandwidth limits, and offline capturing options in the Microsoft Purview compliance portal. |
| 4. Create a policy | Forensic evidence policies define the scope of security-related user activity to capture for configured devices. There are two scope options for capturing forensic evidence: Specific activities or All activities |
| 5. Define and approve users for capturing | To capture security-related user activities, admins must ensure that visual capturing for specific users is defined and approved through a dual authorization process. |
Manage users
Before forensic evidence capturing can be enabled, individuals must be requested and approved. Simply adding them to a policy doesn't activate capturing automatically. Members of the Insider Risk Management or Insider Risk Management Admins role groups submit approval requests to those in the Insider Risk Management Approvers role group. Once approved, the captures become available for review.
Request capturing approvals
To request capturing approvals, you need to submit a request to turn on forensic evidence capturing for specific users. Approvers in your organization receive an email notification and can approve or reject the request. If approved, the user appears on the Approved users tab and become eligible for capturing. If the request isn't addressed, it expires six months from the submission date.
To configure approved users for forensic evidence capturing, complete the following steps:
In the Microsoft Purview compliance portal, go to Insider risk management > Forensic evidence > User management.
Select the Manage forensic evidence requests tab.
Select Create request.
On the Users page, select Add users.
Use Search to locate a specific user or select one or more users from the list. Select Add, then select Next.
On the Forensic evidence policy page, select a forensic evidence policy for the added users. The policy you choose determines the scope of activity to capture for users. Select Next.
On the Justification page, let the reviewer know why you're requesting that capturing be enabled for the users you added in the Justification for turning on forensic evidence capturing text box. This field is required. When complete, select Next.
On the Email notifications page, use a template to notify users that forensic evidence capturing is enabled on their devices, following your organization's policies. Emails are sent only if requests are approved.
Select the Send an email notification to approved users check box. Choose an existing template or create a new template by selecting Create a notification template.
On the Finish page, review your settings before submitting the request. Select Edit users or Edit justification to change any of the request values or select Submit to create and send the request to reviewers.
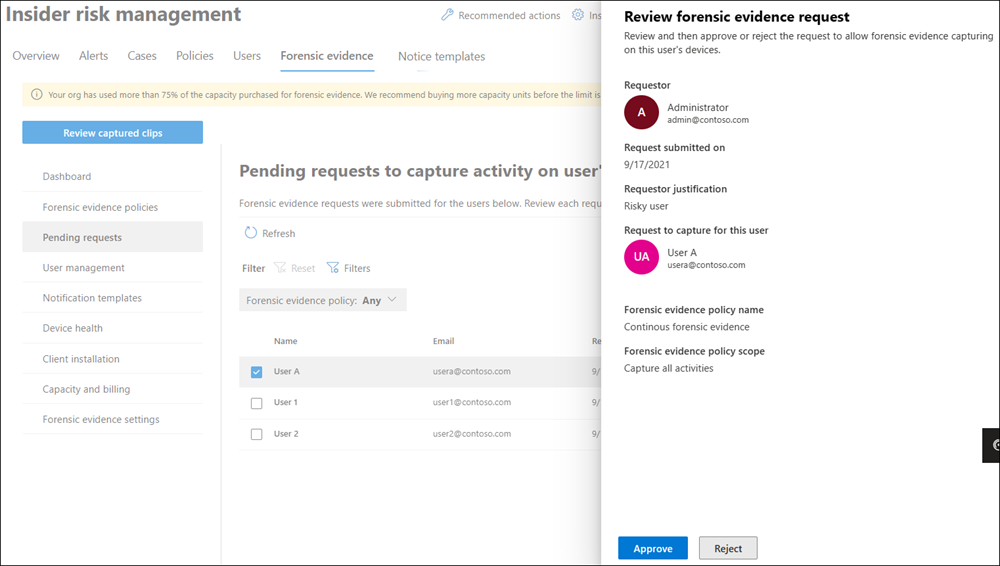
To view pending approval requests, navigate to Insider risk management > Forensic evidence > Pending requests. Here you see the users with pending requests, their email address, the request submission date, and who submitted the approval request. If no users are displayed, there aren't any pending approval requests for any users.
Members assigned to the Insider Risk Management Approvers role group can select a user on the Forensic evidence request tab and review the request. Users review the request and then approve or reject the forensic evidence capturing request. Once they approve or reject the request, it no longer appears in their pending requests view.
Approve or reject capturing requests
After requests are complete, users assigned to the Insider Risk Management Approvers role group will receive an email notification for the approval request. To approve or reject requests, reviewers must complete the following steps:
- In the Microsoft Purview compliance portal, go to Insider risk management > Forensic evidence > Pending requests.
- Select a user to review.
- On the Review forensic evidence request (preview) pane, review the justification submitted by the requestor. Select Approve or Reject as applicable.
- On the Request approved or Request rejected page, select Close.
Revoke capturing approvals
If needed, you can revoke approval for specific users and exclude them from forensic evidence capturing. Revoking approval doesn't delete or remove any existing captures for these users, only future capturing of activity for these users is disabled.
To revoke approvals for users, users assigned to the Insider Risk Management Approvers role group must complete the following steps:
- In the Microsoft Purview compliance portal, go to Insider risk management > Forensic evidence > User management.
- Select the Approved users tab.
- Select a user, then select Remove.
- On the removal confirmation page, select Remove to revoke capturing approval or select Cancel to close the confirmation page.
Creating and managing notification templates
You can create a notification template to inform users via email that their device has forensic evidence capturing enabled, following your organization's policies. The email is sent to users only if their request is approved.
To create a new notification template, complete the following steps:
- In the Microsoft Purview compliance portal, go to Insider risk management > Forensic evidence > Notification templates.
- Select Create notification template.
- On the New email notification template pane, complete the following required fields:
- Template name
- Send from
- Subject
- Message body
- Select Save.
Select a template and select Delete to delete an existing notification template.
Viewing captured clips
You can view captured clips in Microsoft Purview Insider Risk Management by selecting the Forensics evidence tab. Clips can be accessed in different contexts:
- Alerts dashboard: Captures specific user activities based on forensic evidence policy indicators.
- User activity reports: Captures any security-related activity for users in forensic evidence policies.
- Cases dashboard: Captures alerts escalated to cases.
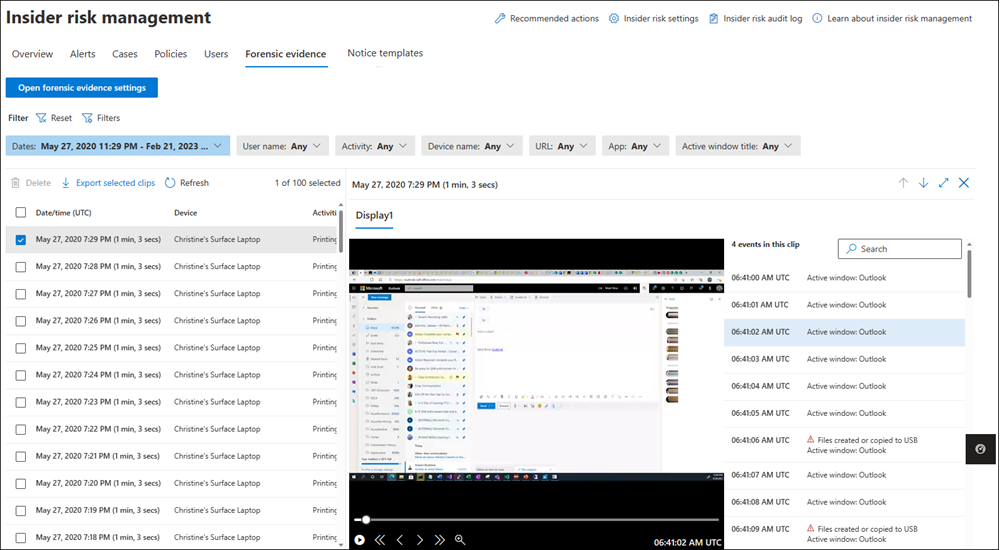
When you select the Forensics evidence tab, you see a list of captured clips and their details. Clicking a clip displays a video player and a transcript of activities and events.
Each captured clip includes the following information:
- Date/time (UTC): Capture date, time (UTC), and duration.
- Device: Device name in Windows 10/11.
- Activities: Activity type based on global and policy indicators.
- User: User name.
- URL (if applicable): Accessed URL during the activity.
- Application (if applicable): Accessed application during the activity.
- Active window title: Title of the accessed window during the activity.
To view a captured clip:
If needed, configure the filters at the top of the list.
Select a clip from the list.
Using the video player controls, select the Play control to review the entire clip from beginning to end.
To scope the review to a specific activity or event in the clip, select the activity or event in the transcript. You can also use the search box above the transcript to search for specific activities or events.
Note
A red triangle in the transcript denotes an activity.
Filtering the captured clips list
Use filters above the captured clips list to find specific activities and information.
- Filters support up to 10 unique IDs, allowing filtering for up to 10 users at once.
- URL name filter: Match domain names or search for keywords within URLs.
- App name filter: Use Contains any of or Contains all of to filter based on app names.
- Active window title filter: Works the same way as the App name filter.
Deleting clips
Users assigned to the Insider Risk Management Investigators role group can delete individual clips from the captured clips list. To perform this action:
- Select the check box next to the capture.
- Select the Delete (Trash can) button.
Users assigned to the Insider Risk Management Admins role group can do bulk deletions through settings. To do this:
- In the Microsoft Purview compliance portal, go to Insider risk management > Forensic evidence > Forensic evidence settings.
- Make sure that the Allow deletion of forensic user data by an Administrator or Investigator option is set to On.
- Under Delete a user's data, select Select a user, and then select the user that you want to delete clips for.
Important
Forensic evidence clips are deleted 120 days after they're captured. You can export or transfer forensic evidence clips before they're deleted.
Alerts dashboard
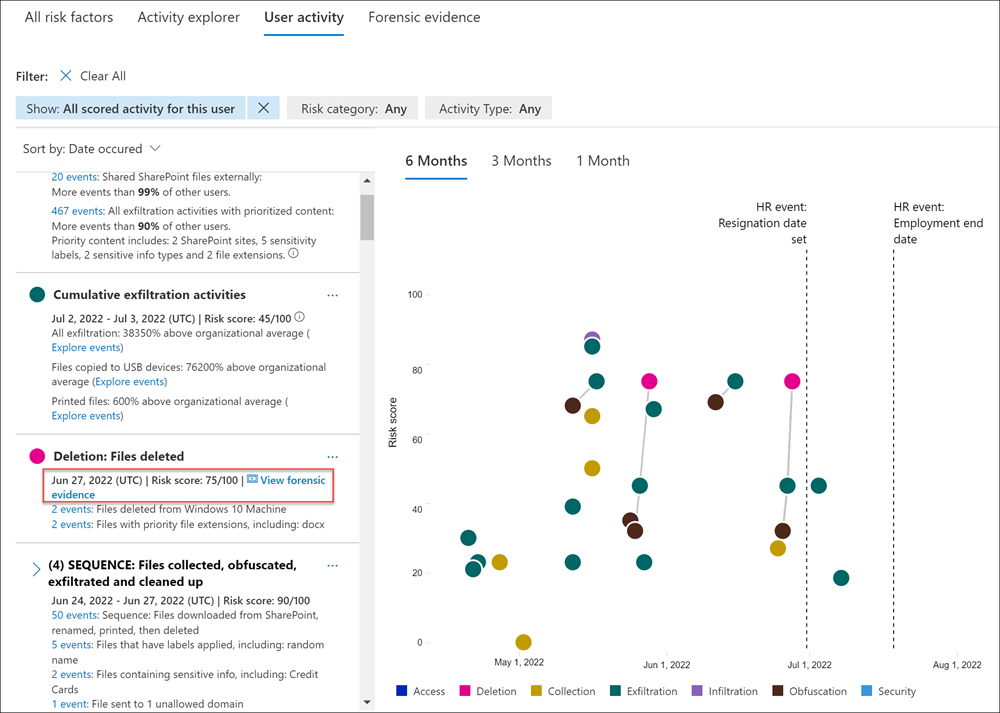
For alerts generated by policies, you can review forensic evidence captures on the Forensic evidence tab on the Alerts dashboard. If one or more captures are available for the alert, you also see a View forensic evidence notification link in the activity that generates an alert header section. You can select the notification link or the Forensic evidence tab to review a list of activity captures.
Reviewing an alert for potentially risky activity that may contain forensic evidence captures is essentially the same as reviewing an alert without forensic evidence captures. The significant difference is the inclusion of any applicable captures. The Forensic evidence tab provides access to all available captures associated with the alert.
Cases dashboard
If alerts are escalated to cases, all associated forensic evidence captures are included as part of the case. Reviewing forensic evidence captures for cases follows the same process as reviewing captures for alerts.
User activity reports
User activity reports let you review specific user actions within a set time frame, without assigning them to an insider risk management policy. If activities involve forensic evidence capturing, clips are included in the report.
If you've configured forensic evidence to capture all security-related user activity, regardless of whether they're included in a forensic evidence policy, to review these captures:
- Select Insider risk management > Overview.
- At the bottom of the Overview screen, under Investigate user activity, select Manage reports.
- Select a specific user, and then select the Forensic evidence tab.
- Refer to the previous instructions.
Device health report (preview)
The Device Health Report in Microsoft Purview allows you to monitor the health and status of devices configured for forensic evidence. You can access it by going to Insider risk management > Forensic evidence > Device health. The report shows the number of devices online, offline, with warnings, and with errors. The report includes details about each device. Information provided consists of device name, device status, and status details. It also shows the last sync time, user name, Windows version, and client version. This information helps you identify potential issues with devices and the Microsoft Purview Client, ensuring that devices are healthy and properly configured for forensic evidence capturing.
For additional information on device health, visit Device health report (preview)


