Configure applications and virtual machines
It's common to build apps and other custom code for your Azure solution. Custom apps might include websites, APIs, and background apps that run without any human interaction. In this unit, you'll learn how to design a workflow to build and deploy an app alongside its infrastructure.
Build apps
Many types of apps need to be compiled or built before they can be used. The build process takes the source code for the app, performs a sequence of activities on it, and then creates a set of deployable files.
The build process compiles the source code into binary files or executables. A build process ordinarily includes other activities, including compressing the image files that will be served to your website's users, linting your code to verify that it follows good coding practices, and running unit tests that verify the behavior of individual pieces of your app. You might also perform steps such as digitally signing the files to help ensure that they can't be modified.
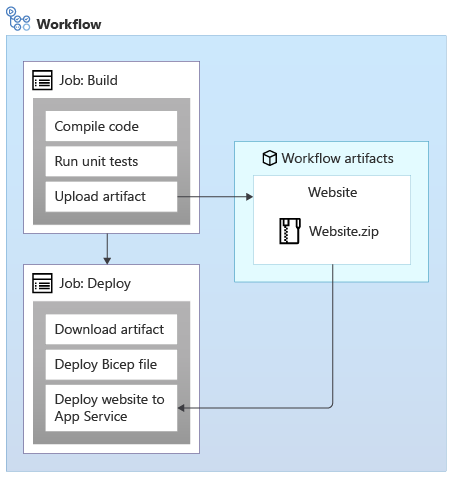
Whatever the series of steps might be, the output of the build process is a deployable artifact. The artifact is ordinarily saved to the workflow runner's file system. Later parts of your workflow need to work with the artifact to deploy it through your environments, and test it as it progresses through the quality gates you define in your workflow definition.
Note
You might have heard of the terms continuous integration and continuous deployment, or CI and CD. A build process sits within the continuous integration part of your workflow.
Workflow artifacts
The artifacts that are generated in your workflow aren't stored in your Git repository. They're derived from the source code but aren't code themselves, and so they don't belong in a source control repository. They're created on the workflow runner's file system. A new runner is created for each workflow job, so you need a way to share the files between jobs and runners.
Workflow artifacts provide a way to store files in GitHub Actions, and they're associated with the particular run of your workflow. You use the actions/upload-artifact workflow action to instruct GitHub Actions to upload a file or folder from the runner's file system as a workflow artifact:
- name: Upload folder as a workflow artifact
  uses: actions/upload-artifact@v3
  with:
    name: my-artifact-name
    path: ./my-folder
The path property is the location that contains your compiled code or output files on the job runner's file system. The contents at this location will be uploaded to the artifact. You can specify a single file, multiple files, or a folder.
Each artifact has a name, which you specify by using the name property. You use the artifact name to refer to it later in the workflow. Subsequent workflow jobs can download the artifact so that they can work with it to, for example, deploy the website to the server that hosts it:
Use the actions/download-artifact action to download all of the workflow artifacts:
- uses: actions/download-artifact@v3
Or, specify an artifact name to download just a specific artifact:
- uses: actions/download-artifact@v3
  with:
    name: my-artifact-name
Deploy apps
The build process for an app generates and uploads a deployable artifact. Later jobs in the workflow deploy the artifact. The way that you deploy an app depends on the service you use to host it.
Deploy to Azure App Service
Your toy company uses Azure App Service to host its website. You can create and configure an App Service app by using Bicep. But when it comes time to deploy the app, you have several options to get the compiled app onto the hosting infrastructure. These options are managed as part of the App Service data plane.
The most common approach is to use the azure/webapps-deploy action:
- uses: azure/webapps-deploy@v2
  with:
    app-name: my-app-service
    package: my-artifact-name/website.zip
You need to provide several pieces of information to deploy your app to App Service. This information includes the resource name of the App Service app, which you specify by using the app-name property. As you learned in the preceding unit, you should add an output to your Bicep file and use a workflow variable to propagate the app name through your workflow. You also need to specify a .zip file with the app to deploy by using the package property. This is usually the path to a workflow artifact.
App Service has its own data plane authentication system that it uses for deployments. The azure/webapps-deploy action handles the authentication process automatically for you:
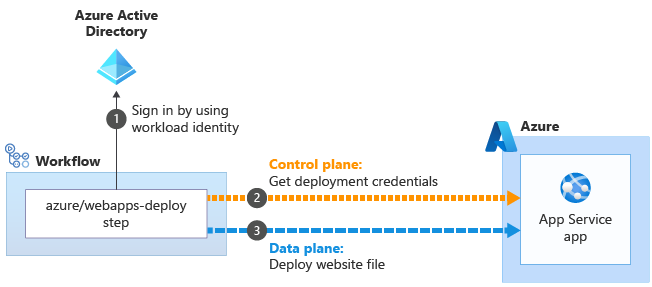
The azure/webapps-deploy action uses the identity that's associated with your job's active Azure session, which you signed in by using a workload identity . The action creates and downloads the necessary credentials for deployment
 . It then uses the deployment credentials when it communicates with the App Service data plane API
 .
.
App Service also provides a few other deployment-related features, including deployment slots. Slots help you safely deploy new versions of your apps with no downtime. They also help you prepare and warm up the new version of your application before you send production traffic to it. We don't use slots in this module, but we provide a link to more information about them on the Summary page at the end of the module.
Deploy apps to other Azure services
Azure provides many other options for hosting your apps, each of which has its own approach to deployment.
Azure Functions is built on App Service, and it uses a deployment process that's similar to the one described earlier.
If you deploy to a virtual machine, you ordinarily need to connect to the virtual machine instance to install your app. You often need to use specialized tooling, such as Chef, Puppet, or Ansible, to orchestrate a deployment to virtual machines.
If you use Kubernetes or Azure Kubernetes Service (AKS), you would ordinarily use a slightly different approach to build and deploy your solution. After your app is built, your workflow creates a container image and publishes it to a container registry, which your Kubernetes cluster then reads from. Because your container registry keeps the compiled application, you don't generally use a workflow artifact.
In this module, we focus on Azure App Service to illustrate the workflow concepts involved. On the Summary page at the end of the module, we provide links to more information about deploying to other hosting services.
Test apps in your workflow
In a previous module, you learned about the value and importance of running automated tests from your workflow. When you deploy an app, it's a good practice for the workflow to run some tests that invoke the app's code. Such tests reduce the risk that an app or deployment error might cause downtime. In more advanced scenarios, you might even perform a set of test cases against your app, such as invoking APIs or submitting and monitoring a synthetic transaction.
Many apps implement health check endpoints. When a health check endpoint receives a request, it performs a series of checks against the website, such as ensuring that databases and network services are reachable from the app environment. The response that the site returns indicates whether the app is healthy. Developers can write and customize their own health checks to suit the app's requirements. If your app has a health check endpoint, it often makes sense to monitor it from your workflow after the deployment job finishes.
Your deployment workflow
In the next exercise, you'll update your deployment workflow to add new jobs to build your website's application and deploy it to each environment:
