Exercise - Set up your environment
Important
You need your own Azure subscription to run this exercise, and you might incur charges. If you don't already have an Azure subscription, create a free account before you begin.
Before you start to work on your toy company's website workflow, you need to configure your environment. In this unit, you make sure that your Azure and GitHub environments are set up to complete the rest of this module.
To meet these objectives, you'll:
- Set up a GitHub repository for this module.
- Clone the project's repository to your computer.
- Create two workload identities in Microsoft Entra ID.
- Create two resource groups in Azure.
- Create two secrets and environments in GitHub.
Get the GitHub repository
Here you make sure that your GitHub repository is set up to complete the rest of this module. You set it up by creating a new repository based on a template repository. The template repository contains the files you need to get started for this module.
The modules in this learning path are part of a progression. For learning purposes, each module has an associated GitHub template repository.
Tip
Even if you completed the previous module in the learning path, please follow these instructions to create a new repository and ensure that you give it a new name.
Start from the template repository
Run a template that sets up your GitHub repository.
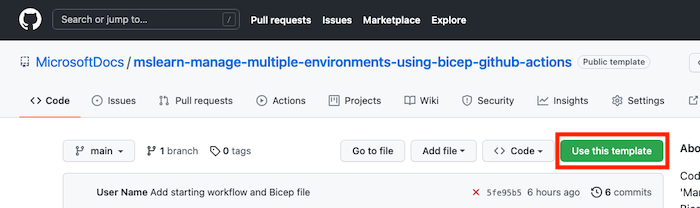
On the GitHub site, follow these steps to create a repository from the template:
Select Use this template > Create a new repository.
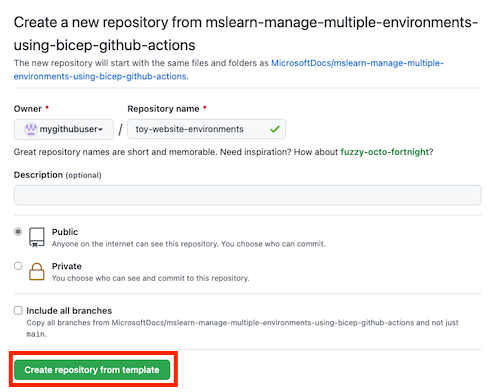
Note the name of your GitHub username or organization. In the example, the GitHub user name is mygithubuser. You'll need this name soon.
Enter a name for your new project, such as toy-website-environments.
Select the Public option.
When you create your own repositories, you might want to make them private. In this module, you'll work with some features of GitHub that only work with public repositories and with GitHub Enterprise accounts.
Select Create repository from template.
Important
The final exercise in this module contains important cleanup steps. Be sure to follow the cleanup steps even if you don't complete this module.
Clone the repository
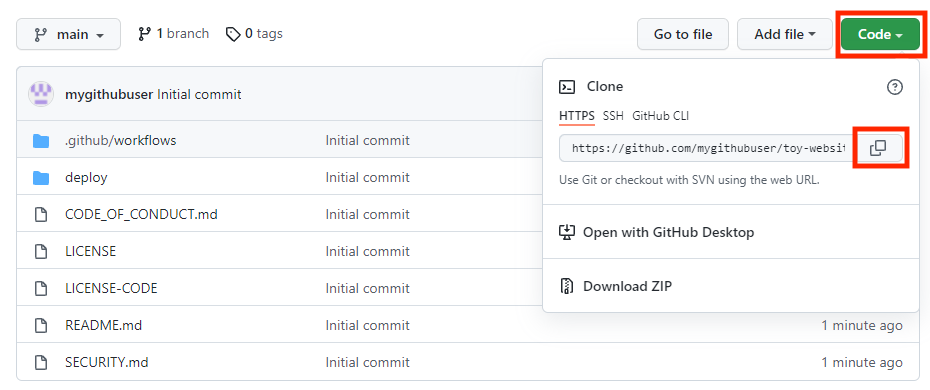
You now have a copy of the template repository in your own account. You will now clone this repository locally so you can start work in it.
Select Code and select the copy icon.
Open Visual Studio Code.
Open a Visual Studio Code terminal window by selecting Terminal > New Terminal. The window usually opens at the bottom of the screen.
Navigate in the terminal to the directory where you want to clone the GitHub repository on your local computer. For example, to clone the repository to the toy-website-environments folder, run the following command:
cd toy-website-environmentsType
git cloneand then paste the URL you copied earlier, which looks something like this:git clone https://github.com/mygithubuser/toy-website-environments.gitReopen Visual Studio Code in the repository folder by running the following command in the Visual Studio Code terminal:
code -r toy-website-environments
Sign in to Azure
To work with resource groups in Azure, sign in to your Azure account from the Visual Studio Code terminal. Be sure that you've installed the Azure CLI tools.
In the Terminal menu, select New Terminal. The terminal window usually opens in the lower half of your screen.
The default shell is typically pwsh, as shown on the right side of the terminal window.

Select the shell dropdown, and then select Azure Cloud Shell (bash).
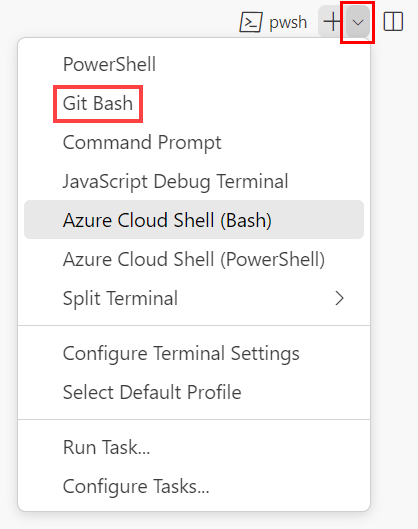
A new shell opens.
Sign in to Azure by using the Azure CLI
In the Visual Studio Code terminal, run the following command to sign in to Azure:
az loginIn the browser that opens, sign in to your Azure account.
To work with resource groups in Azure, sign in to your Azure account from the Visual Studio Code terminal. Be sure that you've installed Azure PowerShell.
In the Terminal menu, select New Terminal. The terminal window usually opens in the lower half of your screen.
The default shell is typically pwsh, as shown on the right side of the terminal window.
Select the shell dropdown, and then select Azure Cloud Shell (PowerShell).
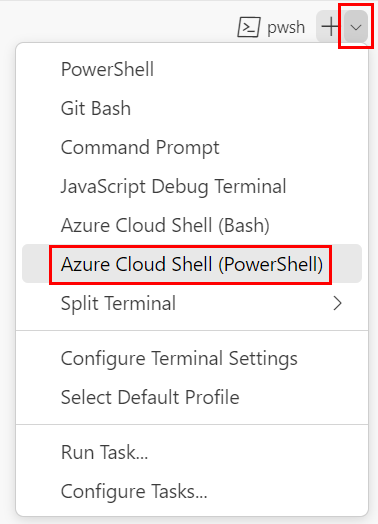
A new shell opens.
Sign in to Azure by using Azure PowerShell
In the Visual Studio Code terminal, run the following command to sign in to Azure:
Connect-AzAccountIn the browser that opens, sign in to your Azure account.
Create two workload identities
Next, create two workload identities in Microsoft Entra ID: one for your test environment and another for your production environment.
To create the workload identities, the Azure CLI commands use jq to parse data from JSON output. If you don't have jq installed, you can use Bash in Azure Cloud Shell to create the workload identity, resource group and role assignment, and prepare the GitHub secrets.
Run the following code to define variables for your GitHub username and your repository name. Ensure that you replace
mygithubuserwith your GitHub username, which you noted earlier in this exercise. Also ensure that you specify the correct GitHub repository name.githubOrganizationName='mygithubuser' githubRepositoryName='toy-website-environments'Create a workload identity for deployments to your test environment. The workload identity needs two federated credentials: one is used when the workflow runs the validate job, because this job isn't associated with a GitHub environment. The second is used when the workflow runs the deploy job, which runs against the Test GitHub environment.
testApplicationRegistrationDetails=$(az ad app create --display-name 'toy-website-environments-test')
testApplicationRegistrationObjectId=$(echo $testApplicationRegistrationDetails | jq -r '.id')
testApplicationRegistrationAppId=$(echo $testApplicationRegistrationDetails | jq -r '.appId')

az ad app federated-credential create \
   --id $testApplicationRegistrationObjectId \
   --parameters "{\"name\":\"toy-website-environments-test\",\"issuer\":\"https://token.actions.githubusercontent.com\",\"subject\":\"repo:${githubOrganizationName}/${githubRepositoryName}:environment:Test\",\"audiences\":[\"api://AzureADTokenExchange\"]}"

az ad app federated-credential create \
   --id $testApplicationRegistrationObjectId \
   --parameters "{\"name\":\"toy-website-environments-test-branch\",\"issuer\":\"https://token.actions.githubusercontent.com\",\"subject\":\"repo:${githubOrganizationName}/${githubRepositoryName}:ref:refs/heads/main\",\"audiences\":[\"api://AzureADTokenExchange\"]}"
Run the following code that creates a similar workload identity and federated credentials for the production environment:
productionApplicationRegistrationDetails=$(az ad app create --display-name 'toy-website-environments-production')
productionApplicationRegistrationObjectId=$(echo $productionApplicationRegistrationDetails | jq -r '.id')
productionApplicationRegistrationAppId=$(echo $productionApplicationRegistrationDetails | jq -r '.appId')

az ad app federated-credential create \
   --id $productionApplicationRegistrationObjectId \
   --parameters "{\"name\":\"toy-website-environments-production\",\"issuer\":\"https://token.actions.githubusercontent.com\",\"subject\":\"repo:${githubOrganizationName}/${githubRepositoryName}:environment:Production\",\"audiences\":[\"api://AzureADTokenExchange\"]}"

az ad app federated-credential create \
   --id $productionApplicationRegistrationObjectId \
   --parameters "{\"name\":\"toy-website-environments-production-branch\",\"issuer\":\"https://token.actions.githubusercontent.com\",\"subject\":\"repo:${githubOrganizationName}/${githubRepositoryName}:ref:refs/heads/main\",\"audiences\":[\"api://AzureADTokenExchange\"]}"
Run the following code to define variables for your GitHub username and your repository name. Ensure that you replace
mygithubuserwith your GitHub username, which you noted earlier in this exercise. Also ensure that you specify the correct GitHub repository name.$githubOrganizationName = 'mygithubuser' $githubRepositoryName = 'toy-website-environments'Run the following code that creates a workload identity for the test environment and associates it with your GitHub repository:
$testApplicationRegistration = New-AzADApplication -DisplayName 'toy-website-environments-test'
New-AzADAppFederatedCredential `
   -Name 'toy-website-environments-test' `
   -ApplicationObjectId $testApplicationRegistration.Id `
   -Issuer 'https://token.actions.githubusercontent.com' `
   -Audience 'api://AzureADTokenExchange' `
   -Subject "repo:$($githubOrganizationName)/$($githubRepositoryName):environment:Test"
New-AzADAppFederatedCredential `
   -Name 'toy-website-environments-test-branch' `
   -ApplicationObjectId $testApplicationRegistration.Id `
   -Issuer 'https://token.actions.githubusercontent.com' `
   -Audience 'api://AzureADTokenExchange' `
   -Subject "repo:$($githubOrganizationName)/$($githubRepositoryName):ref:refs/heads/main"
Run the following code, which follows a similar process for the production environment:
$productionApplicationRegistration = New-AzADApplication -DisplayName 'toy-website-environments-production'
New-AzADAppFederatedCredential `
   -Name 'toy-website-environments-production' `
   -ApplicationObjectId $productionApplicationRegistration.Id `
   -Issuer 'https://token.actions.githubusercontent.com' `
   -Audience 'api://AzureADTokenExchange' `
   -Subject "repo:$($githubOrganizationName)/$($githubRepositoryName):environment:Production"
New-AzADAppFederatedCredential `
   -Name 'toy-website-environments-production-branch' `
   -ApplicationObjectId $productionApplicationRegistration.Id `
   -Issuer 'https://token.actions.githubusercontent.com' `
   -Audience 'api://AzureADTokenExchange' `
   -Subject "repo:$($githubOrganizationName)/$($githubRepositoryName):ref:refs/heads/main"
Create two resource groups in Azure and grant the workload identity access
Next, create a resource group for each environment. This process also grants the respective workload identity the Contributor role on the resource group, which allows your workflow to deploy to the resource group.
To create the test environment's resource group and grant the workload identity access to it, run the following Azure CLI commands in the Visual Studio Code terminal:
testResourceGroupResourceId=$(az group create --name ToyWebsiteTest --location westus3 --query id --output tsv)

az ad sp create --id $testApplicationRegistrationObjectId
az role assignment create \
   --assignee $testApplicationRegistrationAppId \
   --role Contributor \
   --scope $testResourceGroupResourceId
Run a similar process to create the production environment's resource group:
productionResourceGroupResourceId=$(az group create --name ToyWebsiteProduction --location westus3 --query id --output tsv)

az ad sp create --id $productionApplicationRegistrationObjectId
az role assignment create \
   --assignee $productionApplicationRegistrationAppId \
   --role Contributor \
   --scope $productionResourceGroupResourceId
To create the test environment's resource group and grant the workload identity access to it, run the following Azure PowerShell commands in the Visual Studio Code terminal:
$testResourceGroup = New-AzResourceGroup -Name ToyWebsiteTest -Location westus3

New-AzADServicePrincipal -AppId $($testApplicationRegistration.AppId)
New-AzRoleAssignment `
   -ApplicationId $($testApplicationRegistration.AppId) `
   -RoleDefinitionName Contributor `
   -Scope $($testResourceGroup.ResourceId)
Run a similar process to create the production environment's resource group:
$productionResourceGroup = New-AzResourceGroup -Name ToyWebsiteProduction -Location westus3

New-AzADServicePrincipal -AppId $($productionApplicationRegistration.AppId)
New-AzRoleAssignment `
   -ApplicationId $($productionApplicationRegistration.AppId) `
   -RoleDefinitionName Contributor `
   -Scope $($productionResourceGroup.ResourceId)
Prepare GitHub secrets
Run the following code to show you the values you need to create as GitHub secrets:
echo "AZURE_CLIENT_ID_TEST: $testApplicationRegistrationAppId"
echo "AZURE_CLIENT_ID_PRODUCTION: $productionApplicationRegistrationAppId"
echo "AZURE_TENANT_ID: $(az account show --query tenantId --output tsv)"
echo "AZURE_SUBSCRIPTION_ID: $(az account show --query id --output tsv)"
$azureContext = Get-AzContext
Write-Host "AZURE_CLIENT_ID_TEST: $($testApplicationRegistration.AppId)"
Write-Host "AZURE_CLIENT_ID_PRODUCTION: $($productionApplicationRegistration.AppId)"
Write-Host "AZURE_TENANT_ID: $($azureContext.Tenant.Id)"
Write-Host "AZURE_SUBSCRIPTION_ID: $($azureContext.Subscription.Id)"
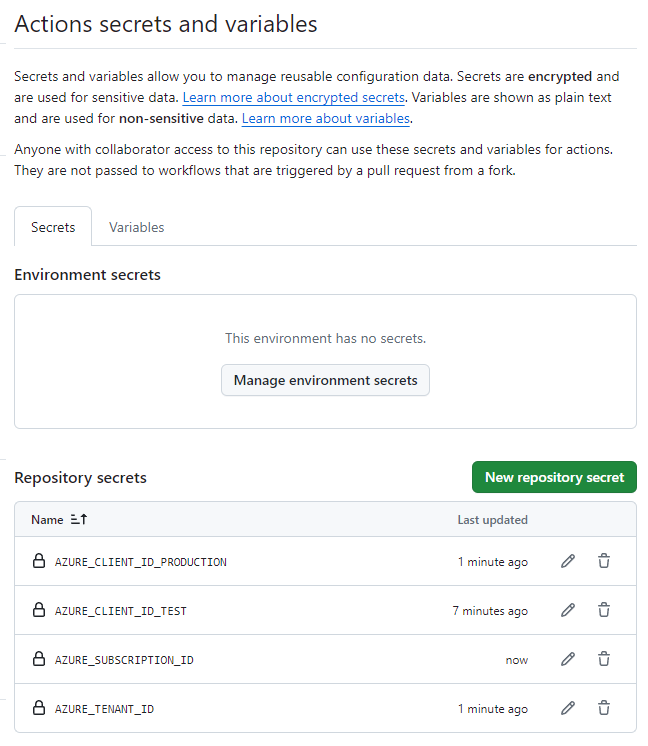
Create GitHub secrets
You've created two workload identities, and resource groups that they can deploy to. Next, create secrets in GitHub Actions.
In your browser, navigate to your GitHub repository.
Select Settings > Secrets and variables > Actions.
Select New repository secret.

Name the secret AZURE_CLIENT_ID_TEST.
In the Value field, paste the GUID from the first line of the terminal output. Don't include
AZURE_CLIENT_ID_TEST, the colon, or any spaces in the value.Select Add secret.

Repeat the process to create the secrets for AZURE_CLIENT_ID_PRODUCTION, AZURE_TENANT_ID, and AZURE_SUBSCRIPTION_ID, copying the values from the corresponding fields in the terminal output.
Verify that your list of secrets now shows all four secrets.
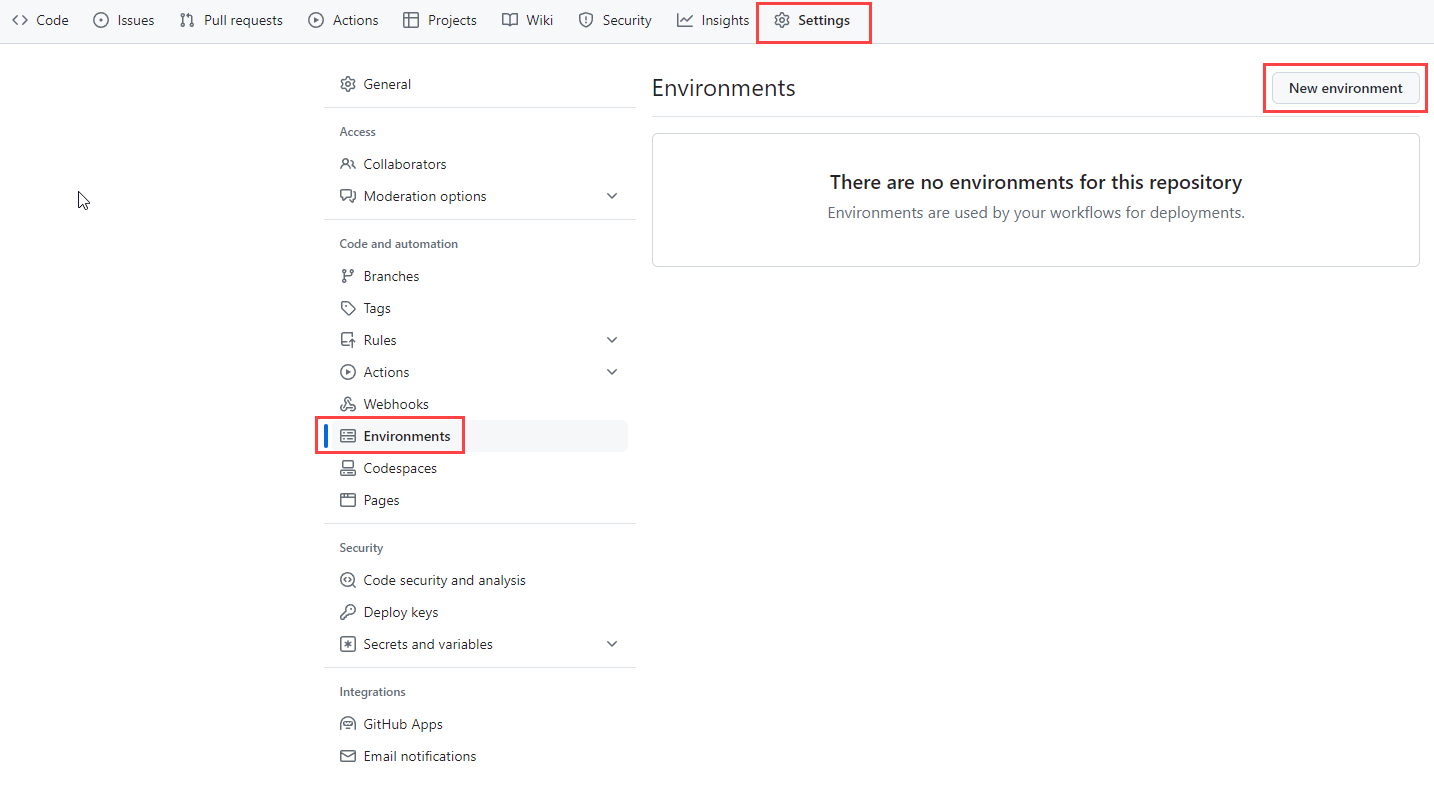
Create environments in GitHub
In your browser, go to Settings > Environments.
Select New environment.
Enter Test as the environment name.
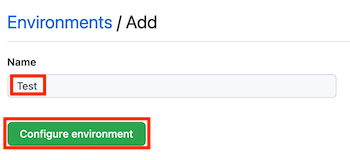
Select Configure environment.
Select Environments to return to the environments list.
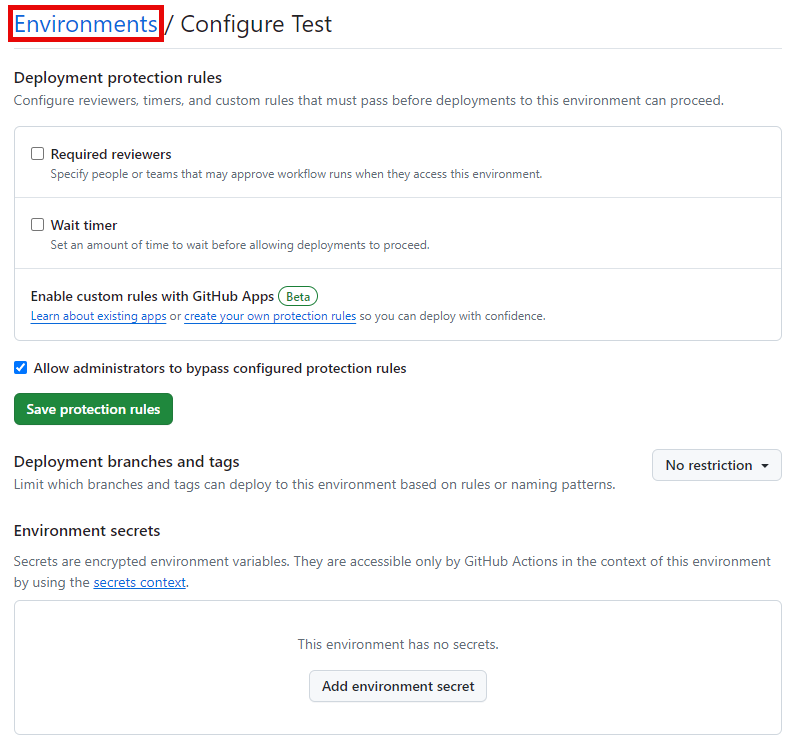
Repeat the process to create another environment named Production.
Leave the production environment configuration page open.
Add a protection rule to the production environment
Select Required reviewers.
In the Search for people or teams text box, type your own GitHub username and select yourself.
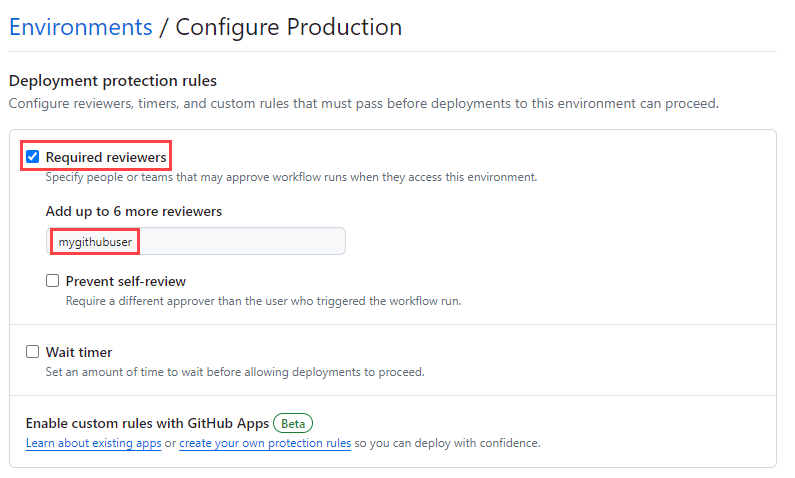
Select Save protection rules.
Select Environments to exit the configuration.