Exercise - Implement a feature flag to control ASP.NET Core app features
In this exercise, implement a feature flag to toggle a seasonal sales banner for your application. Feature flags allow you to toggle feature availability without redeploying your app.
You'll use the Feature Management in the .NET feature flag library. This library provides helpers to implement feature flags in your app. The library supports simple use cases like conditional statements to more advanced scenarios like conditionally adding routes or action filters. Additionally, it supports feature filters, which allow you to enable features based on specific parameters. Examples of such parameters include a window time, percentages, or a subset of users.
In this unit, you will:
- Create an Azure App Configuration instance.
- Add a feature flag to the App Configuration store.
- Connect your app to the App Configuration store.
- Amend the application to use the feature flag.
- Change the products page to display a sales banner.
- Build and test the app.
Open the development environment
You can choose to use a GitHub codespace that hosts the exercise, or complete the exercise locally in Visual Studio Code.
To use a codespace, create a preconfigured GitHub Codespace with this Codespace creation link.
GitHub takes several minutes to create and configure the codespace. When it's finished, you see the code files for the exercise. The code that's used for the remainder of this module is in the /dotnet-feature-flags directory.
To use Visual Studio Code, clone the https://github.com/MicrosoftDocs/mslearn-dotnet-cloudnative repository to your local machine. Then:
- Install any system requiements to run Dev Container in Visual Studio Code.
- Make sure Docker is running.
- In a new Visual Studio Code window open the folder of the cloned repository
- Press Ctrl+Shift+P to open the command palette.
- Search: >Dev Containers: Rebuild and Reopen in Container
- Select eShopLite - dotnet-feature-flags from the drop down. Visual Studio Code creates your development container locally.
Create an App Configuration instance
Complete the following steps to create an App Configuration instance in your Azure subscription:
In the new terminal pane, sign in to the Azure CLI.
az login --use-device-codeView your selected Azure subscription.
az account show -o tableIf the wrong subscription is selected, select the correct one using the az account set command.
Run the following Azure CLI command to get a list of Azure regions and the Name associated with it:
az account list-locations -o tableLocate a region closest to you and use it in the next step to replace
[Closest Azure region]Run the following Azure CLI commands to create an App Configuration instance:
export LOCATION=[Closest Azure region]
export RESOURCE_GROUP=rg-eshop
export CONFIG_NAME=eshop-app-features$SRANDOM
You need to change the LOCATION to an Azure region close to you, for example eastus. If you'd like a different name for your resource group or app configuration change the values above.
Run the following command to create the Azure Resource Group:
az group create --name $RESOURCE_GROUP --location $LOCATIONRun the following command to create an App Configuration instance:
az appconfig create --resource-group $RESOURCE_GROUP --name $CONFIG_NAME --location $LOCATION --sku FreeA variation of the following output appears:
{
  "createMode": null,
  "creationDate": "2023-10-31T15:40:10+00:00",
  "disableLocalAuth": false,
  "enablePurgeProtection": false,
  "encryption": {
    "keyVaultProperties": null
  },
  "endpoint": "https://eshop-app-features1168054702.azconfig.io",
  "id": "/subscriptions/7eebce2a-0884-4df2-8d1d-2a3c051e47fe/resourceGroups/rg-eshop/providers/Microsoft.AppConfiguration/configurationStores/eshop-app-features1168054702",
  "identity": null,
Run this command to retrieve the connection string for the App Configuration instance:
az appconfig credential list --resource-group $RESOURCE_GROUP --name $CONFIG_NAME --query [0].connectionString --output tsvThis string prefixed with
Endpoint=represents the App Configuration store's connection string.Copy the connection string. You'll use it in a moment.
Store the App Configuration connection string
You'll now add the App Configuration connection string to the application. Complete the following steps:
Open the /dotnet-feature-flags/docker-compose.yml file.
Add a new environment variable at line 13.
- ConnectionStrings:AppConfig=[PASTE CONNECTION STRING HERE]The docker-compose.yml will resemble the following YAML:
environment:
  - ProductEndpoint=http://backend:8080
  - ConnectionStrings:AppConfig=Endpoint=https://eshop-app-features1168054702.azconfig.io;Id=<ID>;Secret=<Secret value>
The preceding line represents a key-value pair, in which ConnectionStrings:AppConfig is an environment variable name. In the Store project, the environment variables configuration provider reads its value.
Tip
Your Azure App Configuration connection string contains a plain-text secret. In real world apps, consider integrating App Configuration with Azure Key Vault for secure storage of secrets. Key Vault is out of scope for this module, but guidance can be found at Tutorial: Use Key Vault references in an ASP.NET Core app.
Add the feature flag to the App Configuration store
In Azure App Configuration, create and enable a key-value pair to be treated as a feature flag. Complete the following steps:
In another browser tab, sign into the Azure portal with the same account and directory as the Azure CLI.
Use the search box to find and open the App Configuration resource prefixed with eshop-app-features.

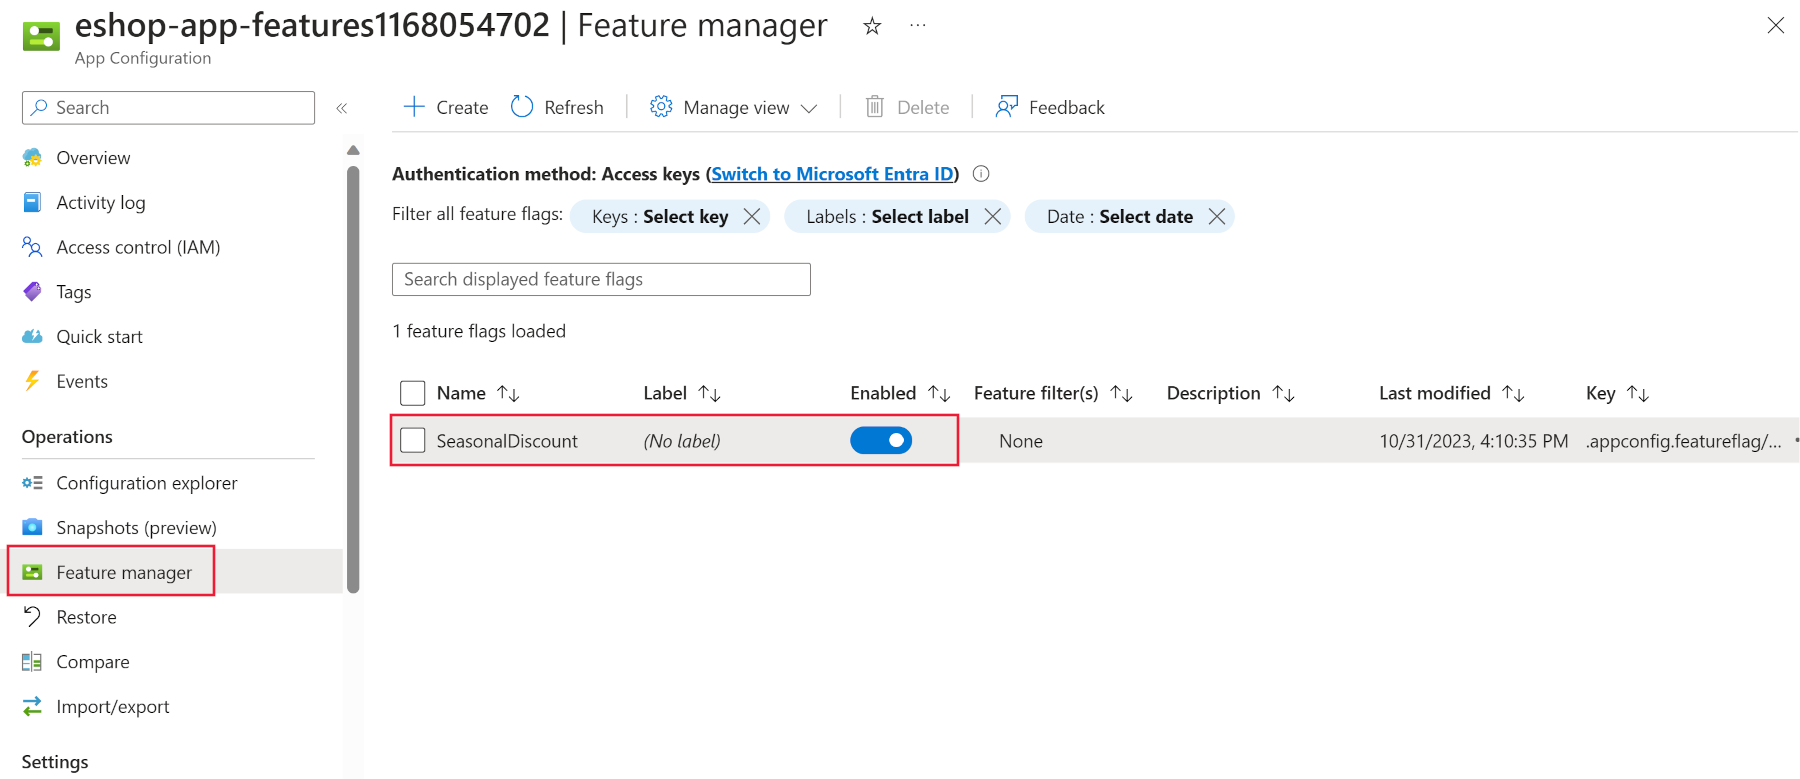
In the Operations section, select Feature manager.
In the top menu, select + Create.
Select the Enable feature flag check box.
In the Feature flag name text box, enter SeasonalDiscount.
Select Apply.
Now that the feature flag exists in the App Configuration store, the Store project requires some changes to read it.

Review code
Review the directories in the explorer pane in the IDE. Note that there's three projects DataEntities, Products, and Store. The Store project is the Blazor app. The Products project is a .NET Standard library that contains the product service. The DataEntities project is a .NET Standard library that contains the product model.
Connect your app to the App Configuration store
To access values from the App Configuration store in an ASP.NET Core app, the configuration provider for App Configuration is needed.
Apply the following changes to your Store project:
In the terminal window, navigate to the Store folder:
cd dotnet-feature-flags/StoreRun the following command to install a NuGet package containing the .NET configuration provider for the App Configuration service:
dotnet add package Microsoft.Azure.AppConfiguration.AspNetCore
dotnet add package Microsoft.FeatureManagement.AspNetCore
dotnet add package Microsoft.Extensions.Configuration.AzureAppConfiguration
Open the Store/Program.cs file.
Add the new package references at the top of the file:
using Microsoft.FeatureManagement;
using Microsoft.Extensions.Configuration;
using Microsoft.Extensions.Configuration.AzureAppConfiguration;
Add this code below the // Add the AddAzureAppConfiguration code comment.
// Retrieve the connection string
var connectionString = builder.Configuration.GetConnectionString("AppConfig");

// Load configuration from Azure App Configuration
builder.Configuration.AddAzureAppConfiguration(options => {
  options.Connect(connectionString)
    .UseFeatureFlags();
});

// Register the Feature Management library's services
builder.Services.AddFeatureManagement();
builder.Services.AddAzureAppConfiguration();
In the preceding code snippet:
- The
Connectmethod authenticates to the App Configuration store. Recall that the connection string is being passed as an environmental variableConnectionStrings:AppConfig. - The
UseFeatureFlagsmethod enables the Feature Management library to read feature flags from the App Configuration store. - The two
builder.Servicescalls register the Feature Management library's services with the app's dependency injection container.
- The
At the bottom of the file, below // Add the App Configuration middleware, add this code:
app.UseAzureAppConfiguration();The preceding code adds the App Configuration middleware to the request pipeline. The middleware triggers a refresh operation for the Feature Management parameters for every incoming request. Then it's up to the
AzureAppConfigurationprovider to decide, based on refresh settings, when to actually connect to the store to get the values.
Enable a sales banner
Your app can now read the feature flag, but the products page needs to be updated to show that a sale is on. Complete the following steps:
Open the Store/Components/Pages/Products.razor file.
At the top of the file, add the following code:
@using Microsoft.FeatureManagement
@inject IFeatureManager FeatureManager
The preceding code imports the Feature Management library's namespaces and injects the
IFeatureManagerinterface into the component.In the @code section, add the following variable to store the state of the feature flag:
private bool saleOn = false;In the OnInitializedAsync method, add the following code:
saleOn = await FeatureManager.IsEnabledAsync("SeasonalDiscount");The method should look like the following code:
protected override async Task OnInitializedAsync()
{
    saleOn = await FeatureManager.IsEnabledAsync("SeasonalDiscount");

    // Simulate asynchronous loading to demonstrate streaming rendering
    products = await ProductService.GetProducts();
}
At line 26, under the <!-- Add a sales alert for customers --> comment, add the following code:
<!-- Add a sales alert for customers -->
@if (saleOn)
{
<div class="alert alert-success" role="alert">
  Our sale is now on.
</div>
}
The preceding code displays a sales alert if the feature flag is enabled.
Build the app
Ensure you've saved all your changes, and are in the dotnet-feature-flags directory. In the terminal, run the following command:
dotnet publish /p:PublishProfile=DefaultContainerRun the app using docker:
docker compose up
Test the feature flag
To verify the feature flag works as expected in a codespace, complete the following steps:
- Switch to the PORTS tab, then to the right of the local address for the Front End port, select the globe icon. The browser opens a new tab at the homepage.
- Select Products.
If you're using Visual Studio Code locally, open http://localhost:32000/products.

In the Azure portal, you can enable and disable the feature flag and refresh the products page to see the flag in action.