Manually deploy your cloud-native app to Azure Kubernetes Service
Before you can automate your website deployments, you need to deploy the existing eShop app manually to Azure Kubernetes Service (AKS). You create the Azure resources and deploy the app to AKS using Azure CLI commands and bash scripts. Finally, you create an Azure Active Directory (Azure AD) service principal to allow GitHub Actions to deploy to AKS and Azure Container Registry.
The commands create the following resources to deploy an updated version of the eShop app.
- Provision an Azure Container Registry (ACR) and then push images into the registry.
- Provision an AKS cluster and then deploy the containers into the cluster.
- Test the deployment.
- Create service principals to allow GitHub Actions to deploy to AKS and Azure Container Registry.
Important
Make sure you've completed the prerequisites before you begin.
Open the development environment
You can choose to use a GitHub codespace that hosts the exercise, or complete the exercise locally in Visual Studio Code.
GitHub Codespaces Setup
Fork the https://github.com/MicrosoftDocs/mslearn-dotnet-cloudnative-devops repository to your own GitHub account. Then on your new fork:
- Select Code.
- Select the Codespaces tab.
- Select the + icon to create your codespace.
GitHub takes several minutes to create and configure the codespace. When the process completes, you see the code files for the exercise.
Optional: Visual Studio Code Setup
To use Visual Studio Code, fork the https://github.com/MicrosoftDocs/mslearn-dotnet-cloudnative-devops repository to your own GitHub account and clone it locally. Then:
- Install any system requiements to run Dev Container in Visual Studio Code.
- Make sure Docker is running.
- In a new Visual Studio Code window open the folder of the cloned repository
- Press Ctrl+Shift+P to open the command palette.
- Search: >Dev Containers: Rebuild and Reopen in Container
- Visual Studio Code creates your development container locally.
Build containers
In the terminal pane, run this dotnet CLI command:
dotnet publish /p:PublishProfile=DefaultContainer
Create the Azure resources
In the terminal pane, sign in to Azure with this Azure CLI command:
az login --use-device-codeView the selected Azure subscription.
az account show -o tableIf the wrong subscription is selected, use the az account set command to select the correct one.
Run the following Azure CLI command to get a list of Azure regions and the Name associated with it:
az account list-locations -o tableLocate a region closest to you and use it in the next step by replacing
[Closest Azure region]Run these bash statements:
export LOCATION=[Closest Azure region]
export RESOURCE_GROUP=rg-eshop
export CLUSTER_NAME=aks-eshop
export ACR_NAME=acseshop$SRANDOM
The previous commands create environment variables that you'll use in the next Azure CLI commands. You need to change the LOCATION to an Azure region close to you; for example, eastus. If you'd like a different name for your resource group, AKS cluster, or ACR, change those values. To view your new repositories in the Azure portal, assign yourself as App Compliance Automation Administrator in the Access control (IAM) of the container registry.
Run these Azure CLI commands:
az group create --name $RESOURCE_GROUP --location $LOCATION
az acr create --resource-group $RESOURCE_GROUP --name $ACR_NAME --sku Basic
az acr login --name $ACR_NAME
If you receive an authentication error when
az acr login --name $ACR_Nameis run, you need to turn on Admin user in the newly created container register in Azure under Settings - Access Keys. Azure prompts you to enter these credentials to continue. You could also need to authenticate again withaz login --use-device-code.These commands create a resource group to contain the Azure resources, an ACR for your images, and then logins into the ACR. It can take a few minutes until you see this output:
  ...
  },
  "status": null,
  "systemData": {
    "createdAt": "2023-10-19T09:11:51.389157+00:00",
    "createdBy": "",
    "createdByType": "User",
    "lastModifiedAt": "2023-10-19T09:11:51.389157+00:00",
    "lastModifiedBy": "",
    "lastModifiedByType": "User"
  },
  "tags": {},
  "type": "Microsoft.ContainerRegistry/registries",
  "zoneRedundancy": "Disabled"
}
Login Succeeded
To tag your images and push them to the ACR you created, run these commands:
docker tag store $ACR_NAME.azurecr.io/storeimage:v1
docker tag products $ACR_NAME.azurecr.io/productservice:v1

docker push $ACR_NAME.azurecr.io/storeimage:v1
docker push $ACR_NAME.azurecr.io/productservice:v1
You can check pushing the images completes successfully with this command:
az acr repository list --name $ACR_NAME --output tableCreate your AKS and connect it to the ACR with these commands:
az aks create --resource-group $RESOURCE_GROUP --name $CLUSTER_NAME --node-count 1 --generate-ssh-keys --node-vm-size Standard_B2s --network-plugin azure --attach-acr $ACR_NAME

az aks get-credentials --name $CLUSTER_NAME --resource-group $RESOURCE_GROUP
The above commands create a single node AKS cluster, connect it to the ACR, and then connect your local machine to the AKS cluster. The above commands can take a few minutes to complete.
Check that the new AKS can pull images from the ACR with this command:
az aks check-acr --acr $ACR_NAME.azurecr.io --name $CLUSTER_NAME --resource-group $RESOURCE_GROUPYou should see similar output to the following messages:
[2023-10-19T13:33:09Z] Loading azure.json file from /etc/kubernetes/azure.json
[2023-10-19T13:33:09Z] Checking managed identity...
[2023-10-19T13:33:09Z] Cluster cloud name: AzurePublicCloud
[2023-10-19T13:33:09Z] Kubelet managed identity client ID: 71588cd0-9229-4914-9c8e-1dc229d775c8
[2023-10-19T13:33:09Z] Validating managed identity existance: SUCCEEDED
[2023-10-19T13:33:09Z] Validating image pull permission: SUCCEEDED
[2023-10-19T13:33:09Z]
Your cluster can pull images from acseshop1251599299.azurecr.io!
You can now run kubectl commands against your new AKS cluster. Copy the full ACR URL from the output; for example, above the URL is acseshop1251599299.
Check the status of your AKS cluster:
kubectl get nodes -AYou should see similar output to the following messages:
NAME                                STATUS   ROLES   AGE     VERSION
aks-nodepool1-37200563-vmss000000   Ready    agent   3h44m   v1.26.6
Configure the Kubernetes deployment manifest
Now the eShop images are in the ACR you can update the AKS deployment manifest to use these new images.
In Visual Studio Code, from the EXPLORER panel, select the deployment.yml file in the root of the project.
Replace on line 17:
- image: [replace with your ACR name].azurecr.io/storeimage:v1Paste the copied ACR name from the previous step – the line should look similar to the following yaml:
- image: acseshop1251599299.azurecr.io/storeimage:v1Repeat these steps for line 65:
- image: [replace with your ACR name].azurecr.io/productservice:v1Save the file with CTRL+S.
In the terminal pane, deploy an NGINX ingress controller with the following kubernetes command:
kubectl apply -f https://raw.githubusercontent.com/kubernetes/ingress-nginx/controller-v1.9.3/deploy/static/provider/cloud/deploy.yamlThe above
kubectlcommand adds services and components to allow ingress into your AKS cluster. Check that the ingress is ready run using the following kubernetes command:kubectl get services --namespace ingress-nginxYou should see similar output to the following messages:
NAME                                 TYPE           CLUSTER-IP     EXTERNAL-IP    PORT(S)                      AGE
ingress-nginx-controller             LoadBalancer   10.0.135.51    20.26.154.64   80:32115/TCP,443:32254/TCP   58s
ingress-nginx-controller-admission   ClusterIP      10.0.137.137   <none>         443/TCP                      58s
Deploy the eShop app with this command:
kubectl apply -f deployment.ymlThe
kubectlapply command deploys the eShop app, a front-end Blazor web app and back-end REST API product service, and an ingress rule to route traffic to the correct services to your AKS cluster. Rerun this command if you receive any error on deployments.You should see similar output to the following messages:
deployment.apps/storeimage created
service/eshop-website created
deployment.apps/productservice created
service/eshop-backend created
ingress.networking.k8s.io/eshop-ingress created
Check the two microservices are deployed with this command:
kubectl get pods -AYou should see similar output to the following messages:
NAMESPACE       NAME                                        READY   STATUS      RESTARTS   AGE
default         productservice-7569b8c64-vfbfz              1/1     Running     0          3m56s
default         storeimage-6c7c999d7c-zsnxd                 1/1     Running     0          3m56s
ingress-nginx   ingress-nginx-admission-create-szb8l        0/1     Completed   0          4m4s
ingress-nginx   ingress-nginx-admission-patch-czdbv         0/1     Completed   0          4m4s
ingress-nginx   ingress-nginx-controller-58bf5bf7dc-nwtsr   1/1     Running     0          4m4s
View the deployed eShop with this command:
echo "http://$(kubectl get services --namespace ingress-nginx ingress-nginx-controller --output jsonpath='{.status.loadBalancer.ingress[0].ip}')"The above command returns the external IP address for the web app. Hold CTRL and click the link to open the app in a new tab.
Create a service principal for deploying from GitHub
GitHub Actions can publish container images to an Azure Container Registry. The GitHub runner therefore must have permissions to connect to Azure. The following steps create an Azure AD service principal to act as the GitHub Actions identity inside Azure.
To save your Subscription ID in an environment variable, run the following command in the terminal:
export SUBS=$(az account show --query 'id' --output tsv)To create an Azure AD service principal to allow access from GitHub, run the following command:
az ad sp create-for-rbac --name "eShop" --role contributor --scopes /subscriptions/$SUBS/resourceGroups/$RESOURCE_GROUP --json-authA variation of the following output appears:
Creating 'Contributor' role assignment under scope '/subscriptions/00000000-0000-0000-0000-000000000000'

The output includes credentials that you must protect. Be sure that you do not include these credentials in your code or check the credentials into your source control. For more information, see https://aka.ms/azadsp-cli
 {
  "clientId": "00000000-0000-0000-0000-000000000000",
  "clientSecret": "abc1A~abc123ABC123abc123ABC123abc123ABC1",
  "subscriptionId": "00000000-0000-0000-0000-000000000000",
  "tenantId": "00000000-0000-0000-0000-000000000000",
  "activeDirectoryEndpointUrl": "https://login.microsoftonline.com",
  "resourceManagerEndpointUrl": "https://management.azure.com/",
  "activeDirectoryGraphResourceId": "https://graph.windows.net/",
  "sqlManagementEndpointUrl": "https://management.core.windows.net:8443/",
  "galleryEndpointUrl": "https://gallery.azure.com/",
  "managementEndpointUrl": "https://management.core.windows.net/"
}
Copy the JSON output and brackets to use in the next step.
Create the GitHub secrets
The GitHub Actions runner uses credentials to interact with Container Registry and AKS. The service principal and the credentials for the container registry are sensitive information. It's best to store sensitive information as encrypted secrets in a secure location. GitHub provides a built-in location to store secrets and other variables.
Complete the following steps to securely store the sensitive information as environment variables in your repository. Repository administrators should manage the secrets that the GitHub Actions runner can access.
In your forked GitHub repository, go to Settings > Secrets and variables > Actions.
On the Actions secrets and variables page, select New repository secret.
On the New secret page, under Name, enter AZURE_CREDENTIALS, and under Secret, enter the JSON output you copied from the terminal.
The settings should look similar to the following screenshot:
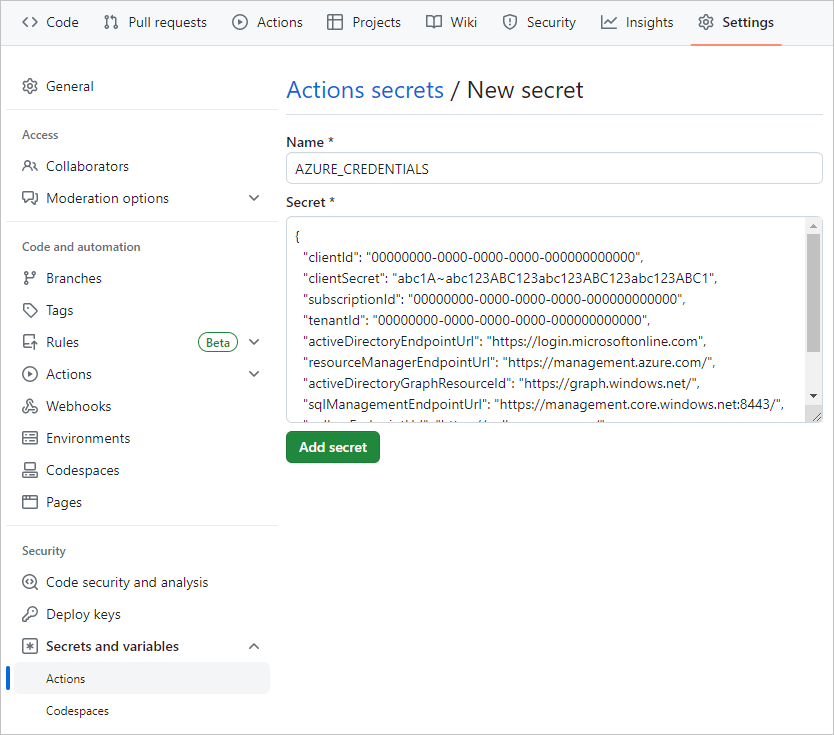
Select Add secret.

You'll use this GitHub secret in the next section to create a GitHub action to build the container image.