Implement Conditional Access policy controls and assignments
Visual Studio App Center supports Microsoft Entra Conditional Access, an advanced feature of Microsoft Entra ID that enables you to specify detailed policies that control who can access your resources. Using Conditional Access, you can protect your applications by limiting users' access based on things like group, device type, location, and role.
Setting up Conditional Access
This is an abbreviated guide to setting up Conditional Access. Full documentation is available at What is Conditional Access?.
In the Azure portal, open your Active Directory tenant, then open the Security settings, and select Conditional Access.
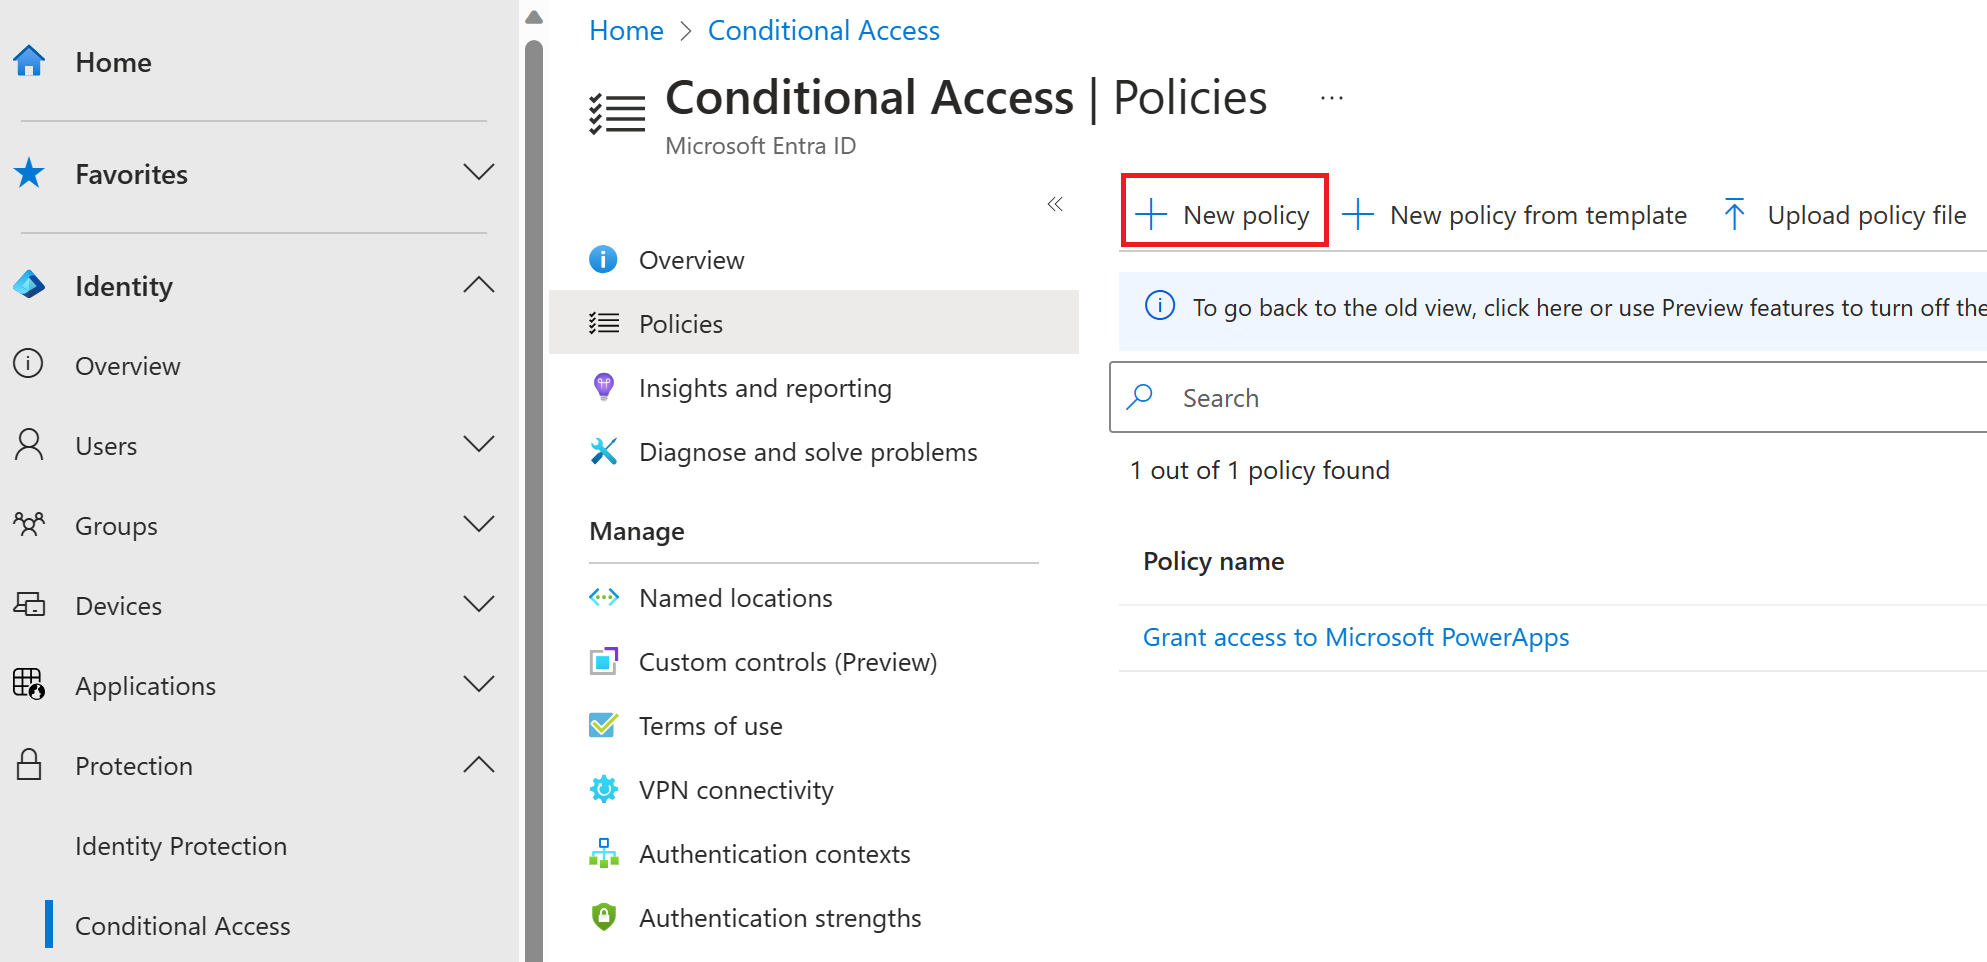
In Conditional Access settings, select New policy to create a policy.
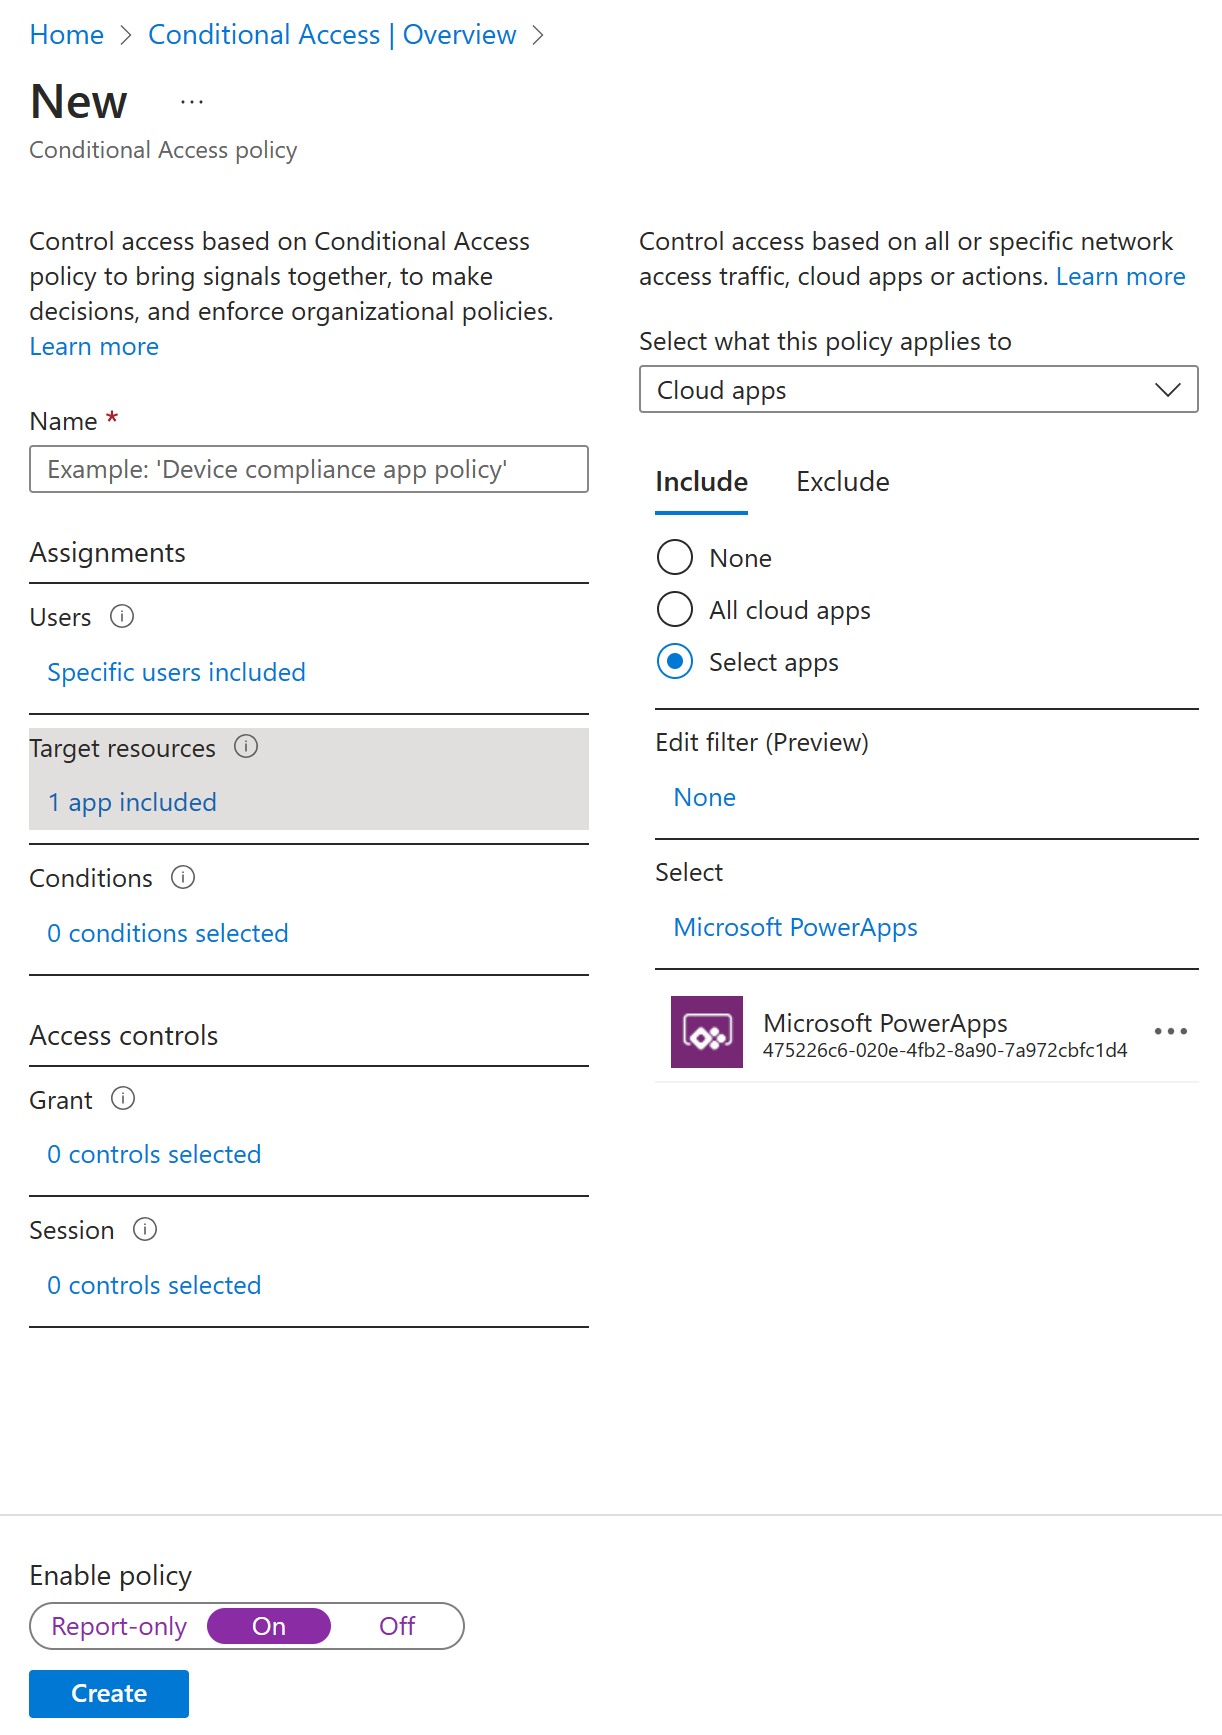
In New policy settings, select Cloud apps or actions and select Visual Studio App Center as the target of the policy. Then select the other conditions that you want to apply, enable the policy, and select Create to save it.
Sign-in risk-based Conditional Access
Most users have a normal behavior that can be tracked. When they fall outside of this norm, it could be risky to allow them to just sign in. You want to block that user or ask them to perform multifactor authentication to prove that they are really who they say they are.
A sign-in risk represents the probability that a given authentication request isn't authorized by the identity owner. Organizations with Microsoft Entra ID Premium P2 licenses can create Conditional Access policies incorporating Microsoft Entra Identity Protection sign-in risk detections.
This policy can be assigned either through Conditional Access itself or through Microsoft Entra Identity Protection. Organizations should choose one of two options to enable a sign-in risk-based Conditional Access policy requiring a secure password change.
User risk-based Conditional Access
Microsoft works with researchers, law enforcement, various security teams at Microsoft, and other trusted sources to find leaked username and password pairs. Organizations with Microsoft Entra ID Premium P2 licenses can create Conditional Access policies incorporating Microsoft Entra Identity Protection user risk detections.
Like sign-in risk-based Conditional Access, this policy can be assigned either through Conditional Access itself or through Microsoft Entra Identity Protection.
Securing security info registration
Securing when and how users register for multifactor authentication and self-service password reset is now possible with user actions in Conditional Access policy. This preview feature is available to organizations that have enabled the combined registration preview. This functionality might be enabled in organizations where they want to use conditions like trusted network location to restrict access to register for multifactor authentication and self-service password reset (SSPR).
Create a policy to require registration from a trusted location
The following policy applies to all selected users who attempt to register using the combined registration experience, and it blocks access unless they are connecting from a location marked as a trusted network.
In the Microsoft Entra admin center, browse to Identity, then Protection, and then Conditional Access.
Select + Create new policy.
In Name, Enter a Name for this policy. For example, Combined Security Info Registration on Trusted Networks.
Under Assignments, select Users and groups, and select the users and groups you want this policy to apply to.
- Under Exclude, select Users and groups and choose your organization's emergency access or break-glass accounts.
- Select Done.
Under Cloud apps or actions, select User actions, check Register security information.
Under Conditions, select Locations.
- Configure Yes.
- Include Any location.
- Exclude All trusted locations.
- Select Done on the Locations screen.
- Select Done on the Conditions screen.
Under Conditions, in Client apps (Preview), set Configure to Yes, and select Done.
Under Access controls, select Grant.
- Select Block access.
- Then use the Select option.
Set Enable policy to On.
Then select Save.
At step 6 in this policy, organizations have choices they can make. The policy above requires registration from a trusted network location. Organizations can choose to utilize any available conditions in place of Locations. Remember that this policy is a block policy, so anything included is blocked.
You can choose to use device state instead of location in step 6 above:
- Under Conditions, select Device state (Preview).
- Configure Yes.
- Include All device state.
- Exclude Device Hybrid Microsoft Entra joined and/or Device marked as compliant.
- Select Done on the Locations screen.
- Select Done on the Conditions screen.
Block access by location
With the location condition in Conditional Access, you can control access to your cloud apps based on the network location of a user. The location condition is commonly used to block access from countries/regions where your organization knows traffic should not come from.
Define locations
Sign in to the Microsoft Entra admin portal as a Global Administrator, Security Administrator, or Conditional Access Administrator.
Browse to Identity, then Protection, then Conditional Access, and then Named locations.
Choose New location.
Give your location a name.
Choose IP ranges if you know the specific externally accessible IPv4 address ranges that make up that location or Countries/Regions.
- Provide the IP ranges or select the Countries/Regions for the location you are specifying.
- If you choose Countries/Regions, you can optionally choose to include unknown areas.
Choose Save.
Create a Conditional Access policy
Sign in to the Microsoft Entra admin center as a Global Administrator, Security Administrator, or Conditional Access Administrator.
Browse to Identity, then Protection, and then Conditional Access.
Select + Create new policy.
Give your policy a name. We recommend that organizations create a meaningful standard for the names of their policies.
Under Assignments, select Users and groups.
- Under Include, select All users.
- Under Exclude, select Users and groups and choose your organization's emergency access or break-glass accounts.
- Select Done.
Under Cloud apps or actions, then Include, and select All cloud apps.
Under Conditions, then Location.
- Set Configure to Yes.
- Under Include, select Selected locations.
- Select the blocked location you created for your organization.
- Choose Select.
Under Access controls, then select Block Access, and select Select.
Confirm your settings and set Enable policy to On.
Select Create to create Conditional Access Policy.
Require compliant devices
Organizations that have deployed Microsoft Intune can use the information returned from their devices to identify devices that meet compliance requirements, such as:
- Requiring a PIN to unlock.
- Requiring device encryption.
- Requiring a minimum or maximum operating system version.
- Requiring a device is not jailbroken or rooted.
This policy compliance information is forwarded to Microsoft Entra ID where Conditional Access can make decisions to grant or block access to resources.
Create a Conditional Access policy
The following steps will help create a Conditional Access policy to require devices accessing resources be marked as compliant with your organization's Intune compliance policies.
Sign in to the Microsoft Entra admin center as a Global Administrator, Security Administrator, or Conditional Access Administrator.
Browse to Identity, then Protection, and then Conditional Access.
Select + Create new policy.
Give your policy a name. We recommend that organizations create a meaningful standard for the names of their policies.
Under Assignments, select Users and groups.
- Under Include, select All users.
- Under Exclude, select Users and groups and choose your organization's emergency access or break-glass accounts.
- Select Done.
Under Cloud apps or actions, then Include, and select All cloud apps.
- If you must exclude specific applications from your policy, you can choose them from the Exclude tab under Select excluded cloud apps and choose Select.
- Select Done.
Under Conditions, then Client apps (Preview), then Select the client apps this policy will apply to, leave all defaults selected and select Done.
Under Access controls, then Grant, select Require device to be marked as compliant.
- Select Select.
Confirm your settings and set Enable policy to On.
Select Create to create to enable your policy.
Note
You can enroll your new devices to Intune even if you select Require device to be marked as compliant for All users and All cloud apps using the steps above. Require device to be marked as compliant control does not block Intune enrollment.
Known behavior
On Windows 7, iOS, Android, macOS, and some third-party web browsers, Microsoft Entra ID identifies the device using a client certificate that is provisioned when the device is registered with Microsoft Entra ID. When a user first signs in through the browser, the user is prompted to select the certificate. The end user must select this certificate before they can continue to use the browser.
Block access
For organizations with a conservative cloud migration approach, the block all policy is an option that can be used.
Warning
Misconfiguration of a block policy can lead to organizations being locked out of the Azure portal.
Policies like these can have unintended side effects. Proper testing and validation are vital before enabling. Administrators should utilize tools such as Conditional Access report-only mode and the What If tool in Conditional Access.
User exclusions
Conditional Access policies are powerful tools. We recommend excluding the following accounts from your policy:
Emergency access or break-glass accounts to prevent tenant-wide account lockout. In the unlikely scenario that all administrators are locked out of your tenant, your emergency-access administrative account can be used to sign into the tenant and take steps to recover access.
Service accounts and service principals, such as the Microsoft Entra Connect Sync Account. Service accounts are non-interactive accounts that are not tied to any particular user. They are normally used by back-end services allowing programmatic access to applications, but they are also used to sign in to systems for administrative purposes. Service accounts like these should be excluded since MFA can't be completed programmatically. Calls made by service principals are not blocked by Conditional Access.
- If your organization has these accounts in use in scripts or code, consider replacing them with managed identities. As a temporary workaround, you can exclude these specific accounts from the baseline policy.
Conditional Access Terms of Use (TOU)
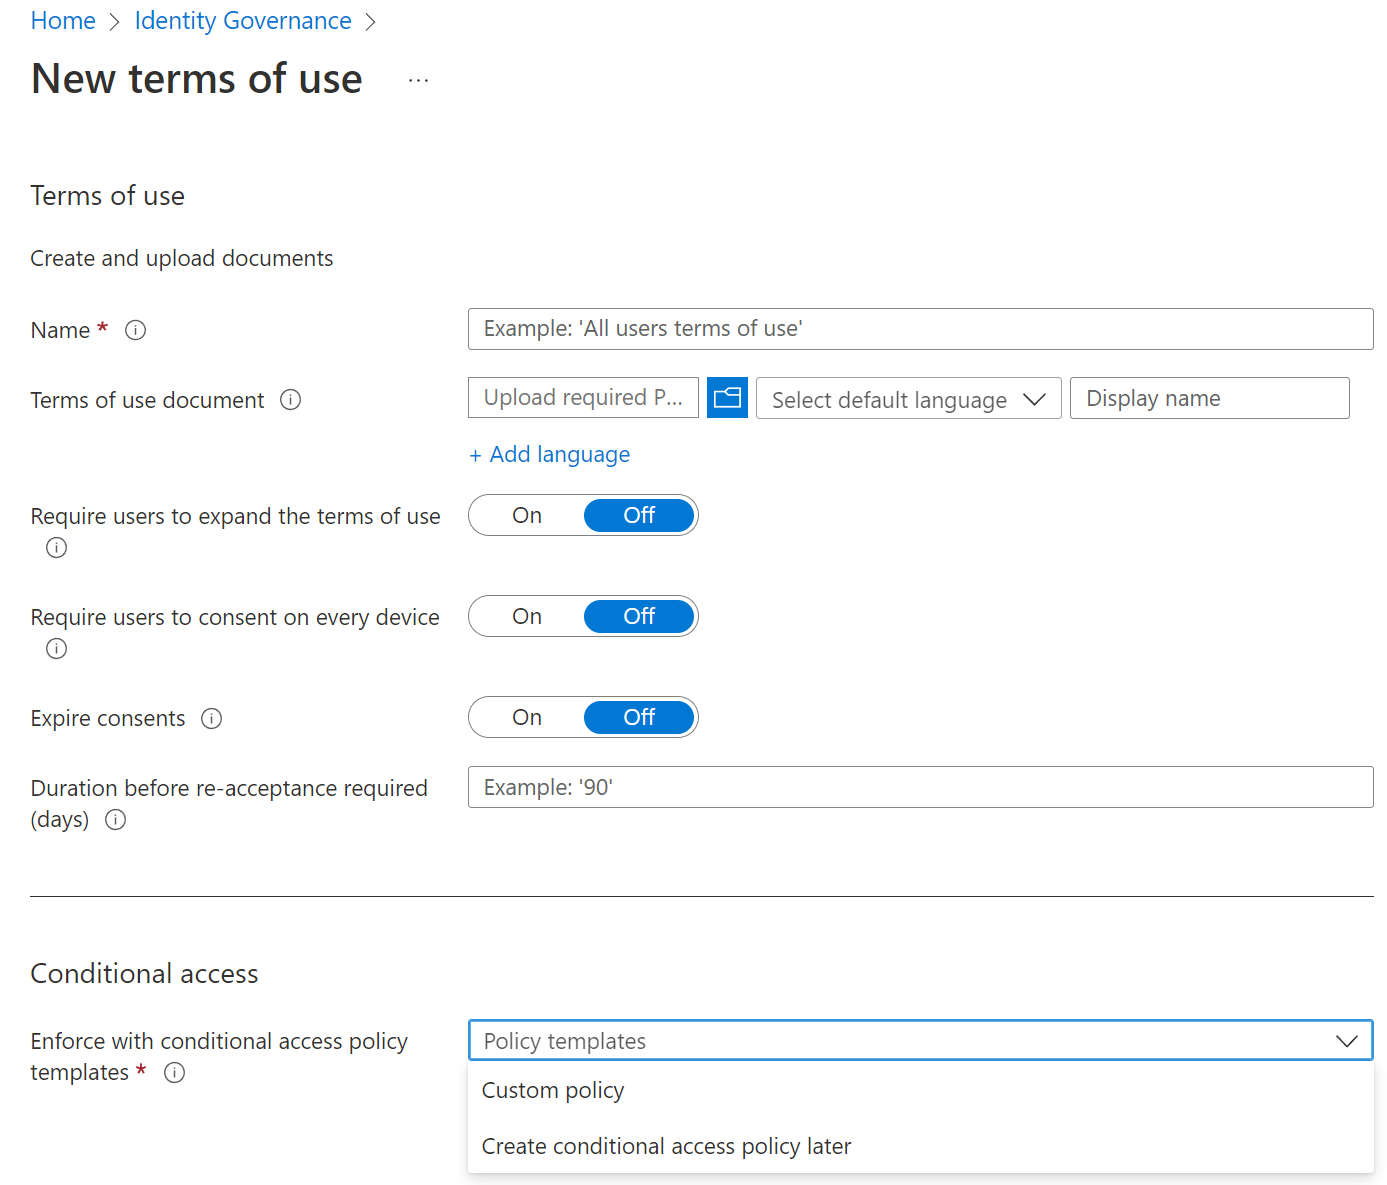
You can create Terms of Use (TOU) for your site in the Identity Governance tools. Launch the identity governance app, and choose Terms of use from the menu. You have to supply and PDF file with the terms for the user. You can set up several rules like when the terms will expire, or whether the user has to open them before accepting. Once created, you can build a custom conditional rule right in identity governance. Or you can save the terms and use Conditional Access in Microsoft Entra ID. To create new Terms of use you fill in the above dialog.
The linking of consent (accept terms before access) and conditional access is getting more and more traction. Organizations get the ability to enforce a user to consent to the terms of use. Additionally, organizations can expire the consent given or change the terms of use, and request the user attests again.
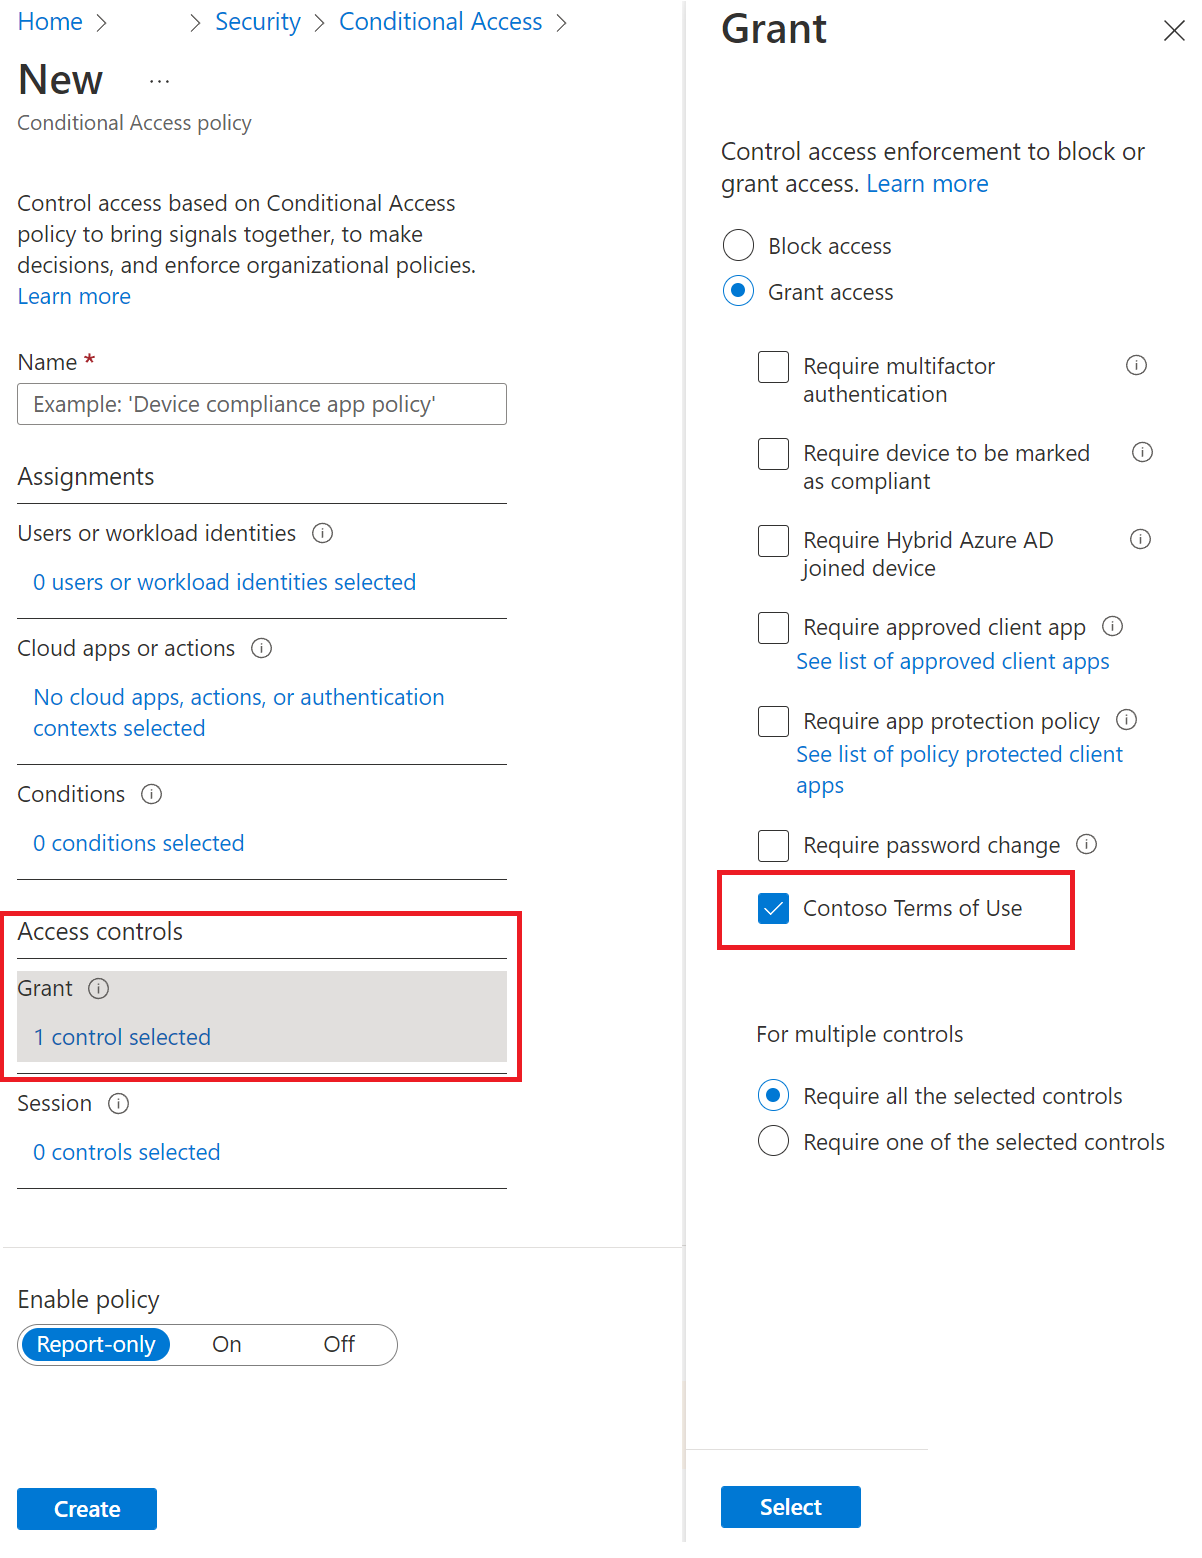
Before accessing certain cloud apps in your environment, you might want to get consent from users in form of accepting your terms of use (ToU). Microsoft Entra Conditional Access provides you with:
- A simple method to configure ToU
- The option to require accepting your terms of use through a Conditional Access policy