Evaluate network specifications
Together, the Microsoft Teams Network Assessment Tool and Microsoft 365 network connectivity test can be used to assess your needs and evaluate where adjustments need to be made. You can analyze if the connection from the client machine, inside or outside the organization's network, meets these requirements.
After learning the raw values required to operate Teams in your organizations network, you can analyze the existing infrastructure with the provided tools.
Determine network requirements using the Teams Network Planner
The Network Planner tool is available in the Teams admin center. It helps you determine the network requirements for Teams in your organization.

Note
The tool does not configure anything, change any settings or test anything, it will simply generate reports and calculate bandwidth requirements for Teams usage based on typical usage personas and number of users on each site.
Tip
The recommended user bandwidth personas were developed by Microsoft based on data from Teams best use scenarios and typical usage patterns. However, you can create up to three custom personas in addition to the three recommended personas if you require.
To create a new network plan in Network planner, perform the following steps:
Navigate to the Microsoft Teams admin center at https://admin.teams.microsoft.com.
Sign in with an account member in the role Teams Administrator.
Navigate to Planning and select Network planner.
To start, select Add, input a name and description for your plan, and then select Apply.
Once created, select your plan, and select add a network site for each site.
For each site you need to add:
The number of users, called "network users"
Network subnets
If the site is directly connected to the internet, set the internet capacity in Mbps. If there's no local internet connectivity, set it to 0.
If the site is connected to other sites via a WAN, check this box to set the WAN capacity, and the queue size for audio and video in Mbps if you're using QoS queues.
PSTN egress
Select VoIP only if you don't have a local PSTN. If there's PSTN breakout, select local.
If the site is connected directly to Office 365 via ExpressRoute, tick this box.
After adding your network sites and details, go to the Report tab and select Start a report.
Enter a report name and select Generate report.
From the Report tab, you can review the results.
Choose to divide your network site users between the bandwidth personas. Think about the ratios of each type of user you require on that site.
By default, the tool assumes 30% of a link is reserved for real-time communications. You can change this allowed bandwidth percentage in the report page.
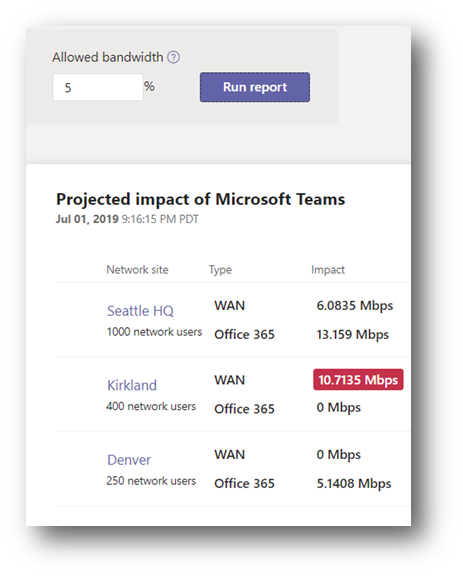
The above image shows an example of a network planner report with a link that doesn't have enough bandwidth, highlighted in red. Any figured highlighted in red indicate areas that need more bandwidth. You can access the reports at any time in the future by going back Network planner in the Microsoft Teams admin center.
Now that your network is mapped out, you can plan for any sites or links that might require additional bandwidth.
Perform a network analysis using the Teams Network Assessment Tool
While Network Planner is just a planning exercise, Microsoft Teams Network Assessment Tool performs a simple test of actual network connectivity and network performance to determine how well the network would perform for Microsoft Teams calls.
The tool enables you to analyze network connectivity in two different ways: testing connectivity to the service and performance of your network path. The tests are detailed in the following bullets:
Network connectivity: Verify network connectivity between test location, and the Microsoft Network are correctly configured to enable communication to the IP addresses and ports needed for Microsoft Teams calls.
Network performance: Test the connection performance from the test location to a Microsoft Teams relay by streaming packets to the nearest edge site and back for a configurable amount of time. The tool collects and outputs loss, jitter, and round-trip time. The results from set of test calls can be analyzed to determine if it meets the media quality and performance targets.
Network connectivity is mainly about checking if firewalls or proxies are blocking any connections required, and network performance test is about the actual performance of packets sent across the network.
It can also output a verbose HTTP stack infrastructure test. This would only be used in advanced troubleshooting with Microsoft support.
Install the Teams Network Assessment Tool
To install The Teams Network Assessment Tool, follow these steps:
Download the Microsoft Teams Network Assessment Tool installer.
Run MicrosoftTeamsNetworkAssessmentTool.exe to install the tool.
The tool is installed to the following path by default: %ProgramFiles(x86)%\Microsoft Teams Network Assessment Tool\
The folder contains multiple items: the executable to start the tool (NetworkAssessmentTool.exe) and a Word document named Usage.docx with instructions on how to use the tool. The tool is command-line tool only and can be run from the command prompt or PowerShell.
Network Connectivity Check
Running the tool in a command line with no switches performs a network connectivity check:
C:\Program Files (x86)\Microsoft Teams Network Assessment Tool\NetworkAssessmentTool.exe
Firstly, the tool checks connectivity to the Teams media relay. These are used to relay audio and video when direct connection between clients isn't possible. The relay connectivity checker verifies network connectivity to the load-balancer relay (VIP), AND one relay instance (DIP) forwarded by the load-balancer relay. The checker tests connectivity via UDP, TCP (Pseudo-TLS/Full-TLS), and HTTPS transport protocol. The checker tests connectivity to port 3478 (control port) of the load-balancer relay, and ports 3478-3481 of the relay instance.
The checker also tests whether the load-balancer relay is enabled for QoS (Quality of Service), which means the load-balancer redirects packets to relay instance ports 3479-3481, instead of 3478, depending on the modality.
Tip
By default, a default relay load-balancer relay FQDN for Worldwide Office 365 Endpoints is used. If you are working with a U.S. Government DoD tenant or U.S. Government GCC High tenant, you can edit the configuration file to test those endpoints
Microsoft Teams - Network Assessment Tool

Starting Relay Connectivity Check:

UDP, PseudoTLS, FullTLS, HTTPS connectivity will be checked to this relay (VIP) FQDN: worldaz.tr.teams.microsoft.com

If user wants to check connectivity to a particular relay (VIP) IP, please specify in NetworkAssessment.exe.config.

Connectivity check source port range: 50000 - 50019

Relay : 52.115.84.7     is the relay load balancer (VIP)

Relay : 52.115.84.7     is reachable using Protocol UDP and Port 3478

Relay : 52.115.84.7     is QOS (Media Priority) enabled

Relay : 52.115.84.7     is the relay load balancer (VIP)

Relay : 52.115.84.7     is reachable using Protocol PseudoTLS and Port 443

Relay : 52.115.84.7     is the relay load balancer (VIP)

Relay : 52.115.84.7     is reachable using Protocol FullTLS and Port 443

Relay : 52.115.84.7     is the relay load balancer (VIP)

Relay : 52.115.84.7     is reachable using Protocol HTTPS and Port 443

Relay : 52.115.84.153   is the actual relay instance (DIP)

Relay : 52.115.84.153   is reachable using Protocol UDP and Port 3478

Relay : 52.115.84.153   is the actual relay instance (DIP)

Relay : 52.115.84.153   is reachable using Protocol UDP and Port 3479

Relay : 52.115.84.153   is the actual relay instance (DIP)

Relay : 52.115.84.153   is reachable using Protocol UDP and Port 3480

Relay : 52.115.84.153   is the actual relay instance (DIP)

Relay : 52.115.84.153   is reachable using Protocol UDP and Port 3481

Relay connectivity and Qos (Media Priority) check are successful for all relays.
Next, it checks if it can connect to the Teams call services.
These services include (with protocol provided):
Call Controller (HTTP and UDP)
Conversation Service (HTTP)
Chat Service (HTTP)
Trouter Service (HTTP)
Broker Service (HTTP)
Starting Service Connectivity Check:

Service verifications completed successfully.
The results are output to \AppData\Local\Microsoft Teams Network Assessment Tool\service.
Service connectivity result has been written to: C:\Users\<alias>\AppData\Local\Microsoft Teams Network Assessment Tool\service_connectivity_check_results.txt
You're looking for a successful result for all tests. If tests aren't successful, check the log file for more information regarding any tests that failed and look to open network connectivity for those addresses or services. Typical places to look for issues are firewalls and proxies.
Network Quality Check
The network quality check (performance test) is run with the NetworkAssessmentTool.exe /qualitycheck switch. This sends real packets across the network and reports on indicators like jitter, packet loss, and latency.
Note
You can only run a single instance of the tool on a PC. This tool is not intended for load/stress testing by running concurrent instances all performing tests.
C:\Program Files (x86)\Microsoft Teams Network Assessment Tool>NetworkAssessmentTool.exe /qualitycheck
The tool identifies which relay VIP it's testing and how long the test is set up for. By default, it tests every 5 seconds for 300 seconds. To change the length of time the quality checker runs, you can change the MediaDuration setting in the config file - NetworkAssessmentTool.exe.config.
A test that is 300 seconds, or 5 minutes, isn't a very long test. Setting this to 1800 or 30 minutes includes a set of results covering a longer window of time. It's best practice to gather results over a longer period of time and at different times of the day and week. You might discover whether Teams still performs well during peak times when a high number of users are working or high-performance workloads stress the network. The following picture shows the value to modify:

Microsoft Teams - Network Assessment Tool

Initializing media flow

***************

Starting new call

Media flow will start after allocating with relay VIP FQDN: worldaz.tr.teams.microsoft.com

If user wants to allocate with a particular relay VIP IP address, please specify in NetworkAssessment.exe.config.

Waiting for call to end after 300 seconds, displaying call quality metrics every ~5 seconds.

Change the 'MediaDuration' field in the NetworkAssessmentTool.exe.config file to change the media flow duration.
It provides some instruction about how to read the output.
TIMESTAMP is in UTC. LOSS RATE is in percentage, out of 100.

LATENCY and JITTER are in milliseconds and are calculated as averages in ~5-second windows.

PROTOCOL displays whether UDP, TCP (PseudoTLS/FullTLS), or HTTPS protocol was used to allocate with the relay server.

Note that for PROTOCOL, UDP protocol is attempted first to connect to the relay, by default.

LOCAL ADDRESS is the local client IP and port that media is flowing from.

REMOTE ADDRESS is the peer (relay server) destination IP and port that media is flowing to.

IS PROXIED PATH shows whether a proxy server is used to connect to the relay, only applies to TCP/HTTPS connections

LAST KNOWN REFLEXIVE IP shows what your latest public (NAT translated) IP and port is that the relay sees during media flow.

[If LOSS RATE is 100%, the output lines here will be in red]

Quality check source port range: 50000 - 50019
Then it outputs the results of each test.
Tip
Press Ctrl+C in the middle of a test to end it early.
As soon as the test is complete, an output file with the results in CSV are created in the following folder on your test: %appdata%\..\Local\Microsoft Teams Network Assessment Tool
Call Quality Metrics:

2021-02-05 21:13:05            Loss Rate: 0          Latency: 71.45      Jitter: 10         Protocol: UDP

Local IP:                                            Remote IP: 52.114.149.101:3478

Is Proxied Path: False                               Last Known Reflexive IP:

2021-02-05 21:13:10            Loss Rate: 0          Latency: 71.65      Jitter: 8          Protocol: UDP

Local IP:                                            Remote IP: 52.114.149.101:3478

Is Proxied Path: False                               Last Known Reflexive IP:

2021-02-05 21:13:16            Loss Rate: 0          Latency: 71.75      Jitter: 6          Protocol: UDP

Local IP:                                               Remote IP: 52.114.149.101:3478

Is Proxied Path: False                               Last Known Reflexive IP:

Call Quality Check Has Finished

Call Quality Check result has been written to: C:\Users\<alias>\AppData\Local\Microsoft Teams Network Assessment Tool\quality_check_results.csv
The following picture shows the example results of a network test. You can see the metrics for each test as well as the protocols and IP addresses.

In this test we see only five results, but your test might show many more results. You might want to use excel to look at minimums, maximums, and averages to understand your overall results.
Tip
You should assess and gather data for all your networks over a long period of time. It’s recommended for you to perform your testing of network performance for a minimum of a week, so that you can see usage patterns for all business days and hours. This will show you peak times.