Exercise - Publish a template spec
Your team has built some security-hardened Bicep files that are compliant with your company's new governance model. One of the hardened Bicep files deploys a Linux-based Azure App Service app. In this exercise, you'll use a deployment workflow to publish the Bicep file as a template spec.
During the process, you'll:
- Add a lint job to the workflow.
- Add a workflow job to publish the template spec.
- Manually run the workflow and verify that it finishes successfully.
- Check the published template spec in Azure.
Add a lint job to your workflow
Your repository contains a draft of a workflow that you can use as a starting point.
In Visual Studio Code, expand the .github/workflows folder in the root of the repository.
Open the template-spec-linux-app-service.yml file.

The workflow definition includes two triggers. In this exercise, you don't modify the Bicep file for the template spec, so the
pushtrigger never fires. To try out your workflow, you manually invoke it by using theworkflow_dispatchtrigger.At the bottom of the file, where you see a comment that says To be added, add the following lint job definition:
jobs:
  lint:
    runs-on: ubuntu-latest
    steps:
    - uses: actions/checkout@v3
    - name: Run Bicep linter
      run: az bicep build --file ${{ env.TEMPLATE_SPEC_FILE_PATH }}
Your repository has a bicepconfig.json file that configures the linter to emit errors instead of warnings. Any failures during the lint job will cause the workflow to fail.
Tip
YAML files are sensitive to indentation. Whether you type or paste this code, make sure your indentation is correct. Later in this exercise, you'll see the complete YAML workflow definition so that you can verify that your file matches.
Add a publish job to your workflow
Now, you can add a second job to publish the template spec to Azure.
Add the following code at the end of the template-spec-linux-app-service.yml file:
publish:
  runs-on: ubuntu-latest
  needs: [ lint ]
  steps:
  - uses: actions/checkout@v3
  - uses: azure/login@v1
    name: Sign in to Azure
    with:
      client-id: ${{ secrets.AZURE_CLIENT_ID }}
      tenant-id: ${{ secrets.AZURE_TENANT_ID }}
      subscription-id: ${{ secrets.AZURE_SUBSCRIPTION_ID }}
  - uses: azure/cli@v1
    name: Publish template spec
    with:
      inlineScript: |
        az ts create \
          --resource-group ${{ env.AZURE_RESOURCEGROUP_NAME }} \
          --name ${{ env.TEMPLATE_SPEC_NAME }} \
          --version ${{ github.run_number }} \
          --template-file ${{ env.TEMPLATE_SPEC_FILE_PATH }} \
          --location ${{ env.AZURE_REGION }} \
          --yes
This job checks out the code from your repository and signs in to Azure using the GitHub secrets that you created. It then runs the
az ts createcommand to publish the template spec to Azure.Tip
To keep things simple, your workflow uses the workflow's run number as the template spec's version number. In the next unit, you'll learn about a more complex versioning scheme.
Save your changes to the file.
Verify and commit your workflow definition
Verify that your template-spec-linux-app-service.yml file looks like the following example:
name: template-spec-linux-app-service
concurrency: template-spec-linux-app-service

on:
  workflow_dispatch:
  push:
    branches:
      - main
    paths:
      - 'template-specs/linux-app-service/**'

permissions:
  id-token: write
  contents: read

env:
  AZURE_RESOURCEGROUP_NAME: ToyReusable
  AZURE_REGION: westus3
  TEMPLATE_SPEC_NAME: linux-app-service
  TEMPLATE_SPEC_FILE_PATH: template-specs/linux-app-service/main.bicep

jobs:
  lint:
    runs-on: ubuntu-latest
    steps:
    - uses: actions/checkout@v3
    - name: Run Bicep linter
      run: az bicep build --file ${{ env.TEMPLATE_SPEC_FILE_PATH }}

  publish:
    runs-on: ubuntu-latest
    needs: [ lint ]
    steps:
    - uses: actions/checkout@v3
    - uses: azure/login@v1
      name: Sign in to Azure
      with:
        client-id: ${{ secrets.AZURE_CLIENT_ID }}
        tenant-id: ${{ secrets.AZURE_TENANT_ID }}
        subscription-id: ${{ secrets.AZURE_SUBSCRIPTION_ID }}
    - uses: azure/cli@v1
      name: Publish template spec
      with:
        inlineScript: |
          az ts create \
            --resource-group ${{ env.AZURE_RESOURCEGROUP_NAME }} \
            --name ${{ env.TEMPLATE_SPEC_NAME }} \
            --version ${{ github.run_number }} \
            --template-file ${{ env.TEMPLATE_SPEC_FILE_PATH }} \
            --location ${{ env.AZURE_REGION }} \
            --yes
If it doesn't, update it to match this example, and then save it.
Commit and push your changes to your Git repository by running the following commands in the Visual Studio Code terminal:
git add .
git commit -m "Add lint and publish jobs to Linux App Service template spec workflow"
git push
This is the first time you've pushed to this repository, so you might be prompted to sign in.
On Windows, type 1 to authenticate by using a web browser, and then select Enter.
On macOS, select Authorize.
A browser window appears. You might need to sign in to GitHub again. Select Authorize.
Trigger the workflow
In your browser, select the Actions tab.

Failed workflow runs are listed already, but you don't need to worry about them. They failed because the workflow definitions weren't yet completed when you created the repository.
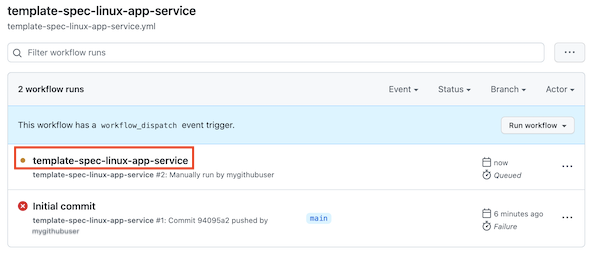
Select the template-spec-linux-app-service workflow, select the Run workflow button, and then select Run workflow.

GitHub starts a new workflow run. You might need to refresh your browser window to see the run appear.
Select the latest run in the list.
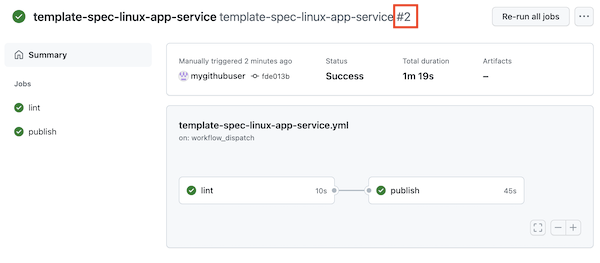
Wait for the workflow run to finish. When it does, the template spec is published to Azure.
Note the workflow's run number, which is probably 2.
Review the template spec in Azure
You can also view the published template spec in the Azure portal.
In your browser, go to the Azure portal.
Go to the ToyReusable resource group, and select the linux-app-service template spec.
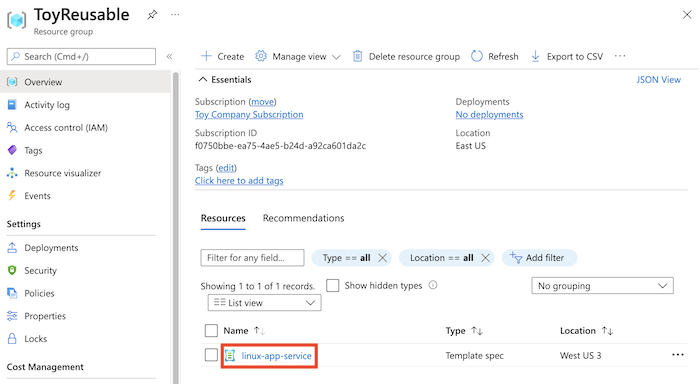
Examine the details of the template spec.
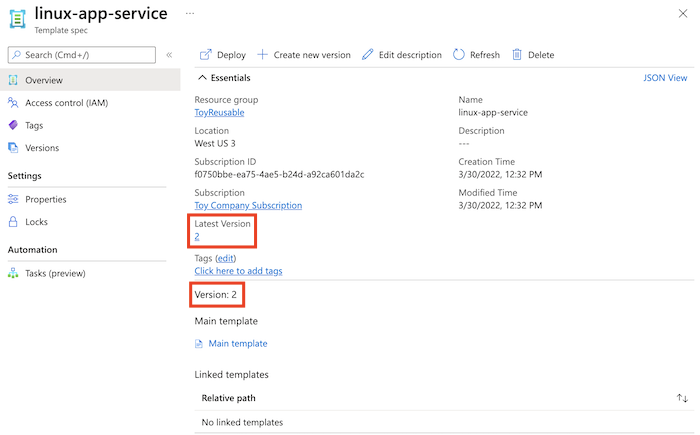
Notice that the Latest version and Version number is the same as the workflow's run number. Your workflow uses the run number for the template spec's version number.