Design a workflow and versioning strategy
When you start to publish reusable Bicep code, you probably use a manual approach. It's easy for you to determine which Bicep file you need to publish, and you probably have a manual process for incrementing the version number.
When you automate the publishing process, you need to consider how to automate these steps. In this unit, you'll learn how to adopt a versioning system that communicates the changes you've made to your code. You'll also learn how you can scope your workflows to publish just the code that you expect.
Version numbers
In previous Microsoft Learn training modules, you learned about the importance of versioning for template specs and Bicep modules. You can choose from many different versioning approaches. In many situations, it's a good practice to use a multipart versioning system. A multipart versioning system consists of a major version, minor version, and revision number, similar to the following example:
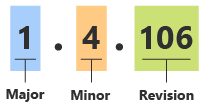
In the preceding example, the major version is 1, the minor version is 4, and the revision number is 106.
Changes in different parts of version numbers communicate important information about the types of changes in the code:
Whenever you make a breaking change, you should increment the major version number. For example, suppose you add a new mandatory parameter or remove a parameter from your Bicep file. These are examples of breaking changes, because Bicep requires mandatory parameters to be specified at deployment time and doesn't allow setting values for nonexistent parameters. So, you would update the major version number.
Whenever you add something new to the code, but it isn't a breaking change, you should increment the minor version number. For example, suppose you add a new optional parameter with a default value. Optional parameters aren't breaking changes, so you should update the minor version number.
Whenever you make backward-compatible bug fixes or other changes that don't affect how the code works, you should increment the revision number. For example, suppose you refactor your Bicep code to make better use of variables and expressions. If the refactoring doesn't change your Bicep code's behavior at all, you update the revision number.
Your workflow can also automatically set the revision number. The workflow's run number can be used as the revision number. This convention helps ensure that your version numbers are always unique, even if you don't update the other components of your version numbers.
For example, suppose you're using a Bicep module that somebody else has published. The module has a version number of 2.0.496. You see that a new version of the module is available with the version number 2.1.502. The only significant change is to the minor version number, which indicates that you shouldn't expect a breaking change when you use the new version.
Note
Semantic versioning is a formalized versioning structure that's similar to multipart versioning. Semantic versioning includes additional components in the version number, along with strict rules about when you should set or reset each component. We link to more information about semantic versioning in the summary.
Your team needs to decide how to define a breaking change for the purpose of versioning. For example, suppose you've built a Bicep module that deploys a storage account. You're now updating the Bicep file to enable private endpoints on your storage account. You're adding a private DNS zone to your Bicep file at the same time.
In that example, you might be able to make the change without affecting the Bicep file's parameters or outputs. That way, anybody who deploys the file might not notice that anything is different. But this change introduces a significant difference in the behavior of your resources, so you might decide to treat it as a major version update.
You can also choose to use a simpler versioning strategy, such as just using the workflow's run number as your version number. Although this approach is easier to implement, it means you can't effectively communicate the differences between versions to anybody who uses your code.
Versions and workflows
When you publish your code interactively, such as by using the Azure CLI, you probably think about the version number that you assign to your template spec or module as you publish it. But in an automated deployment workflow, you need to change your approach to assign version numbers. Your workflow can't automatically detect breaking changes, or advise you when you should increment your major or minor version numbers. Carefully consider versioning before you publish the template spec or module.
One approach is to store a metadata file with your Bicep code, as illustrated in the following diagram:
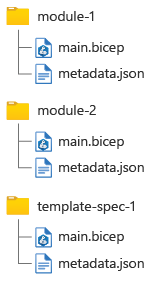
Whenever you update your Bicep code, you update the version information in the corresponding metadata file. Ensure that you correctly identify breaking and nonbreaking changes so you can increment the version numbers correctly.
Tip
If your team reviews your Bicep code by using pull requests, ask the reviewers to validate whether any changes to your code require changing your major or minor version numbers.
You'll see how you can use a metadata file in the next exercise.
How many workflows?
It's common to build up a collection of template specs and modules. Often, it makes sense to keep these in the same Git repository.
By using path filters in GitHub Actions, you can create separate workflows for each module or template spec within your repository. This approach helps you avoid publishing a new version of every Bicep file within the repository every time you change one file. You can use reusable workflows to define your workflow's steps in a centralized file, which keeps each module's and template spec's workflow lightweight.
For example, suppose you have a file structure similar to the one illustrated earlier. You could configure three separate workflows, one for each Bicep file. Select each tab to see the corresponding workflow definition and its path filter:
name: 'publish-module-1'

on:
  push:
    branches:
      - main
    paths:
      - 'module-1/**'

jobs:
  publish:
    uses: ./.github/workflows/publish-module.yml
    with:
      path: 'module-1/main.bicep'
Suppose you change only the module-2/main.bicep file. Only the workflow for module 2 runs. But if you change multiple files in the same commit, each of the relevant workflows is triggered.
Note
The approach of creating a workflow for each of your reusable Bicep files is simple and flexible. But it can become cumbersome when you have a large number of Bicep files, or if you don't want to maintain separate workflows for each module and template spec.
You can also write scripts within your workflow to find the code that's changed and publish just those files. This is a more complex approach, and it's beyond the scope of this Microsoft Learn training module.
Environments for reusable Bicep code
When you deploy to Azure by using Bicep, it's common to use multiple environments to help you to validate and test your code before it's published to a production environment. In previous Microsoft Learn training modules, you learned how to work with multiple environments from a deployment workflow.
Some organizations apply the same principles to Bicep modules and template specs. For example, you might first publish new versions of your modules to a nonproduction registry so that the users of each module can try out the new versions. Then, after they've signed off, you can publish the modules to your organization's production registry.
Like regular deployments, you can use jobs and reusable workflows to define the deployment sequence across your environments. In this Microsoft Learn training module, we publish to a single environment to keep the workflow simple.
When you consume modules from a registry or use a template spec as a Bicep module, you can use aliases. Instead of specifying the registry name or the template spec's location every time you define a module, you use its alias.
By using aliases, you can make your deployment process work across multiple environments. For example, when you define a module, you might use an alias instead of a registry name. Then, you can design a deployment workflow to configure the alias to be mapped to:
- A development module registry when you're deploying to a sandbox environment.
- A production registry when you're deploying to other environments.
Note
Aliases don't apply when you publish. They work only when you use template specs or modules within a Bicep file.