Exercise - Visualize data using Microsoft Sentinel Workbooks
As a security engineer working for Contoso, you notice suspicious activities in your Azure subscription and you decide to analyze this activity by using Microsoft Sentinel workbooks.
Exercise: Query and visualize data with Microsoft Sentinel Workbooks
You want to analyze the logs in Microsoft Sentinel from the Azure Activity connector. You want to further implement visualization of this data and save it in a customized workbook.
In this exercise, explore logs and Microsoft Sentinel Workbooks. You perform the following tasks:
- Interact with logs data in the Microsoft Sentinel Logs page.
- Create and edit a custom workbook to visualize important data.
Note
You must have completed the Query and visualize data with Microsoft Sentinel Workbooks unit before you can complete this exercise. If you have not done so, complete it now, and then continue with the exercise steps.
Task 1: Work with Logs in Microsoft Sentinel
In the Azure portal, search for and select Microsoft Sentinel, and then select the previously created Microsoft Sentinel workspace.
On the Microsoft Sentinel page, in the General section, select Logs.
Note
When you open the Logs page for the first time, you might be redirected to the Queries window. Close the Queries window and return to the New Query 1 section.
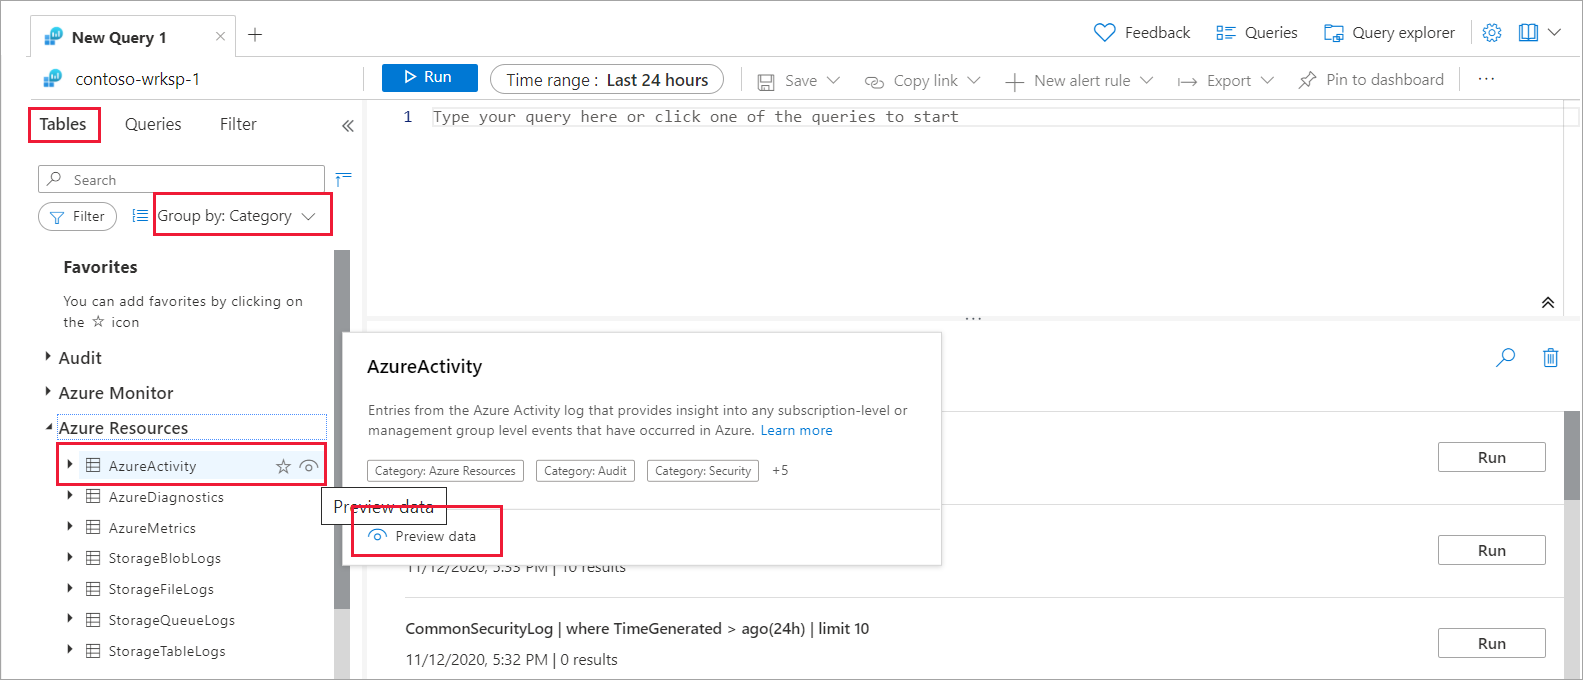
On the Microsoft Sentinel | Logs page, in the Tables pane, from the Group by: Solution dropdown menu, select Category.
In the Tables pane, from the list of tables, expand the Azure Resources category, move the cursor over the Azure Activity table or use the Tab key to navigate to the table, and then select Preview data.
In the AzureActivity window, select See in query editor. This option enables you to preview the data and to check if the results are as you expect before you actually run a query with it.
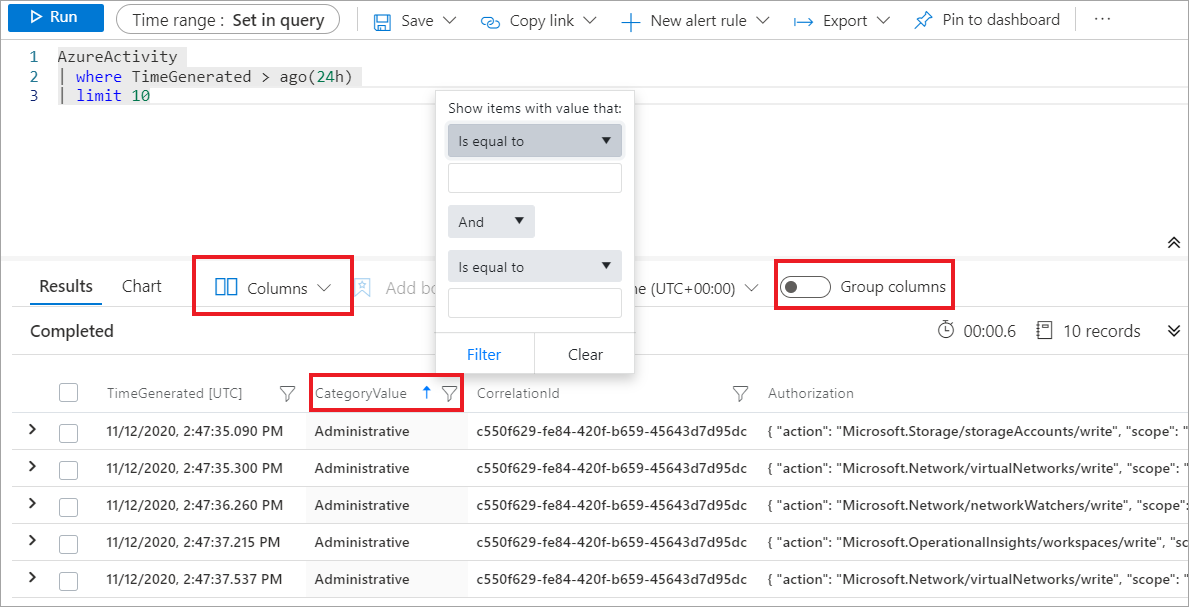
In the Query section, you can observe the query structure. This query searches and presents the last 10 events from the Azure Activity log. The first row in the query,
AzureActivityspecifies the table used in the query. The second line contains awherestatement that filters the records from the last day. The third line contains another statement to filter only the last 10 events.The query results section presents the results of the query. You can expand any of the records to review the values in the table. Select the name of any column to sort the results by that column.
Select the filter icon next to it to provide a filter condition. This approach is similar to adding a filter condition to the query itself except that this filter is cleared if you run the query again. If you select the Columns dropdown menu, you can filter the columns from the table that you want to display. By selecting Group columns, you can group records by a particular column.
Select Queries tab in the left pane. This pane includes example queries that you can add to the query window. If you're using your own workspace, you should have various queries in multiple categories. If you're using the demonstration environment, you might only see a single Log Analytics workspaces category.
Note
You can try to practice writing queries in the following demonstration environment.
Task 2: Work with Workbooks in Microsoft Sentinel
On the Microsoft Sentinel page, in the Threat Management section, select Workbooks.
On the Microsoft Sentinel | Workbooks page, select the Templates tab.
In the Search field, enter and select Azure Activity.
In the details pane, review the information provided for the template, and then select Save. In the Save workbook to… window, select the same location that you selected in the preparation exercise, and then select OK.
On the Microsoft Sentinel | Workbooks page, select My workbooks tab. From the list of saved templates, select Azure Activity. Then in the details pane, select View saved workbook.
On Azure Activity- sentinelname page, review all the elements of the workbook. You can interact with the workbook by selecting some of the elements.
Select the Time range field to select a different time range for the records presented in the Azure Activity table. Select the Caller dropdown menu to filter the records based on the user or service that generates the events. Select the Resource Group dropdown menu to filter the events based on a specific resource group.
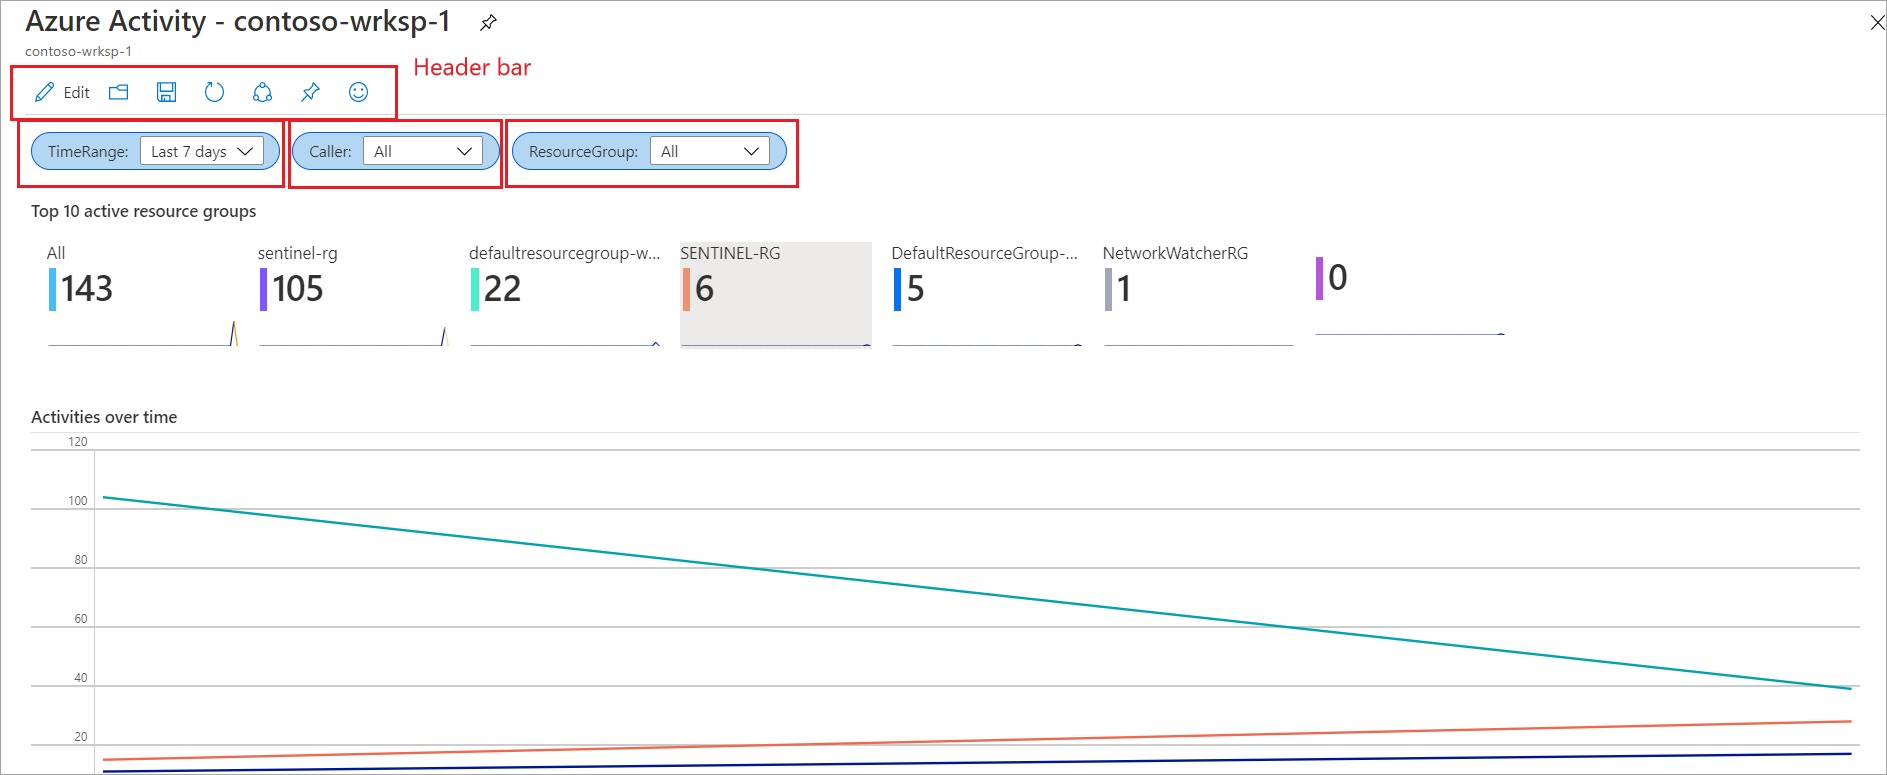
Scroll down to the Caller activities table, which displays the activities run by your users or security principals. Sort the table data in each column by selecting the arrows in the column header.
Scroll up to the header bar in the Azure Activity- sentinelname page. Select the Edit option to switch the workbook to the editing mode. Observe the various Edit options that display on the page.
Select the first Edit option. This action displays the editing pane for one of the steps in the workbook. You can customize the presentation of the elements by adjusting the style and reordering them in different order.
You can add other parameters with different types such as text, dropdown, multivalues, or similar.
Select Add parameters.
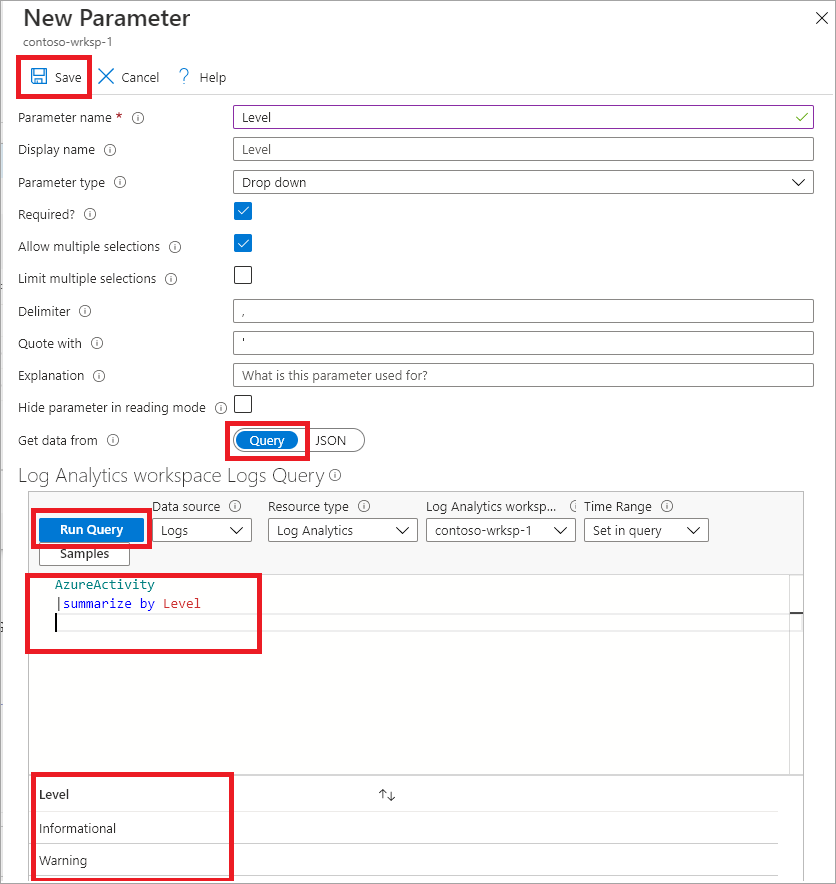
In the New Parameter page, enter the following values:
Name Description Parameter name Level Display name Level Parameter type From the dropdown menu, select Drop down. Required? Select this checkbox. Allow multiple selections Select this checkbox. Limit multiple selections Don't select this checkbox. Delimiter Retain the default values. Quote with Retain the default values. Explanation This parameter filters the events based on the level. Hide parameter in reading mode Don't select this checkbox. Get data from Query In the Log Analytics workspace Logs Query section, enter the following query, and then select Run Query.
AzureActivity
|summarize by Level
Confirm that the query result returns two types of events based on the level: Informational and Warning.
Select Save to commit the changes, and notice the parameter step now includes a parameter called Level.
Tip
In the edit mode, you can select the ellipsis icon next to the Edit option to display a new dropdown menu. From that menu, you can move this step to different parts of the workbook. You can also clone or remove the step from the workbook.
On the header bar, select the Save as icon to save the customized workbook.
In the Title field, provide a name for the new workbook, and then select Save.
When you're finished making changes, select Done Editing.
Tip
Your new workbook is accessible from the Microsoft Sentinel | Workbooks pane in the My workbooks tab. If your new workbook isn't listed, select the Refresh option.
Clean up the resources
- In the Azure portal, search for Resource groups.
- Select azure-sentinel-rg.
- On the header bar, select Delete resource group.
- In the TYPE THE RESOURCE GROUP NAME: field, enter the name of the resource group azure-sentinel-rg and select Delete.