Build logic that responds to an event
When you create events in Azure Event Grid, you choose how to respond to those events and which actions should occur.
You've set up a logic app for your healthcare organization to listen for events related to your Azure resources. Now, you need to filter the events and create actions based on conditions within them.
Here, you'll learn how to create actions and conditions to respond to events.
Conditions
To run actions in your logic app after events pass a specified condition, you'll add a conditional statement. This control structure compares the data in your workflow against specific values or fields. You'll then specify different actions that run based on whether the data meets the condition.
The following image shows an example of a filter that checks whether a filename in a directory has the .pdf extension.
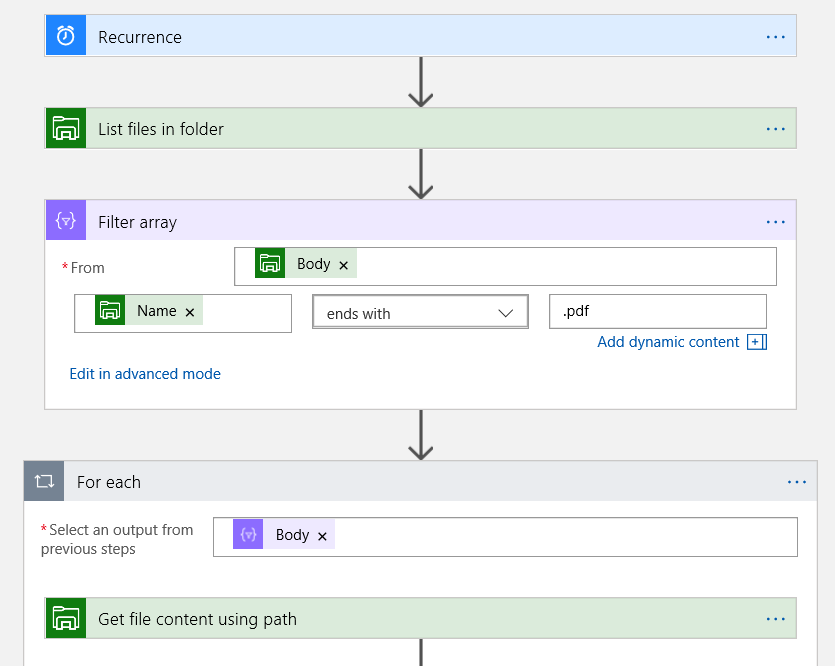
For example, suppose you have a logic app that needs to send an email based on certain fields being found in an Event Grid trigger. You'd create a condition in your logic app that could check the event data and conditionally call an action.
Actions
Logic apps provide built-in triggers and actions. You can use logic apps to orchestrate workflows, communicate with other apps and services, and manage or manipulate data.
Here are some of the many built-in actions:
- Azure Service Bus
- SQL Server
- Office 365 Outlook
- Salesforce
Suppose you have a logic app that needs to send an email in response to an event. You could use the built-in Office 365 Outlook action.
JSON configuration
The Logic Apps Designer command bar has two views of a logic app; you can use both views for development and configuration:
- Designer: Graphical interface for mapping all triggers, actions, and connectors.
- Code view: JSON format of your logic app configuration, which allows you to edit any trigger, event, connection, or related field you've mapped.
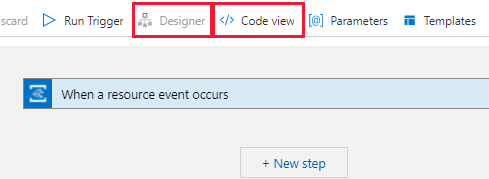
In the Logic Apps Designer command bar, select Code view to see the JSON configuration for the Event Grid trigger you've created.
Review the JSON configuration code for your event triggers, and you'll recognize the settings and concepts we've completed thus far. As you become more familiar with JSON, you'll be able to confidently edit the JSON configuration directly.
{
    "definition": {
        "$schema": "https://schema.management.azure.com/providers/Microsoft.Logic/schemas/2016-06-01/workflowdefinition.json#",
        "actions": {},
        "contentVersion": "1.0.0.0",
        "outputs": {},
        "parameters": {
            "$connections": {
                "defaultValue": {},
                "type": "Object"
            }
        },
        "triggers": {
            "When_a_resource_event_occurs": {
                "inputs": {
                    "body": {
                        "properties": {
                            "destination": {
                                "endpointType": "webhook",
                                "properties": {
                                    "endpointUrl": "@{listCallbackUrl()}"
                                }
                            },
                            "filter": {
                                "includedEventTypes": [
                                    "Microsoft.Resources.ResourceActionSuccess",
                                    "Microsoft.Resources.ResourceDeleteSuccess",
                                    "Microsoft.Resources.ResourceWriteSuccess"
                                ]
                            },
                            "topic": "/subscriptions/826d0748-8207-40ad-9e9c-44be4fa3f764/resourceGroups/learn-d022bcb1-0ce2-4e71-99a6-2ddd19e85389"
                        }
                    },
                    "host": {
                        "connection": {
                            "name": "@parameters('$connections')['azureeventgrid']['connectionId']"
                        }
                    },
                    "path": "/subscriptions/@{encodeURIComponent('826d0748-8207-40ad-9e9c-44be4fa3f764')}/providers/@{encodeURIComponent('Microsoft.Resources.ResourceGroups')}/resource/eventSubscriptions",
                    "queries": {
                        "x-ms-api-version": "2017-09-15-preview"
                    }
                },
                "splitOn": "@triggerBody()",
                "type": "ApiConnectionWebhook"
            }
        }
    },
    "parameters": {
        "$connections": {
            "value": {
                "azureeventgrid": {
                    "connectionId": "/subscriptions/826d0748-8207-40ad-9e9c-44be4fa3f764/resourceGroups/learn-d022bcb1-0ce2-4e71-99a6-2ddd19e85389/providers/Microsoft.Web/connections/azureeventgrid",
                    "connectionName": "azureeventgrid",
                    "id": "/subscriptions/826d0748-8207-40ad-9e9c-44be4fa3f764/providers/Microsoft.Web/locations/westus/managedApis/azureeventgrid"
                }
            }
        }
    }
}
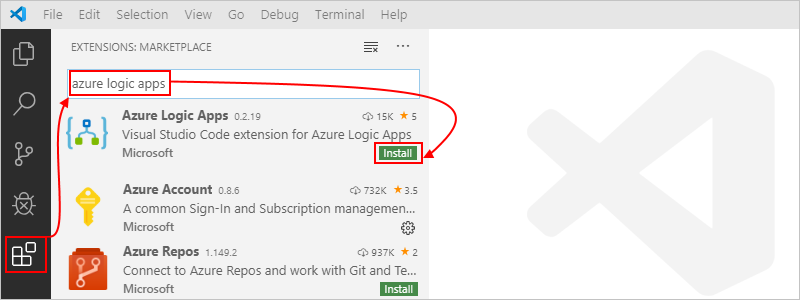
An extension is also available to enable you to edit your logic apps in Visual Studio Code. You can download and install this extension from the Visual Studio Marketplace or directly from inside Visual Studio Code.
Let's use the Designer view in the Azure portal to configure the logic app to respond to triggers.