Define duplicate record settings
It isn't uncommon for a customer to exist in a single data source more than once. Having multiple records for a customer can impact the unification process. The system might not be able to correctly identify which record to use when the matching rules run. It's important to identify and remove any duplicate records that might exist in the system. Deduplication identifies duplicate records and merges them into one record.
Define deduplication rules
You can define duplicate record rules for any data sources that you defined during the source column phase. For example, if you included a data source called Contacts: eCommerce and another called LoyCustomers: Loyalty, you can define duplicate rules for each. This is done on the Define deduplication rules page by selecting the Add rule button under the table you want to add the rule to.
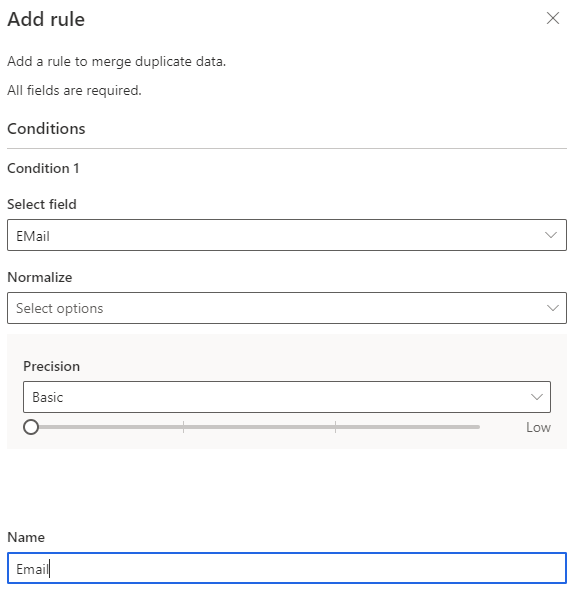
When defining duplicate rules, you'll need to define conditions that will be used to evaluate if you have duplicate records in the dataset. In the Add rule pane, you'll need to do the following:
Select field: Specify the field from the table you want to check for duplicates in. You should try to choose fields that are likely unique for every single customer, such as an email address.
Normalization: Normalization of the data can help to ensure matches such as removing punctuation, not considering whitespace, and treating the values as a type of data such as an address or phone number.
Precision method: Indicates the level of precision that the rule should use when determining if it can find a matching record in the other table. This can be set to either Basic or Custom.
Basic: Choose from Low (30%), Medium (60%), High (80%), and Exact (100%).
Custom: Set a percentage that records need to match. The system will only match records passing this threshold.
You might find times where only one column isn't enough to identify unique records. In those instances, you can choose to add other conditions. All the conditions are combined to identify unique records. For example, you might want to look at someone’s full name and phone number. Conditions can be added by selecting Add > Add condition to add more conditions to the rule. All conditions added are evaluated together, and thus only executed if all conditions are met. Optionally, you can add exceptions to the rule. Exceptions are used to address rare cases of false positives and false negatives.
Once your rule is complete, select Done to create the rule. If necessary, you can add other rules to accommodate different scenarios.
Defining merging preferences
Once you have identified duplicate records, you'll need to decide how those records should be merged into a single record. For example, one record might have more data filled in than another record.
For each table, you can select Edit merge preferences to determine which record to keep. You can choose from three options:
Most filled: Identifies the record with most populated columns as the winner record. It's the default merge option.
Most recent: Identifies the winner record based on the most recency. Requires a date or a numeric column to define the recency.
Least recent: Identifies the winner record based on the least recency. Requires a date or a numeric column to define the recency.
Optionally, to define merge preferences on individual columns of a table, select Advanced at the bottom of the pane. For example, you can choose to keep the most recent email AND the most complete address from different records. Expand the entity to see all its columns and define which option to use for individual columns. If you choose a recency-based option, you also need to specify a date/time column that defines the recency.

