Exercise - Extend Microsoft Viva Connections with Adaptive Card Extensions
In this exercise, you'll build an Adaptive Card Extension (ACE) to display the latest important company announcement. You'll add the ACE to the dashboard so that it's displayed in the Viva Connections desktop and mobile experience.
Create a new solution
To start, create a new solution using the SharePoint Framework Yeoman generator.
- Create a folder for your project named spfx-company-announcements-ace
- In a terminal, change the working directory to spfx-company-announcements-ace
- Next, run the
yo @microsoft/sharepointcommand to start scaffolding a new solution - Answer generator's prompts:
- What is your solution name? spfx-company-announcements-ace
- Only SharePoint Online (latest) is supported. For earlier versions of SharePoint (2016 and 2019) please use the 1.12.1 version of the generator. SharePoint Online only (latest)
- Where do you want to place the files? Use the current folder
- Do you want to allow the tenant admin the choice of being able to deploy the solution to all sites immediately without running any feature deployment or adding apps in sites? No
- Will the components in the solution require permissions to access web APIs that are unique and not shared with other components in the tenant? No
- Which type of client-side component to create? Adaptive Card Extension
- Which template do you want to use? Basic Card Template
- What is your Adaptive Card Extension name? Important announcements
- What is your Web part description? Shows important company announcements
- Wait for the project creation to complete. It may take a few minutes
Tip
While creating the project, you will likely see some warnings. You can safely ignore them.
Install the development certificate
SharePoint Framework uses a workbench hosted in SharePoint Online to let you test your code before deploying it to Viva Connections. When you test your code, you start a local web server using Gulp. SharePoint Framework workbench then loads files from your local server and lets you test them. To let the workbench load files from your local dev server, you need to trust the development certificate provided by SharePoint Framework.
Important
You need to install the development certificate only once on your machine. When you create a new project, SharePoint Framework will use the previously installed certificate. If you've done this already, you can skip these steps.
- Open a terminal
- Change the working directory to your project folder
- Run the
gulp trust-dev-certcommand - Follow the instructions on the screen to complete the installation of the certificate
Edit the Adaptive Card Extension's code
After you added an Adaptive Card Extension to your solution, the next step is to implement its code so that it shows the latest important announcement.
Load the latest announcement
To start, extend the ACE's code to load the latest announcement from the Announcements list.
In the code editor, open your project
Open the ./src/adaptiveCardExtensions/importantAnnouncements/ImportantAnnouncementsAdaptiveCardExtension.ts file
To the list of imports add
import { SPHttpClient } from '@microsoft/sp-http';Add an interface to define the shape of the announcement data
export interface IAnnouncement {
  title: string;
  url: string;
}
Update the
IImportantAnnouncementsAdaptiveCardExtensionStateinterface to store information about the retrieved announcementexport interface IImportantAnnouncementsAdaptiveCardExtensionState { announcement: IAnnouncement | undefined; }Update the
onInitmethod to set the initial state for the card and initialize loading announcements.public onInit(): Promise<void> { this.state = { announcement: undefined }; this.cardNavigator.register(CARD_VIEW_REGISTRY_ID, () => new CardView()); this.quickViewNavigator.register(QUICK_VIEW_REGISTRY_ID, () => new QuickView()); return this._fetchAnnouncements(); }Implement the
_fetchAnnouncementsmethod that loads the company announcements from the list.private _fetchAnnouncements(): Promise<void> { return this.context.spHttpClient .get(`${this.context.pageContext.web.absoluteUrl}/_api/web/lists/getByTitle('Announcements')/items?$filter=Important eq 1&$select=Title,ID`, SPHttpClient.configurations.v1, { headers: { 'accept': 'application/json;odata.metadata=none' } }) .then(response => response.json()) .then(announcements => { const announcement = announcements.value.pop(); this.setState({ announcement: { title: announcement.Title, url: `${this.context.pageContext.web.absoluteUrl}/lists/Announcements/DispForm.aspx?ID=${announcement.ID}` } }); }) .catch(error => console.error(error)); }The method uses the
spHttpClientto retrieve important announcements from the Announcements list.spHttpClientwraps the standardfetchAPI and is authenticated to call SharePoint APIs. In the API URL, you use the OData$selectparameter to specify the list of properties to retrieve. These properties match the columns from the Announcements list. While calling the SharePoint API, you also set theacceptheader to suppress metadata in the response. It allows you to minimize the amount of data sent over the network. After the method retrieved the data, it gets the latest announcement and assigns it to be displayed by the ACE.The last step is to change the card's icon to a warning triangle in the
iconPropertygetter:protected get iconProperty(): string { return 'warning'; }
Show the announcement title on the card
After you implemented the code to retrieve the latest important announcement from the list, the next step is to show it on the card.
In the code editor, open the ./src/adaptiveCardExtensions/importantAnnouncements/cardView/CardView.ts file
In the
CardViewclass, update thedatagetter, to assign the announcement's title to the card's primary text.public get data(): IBasicCardParameters { return { primaryText: this.state.announcement.title }; }Next, update the
cardButtonsgetter to point to the announcement's URL:public get cardButtons(): [ICardButton] | [ICardButton, ICardButton] | undefined { return [ { title: 'View', action: { type: 'ExternalLink', parameters: { target: this.state.announcement.url } } } ]; }Finally, update the
onCardSelectionevent handler to also point to the announcement's URL:public get onCardSelection(): IQuickViewCardAction | IExternalLinkCardAction | undefined { return { type: 'ExternalLink', parameters: { target: this.state.announcement.url } }; }With these changes, the card will show a button to view the details of the announcement in the SharePoint list, but also selecting the card itself will open the announcement.
Test the Adaptive Card Extension in the workbench
To test Adaptive Card Extensions in the workbench:
- Open terminal and change the working directory to your project folder
- Run the
gulp serve --nobrowsercommand to start the local web serverWarning
If you see in the terminal the following warning:
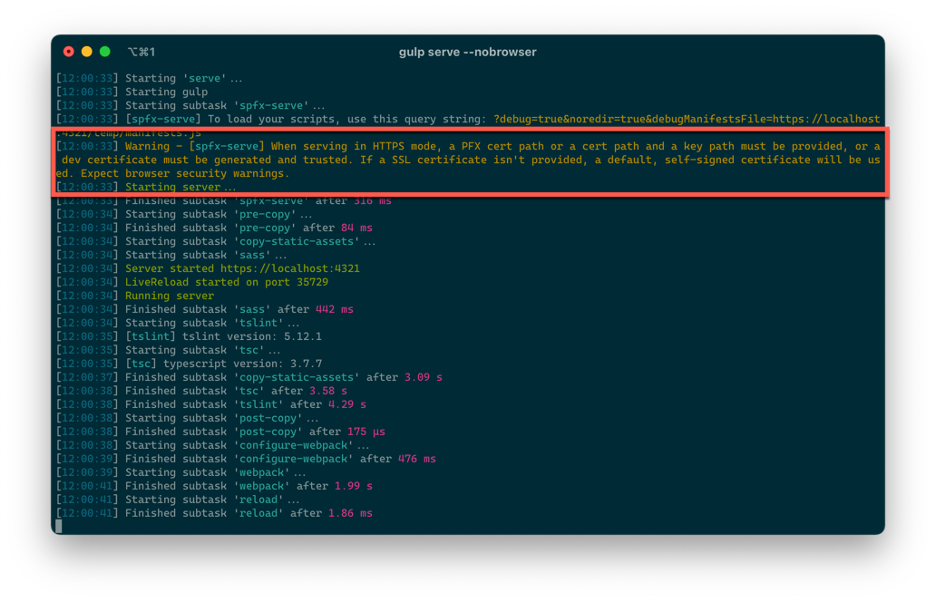
Warning - [spfx-serve] When serving in HTTPS mode, a PFX cert path or a cert path and a key path must be provided, or a dev certificate must be generated and trusted. If a SSL certificate isn't provided, a default, self-signed certificate will be used. Expect browser security warnings.
it means that the local web server couldn't load your development certificate. To fix this issue, stop the web server by pressing
CTRL+Cand execute thegulp trust-dev-certcommand. - In a web browser, go to the workbench at
<Home site url>/_layouts/workbench.aspx. The Home site URL is where you've created the Announcements list in the previous exercise.Warning
After you open the workbench, if you see the following error:

Your web part will not appear in the toolbox. Please make sure “gulp serve” is running in a web part project. Please refresh the page once “gulp serve” is running.
it means that the local web server couldn't load your development certificate. To fix this issue, stop the web server by pressing
CTRL+Cand execute thegulp trust-dev-certcommand. - To add the newly created Adaptive Card Extension to the canvas, select the + button to launch the toolbox.
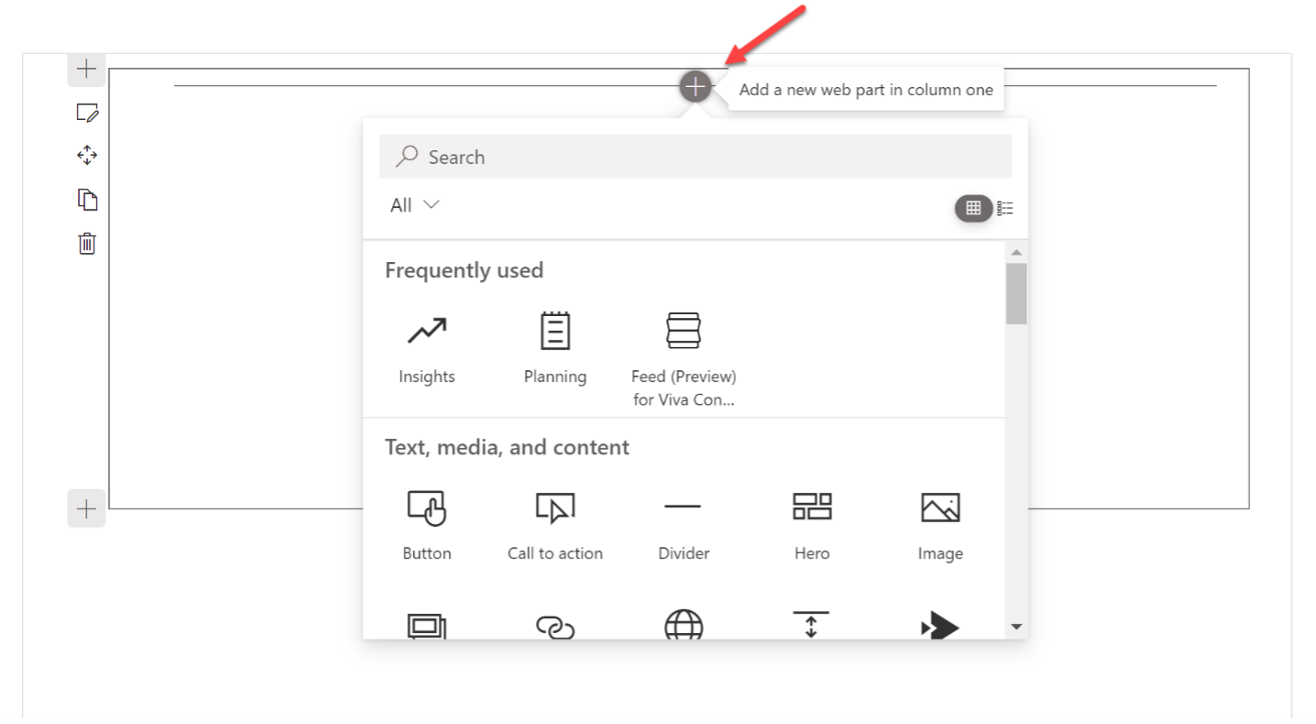
- In the search bar, type
Important announcementsand select the Adaptive Card Extension.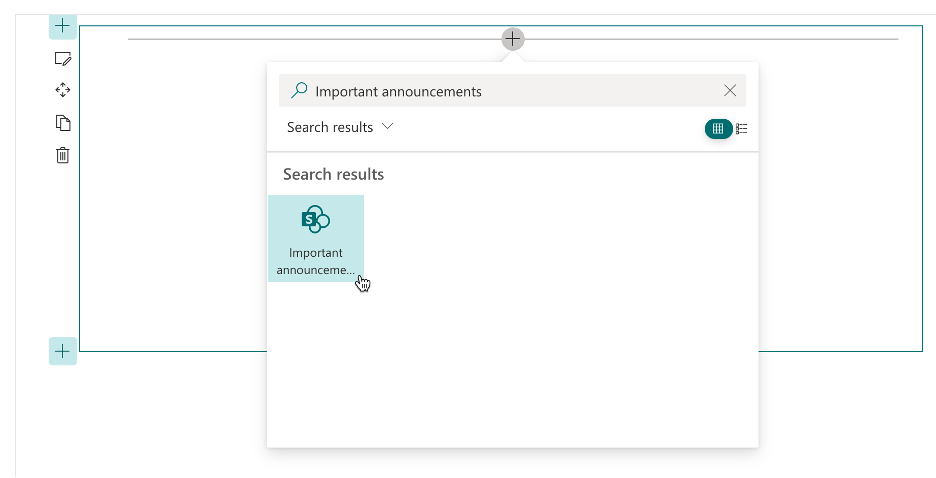
- From the workbench view options, choose Preview to exit the edit mode and interact with the Adaptive Card Extension
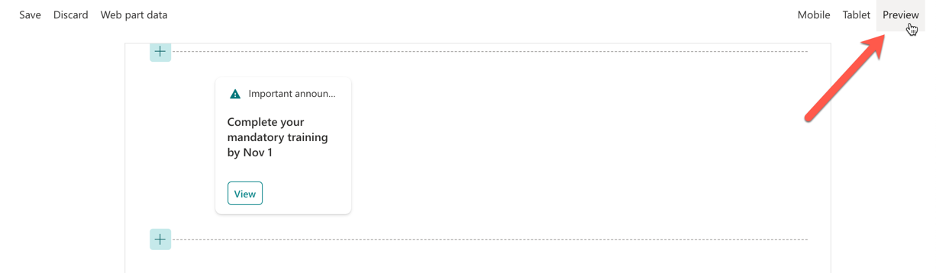
- When you select the card or the View button, you'll be redirected to the SharePoint list to see the announcement.

- To stop testing, go to the terminal and press
CTRL+Cto stop the local web server.
After you verified that the newly added Adaptive Card Extension works as intended, you'll deploy it to Viva Connections.
Deploy the Adaptive Card Extension to Viva Connections
You've built the Important announcements Adaptive Card Extension using the SharePoint Framework. Now let's deploy it to Viva Connections.
Package the app
To package the Adaptive Card Extension into an app using Gulp:
- Go to the terminal where the working directory is the root folder of the project
- To build the solution in release mode, run the
gulp bundle --shipcommand - To make a release mode package of the solution, run the
gulp package-solution --shipcommand - The
package-solutiontask created an app package file named spfx-company-announcements-ace.sppkg in the ./sharepoint/solution folder.
This file is your app package. Next, you'll deploy this package into the SharePoint app catalog, which contains all Viva Connections extensions.
Create an app catalog
If you don't have an app catalog in your tenant, you'll need to create it before you continue this exercise.
- In a web browser, go to the Microsoft 365 admin center located at https://admin.microsoft.com.
- From the side menu, select the Show all option
- From the list of Admin centers, select SharePoint
- In the SharePoint admin center, from the side navigation, select More features
- From the Apps section, select the Open button to go to the Apps admin page
- Under Apps, select App Catalog
- If the site opens up, you already have an app catalog and you can skip further steps
- If the app catalog doesn't exist, you'll be prompted to create one.
- From the list of options, choose Automatically create a new app catalog site and select OK.
Deploy the app to SharePoint app catalog
To deploy your application to the app catalog:
- In a web browser, go to the SharePoint app catalog
- In the SharePoint app catalog, from the side navigation choose Apps for SharePoint
- Upload/drag and drop the spfx-company-announcements-ace.sppkg file into the list
- SharePoint will ask you to confirm and deploy the package. It makes the package available to be installed in SharePoint sites.
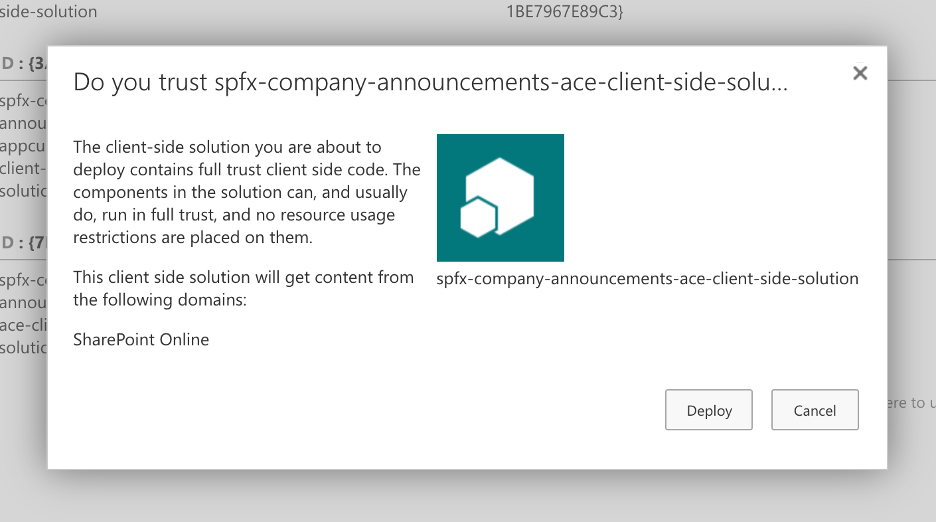
- Select Deploy
Install the app in your Home site
Once the app is successfully deployed in the app catalog, you'll need to install it on your Home site.
To install the app:
- In a web browser, go to the Home site
- From the top navigation, select the Settings (gear) icon
- From the SharePoint section, select the Add an app link. You'll be taken to the My Apps page
- In the search box on the page, type
Companyand locate the spfx-company-announcements-ace-client-side-solution app - To install the app, select the Add button
The Adaptive Card Extension in the app will now be available to add to the dashboard.
Preview the Adaptive Card Extension in Viva Connections
After you deployed the new solution package with Adaptive Card Extension, the last thing left is to test it in Viva Connections desktop.
Add Adaptive Card Extension to the Viva Connections dashboard
To add the Important announcements Adaptive Card Extension to Viva Connections dashboard:
- In a web browser, go to the Home site in your Microsoft 365 tenant
- From the site menu, select Pages
- From the list of pages, select Dashboard.aspx
- From the page menu, choose Edit
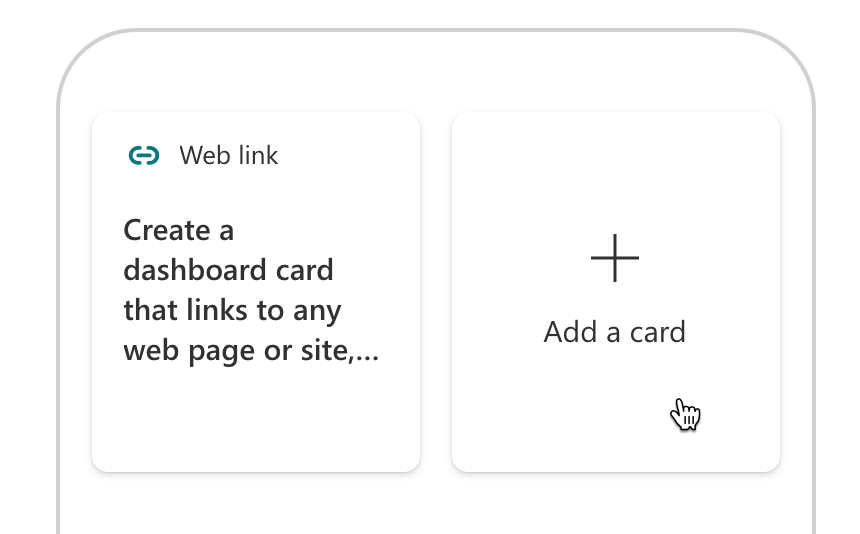
- In the canvas, choose the Add a card button
- In the search box, type
Important announcementsand from the list of search results, select the Important announcements Adaptive Card Extension - To save the changes to the dashboard, from the page menu choose Republish
Preview Adaptive Card Extension in Viva Connections desktop
After you added the Adaptive Card Extension to the dashboard, you can preview it in Viva Connections desktop.
- Open Microsoft Teams desktop client or in a web browser navigate to https://teams.microsoft.com
- From the left rail, choose the Viva Connections app
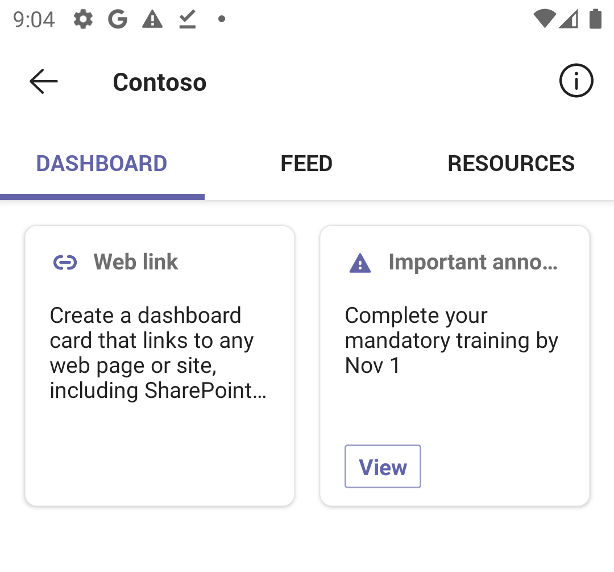
- See the Important announcements Adaptive Card Extension visible in the dashboard

Preview Adaptive Card Extension in Viva Connections mobile
After you added the Adaptive Card Extension to the dashboard, it's also visible in the Viva Connections mobile experience. To preview it:
- On your mobile device, open the Microsoft Teams app
- From the list of apps, choose the Viva Connections app
- See the Important announcements Adaptive Card Extension visible in the dashboard