Features in Configuration Manager technical preview version 2010.2
Applies to: Configuration Manager (technical preview branch)
This article introduces the features that are available in the technical preview for Configuration Manager, version 2010.2. Install this version to update and add new features to your technical preview site.
Review the technical preview article before installing this update. That article familiarizes you with the general requirements and limitations for using a technical preview, how to update between versions, and how to provide feedback.
The following sections describe the new features to try out in this version:
Tenant attach: Troubleshooting portal lists a user’s devices based on usage
The troubleshooting portal in the Microsoft Intune admin center allows you to search for a user and view their associated devices. Starting in this release, tenant attached devices that are assigned user device affinity automatically based on usage will now be returned when searching for a user.
Prerequisites
- An environment that's tenant attached with uploaded devices
- Install the latest version of the Configuration Manager client.
- Target clients with User and Device Affinity client settings to automatically create the affinities.
Try it out!
Try to complete the tasks. Then send Feedback with your thoughts on the feature.
View a user's devices
- Go to the Microsoft Intune admin center.
- Select Troubleshooting + support.
- On the Troubleshoot page, select Change user then search for a user.
- The Devices chart lists the ConfigMgr devices associated with the user.
- Devices that previously reported affinity will resend their affinity to reflect in the admin center.
- Devices that aren't already associated with a user will be updated once the affinity threshold has been met and reported.
Tenant attach: Create and deploy firewall policies
You can now configure and deploy settings for Windows Defender Firewall with Advanced Security to tenant attached Windows 10 devices.
Prerequisites
- An environment that's tenant attached with uploaded devices
- Windows 10 or later clients
Try it out!
Try to complete the tasks. Then send Feedback with your thoughts on the feature.
Make Configuration Manager collections available to assign Endpoint security policies
If you haven't already done so, make Configuration Manager collections available to assign Endpoint security policies.
From a Configuration Manager console connected to your top-level site, right-click on a device collection that you synchronize to Microsoft Intune admin center and select Properties.
On the Cloud Sync tab, enable the option to Make this collection available to assign Endpoint security policies from Microsoft Intune admin center.
- You can't select this option if your Configuration Manager hierarchy isn't tenant attached.
- The collections available for this option are limited by the collection scope selected for tenant attach upload.
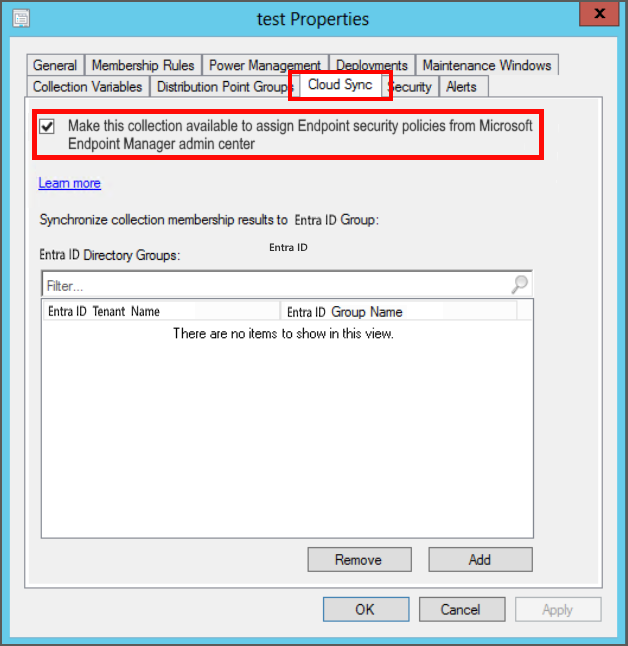
Select Add and then select the Microsoft Entra group that you would like to synchronize with Collect membership results.
Select OK to save the configuration.
Devices in this collection can now onboard with Microsoft Defender for Endpoint, and support use of Intune endpoint security policies.
Configure and assign firewall policies
Go to the Microsoft Intune admin center.
Select Endpoint security > Firewall then Create Policy.
Create a profile with the following settings:
- Platform: Windows 10 and later
- Only Windows 10 clients can be targeted with firewall policies currently.
- Profile: Microsoft Defender Firewall (ConfigMgr) (preview)
- Platform: Windows 10 and later
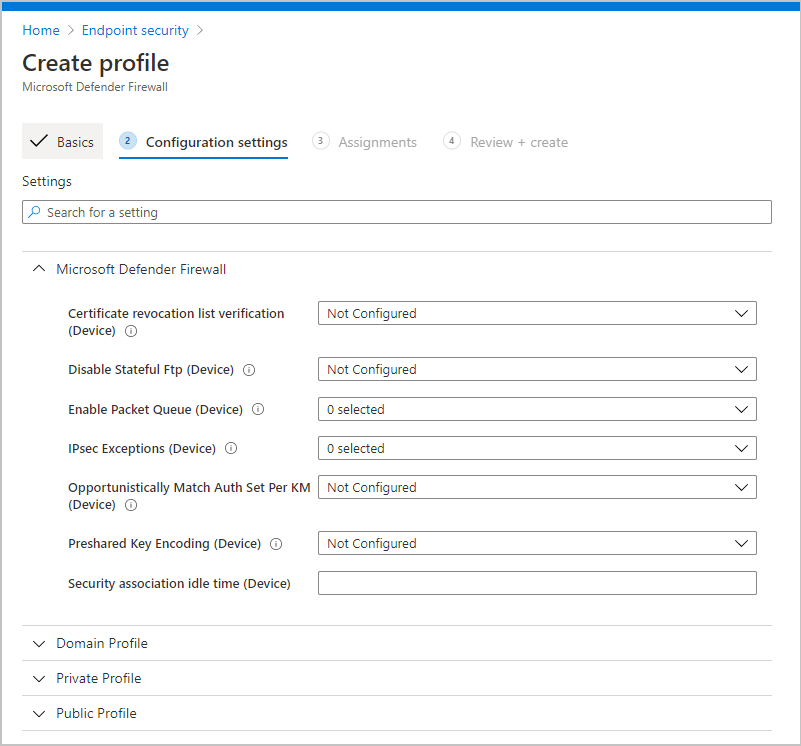
Select Create then give the profile a Name and a Description.
On the Configuration settings page, set the firewall settings for the devices.
On the Assignments page, select the collections to include for the policy assignment then choose Next.
Review the settings on the Review + Create page and select Create when you're done.

Confirming firewall policies on the clients
You can confirm the clients applied the policies by reviewing any of the following items:
- Review the following Configuration Manager client log files:
- SettingsAgent.log
- SettingsWMIHandler.log
- View the settings in Windows Defender Firewall with Advanced Security by running
WF.mscfrom an elevated command prompt. - Use the Get-NetFirewallSetting PowerShell cmdlet. For example,
Get-NetFirewallSetting -All -PolicyStore ActiveStore. - Review the instances of the following classes in the
ROOT\cimv2\mdm\dmmapWMI namespace:- MDM_Firewall_Action04
- MDM_Firewall_App04
- MDM_Firewall_DomainProfile02
- MDM_Firewall_FirewallRules02_01
- MDM_Firewall_Global02
- MDM_Firewall_PrivateProfile02
- MDM_Firewall_PublicProfile02
Enhancements to applications in Microsoft Intune admin center
We've made improvements to applications for tenant attached devices. Administrators can now do the following actions for applications in the Microsoft Intune admin center:
- Uninstall an application
- Repair installation of an application
- Re-evaluate the application installation status
- Reinstall an application has replaced Retry installation

Prerequisites for applications:
- All the prerequisites for applications for tenant attached devices
- Install the latest version of the Configuration Manager client
- Targeted clients need to be online
- To uninstall an application:
- The application must have at least one deployment type with the uninstall command defined
- Required deployments of the application can't be targeted to the client
- The application must currently be installed on the device
- To repair an application:
- The application must have at least one deployment type with the repair command defined
- The application must currently be installed on the device
Permissions needed:
- Read permission on Collection
- Apply the permission to both targeted device collections and targeted user collections
- Read on the Application
- Approve on the Application
Known issues with apps in Microsoft Intune admin center
In this technical preview, if you see an error notification when you install, uninstall, reevaluate, or repair an app, use the following workaround. Open SQL Server Management Studio, select the primary site database, and run the following SQL script:
DECLARE @view nvarchar(max) = OBJECT_DEFINITION(OBJECT_ID('[dbo].[vSMS_CombinedDeviceResources]'));
IF (@view IS NULL) print 'Object not found, select primary site database and re-run script'
ELSE BEGIN
       SET @view = REPLACE(REPLACE(@view, 'ck.ApprovalStatus as IsApproved', '(CASE WHEN ck.ApprovalStatus = 2 OR ck.ApprovalStatus = 3 THEN 1 ELSE ck.ApprovalStatus END) as IsApproved'), 'CREATE VIEW', 'ALTER VIEW')
       EXEC sp_executesql @view
END
Try it out!
Try to complete the tasks. Then send Feedback with your thoughts on the feature.
Uninstall, repair, or re-evaluate an application
- Sign in to the Microsoft Intune admin center.
- Go to Devices then All Devices.
- Select a device that is synced from Configuration Manager via tenant attach.
- Choose Applications.
- Select the application then the action you want to perform on the device.
Improvements to BitLocker management
Based on your feedback, you can now manage BitLocker policies and escrow recovery keys over a cloud management gateway (CMG). This change also provides support for BitLocker management via internet-based client management (IBCM) and when you configure the site for enhanced HTTP. There's no change to the setup process for BitLocker management. For more information, see Deploy BitLocker management.
If you have either the Helpdesk or Self-Service portals set up, use these portals to validate that clients escrow their keys directly to a management point. For more information, see Set up BitLocker portals. Continue to use BitLockerManagementHandler.log to help troubleshoot client communication.
Known issue with BitLocker management
When the client can't communicate with an on-premises management point, there's an issue with the client's BitLocker configuration for key recovery. As a temporary work around for this preview release:
- Set the following registry key on the client:
HKLM\SOFTWARE\Microsoft\CCM\BLM, "UseKeyRecoveryService"=dword:00000001 - Restart the SMS Agent Host (ccmexec) service.
This value resets each time the client evaluates the BitLocker management policy, which is seven days by default.
Improvements to deploy an OS over CMG using boot media
Technical preview branch version 2009 included support for using boot media to reimage internet-based devices that connect through a cloud management gateway (CMG).
This release streamlines the administrative workflow in the Configuration Manager console. On the Media Management page of the Create Task Sequence Media Wizard, the Internet-based media option no longer exists. Select the Site-based media option. Then still select the CMG for the management point on the Boot Image page.
For more information, see Deploy an OS over CMG using boot media.
Desktop Analytics support for new Windows 10 data levels
Microsoft is increasing transparency by categorizing the data that Windows 10 collects:
- Basic diagnostic data is recategorized as Required diagnostic data
- Full is recategorized as Optional
- Enhanced (Limited) is recategorized as Optional (Limited)
Tip
Starting in Configuration Manager current branch version 2006, the Diagnostic Data tab of the Desktop Analytics service in the Configuration Manager console already uses these new labels.
If you previously configured devices for Enhanced or Enhanced (Limited), in an upcoming release of Windows 10, they'll use the Required level. This change may impact the functionality of Desktop Analytics.
Note
You can test the behavioral changes now in Windows 10 Insider Preview build 19577 and later.
Configuration Manager will properly configure the devices. If you're using another mechanism to configure these policies on devices, you may need to make changes for the upcoming new behavior. For more information, see Changes to Windows diagnostic data collection.
After you enroll Windows Insider devices to Desktop Analytics, it may take up to 48 hours to appear on the Desktop Analytics portal or the new configurations to take effect. Use the Configuration Manager console to look for issues or configuration alerts as you Monitor connection health.
Immediate distribution point fallback for clients downloading software update delta content
There's a new client setting for software updates. If delta content is unavailable from distribution points in the current boundary group, you can allow immediate fallback to a neighbor or the site default boundary group distribution points. This setting is useful when using delta content for software updates since the timeout setting per download job is 5 minutes.
Try it out!
Try to complete the tasks. Then send Feedback with your thoughts on the feature.
Observe the new fallback behavior for delta content
In the Configuration Manager console, go to Administration > Overview > Client Settings.
Open either the default set of client settings or a custom set of settings.
Select the Software Updates group of client settings.
The If content is unavailable from distribution points in the current boundary group, immediately fallback to a neighbor or the site default setting has the following options:
- Yes: Allows fallback for delta content to occur immediately
- No: Doesn't allow fallback immediately (default)
For the following settings, observe the software update download behaviors for missing content:
Yes: For delta content, the client doesn't wait to reach the fallback time (in minutes) defined by the Boundary Group relationship. Clients immediately fall back to a neighbor or the site default content distribution points when both of the following conditions are met:
- Delta content is unavailable from distribution points in the current boundary group.
- The software update deployment allows fallback.
No (default): The client honors the fallback time (in minutes) defined by the Boundary Group relationship when it's allowed on the software update deployment. Delta download content may fail with a timeout even if the update content is available on a neighbor or the site default distribution point group.
Disable Microsoft Entra authentication for onboarded tenants
You can now disable Microsoft Entra authentication for tenants not associated with users and devices. When you onboard Configuration Manager to Microsoft Entra ID, it allows the site and clients to use modern authentication. Currently, Microsoft Entra device authentication is enabled for all onboarded tenants, whether or not it has devices. For example, you have a separate tenant with a subscription that you use for compute resources to support a cloud management gateway. If there aren't users or devices associated with the tenant, disable Microsoft Entra authentication.
Try it out!
Try to complete the tasks. Then send Feedback with your thoughts on the feature.
In the Configuration Manager console, go to the Administration workspace.
Expand Cloud Services and select the Azure Services node.
Select the target connection of type Cloud Management. In the ribbon, select Properties.
Switch to the Applications tab.
Select the option to Disable Microsoft Entra authentication for this tenant.
Select OK to save and close the connection properties.
Additional options when creating app registrations in Microsoft Entra ID
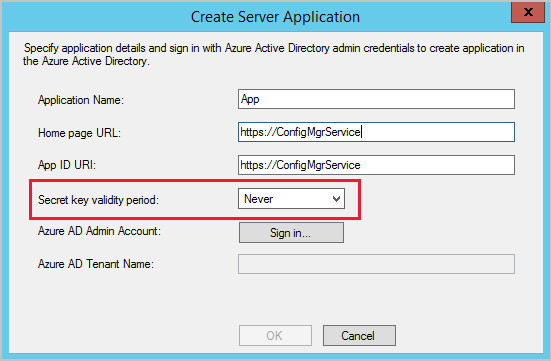
You can now specify Never for the expiration of a secret key when creating Microsoft Entra app registrations. For more information about creating app registrations, see Configure Azure Services.
Important
Choosing Never as an option for secret key expiry carries security risk since a secret that's compromised and never expires can become a point of entry into your environment.
Validate internet access for the service connection point
If you use Desktop Analytics or tenant attach, the service connection point now checks important internet endpoints. These checks help make sure that the cloud-connected services are available. It also helps you troubleshoot issues by quickly determining if network connectivity is a problem.
For more details, review the EndpointConnectivityCheckWorker.log file on the service connection point.
A failure isn't always determined by the HTTP status code, but if there's network connectivity to an endpoint. The following scenarios can cause a check to fail:
Network connection timeout
SSL/TLS failure
Unexpected status code:
Status code Description Possible reason 407 Proxy authentication required May indicate a proxy issue 408 Request timeout May indicate a proxy issue 426 Upgrade required May indicate a TLS misconfiguration 451 Unavailable for legal reasons May indicate a proxy issue 502 Bad gateway May indicate a proxy issue 511 Network authentication required May indicate a proxy issue 598 Network read timeout error Not RFC compliant, but used by some proxy servers to indicate a network timeout 599 Network connection timeout error Not RFC compliant, but used by some proxy servers to indicate a network timeout
There are also the following status messages for the SMS_SERVICE_CONNECTOR component:
| Message ID | Severity | Notes |
|---|---|---|
| 11410 | Informational | All checks are successful |
| 11411 | Warning | One or more non-critical failures occurred |
| 11412 | Error | One or more critical failures occurred |
For more information on required internet endpoints, see Internet access requirements.
Improvements to the administration service
The Configuration Manager REST API, the administration service, requires a secure HTTPS connection. With the previous methods to enable HTTPS, enabling IIS on the SMS Provider was a prerequisite.
Starting in this release, you no longer need to enable IIS on the SMS Provider for the administration service. When you enable the site for enhanced HTTP, it creates a self-signed certificate for the SMS Provider, and automatically binds it without requiring IIS.
If you previously had IIS installed on the SMS Provider, you can remove it. Then restart the SMS_REST_PROVIDER component.
Note
If you don't use enhanced HTTP, you need to manually bind a server authentication certificate to port 443 on the SMS Provider. One method is to use IIS.
You can also use the netsh command line tool, which doesn't require IIS. You can use a command line similar to the following example:
netsh http add sslcert ippport=<ipaddress>:443 certhash=<certhash>
You may require additional command line options depending upon your environment and requirements. For more information, see Netsh http commands.
For more information on the Configuration Manager REST API, see What is the administration service?
Next steps
For more information about installing or updating the technical preview branch, see Technical preview.
For more information about the different branches of Configuration Manager, see Which branch of Configuration Manager should I use?.
Feedback
Coming soon: Throughout 2024 we will be phasing out GitHub Issues as the feedback mechanism for content and replacing it with a new feedback system. For more information see: https://aka.ms/ContentUserFeedback.
Submit and view feedback for