Switch from the list component or change the SharePoint deployment
This article provides an overview about how to switch from the deprecated list component to server-based authentication. This article can also help if you change the SharePoint deployment type, such as moving from SharePoint on-premises to SharePoint Online.
Important
In 2015, we announced the deprecation of the list component. Notice that, the list component wasn’t released for Power Apps or the current versions of Dynamics 365 and previous versions of the list component aren’t supported with these versions. If you are using the list component you must move your document management with SharePoint to server-based authentication.
Switch from list component to server-based authentication
If your organization is already using the list component with SharePoint for document management with model-driven apps, such as Dynamics 365 Sales and Customer Service, you can switch to server-based authentication by following these steps.
- Follow the steps to set up server-based SharePoint integration that best fits your deployment type. For more information, see the appropriate article for your SharePoint deployment below.
| Environment | Article |
|---|---|
| Model-driven apps and SharePoint Online | Set up model-driven apps in Dynamics 365 to use SharePoint Online |
| Model-driven apps in Dynamics 365 and SharePoint on-premises | Configure server-based authentication with model-driven apps in Dynamics 365 and SharePoint on-premises |
Note
If you've made changes to SharePoint, such as new SharePoint servers, new site collections, or migrated from SharePoint on-premises to SharePoint Online, consider deactivating outdated SharePoint site records. When you run the Enable Server-Based SharePoint Integration wizard, the wizard will attempt to validate all active SharePoint sites. More information: Deactivate a site
- Although it is not required for server-based authentication, we recommend that you deactivate and then delete the list component SharePoint solution from the SharePoint site collection. To do this, after you have confirmed that server-based authentication is enabled, in a web browser follow these steps.
- Sign-in to the site collection, select the Settings button in the top-right corner, then Site Settings, and then under Web Designer Galleries, select Solutions.
- Choose crmlistcomponent, and then on the tool bar select Deactivate.
- Choose the crmlistcomponent again, and then on the tool bar select Delete.
Changing the SharePoint deployment type
After the migration of SharePoint to either online or on-premises is completed, deactivate the outdated SharePoint site records. You must do this because, when you run the Enable Server-Based SharePoint Integration wizard, the wizard will attempt to validate all active SharePoint sites. More information: Deactivate a site
Follow the steps to set up server-based SharePoint integration that best fits your deployment type. For more information, see the above section Switch from list component to server-based authentication.
Deactivate a site
In the Power Platform admin center, select an environment.
Select Settings > Integration > Document management settings > SharePoint Sites.
Select the SharePoint site you want to remove, and then on the tool bar select Deactivate.
Repeat step 3 for all sites that you want to deactivate.
What to do when the Enable Server-Based SharePoint Integration wizard doesn't appear
If the Enable Server-Based SharePoint Integration icon doesn't appear in the Document Management area after you deactivate all SharePoint sites, follow these steps.
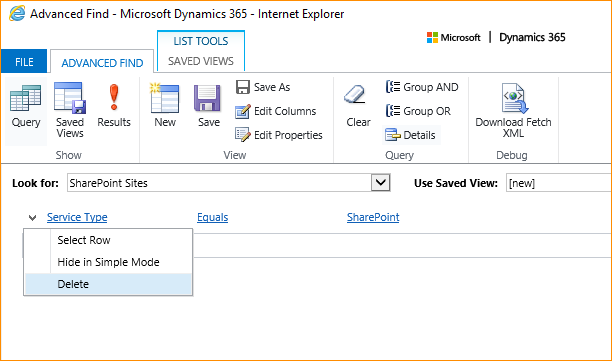
- Select Advanced Find and create the following query.
- Look for: SharePoint Sites
- Use Saved View: [new]
- Select the down arrow next to the Service Type clause and then select Delete to remove it.
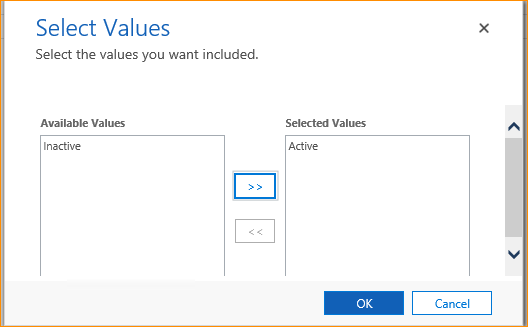
Add Status as a new clause, select Active as the value, and then select OK:
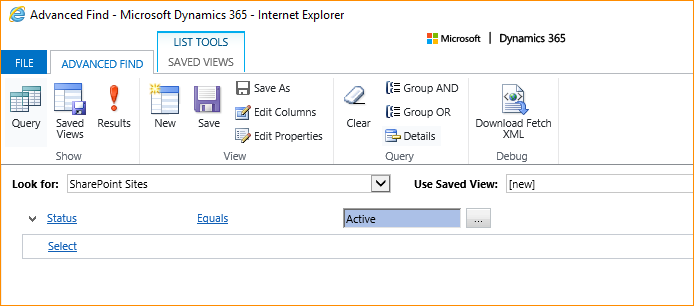
The Status clause appears like this.
Select Results. In the list of active SharePoint sites returned by the query, select all records, and then on the toolbar, select Deactivate.
See also
Feedback
Coming soon: Throughout 2024 we will be phasing out GitHub Issues as the feedback mechanism for content and replacing it with a new feedback system. For more information see: https://aka.ms/ContentUserFeedback.
Submit and view feedback for