Add push notifications to your Xamarin.Forms app
Overview
In this tutorial, you add push notifications to all the projects that resulted from the Xamarin.Forms quick start. This means that a push notification is sent to all cross-platform clients every time a record is inserted.
If you do not use the downloaded quick start server project, you will need the push notification extension package. For more information, see Work with the .NET backend server SDK for Azure Mobile Apps.
Prerequisites
For iOS, you will need an Apple Developer Program membership and a physical iOS device. The iOS simulator does not support push notifications.
Configure a notification hub
The Mobile Apps feature of Azure App Service uses Azure Notification Hubs to send pushes, so you will be configuring a notification hub for your mobile app.
In the Azure portal, go to App Services, and then select your app back end. Under Settings, select Push.
To add a notification hub resource to the app, select Connect. You can either create a hub or connect to an existing one.

Now you have connected a notification hub to your Mobile Apps back-end project. Later you configure this notification hub to connect to a platform notification system (PNS) to push to devices.
Update the server project to send push notifications
In this section, you update code in your existing Mobile Apps back-end project to send a push notification every time a new item is added. This process is powered by the template feature of Azure Notification Hubs, which enables cross-platform pushes. The various clients are registered for push notifications using templates, and a single universal push can get to all client platforms.
Choose one of the following procedures that matches your back-end project type—either .NET back end or Node.js back end.
.NET back-end project
In Visual Studio, right-click the server project. Then select Manage NuGet Packages. Search for
Microsoft.Azure.NotificationHubs, and then select Install. This process installs the Notification Hubs library for sending notifications from the back end.In the server project, open Controllers > TodoItemController.cs. Then add the following using statements:
using System.Collections.Generic;
using Microsoft.Azure.NotificationHubs;
using Microsoft.Azure.Mobile.Server.Config;
In the PostTodoItem method, add the following code after the call to InsertAsync:
// Get the settings for the server project.
HttpConfiguration config = this.Configuration;
MobileAppSettingsDictionary settings =
    this.Configuration.GetMobileAppSettingsProvider().GetMobileAppSettings();

// Get the Notification Hubs credentials for the mobile app.
string notificationHubName = settings.NotificationHubName;
string notificationHubConnection = settings
    .Connections[MobileAppSettingsKeys.NotificationHubConnectionString].ConnectionString;

// Create a new Notification Hub client.
NotificationHubClient hub = NotificationHubClient
.CreateClientFromConnectionString(notificationHubConnection, notificationHubName);

// Send the message so that all template registrations that contain "messageParam"
// receive the notifications. This includes APNS, GCM, WNS, and MPNS template registrations.
Dictionary<string,string> templateParams = new Dictionary<string,string>();
templateParams["messageParam"] = item.Text + " was added to the list.";

try
{
    // Send the push notification and log the results.
    var result = await hub.SendTemplateNotificationAsync(templateParams);

    // Write the success result to the logs.
    config.Services.GetTraceWriter().Info(result.State.ToString());
}
catch (System.Exception ex)
{
    // Write the failure result to the logs.
    config.Services.GetTraceWriter()
        .Error(ex.Message, null, "Push.SendAsync Error");
}
This process sends a template notification that contains the item.Text when a new item is inserted.
Republish the server project.
Node.js back-end project
Set up your backend project.
Replace the existing code in todoitem.js with the following code:
var azureMobileApps = require('azure-mobile-apps'),
promises = require('azure-mobile-apps/src/utilities/promises'),
logger = require('azure-mobile-apps/src/logger');

var table = azureMobileApps.table();

table.insert(function (context) {
// For more information about the Notification Hubs JavaScript SDK,
// see https://aka.ms/nodejshubs.
logger.info('Running TodoItem.insert');

// Define the template payload.
var payload = '{"messageParam": "' + context.item.text + '" }';

// Execute the insert. The insert returns the results as a promise.
// Do the push as a post-execute action within the promise flow.
return context.execute()
    .then(function (results) {
        // Only do the push if configured.
        if (context.push) {
            // Send a template notification.
            context.push.send(null, payload, function (error) {
                if (error) {
                    logger.error('Error while sending push notification: ', error);
                } else {
                    logger.info('Push notification sent successfully!');
                }
            });
        }
        // Don't forget to return the results from the context.execute().
        return results;
    })
    .catch(function (error) {
        logger.error('Error while running context.execute: ', error);
    });
});

module.exports = table;
This process sends a template notification that contains the item.text when a new item is inserted.
When you edit the file on your local computer, republish the server project.
Configure and run the Android project (optional)
Complete this section to enable push notifications for the Xamarin.Forms Droid project for Android.
Enable Firebase Cloud Messaging (FCM)
Sign in to the Firebase console. Create a new Firebase project if you don't already have one.
After you create your project, select Add Firebase to your Android app.

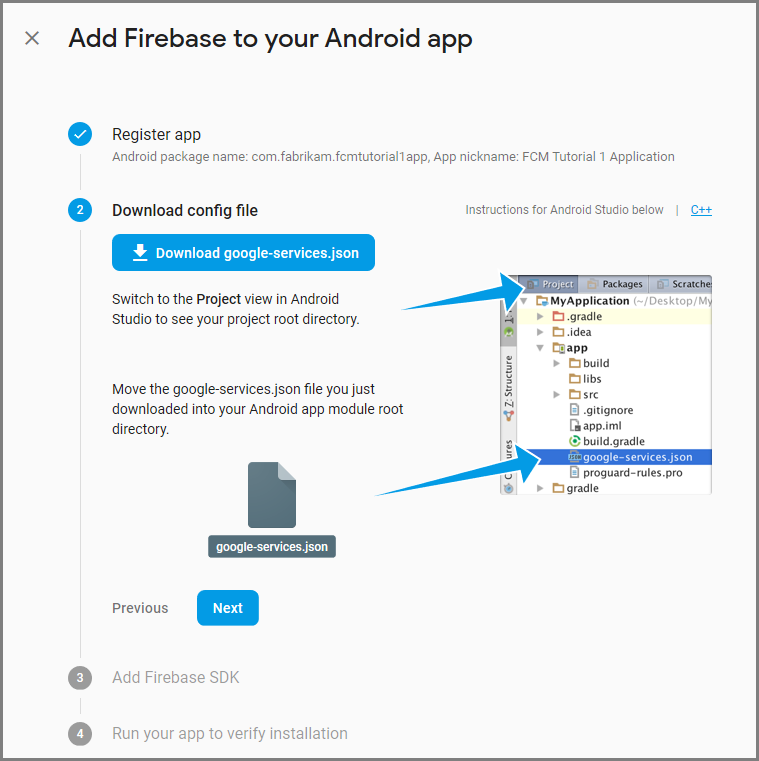
On the Add Firebase to your Android app page, take the following steps:
For Android package name, copy the value of your applicationId in your application's build.gradle file. In this example, it's
com.fabrikam.fcmtutorial1app.
Select Register app.
Select Download google-services.json, save the file into the app folder of your project, and then select Next.
Make the following configuration changes to your project in Android Studio.
In your project-level build.gradle file (<project>/build.gradle), add the following statement to the dependencies section.
classpath 'com.google.gms:google-services:4.0.1'In your app-level build.gradle file (<project>/<app-module>/build.gradle), add the following statements to the dependencies section.
implementation 'com.google.firebase:firebase-core:16.0.8'
implementation 'com.google.firebase:firebase-messaging:17.3.4'
Add the following line to the end of the app-level build.gradle file after the dependencies section.
apply plugin: 'com.google.gms.google-services'Select Sync now on the toolbar.

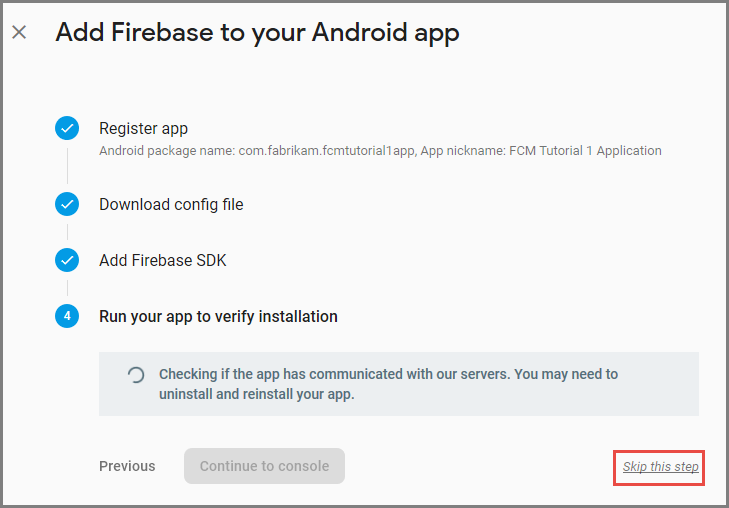
Select Next.
Select Skip this step.
In the Firebase console, select the cog for your project. Then select Project Settings.
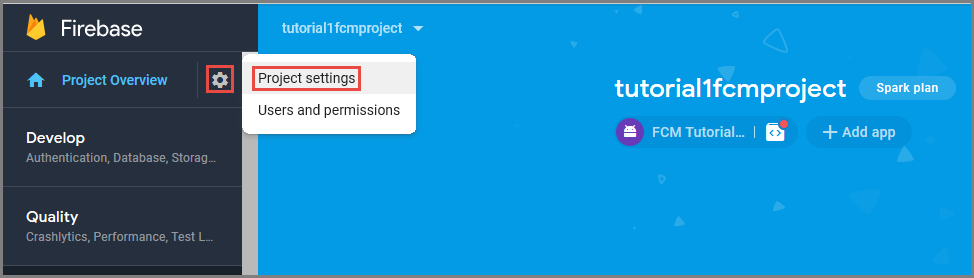
If you haven't downloaded the google-services.json file into the app folder of your Android Studio project, you can do so on this page.
Switch to the Cloud Messaging tab at the top.
Copy and save the Server key for later use. You use this value to configure your hub.
Configure the Mobile Apps back end to send push requests by using FCM
- In the Azure portal, select Browse All > App Services. Then select your Mobile Apps back end.
- Under Settings, select Push. Then select Configure push notification services.
- Go to Google (GCM). Enter the FCM legacy server key that you obtained from the Firebase console, and then select Save.
Your service is now configured to work with Firebase Cloud Messaging.
Add push notifications to the Android project
With the back end configured with FCM, you can add components and codes to the client to register with FCM. You can also register for push notifications with Azure Notification Hubs through the Mobile Apps back end, and receive notifications.
- In the Droid project, right-click References > Manage NuGet Packages ....
- In the NuGet Package Manager window, search for the Xamarin.Firebase.Messaging package and add it to the project.
- In the project properties for the Droid project, set the app to compile using Android version 7.0 or higher.
- Add the google-services.json file, downloaded from the Firebase console, to the root of the Droid project and set its build action to GoogleServicesJson. For more information, see Add the Google Services JSON File.
Registering with Firebase Cloud Messaging
Open the AndroidManifest.xml file and insert the following
<receiver>elements into the<application>element:<receiver android:name="com.google.firebase.iid.FirebaseInstanceIdInternalReceiver" android:exported="false" /> <receiver android:name="com.google.firebase.iid.FirebaseInstanceIdReceiver" android:exported="true" android:permission="com.google.android.c2dm.permission.SEND"> <intent-filter> <action android:name="com.google.android.c2dm.intent.RECEIVE" /> <action android:name="com.google.android.c2dm.intent.REGISTRATION" /> <category android:name="${applicationId}" /> </intent-filter> </receiver>
Implementing the Firebase Instance ID Service
Add a new class to the Droid project named
FirebaseRegistrationService, and make sure that the followingusingstatements are present at the top of the file:using System.Threading.Tasks; using Android.App; using Android.Util; using Firebase.Iid; using Microsoft.WindowsAzure.MobileServices;Replace the empty
FirebaseRegistrationServiceclass with the following code:[Service] [IntentFilter(new[] { "com.google.firebase.INSTANCE_ID_EVENT" })] public class FirebaseRegistrationService : FirebaseInstanceIdService { const string TAG = "FirebaseRegistrationService"; public override void OnTokenRefresh() { var refreshedToken = FirebaseInstanceId.Instance.Token; Log.Debug(TAG, "Refreshed token: " + refreshedToken); SendRegistrationTokenToAzureNotificationHub(refreshedToken); } void SendRegistrationTokenToAzureNotificationHub(string token) { // Update notification hub registration Task.Run(async () => { await AzureNotificationHubService.RegisterAsync(TodoItemManager.DefaultManager.CurrentClient.GetPush(), token); }); } }The
FirebaseRegistrationServiceclass is responsible for generating security tokens that authorize the application to access FCM. TheOnTokenRefreshmethod is invoked when the application receives a registration token from FCM. The method retrieves the token from theFirebaseInstanceId.Instance.Tokenproperty, which is asynchronously updated by FCM. TheOnTokenRefreshmethod is infrequently invoked, because the token is only updated when the application is installed or uninstalled, when the user deletes application data, when the application erases the Instance ID, or when the security of the token has been compromised. In addition, the FCM Instance ID service will request that the application refreshes its token periodically, typically every 6 months.The
OnTokenRefreshmethod also invokes theSendRegistrationTokenToAzureNotificationHubmethod, which is used to associate the user's registration token with the Azure Notification Hub.
Registering with the Azure Notification Hub
Add a new class to the Droid project named
AzureNotificationHubService, and make sure that the followingusingstatements are present at the top of the file:using System; using System.Threading.Tasks; using Android.Util; using Microsoft.WindowsAzure.MobileServices; using Newtonsoft.Json.Linq;Replace the empty
AzureNotificationHubServiceclass with the following code:public class AzureNotificationHubService { const string TAG = "AzureNotificationHubService"; public static async Task RegisterAsync(Push push, string token) { try { const string templateBody = "{\"data\":{\"message\":\"$(messageParam)\"}}"; JObject templates = new JObject(); templates["genericMessage"] = new JObject { {"body", templateBody} }; await push.RegisterAsync(token, templates); Log.Info("Push Installation Id: ", push.InstallationId.ToString()); } catch (Exception ex) { Log.Error(TAG, "Could not register with Notification Hub: " + ex.Message); } } }The
RegisterAsyncmethod creates a simple notification message template as JSON, and registers to receive template notifications from the notification hub, using the Firebase registration token. This ensures that any notifications sent from the Azure Notification Hub will target the device represented by the registration token.
Displaying the Contents of a Push Notification
Add a new class to the Droid project named
FirebaseNotificationService, and make sure that the followingusingstatements are present at the top of the file:using Android.App; using Android.Content; using Android.Media; using Android.Support.V7.App; using Android.Util; using Firebase.Messaging;Replace the empty
FirebaseNotificationServiceclass with the following code:[Service] [IntentFilter(new[] { "com.google.firebase.MESSAGING_EVENT" })] public class FirebaseNotificationService : FirebaseMessagingService { const string TAG = "FirebaseNotificationService"; public override void OnMessageReceived(RemoteMessage message) { Log.Debug(TAG, "From: " + message.From); // Pull message body out of the template var messageBody = message.Data["message"]; if (string.IsNullOrWhiteSpace(messageBody)) return; Log.Debug(TAG, "Notification message body: " + messageBody); SendNotification(messageBody); } void SendNotification(string messageBody) { var intent = new Intent(this, typeof(MainActivity)); intent.AddFlags(ActivityFlags.ClearTop); //Unique request code to avoid PendingIntent collision. var requestCode = new Random().Next(); var pendingIntent = PendingIntent.GetActivity(this, requestCode, intent, PendingIntentFlags.OneShot); var notificationBuilder = new NotificationCompat.Builder(this) .SetSmallIcon(Resource.Drawable.ic_stat_ic_notification) .SetContentTitle("New Todo Item") .SetContentText(messageBody) .SetContentIntent(pendingIntent) .SetSound(RingtoneManager.GetDefaultUri(RingtoneType.Notification)) .SetAutoCancel(true); var notificationManager = NotificationManager.FromContext(this); notificationManager.Notify(0, notificationBuilder.Build()); } }The
OnMessageReceivedmethod, which is invoked when an application receives a notification from FCM, extracts the message content, and calls theSendNotificationmethod. This method converts the message content into a local notification that's launched while the application is running, with the notification appearing in the notification area.
Now, you are ready test push notifications in the app running on an Android device or the emulator.
Test push notifications in your Android app
The first two steps are required only when you're testing on an emulator.
- Make sure that you are deploying to or debugging on a device or emulator that is configured with Google Play Services. This can be verified by checking that the Play apps are installed on the device or emulator.
- Add a Google account to the Android device by clicking Apps > Settings > Add account. Then follow the prompts to add an existing Google account to the device, or to create a new one.
- In Visual Studio or Xamarin Studio, right-click the Droid project and click Set as startup project.
- Click Run to build the project and start the app on your Android device or emulator.
- In the app, type a task, and then click the plus (+) icon.
- Verify that a notification is received when an item is added.
Configure and run the iOS project (optional)
This section is for running the Xamarin iOS project for iOS devices. You can skip this section if you are not working with iOS devices.
Generate the certificate-signing request file
The Apple Push Notification Service (APNs) uses certificates to authenticate your push notifications. Follow these instructions to create the necessary push certificate to send and receive notifications. For more information on these concepts, see the official Apple Push Notification Service documentation.
Generate the Certificate Signing Request (CSR) file, which Apple uses to generate a signed push certificate.
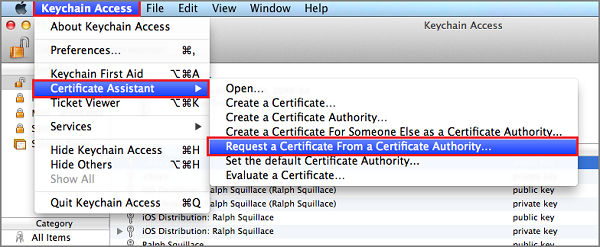
On your Mac, run the Keychain Access tool. It can be opened from the Utilities folder or the Other folder on the Launchpad.
Select Keychain Access, expand Certificate Assistant, and then select Request a Certificate from a Certificate Authority.
Note
By default, Keychain Access selects the first item in the list. This can be a problem if you're in the Certificates category and Apple Worldwide Developer Relations Certification Authority is not the first item in the list. Make sure you have a non-key item, or the Apple Worldwide Developer Relations Certification Authority key is selected, before generating the CSR (Certificate Signing Request).
Select your User Email Address, enter your Common Name value, make sure that you specify Saved to disk, and then select Continue. Leave CA Email Address blank as it isn't required.
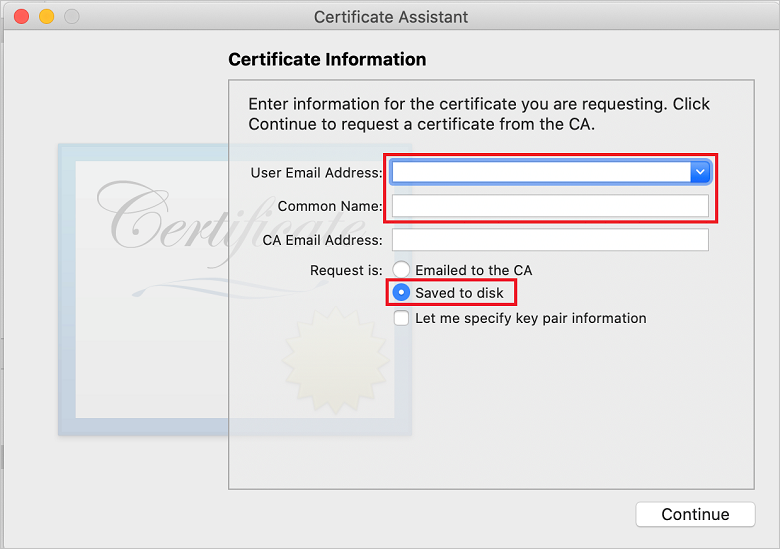
Enter a name for the CSR file in Save As, select the location in Where, and then select Save.

This action saves the CSR file in the selected location. The default location is Desktop. Remember the location chosen for the file.
Next, register your app with Apple, enable push notifications, and upload the exported CSR to create a push certificate.
Register your app for push notifications
To send push notifications to an iOS app, register your application with Apple, and also register for push notifications.
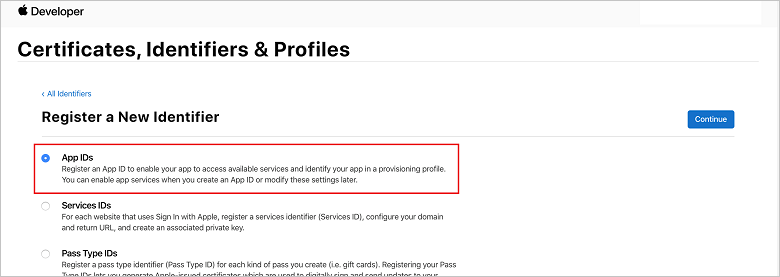
If you haven't already registered your app, browse to the iOS Provisioning Portal at the Apple Developer Center. Sign in to the portal with your Apple ID, and select Identifiers. Then select + to register a new app.

On the Register a New Identifier screen, select the App IDs radio button. Then select Continue.
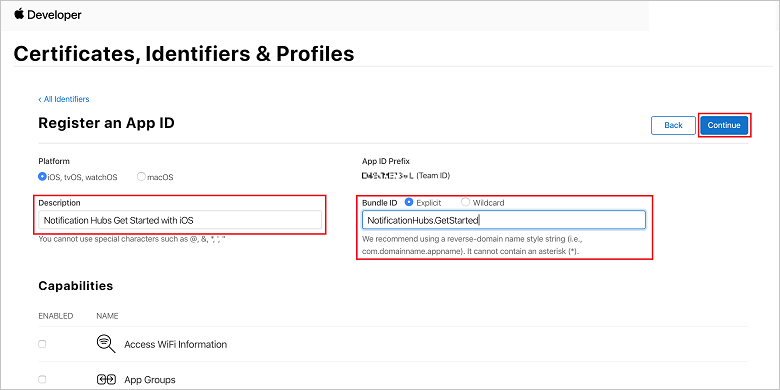
Update the following three values for your new app, and then select Continue:
Description: Type a descriptive name for your app.
Bundle ID: Enter a Bundle ID of the form Organization Identifier.Product Name as mentioned in the App Distribution Guide. The Organization Identifier and Product Name values must match the organization identifier and product name you use when you create your Xcode project. In the following screenshot, the NotificationHubs value is used as an organization identifier and the GetStarted value is used as the product name. Make sure the Bundle Identifier value matches the value in your Xcode project, so that Xcode uses the correct publishing profile.
Push Notifications: Check the Push Notifications option in the Capabilities section.
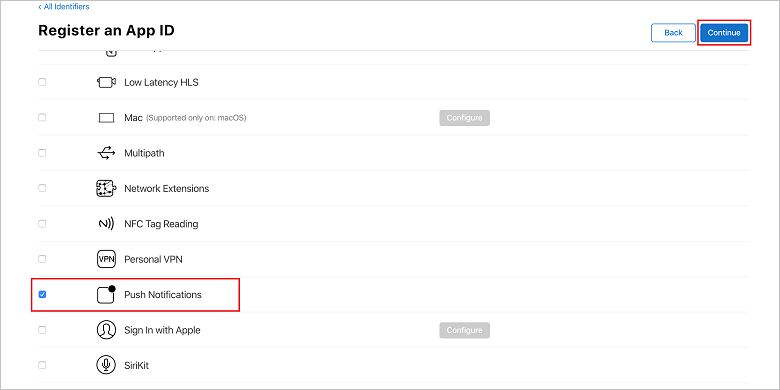
This action generates your App ID and requests that you confirm the information. Select Continue, then select Register to confirm the new App ID.

After you select Register, you see the new App ID as a line item in the Certificates, Identifiers & Profiles page.
In the Certificates, Identifiers & Profiles page, under Identifiers, locate the App ID line item that you just created, and select its row to display the Edit your App ID Configuration screen.
Creating a Certificate for Notification Hubs
A certificate is required to enable the notification hub to work with APNS. This can be done in one of two ways:
- Create a .p12 that can be uploaded directly to Notification Hub.
- Create a .p8 that can be used for token-based authentication (the newer approach).
The newer approach has a number of benefits (compared to using certificates) as documented in Token-based (HTTP/2) authentication for APNS. However, steps have been provided for both approaches.
OPTION 1: Creating a .p12 push certificate that can be uploaded directly to Notification Hub
Scroll down to the checked Push Notifications option, and then select Configure to create the certificate.

The Apple Push Notification service SSL Certificates window appears. Select the Create Certificate button under the Development SSL Certificate section.
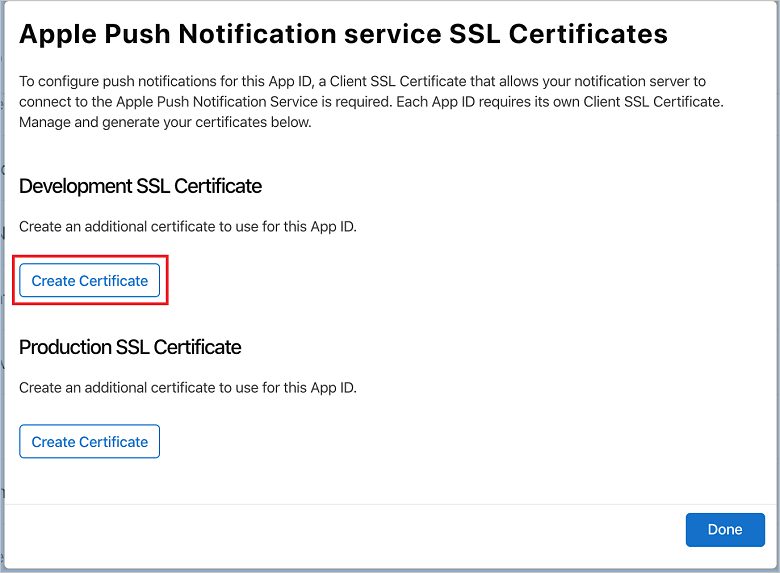
The Create a new Certificate screen is displayed.
Note
This tutorial uses a development certificate. The same process is used when registering a production certificate. Just make sure that you use the same certificate type when sending notifications.
Select Choose File, browse to the location where you saved the CSR file from the first task, and then double-click the certificate name to load it. Then select Continue.
After the portal creates the certificate, select the Download button. Save the certificate, and remember the location to which it's saved.
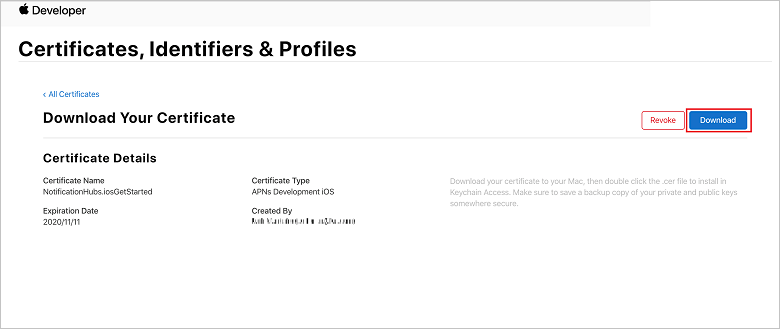
The certificate is downloaded and saved to your computer in your Downloads folder.
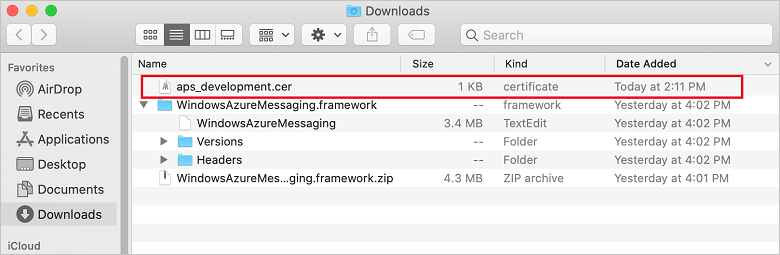
Note
By default, the downloaded development certificate is named aps_development.cer.
Double-click the downloaded push certificate aps_development.cer. This action installs the new certificate in the Keychain, as shown in the following image:

Note
Although the name in your certificate might be different, the name will be prefixed with Apple Development iOS Push Services.
In Keychain Access, right-click the new push certificate that you created in the Certificates category. Select Export, name the file, select the .p12 format, and then select Save.
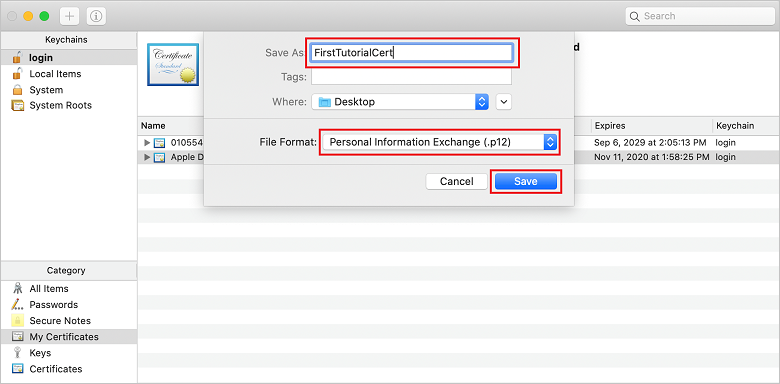
You can choose to protect the certificate with a password, but this is optional. Click OK if you want to bypass password creation. Make a note of the file name and location of the exported .p12 certificate. They are used to enable authentication with APNs.
Note
Your .p12 file name and location might be different than what is pictured in this tutorial.
OPTION 2: Creating a .p8 certificate that can be used for token-based authentication
Make note of the following details:
- App ID Prefix (this is a Team ID)
- Bundle ID
Back in Certificates, Identifiers & Profiles, click Keys.
Note
If you already have a key configured for APNS, you can re-use the .p8 certificate that you downloaded right after it was created. If so, you can ignore steps 3 through 5.
Click the + button (or the Create a key button) to create a new key.
Provide a suitable Key Name value, then check the Apple Push Notifications service (APNs) option, and then click Continue, followed by Register on the next screen.
Click Download and then move the .p8 file (prefixed with AuthKey_) to a secure local directory, then click Done.
Note
Be sure to keep your .p8 file in a secure place (and save a backup). After downloading your key, it cannot be re-downloaded as the server copy is removed.
On Keys, click on the key that you just created (or an existing key if you have chosen to use that instead).
Make note of the Key ID value.
Open your .p8 certificate in a suitable application of your choice such as Visual Studio Code then make note of the key value. This is the value between -----BEGIN PRIVATE KEY----- and -----END PRIVATE KEY----- .
-----BEGIN PRIVATE KEY-----
<key_value>
-----END PRIVATE KEY-----
Note
This is the token value that will be used later to configure Notification Hub.
At the end of these steps you should have the following information for use later in Configure your notification hub with APNs information:
- Team ID (see step 1)
- Bundle ID (see step 1)
- Key ID (see step 7)
- Token value i.e. the .p8 key value (see step 8)
Create a provisioning profile for the app
Return to the iOS Provisioning Portal, select Certificates, Identifiers & Profiles, select Profiles from the left menu, and then select + to create a new profile. The Register a New Provisioning Profile screen appears.
Select iOS App Development under Development as the provisioning profile type, and then select Continue.

Next, select the app ID you created from the App ID drop-down list, and select Continue.
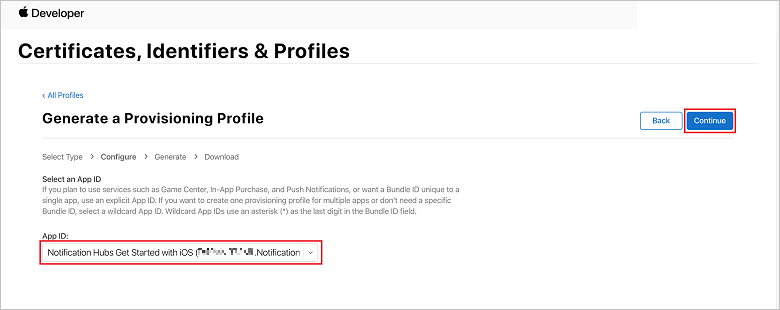
In the Select certificates window, select the development certificate that you use for code signing, and select Continue. This certificate isn't the push certificate you created. If one does not exist, you must create it. If a certificate does exist, skip to the next step. To create a development certificate if one does not exist:
- If you see No Certificates are available, select Create Certificate.
- In the Software section, select Apple Development. Then select Continue.
- In the Create a New Certificate screen, select Choose File.
- Browse to the Certificate Signing Request certificate you created earlier, select it, and then select Open.
- Select Continue.
- Download the development certificate, and remember the location to which it's saved.
Return to the Certificates, Identifiers & Profiles page, select Profiles from the left menu, and then select + to create a new profile. The Register a New Provisioning Profile screen appears.
In the Select certificates window, select the development certificate that you just created. Then select Continue.
Next, select the devices to use for testing, and select Continue.
Finally, choose a name for the profile in Provisioning Profile Name, and select Generate.
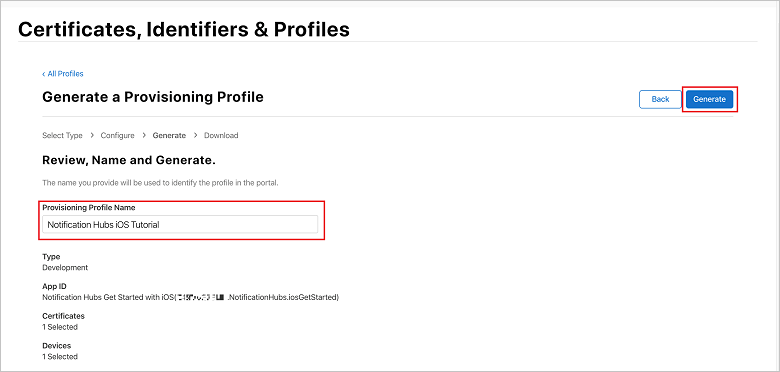
When the new provisioning profile is created, select Download. Remember the location to which it's saved.
Browse to the location of the provisioning profile, and then double-click it to install it on your Xcode development machine.
Create a notification hub
In this section, you create a notification hub and configure authentication with APNs by using either the .p12 push certificate or token-based authentication. If you want to use a notification hub that you've already created, you can skip to step 5.
Sign in to the Azure portal.
Select All services on the left menu, and then select Notification Hubs in the Mobile section. Select the star icon next to the service name to add the service to the FAVORITES section on the left menu. After you add Notification Hubs to FAVORITES, select it on the left menu.

On the Notification Hubs page, select Add on the toolbar.
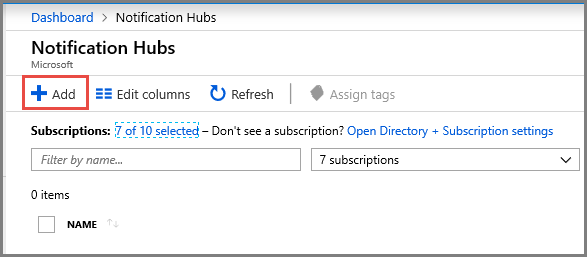
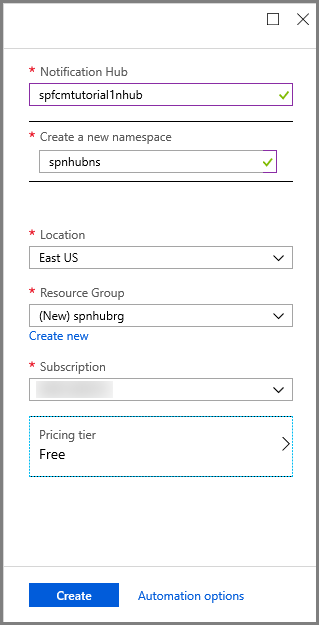
On the Notification Hub page, do the following steps:
Enter a name in Notification Hub.
Enter a name in Create a new namespace. A namespace contains one or more hubs.
Select a value from the Location drop-down list box. This value specifies the location in which you want to create the hub.
Select an existing resource group in Resource Group, or create a name for a new resource group.
Select Create.
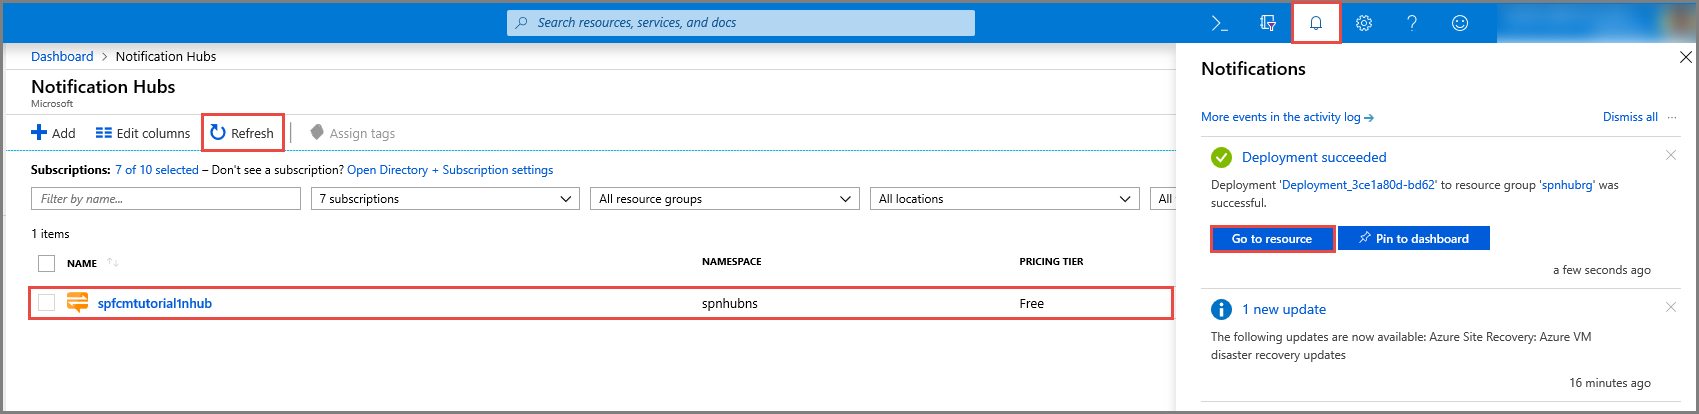
Select Notifications (the bell icon), and then select Go to resource. You can also refresh the list on the Notification Hubs page and select your hub.
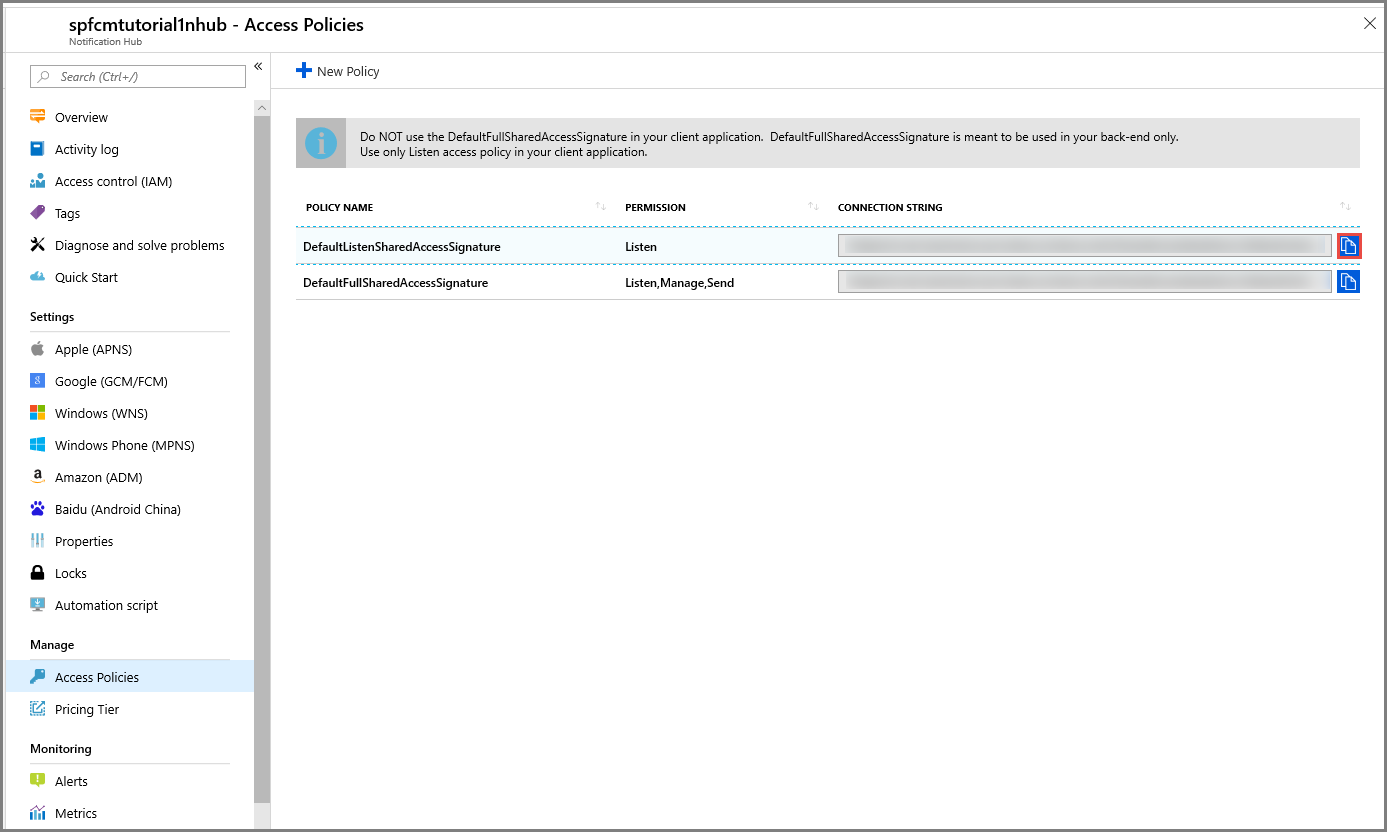
Select Access Policies from the list. Note that the two connection strings are available to you. You'll need them later to handle push notifications.
Important
Do not use the DefaultFullSharedAccessSignature policy in your application. This is meant to be used in your back end only.
Configure your notification hub with APNs information
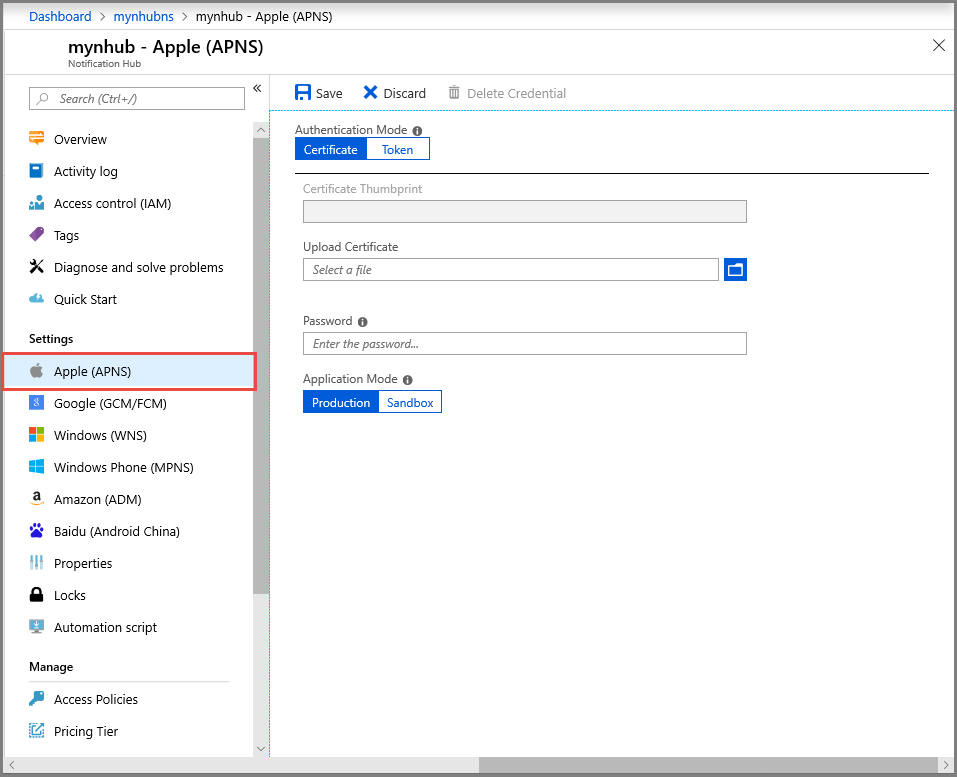
Under Notification Services, select Apple (APNS) then follow the appropriate steps based on the approach you chose previously in the Creating a Certificate for Notification Hubs section.
Note
Use the Production for Application Mode only if you want to send push notifications to users who purchased your app from the store.
OPTION 1: Using a .p12 push certificate
Select Certificate.
Select the file icon.
Select the .p12 file that you exported earlier, and then select Open.
If required, specify the correct password.
Select Sandbox mode.
Select Save.
OPTION 2: Using token-based authentication
Select Token.
Enter the following values that you acquired earlier:
- Key ID
- Bundle ID
- Team ID
- Token
Choose Sandbox
Select Save.
You've now configured your notification hub with APNs. You also have the connection strings to register your app and send push notifications.
Configure the notification hub for APNS
- On your Mac, launch Keychain Access. On the left navigation bar, under Category, open My Certificates. Find the SSL certificate that you downloaded in the previous section, and then disclose its contents. Select only the certificate (do not select the private key). Then export it.
- In the Azure portal, select Browse All > App Services. Then select your Mobile Apps back end.
- Under Settings, select App Service Push. Then select your notification hub name.
- Go to Apple Push Notification Services > Upload Certificate. Upload the .p12 file, selecting the correct Mode (depending on whether your client SSL certificate from earlier is production or sandbox). Save any changes.
Your service is now configured to work with push notifications on iOS.
Next, you will configure the iOS project setting in Xamarin Studio or Visual Studio.
Configure the iOS project in Xamarin Studio
In Xamarin.Studio, open Info.plist, and update the Bundle Identifier with the bundle ID that you created earlier with your new app ID.

Scroll down to Background Modes. Select the Enable Background Modes box and the Remote notifications box.

Double-click your project in the Solution Panel to open Project Options.
Under Build, choose iOS Bundle Signing, and select the corresponding identity and provisioning profile you just set up for this project.

This ensures that the project uses the new profile for code signing. For the official Xamarin device provisioning documentation, see Xamarin Device Provisioning.
Configure the iOS project in Visual Studio
In Visual Studio, right-click the project, and then click Properties.
In the properties pages, click the iOS Application tab, and update the Identifier with the ID that you created earlier.

In the iOS Bundle Signing tab, select the corresponding identity and provisioning profile you just set up for this project.

This ensures that the project uses the new profile for code signing. For the official Xamarin device provisioning documentation, see Xamarin Device Provisioning.
Double-click Info.plist to open it, and then enable RemoteNotifications under Background Modes.
Add push notifications to your iOS app
In the iOS project, open AppDelegate.cs and add the following statement to the top of the code file.
using Newtonsoft.Json.Linq;In the AppDelegate class, add an override for the RegisteredForRemoteNotifications event to register for notifications:
public override void RegisteredForRemoteNotifications(UIApplication application,
    NSData deviceToken)
{
    const string templateBodyAPNS = "{\"aps\":{\"alert\":\"$(messageParam)\"}}";

    JObject templates = new JObject();
    templates["genericMessage"] = new JObject
        {
            {"body", templateBodyAPNS}
        };

    // Register for push with your mobile app
    Push push = TodoItemManager.DefaultManager.CurrentClient.GetPush();
    push.RegisterAsync(deviceToken, templates);
}
In AppDelegate, also add the following override for the DidReceiveRemoteNotification event handler:
public override void DidReceiveRemoteNotification(UIApplication application,
    NSDictionary userInfo, Action<UIBackgroundFetchResult> completionHandler)
{
    NSDictionary aps = userInfo.ObjectForKey(new NSString("aps")) as NSDictionary;

    string alert = string.Empty;
    if (aps.ContainsKey(new NSString("alert")))
        alert = (aps[new NSString("alert")] as NSString).ToString();

    //show alert
    if (!string.IsNullOrEmpty(alert))
    {
        UIAlertView avAlert = new UIAlertView("Notification", alert, null, "OK", null);
        avAlert.Show();
    }
}
This method handles incoming notifications while the app is running.
In the AppDelegate class, add the following code to the FinishedLaunching method:
// Register for push notifications.
var settings = UIUserNotificationSettings.GetSettingsForTypes(
    UIUserNotificationType.Alert
    | UIUserNotificationType.Badge
    | UIUserNotificationType.Sound,
    new NSSet());

UIApplication.SharedApplication.RegisterUserNotificationSettings(settings);
UIApplication.SharedApplication.RegisterForRemoteNotifications();
This enables support for remote notifications and requests push registration.
Your app is now updated to support push notifications.
Test push notifications in your iOS app
Right-click the iOS project, and click Set as StartUp Project.
Press the Run button or F5 in Visual Studio to build the project and start the app in an iOS device. Then click OK to accept push notifications.
Note
You must explicitly accept push notifications from your app. This request only occurs the first time that the app runs.
In the app, type a task, and then click the plus (+) icon.
Verify that a notification is received, and then click OK to dismiss the notification.
Configure and run Windows projects (optional)
This section is for running the Xamarin.Forms WinApp and WinPhone81 projects for Windows devices. These steps also support Universal Windows Platform (UWP) projects. You can skip this section if you are not working with Windows devices.
Register your Windows app for push notifications with Windows Notification Service (WNS)
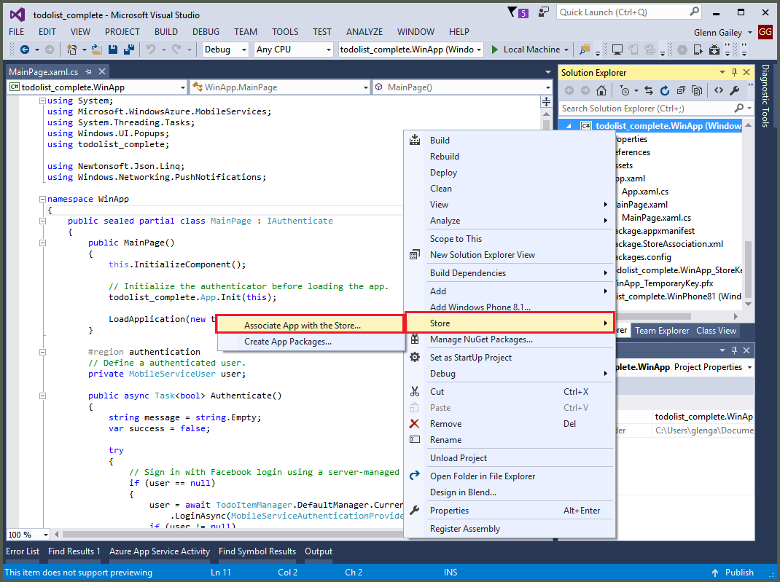
In Visual Studio Solution Explorer, right-click the Windows Store app project. Then select Store > Associate App with the Store.
In the wizard, select Next. Then sign in with your Microsoft account. In Reserve a new app name, type a name for your app, and then select Reserve.
After the app registration is successfully created, select the new app name. Select Next, and then select Associate. This process adds the required Windows Store registration information to the application manifest.
Repeat steps 1 and 3 for the Windows Phone Store app project by using the same registration you previously created for the Windows Store app.
Go to the Windows Dev Center, and then sign in with your Microsoft account. In My apps, select the new app registration. Then expand Services > Push notifications.
On the Push notifications page, under Windows Push Notification Services (WNS) and Microsoft Azure Mobile Apps, select Live Services site. Make a note of the values of the Package SID and the current value in Application Secret.
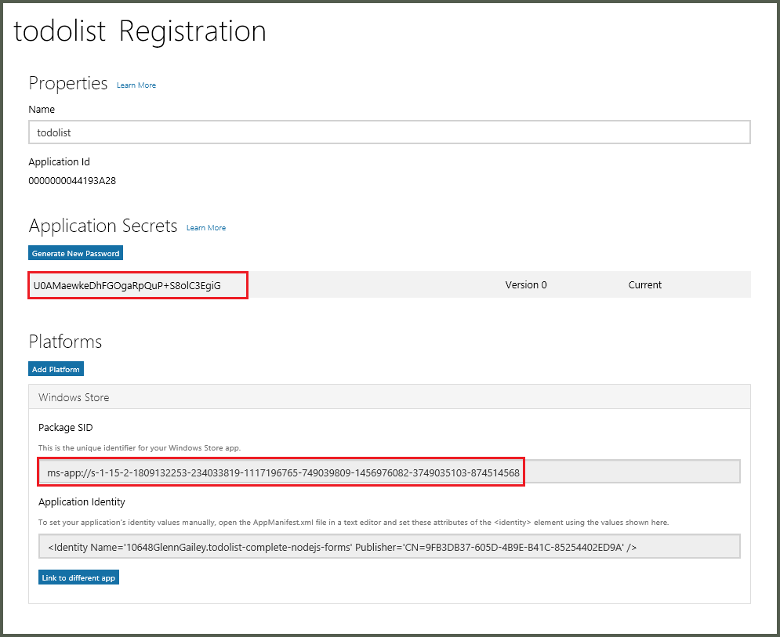
Important
The application secret and package SID are important security credentials. Don't share these values with anyone or distribute them with your app.
Configure the notification hub for WNS
In the Azure portal, select Browse All > App Services. Then select your Mobile Apps back end. Under Settings, select App Service Push. Then select your notification hub name.
Go to Windows (WNS). Then enter the Security key (client secret) and Package SID that you obtained from the Live Services site. Next, select Save.
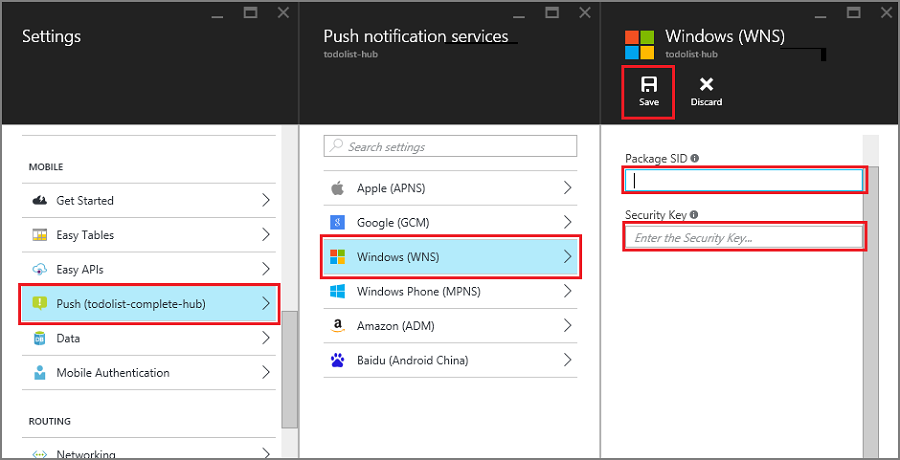
Your back end is now configured to use WNS to send push notifications.
Add push notifications to your Windows app
In Visual Studio, open App.xaml.cs in a Windows project, and add the following statements.
using Newtonsoft.Json.Linq;
using Microsoft.WindowsAzure.MobileServices;
using System.Threading.Tasks;
using Windows.Networking.PushNotifications;
using <your_TodoItemManager_portable_class_namespace>;
Replace
<your_TodoItemManager_portable_class_namespace>with the namespace of your portable project that contains theTodoItemManagerclass.In App.xaml.cs, add the following InitNotificationsAsync method:
private async Task InitNotificationsAsync()
{
    var channel = await PushNotificationChannelManager
        .CreatePushNotificationChannelForApplicationAsync();

    const string templateBodyWNS =
        "<toast><visual><binding template=\"ToastText01\"><text id=\"1\">$(messageParam)</text></binding></visual></toast>";

    JObject headers = new JObject();
    headers["X-WNS-Type"] = "wns/toast";

    JObject templates = new JObject();
    templates["genericMessage"] = new JObject
    {
        {"body", templateBodyWNS},
        {"headers", headers} // Needed for WNS.
    };

    await TodoItemManager.DefaultManager.CurrentClient.GetPush()
        .RegisterAsync(channel.Uri, templates);
}
This method gets the push notification channel, and registers a template to receive template notifications from your notification hub. A template notification that supports messageParam will be delivered to this client.
In App.xaml.cs, update the OnLaunched event handler method definition by adding the
asyncmodifier. Then add the following line of code at the end of the method:await InitNotificationsAsync();This ensures that the push notification registration is created or refreshed every time the app is launched. It's important to do this to guarantee that the WNS push channel is always active.
In Solution Explorer for Visual Studio, open the Package.appxmanifest file, and set Toast Capable to Yes under Notifications.
Build the app and verify you have no errors. Your client app should now register for the template notifications from the Mobile Apps back end. Repeat this section for every Windows project in your solution.
Test push notifications in your Windows app
- In Visual Studio, right-click a Windows project, and click Set as startup project.
- Press the Run button to build the project and start the app.
- In the app, type a name for a new todoitem, and then click the plus (+) icon to add it.
- Verify that a notification is received when the item is added.
Next steps
You can learn more about push notifications:
- Sending Push Notifications from Azure Mobile Apps
- Firebase Cloud Messaging
- Remote Notifications with Firebase Cloud Messaging
- Diagnose push notification issues
There are various reasons why notifications may get dropped or do not end up on devices. This topic shows you how to analyze and figure out the root cause of push notification failures.
You can also continue on to one of the following tutorials:
- Add authentication to your app
Learn how to authenticate users of your app with an identity provider. - Enable offline sync for your app
Learn how to add offline support for your app by using a Mobile Apps back end. With offline sync, users can interact with a mobile app—viewing, adding, or modifying data—even when there is no network connection.