Create an Azure Resource using scripts in Azure PowerShell
In interactive mode, PowerShell lets you write commands and execute them immediately.
Recall that the overall goal in the Customer Relationship Management (CRM) example is to create three test environments containing Virtual Machines. You use resource groups to ensure the VMs are organized into separate environments: one for unit testing, one for integration testing, and one for acceptance testing. You only need to create the resource groups once, so using the PowerShell interactive mode in this use case is a good choice.
When you enter a command into PowerShell, PowerShell matches the command to a cmdlet, then performs the requested action. First, we'll look at some common commands you can use, then we'll look into installing the Azure support for PowerShell.
What are PowerShell cmdlets?
A PowerShell command is called a cmdlet (pronounced "command-let"). A cmdlet is a command that manipulates a single feature. The term cmdlet is intended to imply "small command." By convention, cmdlet authors are encouraged to keep cmdlets simple and single-purpose.
The base PowerShell product ships with cmdlets that work with features such as sessions and background jobs. You can add modules to your PowerShell installation to get cmdlets that manipulate other features. For example, there are third-party modules to work with ftp, administer your operating system, access the file system, and so on.
Cmdlets follow a verb-noun naming convention; for example, Get-Process, Format-Table, and Start-Service. There's also a convention for verb choice: "get" to retrieve data, "set" to insert or update data, "format" to format data, "out" to direct output to a destination, and so on.
Cmdlet authors are encouraged to include a help file for each cmdlet. The Get-Help cmdlet displays the help file for any cmdlet. For example, to get help on the Get-ChildItem cmdlet, enter the following statement in a Windows PowerShell session:
Get-Help -Name Get-ChildItem -Detailed
What is a PowerShell module?
Cmdlets are shipped in modules. A PowerShell Module is a dynamic-link library (DLL) that includes the code to process each available cmdlet. You load cmdlets into PowerShell by loading the module in which they're contained. You can get a list of loaded modules using the Get-Module command:
Get-Module
This command outputs something like:
ModuleType Version    Name                                ExportedCommands
---------- -------    ----                                ----------------
Manifest   3.1.0.0    Microsoft.PowerShell.Management     {Add-Computer, Add-Content, Checkpoint-Computer, Clear-Con...
Manifest   3.1.0.0    Microsoft.PowerShell.Utility        {Add-Member, Add-Type, Clear-Variable, Compare-Object...}
Binary     1.0.0.1    PackageManagement                   {Find-Package, Find-PackageProvider, Get-Package, Get-Pack...
Script     1.0.0.1    PowerShellGet                       {Find-Command, Find-DscResource, Find-Module, Find-RoleCap...
Script     2.0.0      PSReadline                          {Get-PSReadLineKeyHandler, Get-PSReadLineOption, Remove-PS...
What is the Az PowerShell module?
Az is the formal name for the Azure PowerShell module, which contains cmdlets to work with Azure features. It contains hundreds of cmdlets that let you control nearly every aspect of every Azure resource. You can work with resource groups, storage, virtual machines, Microsoft Entra ID, containers, machine learning, and so on. The Az module is an open-source component available on GitHub.
Note
You might have seen or used Azure PowerShell commands that used a -AzureRM format. Because Az PowerShell modules now have all the capabilities of AzureRM PowerShell modules and more, we'll retire AzureRM PowerShell modules on 29 February 2024. To avoid service interruptions, update your scripts that use AzureRM PowerShell modules to use Az PowerShell modules by 29 February 2024. To automatically update your scripts, follow the quickstart guide.
Install the Az PowerShell module
The Az PowerShell module is available from a global repository called the PowerShell Gallery. You can install the module onto your local machine through the Install-Module cmdlet.
To install the latest Azure Az PowerShell module, run the following commands:
Open the Start menu and enter PowerShell.
Select the PowerShell icon.
Enter the following command and press Enter:
Install-Module -Name Az -Scope CurrentUser -Repository PSGallery
The previous command installs the module for your current user (controlled by the Scope parameter).
The command relies on NuGet to retrieve components. So depending on the version you've installed, you might be prompted to download and install the latest version of NuGet.
NuGet provider is required to continue
PowerShellGet requires NuGet provider version '2.8.5.201' or newer to interact with NuGet-based repositories. The NuGet
 provider must be available in 'C:\Program Files\PackageManagement\ProviderAssemblies' or
'C:\Users\<username>\AppData\Local\PackageManagement\ProviderAssemblies'. You can also install the NuGet provider by running
'Install-PackageProvider -Name NuGet -MinimumVersion 2.8.5.201 -Force'. Do you want PowerShellGet to install and import
 the NuGet provider now?
 [Y] Yes  [N] No  [S] Suspend  [?] Help (default is "Y"):
Enter Y and press Enter.
By default, the PowerShell Gallery isn't configured as a trusted repository for PowerShellGet. Each time you perform an installation from an untrusted repository, you're prompted to confirm you want to install the module with following output:
You are installing the modules from an untrusted repository. If you trust this repository, change its
InstallationPolicy value by running the Set-PSRepository cmdlet. Are you sure you want to install the modules from
'PSGallery'?
[Y] Yes  [A] Yes to All  [N] No  [L] No to All  [S] Suspend  [?] Help (default is "N"):
Enter Y or A, then press Enter.
Script execution failed
Depending on your security configuration, Import-Module might fail with something like the following output:
import-module : File C:\Program Files\PowerShell\Modules\az\6.3.0\Az.psm1 cannot be loaded
because running scripts is disabled on this system. For more information, see about_Execution_Policies at
https:/go.microsoft.com/fwlink/?LinkID=135170.
At line:1 char:1
+ import-module Az
+ ~~~~~~~~~~~~~~~~~~~~~
    + CategoryInfo          : SecurityError: (:) [Import-Module], PSSecurityException
    + FullyQualifiedErrorId : UnauthorizedAccess,Microsoft.PowerShell.Commands.ImportModuleCommand
It might also fail by not responding at all. In this case, press Ctrl+C to stop the program.
Both behaviors typically indicate that the execution policy is "Restricted," meaning you can't run modules that you download from an external source, including the PowerShell Gallery. You can check by running the cmdlet Get-ExecutionPolicy. If the cmdlet returns "Restricted," then:
Use the
Set-ExecutionPolicycmdlet to change the policy to "RemoteSigned":Set-ExecutionPolicy -ExecutionPolicy RemoteSigned -Scope CurrentUserYou're prompted for permission:
The execution policy helps protect you from scripts that you do not trust. Changing the execution policy might expose
you to the security risks described in the about_Execution_Policies help topic at
https:/go.microsoft.com/fwlink/?LinkID=135170. Do you want to change the execution policy?
[Y] Yes  [A] Yes to All  [N] No  [L] No to All  [S] Suspend  [?] Help (default is "N"): Y
Enter Y or A, then press Enter.
At the command prompt, use the up arrow on your keyboard and rerun the
Install-Modulecommand for Azure.
You should be able to see the Az PowerShell module loading. After it completes, you'll be able to use Import-Module to load the cmdlets.
Installing Azure PowerShell on Linux or macOS uses the same commands.
In a terminal, run the following command to launch PowerShell.
pwshRun the following command at the PowerShell prompt to install Azure PowerShell.
Install-Module -Name Az -Scope CurrentUser -Repository PSGallery -ForceIf you're asked whether you trust modules from PSGallery, answer Yes or Yes to All.
Update a PowerShell module
You might get a warning or error message that indicates a version of the Azure PowerShell module is already installed. If so, you can issue the following command to update to the latest version.
Update-Module -Name Az
As with the Install-Module cmdlet, answer Yes or Yes to All when prompted to trust the module. You can also use the Update-Module command to reinstall a module if you're having trouble with it.
Example: How to create a resource group with Azure PowerShell
Once you've installed the Azure module, you can begin working with Azure. Let's do a common task: creating a Resource Group. As you know, we use resource groups to administer related resources together. Creating a new resource group is one of the first tasks you do when starting a new Azure solution.
There are four steps you need to perform:
Import the Azure cmdlets.
Connect to your Azure subscription.
Create the resource group.
Verify that creation was successful.
The following illustration shows an overview of these steps:
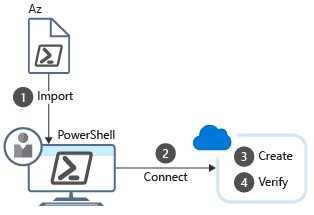
Each step corresponds to a different cmdlet.
Import the Azure cmdlets
Beginning with PowerShell 3.0, modules are loaded automatically when you use a cmdlet within the module. It's no longer necessary to manually import PowerShell modules unless you've changed the default module autoloading settings.
Connect
When you're working with a local install of Azure PowerShell, you need to authenticate before you can execute Azure commands. The Connect-AzAccount cmdlet prompts for your Azure credentials, then connects to your Azure subscription. It has many optional parameters, but if all you need is an interactive prompt, you don't need any parameters:
Connect-AzAccount
Work with subscriptions
If you're new to Azure, you probably only have a single subscription. However, if you've been using Azure for a while, you might have created multiple Azure subscriptions. You can configure Azure PowerShell to execute commands against a particular subscription.
You can only be in one subscription at a time. Use the Get-AzContext cmdlet to determine which subscription is active. If it's not the correct one, you can change subscriptions using another cmdlet.
Get a list of all subscription names in your account with the
Get-AzSubscriptioncommand.Change the subscription by passing the name of the one to select.
Set-AzContext -Subscription '00000000-0000-0000-0000-000000000000'
If you need to look up the Subscription ID, go to the Azure portal and select Subscriptions on the home page.
Get a list of all resource groups
You can retrieve a list of all Resource Groups in the active subscription.
Get-AzResourceGroup
To get a more concise view, you can send the output from the Get-AzResourceGroup to the Format-Table cmdlet using a pipe '|'.
Get-AzResourceGroup | Format-Table
The output looks something like this:
ResourceGroupName                  Location       ProvisioningState Tags TagsTable ResourceId
-----------------                  --------       ----------------- ---- --------- ----------
cloud-shell-storage-southcentralus southcentralus Succeeded                        /subscriptions/00000000-0000-0000...
ExerciseResources                  eastus         Succeeded                        /subscriptions/00000000-0000-0000...
Create a resource group
As you know, when you're creating resources in Azure, you always place them into a resource group for management purposes. A resource group is often one of the first things you create when starting a new application.
You can create resource groups by using the New-AzResourceGroup cmdlet. You must specify a name and location. The name must be unique within your subscription. The location determines where the metadata for your resource group is stored (which might be important to you for compliance reasons). You use strings like "West US", "North Europe", or "West India" to specify the location. As with most of the Azure cmdlets, New-AzResourceGroup has many optional parameters. However, the core syntax is:
New-AzResourceGroup -Name <name> -Location <location>
Note
Remember, we'll be working in an active Azure sandbox, which creates the Resource Group for you. Use the preceding command if you prefer to work in your own subscription.
Verify the resources
The Get-AzResource lists your Azure resources, which is useful here to verify the resources were created and the resource group creation was successful.
Get-AzResource
Like the Get-AzResourceGroup command, you can get a more concise view through the Format-Table cmdlet:
Get-AzResource | Format-Table
You can also filter it to specific resource groups to only list resources associated with that group:
Get-AzResource -ResourceGroupName ExerciseResources
Create an Azure Virtual Machine
Another common task you can do with PowerShell is to create VMs.
Azure PowerShell provides the New-AzVm cmdlet to create a virtual machine. The cmdlet has many parameters to let it handle the large number of VM configuration settings. Most of the parameters have reasonable default values, so we only need to specify five things:
- ResourceGroupName: The resource group into which the new VM should be placed.
- Name: The name of the VM in Azure.
- Location: The geographic location where the VM should be provisioned.
- Credential: An object containing the username and password for the VM admin account. We use the
Get-Credentialcmdlet. This cmdlet prompts for a username and password and packages it into a credential object. - Image: The operating-system image to use for the VM, which is typically a Linux distribution or Windows Server.
   New-AzVm
       -ResourceGroupName <resource group name>
       -Name <machine name>
       -Credential <credentials object>
       -Location <location>
       -Image <image name>
You can supply these parameters directly to the cmdlet as shown in the preceding example. Alternatively, you can use other cmdlets to configure the virtual machine, such as Set-AzVMOperatingSystem, Set-AzVMSourceImage, Add-AzVMNetworkInterface, and Set-AzVMOSDisk.
Here's an example that strings the Get-Credential cmdlet together with the -Credential parameter:
New-AzVM -Name MyVm -ResourceGroupName ExerciseResources -Credential (Get-Credential) ...
The AzVM suffix is specific to VM-based commands in PowerShell. There are several others you can use:
| Command | Description |
|---|---|
Remove-AzVM |
Deletes an Azure VM |
Start-AzVM |
Starts a stopped VM |
Stop-AzVM |
Stops a running VM |
Restart-AzVM |
Restarts a VM |
Update-AzVM |
Updates the configuration for a VM |
Example: Getting information for a VM
You can list the VMs in your subscription using the Get-AzVM -Status command. This command also supports entering a specific VM by including the -Name property. Here, we assign it to a PowerShell variable:
$vm = Get-AzVM -Name MyVM -ResourceGroupName ExerciseResources
The interesting thing is that now your VM is an object with which you can interact. For example, you can make changes to that object, then push changes back to Azure by using the Update-AzVM command:
$ResourceGroupName = "ExerciseResources"
$vm = Get-AzVM  -Name MyVM -ResourceGroupName $ResourceGroupName
$vm.HardwareProfile.vmSize = "Standard_DS3_v2"

Update-AzVM -ResourceGroupName $ResourceGroupName  -VM $vm
The interactive mode in PowerShell is appropriate for one-off tasks. In our example, we use the same resource group for the lifetime of the project, so creating it interactively is reasonable. Interactive mode is often quicker and easier for this task than writing a script and executing that script exactly once.