Exercise - Install and configure Azure CycleCloud
Azure CycleCloud is a Linux-based web application, which you can install and use in any location with connectivity to Azure. The simplest, Microsoft-recommended way of setting it up is by deploying an Azure VM based on a preconfigured Azure Marketplace image.
Imagine you want to simplify the provisioning of a new HPC cluster into your company's Azure subscription by using Azure CycleCloud. You also want to ensure that the cluster you deploy in Azure closely matches the architecture and software stack of the existing on-premises cluster. To accomplish these objectives, you follow the Microsoft recommendation and use an Azure Marketplace-based image to deploy Azure CycleCloud on an Azure VM.
In this exercise, you implement Azure CycleCloud by following these tasks:
- Task 1: Deploy an Azure CycleCloud Azure VM
- Task 2: Connect to the Azure CycleCloud Azure VM
- Task 3: Add an Azure subscription to Azure CycleCloud
Note
To perform this exercise, you need access to an Azure subscription. Deploying the resources referenced in this exercise will result in some costs being incurred by that subscription.
Task 1: Deploy an Azure CycleCloud Azure VM
Start by deploying an Azure virtual machine that hosts the Azure CycleCloud application by using its Azure Marketplace image.
Navigate to the Azure portal. When prompted, authenticate with a Microsoft account or a Microsoft Entra account that has the Contributor or Owner role in the Azure subscription that you're using in this module.
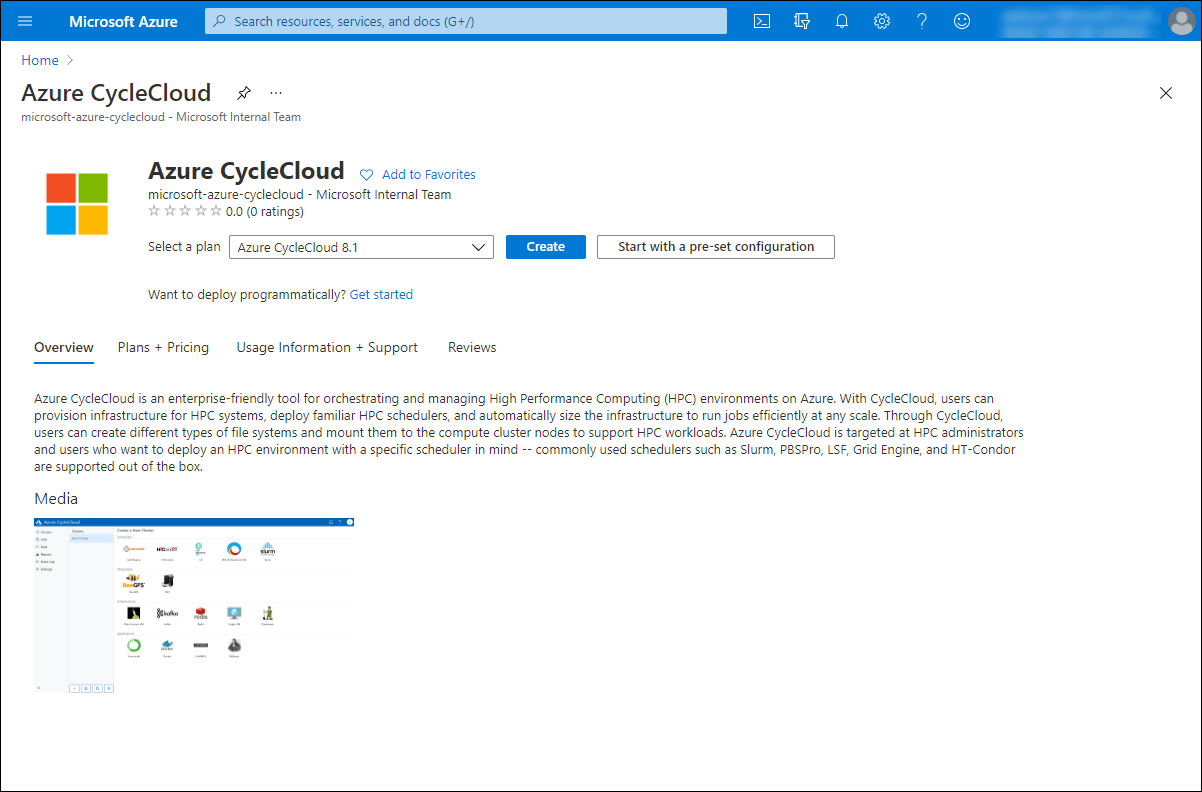
In the Azure portal search box, search for Azure CycleCloud.
In the list of results, select Azure CycleCloud under Marketplace.
On the Azure CycleCloud page, accept the default plan, and select Create.
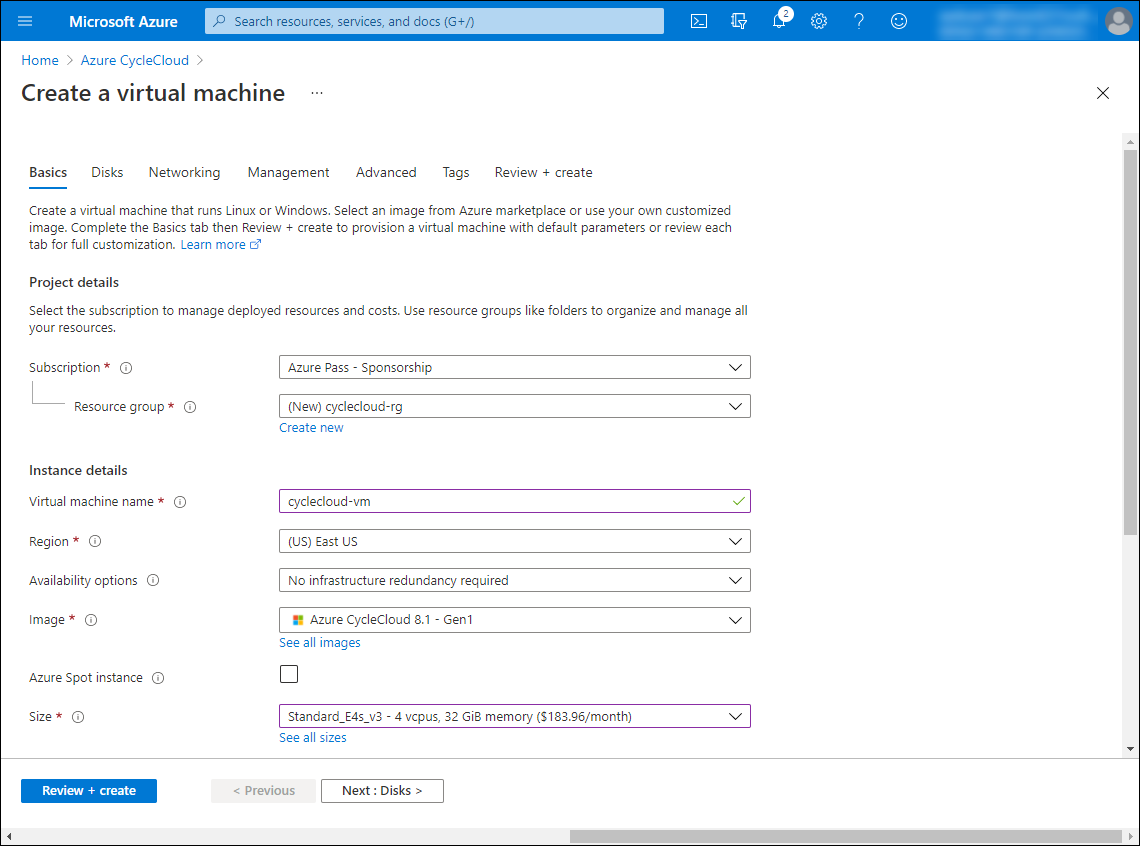
On the Basics tab of the Create a virtual machine page, configure the following settings (leave others with their default values):
Setting Value Subscription Select the name of the Azure subscription you're using in this module. Resource group Select Create new. In the Name text box, enter cyclecloud-rg, and select OK. Virtual machine name Enter cyclecloud-vm. Region Select the name of any Azure region that's close to your location where you can provision Azure VMs. Availability options No infrastructure redundancy required Security type Standard Image Accept the default image selection that is determined by the marketplace plan you chose in the previous step. Azure Spot instance Leave the checkbox unselected. Size Select See all sizes. On the Select a VM size pane, select the Standard E4s v3 entry, and then enter Select. Note
CycleCloud requires 8 GB of RAM and at least four vCPU cores.
Setting Value Authentication type Select the SSH public key option. Username Enter cc-admin. SSH public key source Ensure that the Generate new key pair option is selected, Key pair name Enter cc-ssh-keys. 
Note
Azure provides the ability to automatically generate an SSH key pair and allows you to store it for future use.
Select Next: Disks >. On the Disks tab of the Create a virtual machine pane, configure the following settings (leave others with their default values):
Setting Value OS disk type Ensure that the Premium SSD entry is selected. Host caching for data disk Ensure that the Read-only entry is selected. Select Next: Networking >. On the Networking tab of the Create a virtual machine pane, directly below the Virtual network drop-down list, select Create new. In the Create virtual network section, by default, the address space is set to /16, with a single subnet of /24 size.
In the Create virtual network section, select Discard to proceed with the default settings, without making any changes.
Note
The default configuration aligns with the recommended approach that involves creating a designated subnet for the CycleCloud Azure VM.
On the Networking tab of the Create a virtual machine section, review the default settings without making any changes, and note that the VM image includes predefined Network Security Group rules.
Select Next: Management >, and on the Management tab of the Create a virtual machine section, configure the following settings (leave others with their default values):
Setting Value Enable basic plan for free If present and enabled, clear the checkbox. Enable system assigned managed identity Select the checkbox. Select Next: Monitoring >. On the Monitoring tab of the Create a virtual machine section, configure the following settings (leave others with their default values):
Setting Value Boot diagnostics Ensure that the Enable with managed storage account (recommended) option is selected. Select Review + Create and configure the following settings (leave others with their default values):
Setting Value Preferred email address Enter the email address associated with your user account. Preferred phone number Enter the phone number associated with your user account. On the Review + Create tab of the Create a virtual machine section, select Create.
In the Generate new key pair pop-up window, select Download private key and create resource. This automatically downloads the .pem file containing the private key to your computer.
Note
Wait for the installation to complete. This should take about one minute.
In the deployment section, select Go to resource to navigate to the cyclecloud-vm section.
Task 2: Connect to the Azure CycleCloud Azure VM
After you deploy the Azure CycleCloud web application to an Azure VM, you can connect to it with the public IP address assigned to the network interface of that VM. After you're connected, you'll be prompted to complete an initial setup of the web application. During that initial setup, you'll define the application authentication settings. We recommend that you use the same username and SSH key pair that you chose when deploying the underlying Azure VM. Note that the SSH key pair you define here provides authentication to cluster nodes.
On your computer, in the web browser window displaying the cyclecloud-vm page in the Azure portal, in the Essentials section, note the value of the public IP address assigned to the network adapter of the cyclecloud-vm Azure VM. You'll need it later in this task.
In the Essentials section, select the link cyclecloud-rg to navigate to the cyclecloud-rg pane of the resource group hosting the CycleCloud Azure VM resources.
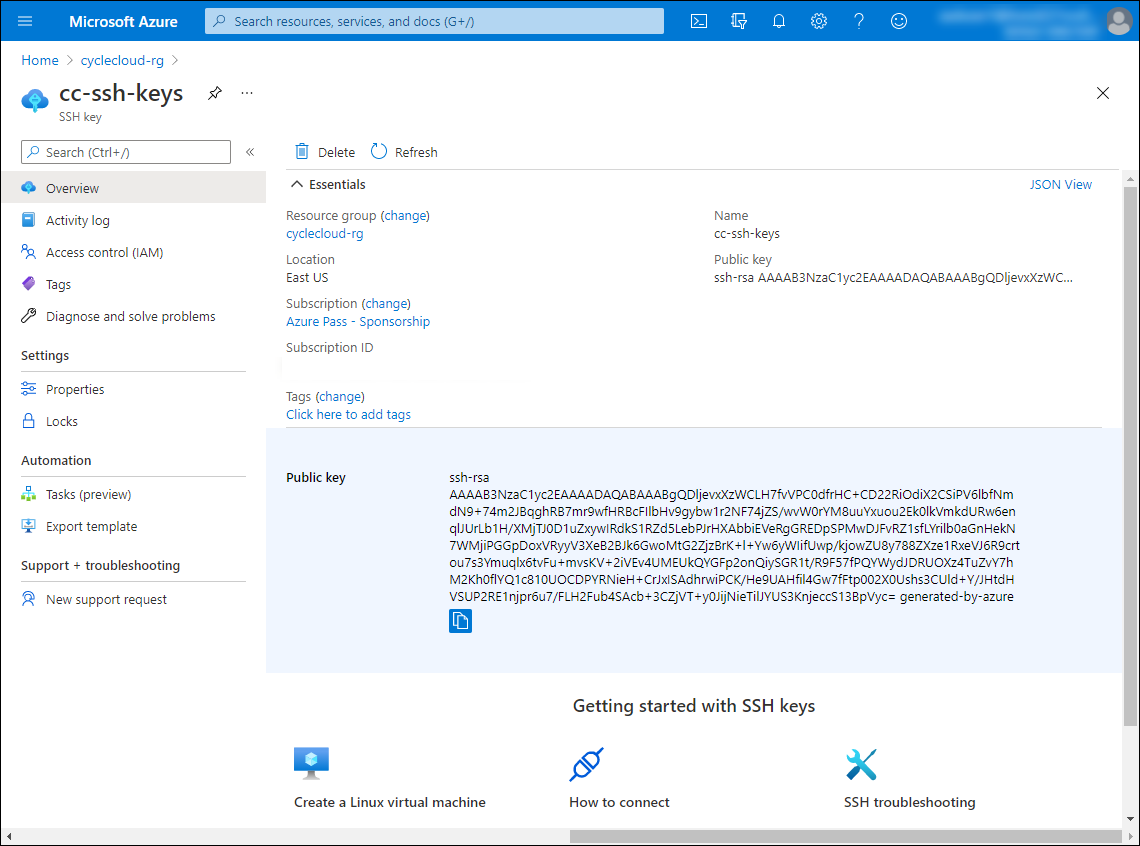
On the cyclecloud-rg resource group pane, in the list of resources, select the cc-ssh-keys entry.
On the cc-ssh-keys pane, note the value of the public key and record it. You'll need it later in this task.
On your computer, open another browser window and navigate to the
https://<IP_address>URL, replacing the <IP_address> placeholder with the public IP address you identified in the previous step. If prompted, confirm that you want to connect to the target Azure VM.Note
Your browser will likely display the message about the connection not being private and warn you about connecting to that IP address. This is expected, because you're connecting to the target server by using a self-signed certificate and the URL you're connecting to doesn't match the subject name of the certificate.
On the Welcome to Azure CycleCloud! page of the setup wizard, in the Site Name text box, enter contoso-lab, and select Next.
On the Azure CycleCloud License page of the setup wizard, select the checkbox I agree to the Azure CycleCloud Software License Agreement, and then select Next.
On the last page of the Azure CycleCloud setup wizard, configure the following settings and select Done:
Setting Value User ID Enter cc-admin. Name Enter the name of your account associated with the target subscription. Password Enter a complex password. Confirm Re-enter the same complex password. SSH Public Key Paste the value of the public SSH key you previously recorded in this task. Note
The user ID and the SSH public key don't have to be the same as those you specified when deploying the Azure VM, but we recommend that you use the same value for simplicity.
Note
The Add Subscription pop-up window might appear at this point. If so, don't close this window or configure its settings at this stage. You configure these settings in the next exercise.
Task 3: Add an Azure subscription to Azure CycleCloud
To manage resources in your Azure subscription, Azure CycleCloud requires a certain level of permissions. The simplest option to address this requirement is to assign the Contributor role in the subscription to the Azure VM hosting the CycleCloud application. This option works if you enabled the system-assigned managed identity for that Azure VM. Because you configured this setting during the Azure VM deployment in the first task of this exercise, this is the approach you'll take.
Note
CycleCloud doesn't require all permissions associated with the Contributor role. You have the option of defining a custom, more restrictive RBAC role and assigning it to the Azure VM hosting the CycleCloud application. This allows you to apply the principle of least privilege. For details, refer to Microsoft Learn.
On your computer, switch to the web browser window displaying the Azure portal, and use the search box at the top of the portal interface to search for Subscriptions.
Select the Azure subscription you're using for exercises in this module.
On the pane displaying the Azure subscription, in the vertical menu on the left side, select Access control (IAM).
In the Access control (IAM) section, select + Add, and in the drop-down menu, select Add role assignment.
In the Add role assignment section, configure the following settings (leave others with their default values):
Setting Value Role Select the Contributor entry. Assign access to Select the Virtual Machine entry. Select Enter cyclecloud-vm. In the list of results, select the entry representing the cyclecloud-vm Azure VM, and then select Save.
In the web browser window displaying the Azure portal, use the search box to search for Storage accounts.
On the Storage accounts page, select + Create.
On the Basics tab of the Create storage account pane, configure the following settings (leave others with their default values):
Setting Value Subscription Select the name of the Azure subscription you're using in this module. Resource group Select the cyclecloud-rg entry Storage account name Enter any globally unique name between 3 and 24 characters in length, consisting of letters and digits, and starting with a letter. Location Select the name of the Azure region in which you intend to deploy your clusters. Performance Select the Standard option. Redundancy Select the Locally redundant storage (LRS) entry. On the Basics tab of the Create storage account pane, select Review + Create, wait for the validation process to complete, and then select Create.
Note
Wait for the storage account provisioning to complete. This should take about one minute.
On your computer, switch to the web browser window displaying the Azure CycleCloud web application.
In the Add Subscription pop-up window, in the Subscription Name text box, enter a descriptive name for your Azure subscription, and then select Validate Credentials.
Note
If the validation fails, you might have to wait a few minutes for the role assignments to take effect and then repeat this step.
In the Add Subscription pop-up window, in the Default Location drop-down list, select the name of the Azure region in which you created the storage account previously in this task.
In the Add Subscription pop-up window, in the Storage account drop-down list, select the name of the storage account you created previously in this task.

In the Add Subscription pop-up window, select Save.
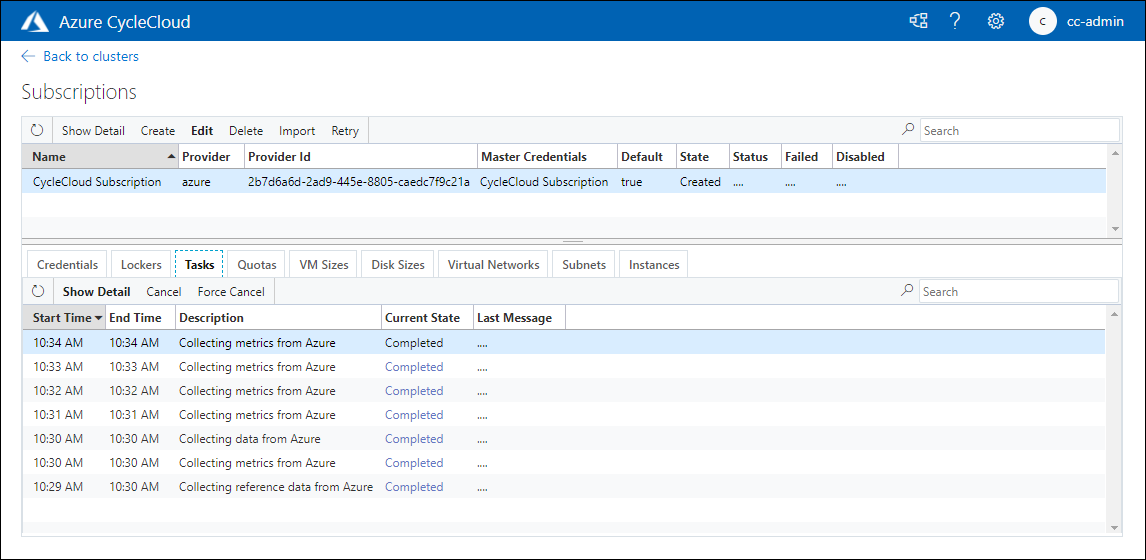
On the Subscriptions page of the Azure CycleCloud web application, select the entry representing the newly added subscription, and review its settings.
Note
Don't delete the resources you deployed in this exercise, since you need them in the next exercise of this module.
Congratulations! You successfully completed the first exercise of this module. In this exercise, you deployed an Azure CycleCloud Azure VM, connected to it, and used it to add an Azure subscription to Azure CycleCloud.