Manage field replacement or repair
This unit describes the general process to replace hardware components that are non hot-swappable. Actual replacement steps vary based on your original equipment manufacturer (OEM) hardware vendor. See your vendor's field replaceable unit (FRU) documentation for detailed steps that are specific to your Azure Stack Hub integrated system.
Firmware leveling is critical for the success of the operation described in this unit. Missing this step can lead to system instability, performance decrease, security threads, or prevent Azure Stack Hub automation from deploying the operating system.
Always consult your hardware partner's documentation when replacing hardware to ensure the applied firmware matches the OEM Version displayed in the Azure Stack Hub administrator portal.
| Hardware Partner | Region | URL |
|---|---|---|
| Cisco | All | Cisco Integrated System for Microsoft Azure Stack Hub Operations Guide Release Notes for Cisco Integrated System for Microsoft Azure Stack Hub |
| Dell EMC | All | Cloud for Microsoft Azure Stack Hub 14G (account and sign-in required) Cloud for Microsoft Azure Stack Hub 13G (account and sign-in required) |
| Fujitsu | Japan | Fujitsu managed service support desk (account and sign-in required) |
| EMEA | Fujitsu support IT products and systems | |
| EU | Fujitsu MySupport (account and sign-in required) | |
| HPE | All | HPE ProLiant for Microsoft Azure Stack Hub |
| Lenovo | All | ThinkAgile SXM Best Recipes |
Non hot-swappable components include the following items:
- CPU
- Memory
- Motherboard/baseboard management controller (BMC)/video card
- Disk controller/host bus adapter (HBA)/backplane
- Network adapter (NIC)
- Operating system disk
- Data drives (drives that don't support hot swap, for example PCI-e add-in cards)
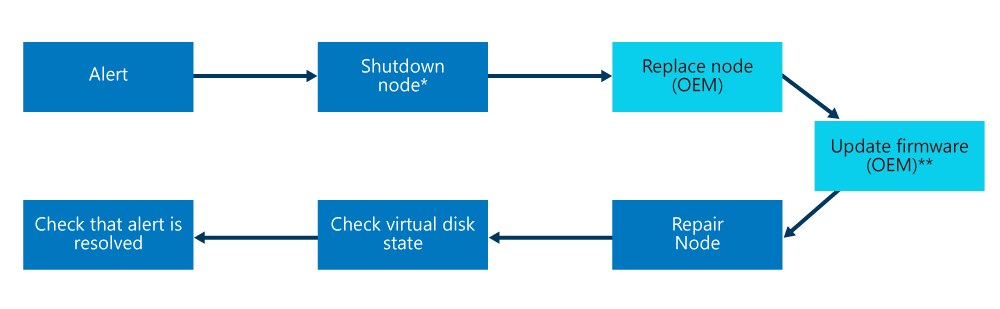
The following flow diagram shows the general FRU process to replace a non hot-swappable hardware component.
Note
Whether your OEM hardware vendor does the component replacement and updates the firmware could vary based on your support contract.
Review alert information
The Azure Stack Hub health and monitoring system track the health of network adapters and data drives controlled by Storage Spaces Direct. It doesn't track other hardware components. For all other hardware components, alerts are raised in the vendor-specific hardware monitoring solution that runs on the hardware lifecycle host.
Component replacement process
The following steps provide a high-level overview of the component replacement process. Don't follow these steps without referring to your OEM-provided FRU documentation.
- Use the Shutdown action to gracefully shut down the scale unit node. This action may not be required based on the physical condition of the hardware.
- In an unlikely case the shutdown action does fail, use the Drain action to put the scale unit node into maintenance mode. This action may not be required based on the physical condition of the hardware.
- After the scale unit node is in maintenance mode, use the Power off action. This action may not be required based on the physical condition of the hardware.
- Replace the damaged hardware component. Whether your OEM hardware vendor does the component replacement could vary based on your support contract.
- Update the firmware. Follow your vendor-specific firmware update process using the hardware lifecycle host to make sure the replaced hardware component has the approved firmware level applied. Whether your OEM hardware vendor does this step could vary based on your support contract.
- Use the Repair action to bring the scale unit node back into the scale unit.
- Use the privileged endpoint to check the status of virtual disk repair. With new data drives, a full storage repair job can take multiple hours depending on system load and consumed space.
- After the repair action has finished, validate that all active alerts have been automatically closed.