Exercise: Migrate MongoDB workloads to Cosmos DB
You work for a utilities company that has IoT sensors that collect temperature data. The temperatures are logged in a MongoDB database, together with a timestamp. Each device has a unique ID. You'll run a MongoDB application that simulates these devices, and stores the data in the database. You'll also use a second application that enables a user to query statistical information about each device. After migrating the database from MongoDB to Cosmos DB, you'll configure both applications to connect to Cosmos DB, and verify that they still function correctly.
In this exercise, you'll take an existing MongoDB database and migrate it to Cosmos DB. You'll use the Azure Database Migration Service. You'll also see how to reconfigure existing applications that use the MongoDB database to connect to the Cosmos DB database instead.
Important
Azure Data Migration Service isn't supported in the free Azure sandbox environment. You can perform these steps in your own personal subscription, or just follow along to understand how to migrate your database.
Create a MongoDB database on Azure
First you'll create the MongoDB database for holding the data captured from the temperature devices.
Create a Resource Group and Virtual Network
Using a web browser, open a new tab and navigate to the Azure portal.
In the Azure portal, select Resource groups, and then select +Add.
On the Create a resource group page, enter the following details:
Property Value Subscription <your-subscription> Resource Group mongodbrg Region Select your nearest location Select Review + Create and then select Create. Wait for the resource group to be created.
In the menu of the Azure portal, select + Create a resource.
On the New page, in the Search the Marketplace box, type Virtual Network, and press Enter.
On the Virtual Network page, select Create.
On the Create virtual network page, enter the following details, and then select Next: IP Addresses:
Property Value Resource Group mongodbrg Name databasevnet Region Select the same location that you specified for the resource group On the IP Addresses page, set the IPv4 address space to 10.0.0.0/24.
Select the default subnet, and then select Remove subnet.
Select + Add subnet. In the Add subnet pane, set the Subnet name to default, set the Subnet address range to 10.0.0.0/28, and then select Add.
On the IP Addresses page, select Next: Security.
On the Security page, verify that Azure DDoS Network Protection is set to Disable, and Firewall is set to Disable. Select Review + create.
On the Create virtual network page, select Create. Wait for the virtual network to be created before continuing.
Create a MongoDB database server
In the menu of the Azure portal, select + Create a resource.
In the Search the Marketplace box, type Ubuntu, and then press Enter.
On the Marketplace page, select Ubuntu Server 18.04 LTS.
On the Ubuntu Server 18.04 LTS page, select Create.
On the Create a virtual machine page, enter the following details:
Property Value Resource Group mongodbrg Virtual machine name mongodbserver Region Select the same location that you specified for the resource group Availability options No infrastructure redundancy required Image Ubuntu Server 18.04 LTS - Gen1 Azure Spot instance Unchecked Size Standard A1_v2 Authentication type Password Username azureuser Password Pa55w.rdPa55w.rd Confirm password Pa55w.rdPa55w.rd Public inbound ports Allow selected ports Select inbound ports SSH (22) Select Next: Disks >.
On the Disks page, leave the settings at their default, and then select Next: Networking >.
On the Networking page, enter the following details:
Property Value Virtual network databasevnet Subnet default (10.0.0.0/28) Public IP (new) mongodbserver-ip NIC network security group Advanced Configure network security group (new) mongodbserver-nsg Accelerated networking Unchecked Load balancing Unchecked Select Review + create >.
On the validation page, select Create.
Wait for the virtual machine to be deployed before continuing
In menu of the Azure portal, select All resources.
On the All resources page, select mongodbserver-nsg.
On the mongodbserver-nsg page, under Settings, select Inbound security rules.
On the mongodbserver-nsg - Inbound security rules page, select + Add.
In the Add inbound security rule pane, enter the following details:
Property Value Source Any Source port ranges * Destination Any Destination port ranges 8080 Protocol Any Action Allow Priority 1030 Name Mongodb-port Description Port that clients use to connect to MongoDB Select Add.
Note
You'll configure MongoDB to use port 8080 in this exercise. You only need to do this due to security constraints in this environment. You would normally use the default MongoDB port of 27017.
Install MongoDB
In the menu the Azure portal, select All resources.
On the All resources page, select mongodbserver-ip.
On the mongodbserver-ip page, make a note of the IP address.
In the toolbar at the top of the Azure portal, select Cloud Shell.
If the You have no storage mounted message box appears, select Create storage.
When the Cloud Shell starts, in the drop-down list above the Cloud Shell window, select Bash.
In the Cloud Shell, enter the following command to connect to the mongodbserver virtual machine. Replace <ip address> with the value of the mongodbserver-ip IP address:
ssh azureuser@<ip address>At the prompt, type yes to continue connecting.
Enter the password Pa55w.rdPa55w.rd.
To reload the package database, enter this command:
sudo apt-get updateTo install MongoDB, enter this command:
sudo apt-get install -y mongodbThe installation should proceed with messages about installing, preparing, and unpacking packages. It can take a few minutes for the installation to complete.
Configure the MongoDB database
By default, the Mongo DB instance is configured to run without authentication. In this task, you'll configure MongoDB to bind to the local network interface so that it can accept connections from other computers. You'll also enable authentication and create the necessary user account to perform migration. Finally, you'll add an account that a test application can use to query the database.
To open the MongoDB configuration file, run this command:
sudo nano /etc/mongodb.confIn the file, locate the bind_ip setting, and set it to 0.0.0.0.
Locate the port setting, and set it to 8080.
To save the configuration file, press Esc and then press CTRL + X. Press y and then Enter to save the modified buffer.
To restart the MongoDB service and apply your changes, enter this command:
sudo service mongodb restartTo connect to the MongoDB service, enter this command:
mongo --host 127.0.0.1:8080At the > prompt, to switch to the admin database, run this command:
use admin;To create a new user named administrator, run the following command. You can enter the command on one line or across multiple lines for better readability. The command is executed when the
mongoprogram reaches the semicolon:db.createUser( { user: "administrator", pwd: "Pa55w.rd", roles: [ { role: "userAdminAnyDatabase", db: "admin" }, { role: "clusterMonitor", db:"admin" }, "readWriteAnyDatabase" ] } );To exit the
mongoprogram, enter this command;exit;To connect to MongoDB with the new administrator's account, run this command:
mongo admin -u "administrator" -p "Pa55w.rd" --host 127.0.0.1:8080To switch to the DeviceData database, execute this command:
use DeviceData;To create a user named deviceadmin, which the app will use to connect to the database, run this command:
db.createUser(
    {
        user: "deviceadmin",
        pwd: "Pa55w.rd",
        roles: [ { role: "readWrite", db: "DeviceData" } ]
    }
);
To exit the
mongoprogram, enter this command;exit;Run the following command restart the mongodb service. Verify that the service restarts without any error messages:
sudo service mongodb restartRun the following command to verify that you can now log in to mongodb as the deviceadmin user:
mongo DeviceData -u "deviceadmin" -p "Pa55w.rd" --host 127.0.0.1:8080At the > prompt, run the following command to quit the mongo shell:
exit;At the bash prompt, run the following command to disconnect from the MongoDB server and return to the Cloud Shell:
exit
Populate and query the MongoDB database
You have now created a MongoDB server and database. The next step is to demonstrate the sample applications that can populate and query the data in this database.
Build and run an App to populate the MongoDB database
In the Azure Cloud Shell, run the following command to download the sample code:
git clone https://github.com/MicrosoftLearning/DP-060T00A-Migrating-your-Database-to-Cosmos-DB migration-workshop-appsMove to the migration-workshop-apps/MongoDeviceDataCapture/MongoDeviceCapture folder:
cd ~/migration-workshop-apps/MongoDeviceDataCapture/MongoDeviceDataCaptureUse the Code editor to examine the TemperatureDevice.cs file:
code TemperatureDevice.csThe code in this file contains a class named TemperatureDevice that simulates a temperature device capturing data and saving it in a MongoDB database. It uses the MongoDB library for the .NET Framework. The TemperatureDevice constructor connects to the database using settings stored in the application configuration file. The RecordTemperatures method generates a reading and writes it to the database.
Close the code editor, and then open the ThermometerReading.cs file:
code ThermometerReading.csThis file shows the structure of the documents that the application stores in the database. Each document contains the following fields:
- An object ID. The is the "_id" field generated by MongoDB to uniquely identify each document.
- A device ID. Each device has a number with the prefix "Device".
- The temperature recorded by the device.
- The date and time when the temperature was recorded.
Close the code editor, and then open the App.config file:
code App.configThis file contains the settings for connecting to the MongoDB database.
Set the value for the Address key to the IP address of the MongoDB server that you recorded earlier.
Change the port the app uses to 8080.
Save the file and close the editor using CTRL + s, and then CTRL + q.
Run the following command to rebuild the application:
dotnet buildThis can take around 5 minutes.
Run the application:
dotnet runThe application simulates 100 devices running simultaneously. Allow the application to run for a couple of minutes, and then press Enter to stop it.
Build and run another app to query the MongoDB database
Move to the DP160T00A-Migrating-your-Database-to-Cosmos-DB/MongoDeviceDataCapture/DeviceDataQuery folder:
cd ~/migration-workshop-apps/MongoDeviceDataCapture/DeviceDataQueryThis folder contains another application that you can use to analyze the data captured by each device.
Use the Code editor to examine the Program.cs file:
code Program.csThe application connects to the database (using the ConnectToDatabase method at the bottom of the file) and then prompts the user for a device number. The application uses the MongoDB library for the .NET Framework to create and run an aggregate pipeline that calculates the following statistics for the specified device:
- The number of readings recorded.
- The average temperature recorded.
- The lowest reading.
- The highest reading.
- The latest reading.
Close the code editor, and then open the App.config file:
code App.configSet the value for the Address key to the IP address of the MongoDB server that you recorded earlier.
Change the port the app uses to 8080.
Save the file and close the editor using CTRL + s, and then CTRL + q.
Build and run the application:
dotnet build
dotnet run
At the Enter Device Number prompt, enter a value between 0 and 99. The application will query the database, calculate the statistics, and display the results. Press Q to quit the application.
Migrate the MongoDB Database to Cosmos DB
The next step is to take the MongoDB database and transfer it to Cosmos DB.
Create a Cosmos account and database
Return to the Azure portal.
In the menu, select + Create a resource.
On the New page, in the Search the Marketplace box, type *Azure Cosmos DB, end then press Enter.
On the Azure Cosmos DB page, select Create.
On the Create Azure Cosmos DB Account page, enter the following settings:
Property Value Resource group mongodbrg Account Name mongodb*nnn*, where nnn is a random number selected by you API Azure Cosmos DB for MongoDB API Notebooks Off Location Specify the same location that you used for the MongoDB server and virtual network Capacity mode Provisioned throughput Apply Free Tier Discount Apply Account Type Non-Production Version 3.6 Geo-Redundancy Disable Multi-region Writes Disable Availability Zones Disable Select Review + create.
On the validation page, select Create, and wait for the Cosmos DB account to be deployed.
In the menu of the Azure portal, select All resources, and then select your new Cosmos DB account (mongodbnnn).
On the mongodbnnn page, select Data Explorer.
In the Data Explorer pane, select New Collection.
In the Add Collection pane, specify the following settings:
Property Value Database ID Select Create new, and then type DeviceData Provision database throughput selected Throughput 10000 Collection ID Temperatures Storage capacity Unlimited Shard key deviceID My shard key is larger than 100 bytes leave de-selected Create a Wildcard Index on all fields leave de-selected Analytical store Off Select OK.
Create the Database Migration Service
Switch back to the Azure portal.
Click All services, click Subscriptions, and then click your subscription.
On your subscription page, under Settings, click Resource providers.
In the Filter by name box, type DataMigration, and then click Microsoft.DataMigration.
If the Microsoft.DataMigration isn't registered, click Register, and wait for the Status to change to Registered. It might be necessary to click Refresh to see the status change.
In the menu of the Azure portal, select + Create a resource.
On the New page, in the Search the Marketplace box, type Azure Database Migration Service, and then press Enter.
On the Azure Database Migration Service page, select Create.
On the Create Migration Service page, enter the following settings:
Property Value Resource group mongodbrg Service Name MongoDBMigration Location Select the same location that you used previously Service mode Azure Pricing Tier Standard: 1 vCores Select Next: Networking.
On the Networking page, select databasevnet/default, then select Review + create.
Select Create, and wait for the service to be deployed before continuing. This operation can take around 10 minutes.
Create and run a new migration project
In the menu of the Azure portal, select Resource groups.
In the Resource groups window, select mongodbrg.
In the mongodbrg window, select MongoDBMigration.
On the MongoDBMigration page, select + New Migration Project.
On the New migration project page, enter the following settings:
Property Value Project name MigrateTemperatureData Source server type MongoDB Target server type Cosmos DB (MongoDB API) Choose type of activity Offline data migration Select Create and run activity.
When the Migration Wizard starts, on the Source details page, enter the following details:
Property Value Mode Standard mode Source server name Specify the value of the mongodbserver-ip IP address that you recorded earlier Server port 8080 User Name administrator Password Pa55w.rd Require SSL de-selected Select Next: Select target.
On the Select target page, enter the following details:
Property Value Mode Select Cosmos DB target Select Comos DB name mongodb*nnn* Connection string Accept the connection string generated for your Cosmos DB account Select Next: Database setting.
On the Database setting page, enter the following details:
Property Value Source Database DeviceData Target Database DeviceData Throughput (RU/s) 1000 Clean up collections Clear this box Select Next: Collection setting.
On the Collection setting page, select the dropdown arrow by the DeviceData database, enter the following details:
Property Value Name Temperatures Target Collection Temperatures Throughput (RU/s) 1000 Shard Key deviceID Unique Leave blank Select Next: Migration summary.
On the Migration summary page, in the Activity name field, enter mongodb-migration, and then select Start migration.
On the mongodb-migration page, select Refresh every 30 seconds, until the migration has completed. Note the number of documents processed.
Verify that the migration was successful
In the menu of the Azure portal, select All Resources.
On the All resources page, select mongodbnnn.
On the mongodb*nnn page, select Data Explorer.
In the Data Explorer pane, expand the DeviceData database, expand the Temperatures collection, and then select Documents.
In the Documents pane, scroll through the list of documents. You should see a document id (_id) and the shard key (/deviceID) for each document.
Select any document. You should see the details of the document displayed. A typical document looks like this:
{
    "_id" : ObjectId("5ce8104bf56e8a04a2d0929a"),
    "deviceID" : "Device 83",
    "temperature" : 19.65268837271849,
    "time" : 636943091952553500
}
In the toolbar in the Document Explorer pane, select New Shell.
In the Shell 1 pane, at the > prompt, enter the following command, and then press Enter:
db.Temperatures.count()This command displays the number of documents in the Temperatures collection. It should match the number reported by the Migration Wizard.
Enter the following command, and then press Enter:
db.Temperatures.find({deviceID: "Device 99"})This command fetches and displays the documents for Device 99.
Reconfigure and run existing applications to use Cosmos DB
The final step is to reconfigure your existing MongoDB applications to connect to Cosmos DB, and verify that they still work. This requires you to modify the way in which your applications connect to the database, but the logic of your applications should remain unchanged.
In the mongodbnnn pane, under Settings, select Connection String.
On the mongodbnnn Connection String page, make a note of the following settings:
- Host
- Username
- Primary Password
Return to the Cloud Shell window (reconnect if the session has timed out), and move to the migration-workshop-apps/MongoDeviceDataCapture/DeviceDataQuery folder:
cd ~/migration-workshop-apps/MongoDeviceDataCapture/DeviceDataQueryOpen the App.config file in the Code editor:
code App.configIn the Settings for MongoDB section of the file, comment out the existing settings.
Uncomment the settings in the Settings for Cosmos DB Mongo API section, and set the values for these settings as follows:
Setting Value Address The HOST from the mongodbnnn Connection String page Port The PORT from the mongodbnnn Connection String page Username The USERNAME from the mongodbnnn Connection String page Password The PRIMARY PASSWORD from the mongodbnnn Connection String page The completed file should look similar to this:
<?xml version="1.0" encoding="utf-8"?>
<configuration>
    <appSettings>
        <add key="Database" value="DeviceData" />
        <add key="Collection" value="Temperatures" />

        <!-- Settings for MongoDB
        <add key="Address" value="nn.nn.nn.nn" />
        <add key="Port" value="27017" />
        <add key="Username" value="deviceadmin" />
        <add key="Password" value="Pa55w.rd" />
        End of settings for MongoDB -->

        <!-- Settings for CosmosDB Mongo API -->
        <add key="Address" value="mongodbnnn.documents.azure.com"/>
        <add key="Port" value="10255"/>
        <add key="Username" value="mongodbnnn"/>
        <add key="Password" value="xxxxxxxxxxxxxxxxxxxxxxxxxxxxxxxxxxxxxxxxxxxxxxxxxxxxxxxxxxxxxxxxxxxx=="/>
        <!-- End of settings for CosmosDB Mongo API -->
    </appSettings>
</configuration>
Save the file, and then close the Code editor.
Open the Program.cs file using the Code editor:
code Program.csScroll down to the ConnectToDatabase method.
Comment out the line that sets the credentials for connecting to MongoDB, and uncomment the statements that specify the credentials for connecting to Cosmos DB. The code should look like this:
// Connect to the MongoDB database
MongoClient client = new MongoClient(new MongoClientSettings
{
    Server = new MongoServerAddress(address, port),
    ServerSelectionTimeout = TimeSpan.FromSeconds(10),

    //
    // Credential settings for MongoDB
    //

    // Credential = MongoCredential.CreateCredential(database, azureLogin.UserName, azureLogin.SecurePassword),

    //
    // Credential settings for CosmosDB Mongo API
    //

    UseTls = true,
    Credential = new MongoCredential("SCRAM-SHA-1", new MongoInternalIdentity(database, azureLogin.UserName), new PasswordEvidence(azureLogin.SecurePassword))

    // End of Mongo API settings
});
These changes are necessary because the original MongoDB database was not using an SSL connection. Cosmos DB always uses SSL.
Save the file, and then close the Code editor.
Rebuild and run the application:
dotnet build
dotnet run
At the Enter Device Number prompt, enter a device number between 0 and 99. The application should run exactly as before, except this time it is using the data held in the Cosmos DB database.
Improve query performance in Cosmos DB
Cosmos DB allows you to add more indexes to improve query performance. As we are aggregating over deviceID adding that field as an index will speed up your queries.
Switch back to the Azure portal.
On the left, select Data Explorer.
In the Data Explorer pane, expand the DeviceData database, expand the Temperatures collection, and then select Settings.
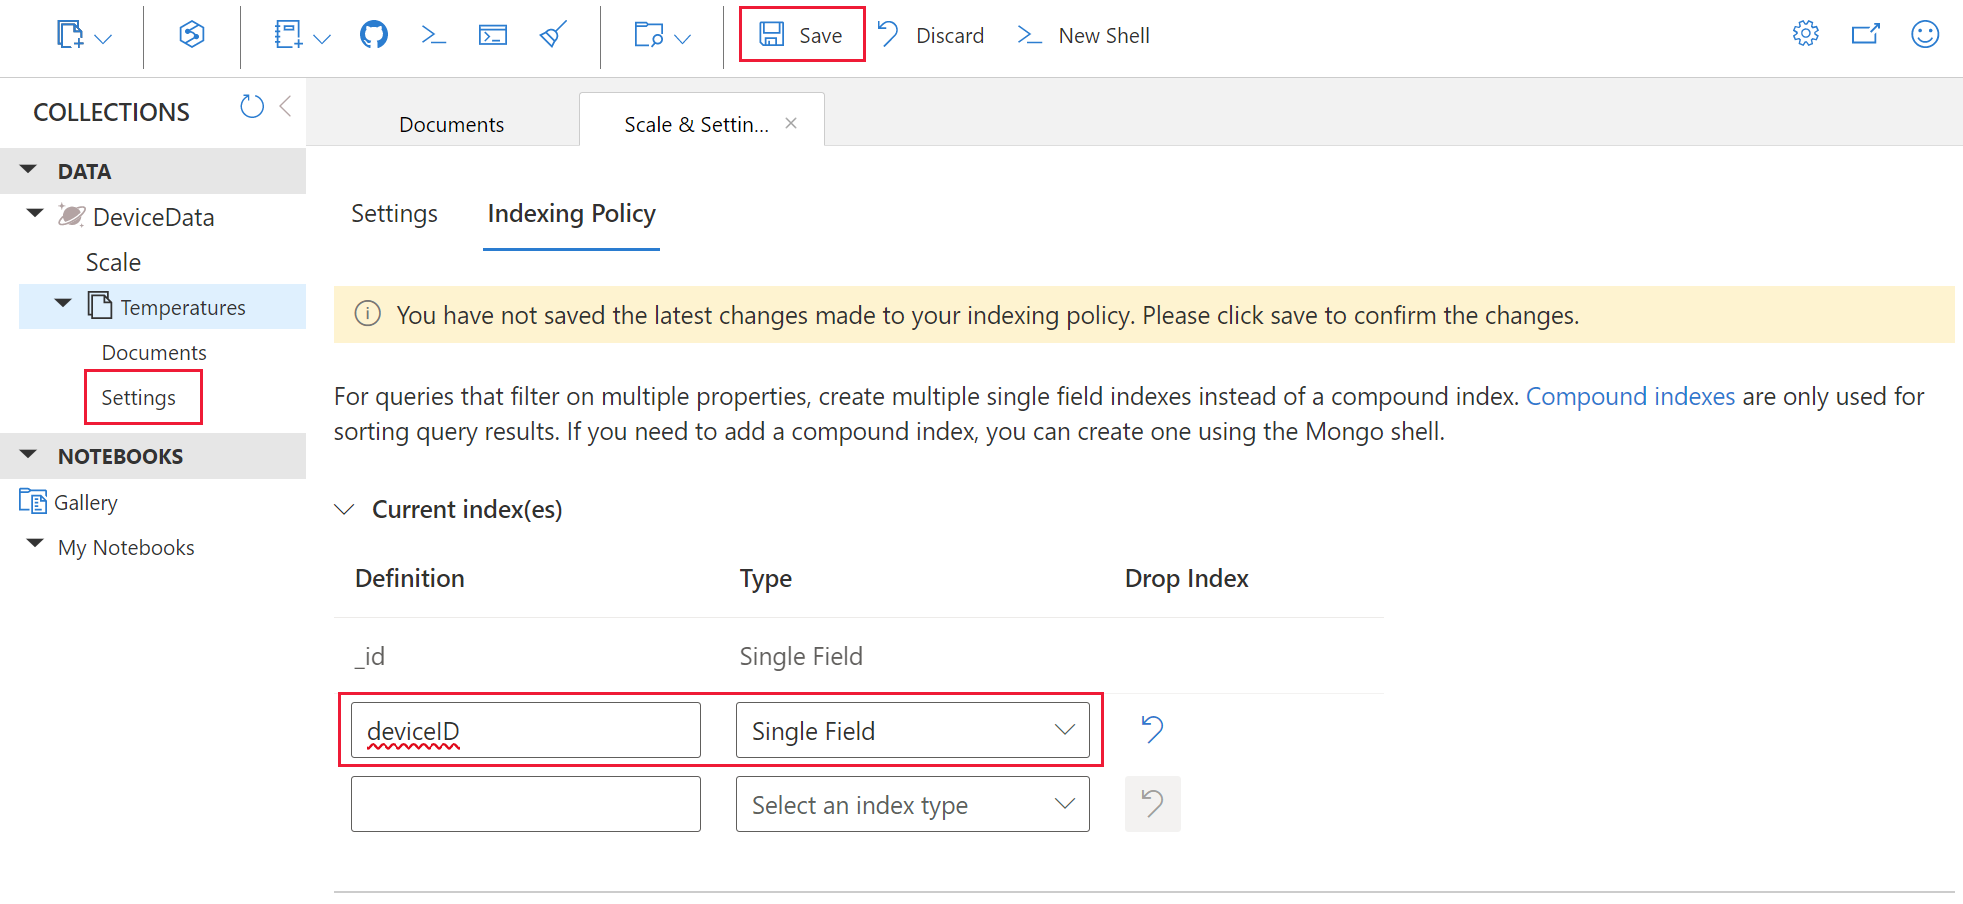
Select Indexing policy.
Under _id add a new index, enter deviceID for the Definition, and select Single Field for the Type.
Select Save to add the new index.
Return to your Cloud Shell to try your query again, and note the improved response in your application.
Test the application with other device numbers. Enter Q to finish.
You have successfully migrated a MongoDB database to Cosmos DB, and reconfigured an existing MongoDB application to connect to the new Cosmos DB database.
Clean up the resources you've created
Important
If you've performed these steps in your own personal subscription, you can delete the resources individually or delete the resource group to delete the entire set of resources. Resources left running can cost you money.
Using the Cloud Shell run this command to delete the resource group:
az group delete --name mongodbrg