Exercise - View replication status
In this unit, you'll create a storage account and configure a blob container for it. You'll create a blob file and upload it to your storage account. You can then view the replication status in the Azure portal.
Important
You need your own Azure subscription to run this exercise, and you might incur charges. If you don't already have an Azure subscription, create a free account before you begin.
Create a storage account
Create a storage account with geo-zone-redundant storage (GZRS).
Sign in to the Azure portal.
From the menu bar in the upper right, open Cloud Shell. Select the Bash option.
Set the resource group name by running the following command.
export RESOURCEGROUP=learn-storage-replication-rgTo set the storage account, run the following command. Replace storageaccountname and the brackets with a unique Azure Storage account name.
Note
Storage account names must be between 3 and 24 characters in length and use numbers and lower-case letters only.
export AZURE_STORAGE_ACCOUNT=<storageaccountname>Set the location. Replace the westus2 value with a location near you.
export LOCATION=westus2The following list has some location values you can use:
- southeastasia
- northeurope
- westeurope
- japaneast
- uksouth
- centralus
- eastus2
- westus2
To create a resource group, run this command:
az group create --name $RESOURCEGROUP --location $LOCATIONTo create a storage account, run this command:
az storage account create \
--name $AZURE_STORAGE_ACCOUNT \
--resource-group $RESOURCEGROUP \
--location $LOCATION \
--sku Standard_GZRS \
--encryption-services blob \
--kind StorageV2
For the rest of the steps in this exercise, you'll need your storage credentials. To list your storage account keys, run this command:
az storage account keys list \
--account-name $AZURE_STORAGE_ACCOUNT \
--resource-group $RESOURCEGROUP \
--output table
Copy the keys listed.
To hold your storage key, set an environment variable. Replace account-key and the brackets with one of your key values.
export AZURE_STORAGE_KEY="<account-key>"
Create a blob container
To upload blobs to Azure Storage, you need a container. You can use containers to logically group your blobs. A container helps you organize blobs, like a folder organizes files on your computer.
Use the following command to set a container name. Replace blob-container-name and the brackets with a unique name.
export BLOB_CONTAINER_NAME=<blob-container-name>Run the following command to create a container for your storage account:
az storage container create --account-key $AZURE_STORAGE_KEY --account-name $AZURE_STORAGE_ACCOUNT --name $BLOB_CONTAINER_NAMEWhen your storage account container has been created, you'll see this message returned in your terminal:
{
    "created": true
}
Create a file (blob)
Your company uploads its music files as blobs in the container. A blob can represent a file of any type. For the purposes of this exercise, you'll upload a text file as a blob.
To create a file you can upload to your storage account, run this command:
cat > song.mp3This creates an empty file to which you can write. Enter This is a song!, select Enter, and then select Ctrl+D.
To see the contents of your
song.mp3file, run this command:cat song.mp3You'll see
This is a song!returned to you in the terminal. You've created a file you can now upload to your storage account.
Upload your file
Upload the file to your storage account via your container.
To upload your file, run this command:
az storage blob upload \
    --container-name $BLOB_CONTAINER_NAME \
    --name song \
    --file song.mp3
When the upload is complete, verify the file is in your storage account by running this command:
az storage blob list \
--container-name $BLOB_CONTAINER_NAME  \
--output table
You'll see details about your file, like its name, blob type, and when it was last modified.
View the replication status
Sign in to the Azure portal.
On the home page, select or search for Resource groups.
Select learn-storage-replication-rg. The learn-storage-replication-rg resource group pane appears.
Select the storage account you created from the list of resources in your resource group. Your storage account pane appears.
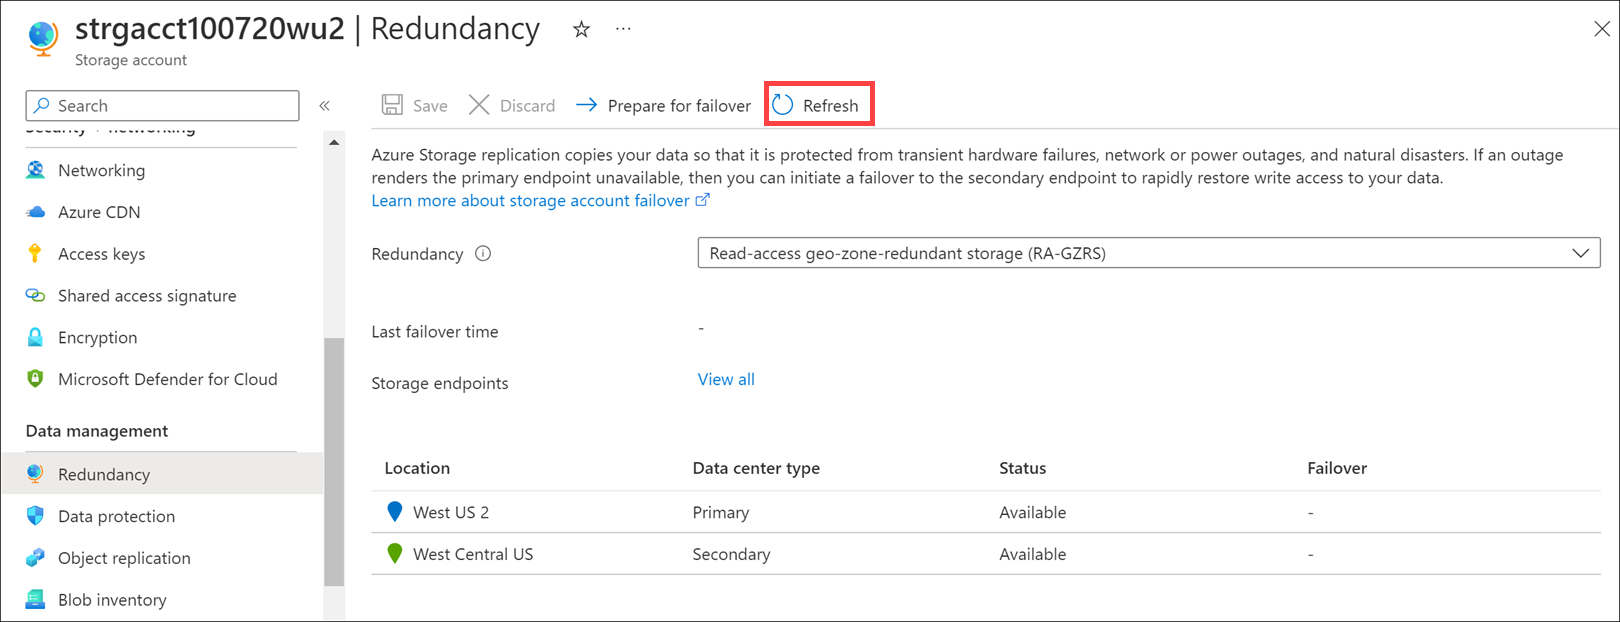
In the left menu pane, under Data management, select Redundancy. The Redundancy pane appears for your storage account. You'll find the replication status of your Azure storage account's primary and secondary regions. If the status shows as Available for a region, it means your region is responsive.
To ensure you're seeing the latest status updates, select Refresh in the top menu bar.
It'll take some time for your data to replicate from the primary to the secondary region.