Unlocking an encrypted disk for offline repair
This article describes how to unlock an encrypted OS disk on a separate virtual machine (called a repair VM) to enable offline remediation and troubleshooting on that disk.
Symptoms
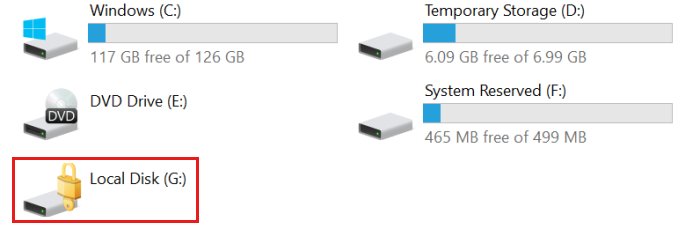
If you are repairing the OS disk of a Windows VM offline, the disk might appear locked when it is attached to the repair VM, as shown below. In this case, Azure Disk Encryption (ADE) is enabled on the disk. You'll be unable to do any mitigations on that disk from a repair VM until the disk is unlocked.
Background
Some troubleshooting scenarios require you to perform offline repair of a virtual disk in Azure. For example, if a Windows VM is inaccessible, displays disk errors, or cannot start, you can run troubleshooting steps on the OS disk by attaching it to a separate repair VM (also called a recovery VM or rescue VM).
However, if the disk is encrypted by using ADE, the disk will remain locked and inaccessible while it's attached to the repair VM until you unlock the disk. To unlock the disk, you must use the same BitLocker encryption key (BEK) that was originally used to encrypt it. This BEK (and, optionally, a key-encrypting key [KEK] that encrypts or "wraps" the BEK) will be stored in an Azure key vault that's managed by your organization.
Objective
The procedures in this article describe methods you can use to attach an encrypted OS disk to a repair VM and then unlock that disk. After the disk is unlocked, you can repair it. As a final step, you can replace the OS disk on the original VM with this newly repaired version.
Preparation
Take the following steps before attaching the failed OS disk to a repair VM:
- Confirm that ADE is enabled on the disk.
- Determine whether the OS disk uses ADE version 1 (dual-pass encryption) or ADE version 2 (single-pass encryption).
- Determine whether the OS disk is managed or unmanaged.
- Select the method to attach the disk to a repair VM and unlock the disk.
Confirm that ADE is enabled on the disk
You can perform this step in the Azure portal, PowerShell, or the Azure command-line interface (Azure CLI).
Azure portal
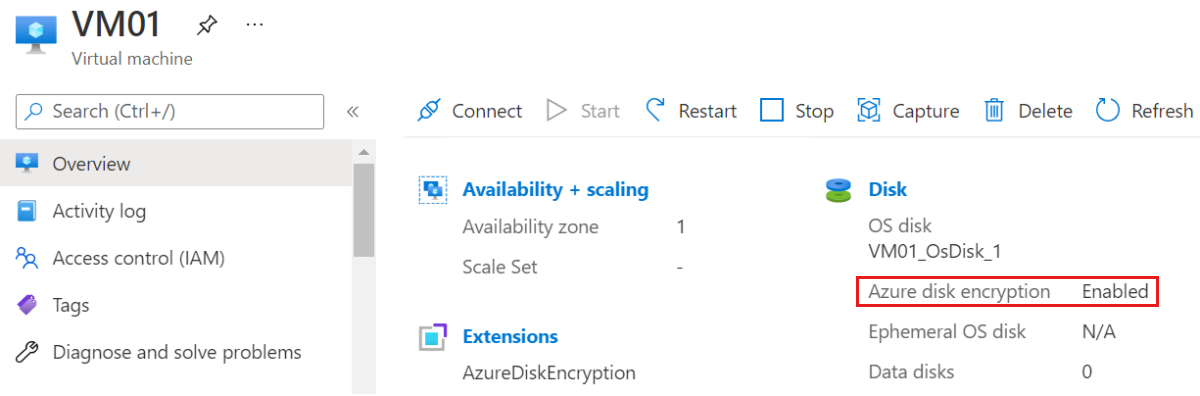
View the Overview blade for the failed VM in the Azure portal. Beneath Disk, Azure disk encryption will appear as Enabled or Not Enabled, as shown in the following screenshot.
PowerShell
You can use the Get-AzVmDiskEncryptionStatus cmdlet to determine whether the OS and/or data volumes for a VM are encrypted by using ADE. The following example output indicates ADE encryption is enabled on the OS volume:
PS /home/me> Get-AzVmDiskEncryptionStatus -ResourceGroupName "MyRg01" -VMName "MyVm01"
OsVolumeEncrypted          : Encrypted
DataVolumesEncrypted       : NoDiskFound
OsVolumeEncryptionSettings : Microsoft.Azure.Management.Compute.Models.DiskEncryptionSettings
ProgressMessage            : Extension status not available on the VM
For more information about the Get-AzureRmDiskEncryptionStatus cmdlet, see Get-AzVMDiskEncryptionStatus (Az.Compute).
Azure CLI
You can use the az vm encryption show command in Azure CLI with the query disks[].encryptionSettings[].enabled appended to determine whether ADE is enabled on a VM's disks. The following output indicates that ADE encryption is enabled.
az vm encryption show --name MyVM --resource-group MyResourceGroup --query "disks[].encryptionSettings[].enabled"
[
  true
]
For more information about the az vm encryption show command, see az vm encryption show.
Note
Offline repair for unencrypted disks
If you determine that ADE is not enabled on the disk, see the following article for instructions about how to attach a disk to a repair VM: Troubleshoot a Windows VM by attaching the OS disk to a recovery VM through the Azure portal
Determine whether the OS disk uses ADE version 1 (dual-pass encryption) or ADE version 2 (single-pass encryption)
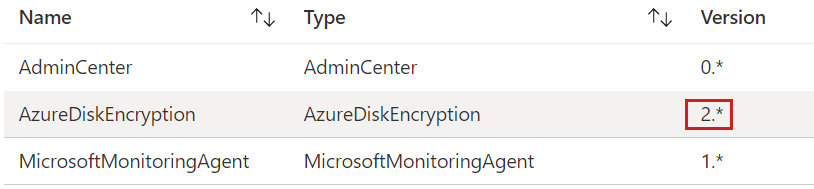
You can learn the ADE version number in the Azure portal by opening the properties of the VM, and then clicking Extensions to open the Extensions blade. On the Extensions blade, view the version number that's assigned to AzureDiskEncryption. If the version number is 1, the disk uses dual-pass encryption. If the version number is 2 or a later version, the disk uses single-pass encryption.
If you determine that your disk uses ADE version 1 (dual-pass encryption), you can go to Resolution #3: Manual method to unlock an encrypted disk on a repair VM.
Determine whether the OS disk is managed or unmanaged
If you don't know whether the OS disk is managed or unmanaged, see Determine if the OS disk is managed or unmanaged.
If you know that the OS disk is an unmanaged disk, go to Resolution #3: Manual method to unlock an encrypted disk on a repair VM.
Select the method to attach the disk to a repair VM and unlock the disk
You should choose one of three methods to attach the disk to a repair VM and unlock the disk:
- If you have determined the disk is managed and encrypted by using ADE version 2 or later (single-pass encryption), and your infrastructure and company policy allow you to assign a public IP address to a repair VM, use Resolution #1: Automated method to unlock an encrypted disk on a repair VM.
- If your disk is both managed and encrypted by using ADE version 2 or later (single-pass encryption), but your infrastructure or company policy prevent you from assigning a public IP address to a repair VM, use Resolution #2: Semi-automated method to unlock an encrypted disk on a repair VM. (Another reason to choose this method is if you lack the permissions to create a resource group in Azure.)
- If either of these methods fails, or if the disk is unmanaged or encrypted by using ADE version 1 (dual-pass encryption), use Resolution #3: Manual method to unlock an encrypted disk on a repair VM.
Resolution #1: Automated method to unlock an encrypted disk on a repair VM
This method relies on az vm repair commands to automatically create a repair VM, attach the failed OS disk, and unlock the disk if it is encrypted. It works only for single-pass-encrypted managed disks and requires use of public IP address for the repair VM. This method unlocks the encrypted disk regardless of whether the BitLocker encryption key (BEK) is unwrapped or wrapped by using a key encryption key (KEK).
To repair the VM by using this automated method, see Repair a Windows VM by using the Azure Virtual Machine repair commands.
Note
If Automatic troubleshoot fails, proceed with Resolution #2: Semi-automated method to unlock an encrypted disk on a repair VM.
Resolution #2: Semi-automated method to unlock an encrypted disk on a repair VM
The semi-automated resolution unlocks a single-pass-encrypted managed disk without requiring a public IP address for the repair VM.
By using this procedure, you manually create a VM that has the OS disk of the source (failed) VM attached. When you attach the encrypted disk at the time you create the VM, the VM automatically fetches the BEK from the Azure key vault and stores it in a BEK volume. You then use a short series of steps to access the BEK and unlock the encrypted disk. During this process, the BEK is unwrapped automatically if necessary.
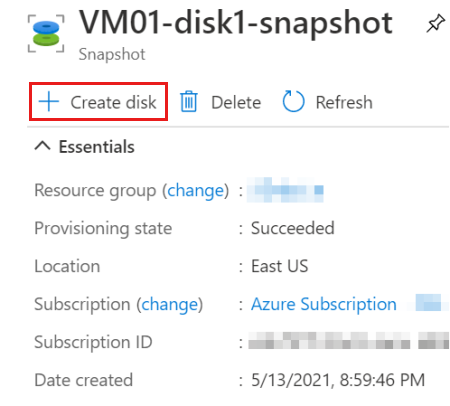
In Azure portal, take a snapshot of the encrypted OS disk on the source (failed) VM.
Create a disk from that snapshot.
For the new disk, choose the same location and availability zone that were assigned to the source VM. Note that you will also need to duplicate these same settings when you create the repair VM in the next step.
Create a VM that's based on Windows Server 2016 Datacenter to use as a repair VM. make sure that you assign the VM to the same region and availability zone that's used for the new disk that you created in step 2.
On the Disks page of the Create a Virtual Machine wizard, attach as a data disk the new disk that you just created from the snapshot.
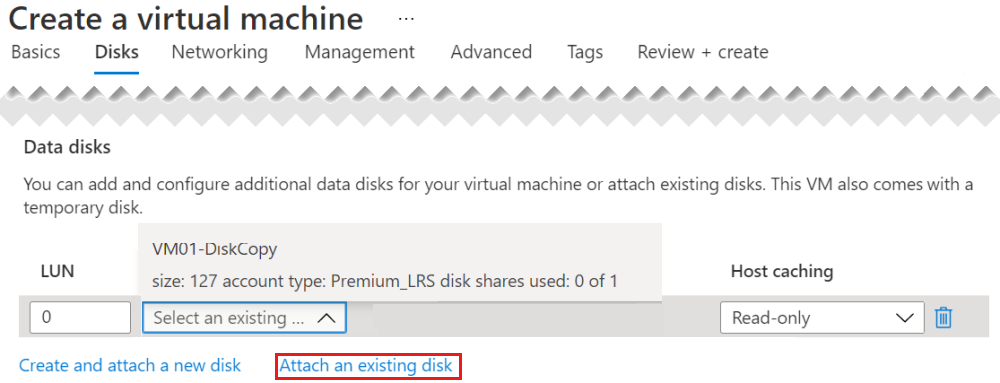
Important
Make sure that you add the disk during the VM creation. It is only during VM creation that encryption settings are detected. This enables a volume that contains the BEK to be added automatically.
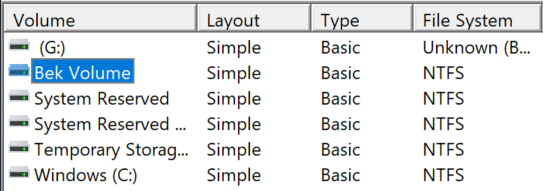
After the repair VM is created, sign in to the VM, and open Disk Management (Diskmgmt.msc). Within Disk Management, locate the BEK volume. By default, no drive letter is assigned to this volume.
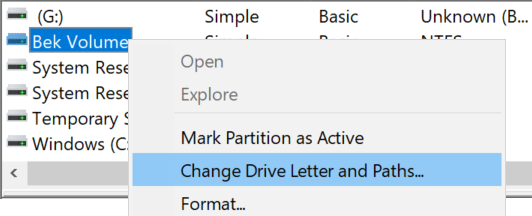
To assign a drive letter to the BEK volume, right-click the BEK volume, and then select Change Drive Letter and Paths.
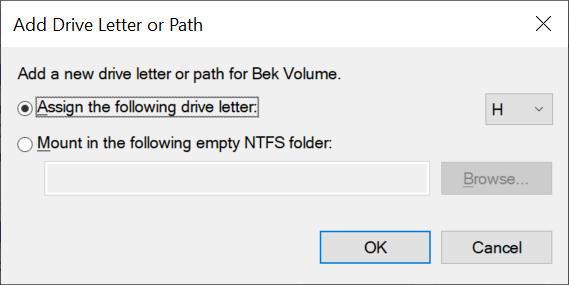
Select Add to assign a drive letter to the BEK volume. In this process, the default letter is most frequently H. Select OK.
In File Explorer, select This PC in the left pane. You will now see the BEK volume listed. Also, notice the volume that is marked by a lock icon. This is the encrypted disk that you attached when you created the VM. (In the following example, the encrypted disk is assigned the drive letter G.)

To unlock the encrypted disk, you must have the .bek file name within the BEK volume. However, by default, the files in the BEK volume are hidden. At a command prompt, enter the following command to show the hidden files:
dir <DRIVE LETTER ASSIGNED TO BEK VOLUME>: /a:h /b /sFor example, if the drive letter that's assigned to the BEK Volume is H, you would enter the following command:
dir H: /a:h /b /sYou should see output that resembles the following:
H:\66ABF036-E331-4B67-A667-D1A8B47B4DAB.BEK
H:\System Volume Information
The first entry is the BEK file pathname. You will use the full pathname in the next step.
At a command prompt, enter the following command:
manage-bde -unlock <ENCRYPTED DRIVE LETTER>: -RecoveryKey <.BEK FILE PATH>For example, if G is the encrypted drive, and the BEK file is the same as the one that's listed in the previous example, you would enter the following:
manage-bde -unlock G: -RecoveryKey H:\66ABF036-E331-4B67-A667-D1A8B47B4DAB.BEKYou will see a message that indicates that the BEK file successfully unlocked the volume that you specified. And in File Explorer, you can see that the drive is no longer locked.

Now that you can access the volume, you can complete troubleshooting and mitigations as necessary, for example, by reading logs or running a script.
After you repair the disk, use the following procedure to replace the source VM's OS disk with the newly repaired disk.
Resolution #3: Manual method to unlock an encrypted disk on a repair VM
You can unlock the disk manually by following this procedure if you have to unlock a dual-pass-encrypted disk (ADE version 1) or an unmanaged disk, or if the other methods fail.
Create the repair VM and attach the source VM's OS disk
If the source VM's encrypted OS disk is a managed disk, follow steps 1-4 in Method 2 to attach a copy of the locked disk to a repair VM.
If the process of creating a new repair VM that has the attached encrypted disk hangs or fails (for example, it returns a message that states that it "contains encryption settings and therefore cannot be used as a data disk"), you can first create the VM without attaching the encrypted disk. After the repair VM is created, attach the encrypted disk to the VM through the Azure portal.
If the source VM's encrypted OS disk is an unmanaged disk, see Attach an unmanaged disk to a VM for offline repair.
Install the Az PowerShell module in the repair VM
The manual resolution method to unlock an encrypted disk offline relies on the Az module in PowerShell. Therefore, you have to install this module on the repair VM.
Connect to the repair VM through RDP.
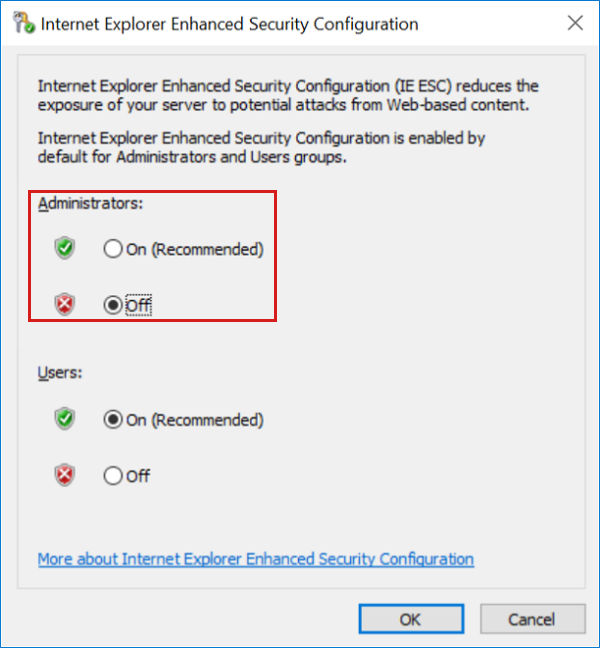
On the repair VM, in Server Manager, Select Local Server, and then turn off IE Enhanced Security Configuration for Administrators.

On the repair VM, open an elevated PowerShell window.
Set the HTTP APIs security protocol to TLS 1.2 for current session by entering the following command.
[Net.ServicePointManager]::SecurityProtocol = [Net.SecurityProtocolType]::Tls12Note
The security protocol will be reverted to the default value after you close the current session.
Download the latest version of the Nuget package:
Install-PackageProvider -Name "Nuget" -ForceWhen the prompt returns, install the latest version of the PowerShellGet package.
Install-Module -Name PowerShellGet -ForceWhen the prompt returns, close the PowerShell window. Then, open a new PowerShell window with elevated privileges to start a new PowerShell session.
At the PowerShell prompt, install the latest version of the Azure Az module:
Install-Module -Name Az -Scope AllUsers -Repository PSGallery -ForceWhen the prompt returns, install the Az.Account 1.9.4 package:
Install-Module -Name Az.Accounts -Scope AllUsers -RequiredVersion "1.9.4" -Repository PSGallery -Force
Retrieve the BEK file name
In the Azure portal, navigate to the key vault that was used to encrypt the source VM. If you don't know the name of the key vault, enter the following command at the prompt in Azure Cloud Shell, and look for the value next to "sourceVault" in the output:
az vm encryption show --name MyVM --resource-group MyResourceGroupIn the left menu, select Access Policies.
In the access policies of the key vault, make sure that the user account you use to sign in to your Azure subscription is granted the following permissions: Key Management Operations: Get, List, Update, Create Cryptographic Operations: Unwrap key Secret Permissions: Get, List, Set
Return to the repair VM and the elevated PowerShell window.
Enter the following command to begin the process of signing into your Azure subscription, replacing "[SubscriptionID]" with your Azure subscription ID:
Add-AzAccount -SubscriptionID <SubscriptionID>Follow the prompts to complete the process of signing in to your Azure subscription.
In the repair VM, open an elevated Windows PowerShell ISE window and expand the script (top) pane.
In the elevated PowerShell ISE window, paste the following script into the empty script pane. Replace "myVM" with your source (failed) VM and "myKeyVault" with the name of your key vault.
    if ((Get-AzContext) -ne $Null)
{

$vmName = "MyVM"
$vault = "myKeyVault"

# Get the Secrets for all VM Drives from Azure Key Vault
Get-AzKeyVaultSecret -VaultName $vault | where {($_.Tags.MachineName -eq $vmName) -and ($_.ContentType -match 'BEK')} `
    | Sort-Object -Property Created `
    | ft  Created, `
        @{Label="Content Type";Expression={$_.ContentType}}, `
        @{Label ="Volume"; Expression = {$_.Tags.VolumeLetter}}, `
        @{Label ="DiskEncryptionKeyFileName"; Expression = {$_.Tags.DiskEncryptionKeyFileName}}, `
        @{Label ="URL"; Expression = {$_.Id}}
}
else
{
    Write-Output "Please log in first with Add-AzAccount"
}
Select Run Script to run the script.
In the output, look for the value beneath DiskEncryptionKeyFileName for the name of the BEK file.
In the following example output, the BEK file name (secret name + the ".BEK" file extension) is AB4FE364-4E51-4034-8E09-0087C3D51C18.BEK. Record this value because it will be used in the next step. (If you see two duplicated volumes, the volume that has the newer timestamp is the current BEK file that is used by the repair VM.)

If the Content Type value in the output is Wrapped BEK, as in the example above, go to Download and unwrap the BEK. If the Content Type value in the output is simply BEK, as in the following example, go to the next section to download the BEK to the repair VM.

Download the BEK to the repair VM
On the repair VM, create a folder named "BEK" (without the quotation marks) in the root of the C volume.
Copy and paste the following sample script into an empty PowerShell ISE script pane.
Note
Replace the values for "$vault" and "$bek" with the values for your environment. For the $bek value, use the secret name that you obtained in the last procedure. (The secret name is the BEK file name without the ".bek" file name extension.)
$vault = "myKeyVault"
$bek = "EF7B2F5A-50C6-4637-0001-7F599C12F85C"
$keyVaultSecret = Get-AzKeyVaultSecret -VaultName $vault -Name $bek
$bstr = [Runtime.InteropServices.Marshal]::SecureStringToBSTR($keyVaultSecret.SecretValue)
$bekSecretBase64 = [Runtime.InteropServices.Marshal]::PtrToStringAuto($bstr)
$bekFileBytes = [Convert]::FromBase64String($bekSecretbase64)
$path = "C:\BEK\DiskEncryptionKeyFileName.BEK"
[System.IO.File]::WriteAllBytes($path,$bekFileBytes)
In the PowerShell ISE window, select Run Script. If the script runs successfully, there will be no output or completion message. However, new file will be created in the C:\BEK folder. (The C:\BEK folder must already exist.)
Download and unwrap the BEK
On the repair VM, create a folder named "BEK" (without the quotation marks) in the root of the C volume.
Record the following values in Notepad. You will be prompted to supply them when the script runs.
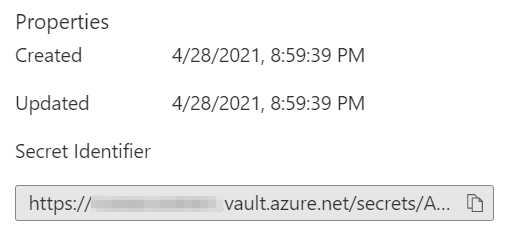
secretUrl. This is the URL of the secret that's stored in the key vault. A valid secret URL uses the following format: <<
https://[key> vault name].vault.azure.net/secrets/[BEK Name]/[version ID]>To find this value in the Azure portal, navigate to the Secrets blade in your key vault. Select the BEK name that was determined in the previous step, Retrieve the BEK file name. Select the current version identifier, and then read the Secret Identifier URL below Properties. (You can copy this URL to the clipboard.)
keyVaultResourceGroup. The resource group of the key vault.
kekUrl. This is the URL of the key that's used to protect the BEK. A valid kek URL uses the following format: <<
https://[key> vault name].vault.azure.net/keys/[key name]/[version ID]>You can get this value in the Azure portal by navigating to the Keys blade in your key vault, selecting the name of the key that's used as the KEK, selecting the current version identifier, and then reading the Key Identifier URL below Properties. (You can copy this URL to the clipboard.)
secretFilePath. This is the full pathname for the location to store the BEK file in. For example, if the BEK file name is AB4FE364-4E51-4034-8E06-0087C3D51C18.BEK, you can enter C:\BEK\AB4FE364-4E51-4034-8E06-0087C3D51C18.BEK. (The C:\BEK folder must already exist.)
Navigate to the following page to download the script that's used to generate the BEK file for unlocking the encrypted disk.
On the page, select Raw.
Copy and paste the contents of the script into an empty script pane in an elevated PowerShell ISE window in the repair VM.
Select Run Script.
When you're prompted, supply the values that you recorded before you ran the script. If you are prompted by an Untrusted Repository message, select Yes to All. If the script runs successfully, a new file will be created in the C:\BEK folder. (This folder must already exist.)
Verify that the script ran successfully
Navigate to the C:\BEK folder on your local computer and locate the new output file.
Open the file in Notepad. If the script ran correctly, you will find the phrase BitLocker Extension Key Protector on the top line of the file if you scroll to the right.

Unlock the attached disk
You are now ready to unlock the encrypted disk.
On the repair VM, in Disk Management bring the attached encrypted disk online if it is not already online. Note the drive letter of the BitLocker encrypted volume.
At a command prompt, enter the following command.
Note
In this command, replace "<ENCRYPTED DRIVE LETTER>" with the letter of the encrypted volume and "<.BEK FILE PATH>" with the full path to the newly created BEK file in the C:\BEK folder.
manage-bde -unlock <ENCRYPTED DRIVE LETTER>: -RecoveryKey <.BEK FILE PATH>For example, if the encrypted drive is F and the BEK file name is "DiskEncryptionKeyFileName.BEK," you would run the following command:
manage-bde -unlock F: -RecoveryKey C:\BEK\DiskEncryptionKeyFileName.BEKIf the encrypted drive is F and the BEK file name is "EF7B2F5A-50C6-4637-9F13-7F599C12F85C.BEK," you would run the following command:
manage-bde -unlock F: -RecoveryKey C:\BEK\EF7B2F5A-50C6-4637-9F13-7F599C12F85C.BEKYou will see output like the following example:
The file "C:\BEK\0D44E996-4BF3-4EB0-B990-C43C250614A4.BEK" successfully unlocked volume F:.Now that you can access the volume, you can do troubleshooting and mitigation as necessary, for example, by reading logs or running a script.
Important
The unlocking process gives you access to the disk, but it does not decrypt the disk. The disk remains encrypted after you unlock it. If you need to decrypt the disk, use the command manage-bde <volume> -off to begin the decryption process and manage-bde <drive> -status to check the progress of the decryption.
When repairs are complete, and if the disk is managed, you can proceed to Replace the source VM's OS disk (managed disks). If instead the disk is unmanaged, you can use the CLI-based steps described here: Replace the OS disk on the source VM
Replace the source VM's OS disk (managed disks)
After you repair the disk, open the Disks blade for the repair VM in the Azure portal. Detach the copy of the source VM OS disk. To do this, locate the row for the associated disk name under Data Disks, select the "X" at the right side of that row, and then select Save.

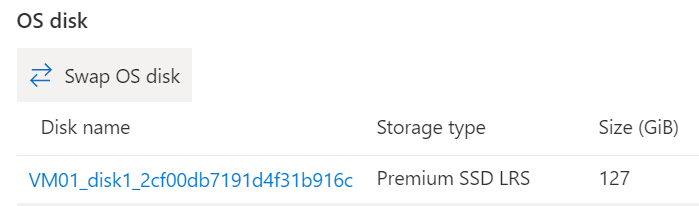
In the Azure portal, navigate to the source (broken) VM, and open the Disks blade. Then, select Swap OS disk to replace the existing OS disk with the one that you repaired.
Select the new disk that you repaired, and then enter the name of the VM to verify the change. If you don't see the disk in the list, wait 10 to 15 minutes after you detach the disk from the troubleshooting VM.
Select OK.
Next Steps
If you're having problems connecting to your VM, see Troubleshoot Remote Desktop connections to an Azure VM. For problems with accessing applications running on your VM, see Troubleshoot application connectivity issues on a Windows VM.
Contact us for help
If you have questions or need help, create a support request, or ask Azure community support. You can also submit product feedback to Azure feedback community.
Feedback
Coming soon: Throughout 2024 we will be phasing out GitHub Issues as the feedback mechanism for content and replacing it with a new feedback system. For more information see: https://aka.ms/ContentUserFeedback.
Submit and view feedback for