Turn on cloud protection in Microsoft Defender Antivirus
Applies to:
- Microsoft Defender Antivirus
- Microsoft Defender for Endpoint Plan 1
- Microsoft Defender for Endpoint Plan 2
Platforms
- Windows
Cloud protection in Microsoft Defender Antivirus delivers accurate, real-time, and intelligent protection. Cloud protection should be enabled by default.
Note
Tamper protection helps keep cloud protection and other security settings from being changed. As a result, when tamper protection is enabled, any changes made to tamper-protected settings are ignored. If you must make changes to a device and those changes are blocked by tamper protection, we recommend using troubleshooting mode to temporarily disable tamper protection on the device. Note that after troubleshooting mode ends, any changes made to tamper-protected settings are reverted to their configured state.
Why cloud protection should be turned on
Microsoft Defender Antivirus cloud protection helps protect against malware on your endpoints and across your network. We recommend keeping cloud protection turned on, because certain security features and capabilities in Microsoft Defender for Endpoint only work when cloud protection is enabled.

The following table summarizes the features and capabilities that depend on cloud protection:
| Feature/Capability | Subscription requirement | Description |
|---|---|---|
| Checking against metadata in the cloud. The Microsoft Defender Antivirus cloud service uses machine learning models as an extra layer of defense. These machine learning models include metadata, so when a suspicious or malicious file is detected, its metadata is checked. To learn more, see Blog: Get to know the advanced technologies at the core of Microsoft Defender for Endpoint next-generation protection |
Microsoft Defender for Endpoint Plan 1 or Plan 2 (Standalone or included in a plan like Microsoft 365 E3 or E5) | |
| Cloud protection and sample submission. Files and executables can be sent to the Microsoft Defender Antivirus cloud service for detonation and analysis. Automatic sample submission relies on cloud protection, although it can also be configured as a standalone setting. To learn more, see Cloud protection and sample submission in Microsoft Defender Antivirus. |
Microsoft Defender for Endpoint Plan 1 or Plan 2 (Standalone or included in a plan like Microsoft 365 E3 or E5) | |
| Tamper protection. Tamper protection helps protect against unwanted changes to your organization's security settings. To learn more, see Protect security settings with tamper protection. |
Microsoft Defender for Endpoint Plan 2 (Standalone or included in a plan like Microsoft 365 E5) | |
| Block at first sight Block at first sight detects new malware and blocks it within seconds. When a suspicious or malicious file is detected, block at first sight capabilities queries the cloud protection backend and applies heuristics, machine learning, and automated analysis of the file to determine whether it's a threat. To learn more, see What is "block at first sight"? |
Microsoft Defender for Endpoint Plan 1 or Plan 2 (Standalone or included in a plan like Microsoft 365 E3 or E5) | |
| Emergency signature updates. When malicious content is detected, emergency signature updates and fixes are deployed. Rather than wait for the next regular update, you can receive these fixes and updates within minutes. To learn more about updates, see Microsoft Defender Antivirus security intelligence and product updates. |
Microsoft Defender for Endpoint Plan 2 (Standalone or included in a plan like Microsoft 365 E5) | |
| Endpoint detection and response (EDR) in block mode. EDR in block mode provides extra protection when Microsoft Defender Antivirus isn't the primary antivirus product on a device. EDR in block mode remediates artifacts found during EDR-generated scans that the non-Microsoft, primary antivirus solution might have missed. When enabled for devices with Microsoft Defender Antivirus as the primary antivirus solution, EDR in block mode provides the added benefit of automatically remediating artifacts identified during EDR-generated scans. To learn more, see EDR in block mode. |
Microsoft Defender for Endpoint Plan 2 (Standalone or included in a plan like Microsoft 365 E5) | |
| Attack surface reduction rules. ASR rules are intelligent rules that you can configure to help stop malware. Certain rules require cloud protection to be turned on in order to function fully. These rules include: - Block executable files from running unless they meet a prevalence, age, or trusted list criteria - Use advanced protection against ransomware - Block untrusted programs from running from removable drives To learn more, see Use attack surface reduction rules to prevent malware infection. |
Microsoft Defender for Endpoint Plan 1 or Plan 2 (Standalone or included in a plan like Microsoft 365 E3 or E5) | |
| Indicators of compromise (IoCs). In Defender for Endpoint, IoCs can be configured to define the detection, prevention, and exclusion of entities. Examples: "Allow" indicators can be used to define exceptions to antivirus scans and remediation actions. "Alert and block" indicators can be used to prevent files or processes from executing. To learn more, see Create indicators. |
Microsoft Defender for Endpoint Plan 2 (Standalone or included in a plan like Microsoft 365 E5) |
Methods to configure cloud protection
You can turn Microsoft Defender Antivirus cloud protection on or off by using one of several methods, such as:
You can also use Configuration Manager. And, you can turn cloud protection on or off on individual endpoints by using the Windows Security app.
For more information about the specific network-connectivity requirements to ensure your endpoints can connect to the cloud protection service, see Configure and validate network connections.
Note
In Windows 10 and Windows 11, there is no difference between the Basic and Advanced reporting options described in this article. This is a legacy distinction and choosing either setting results in the same level of cloud protection. There is no difference in the type or amount of information that is shared. For more information on what we collect, see the Microsoft Privacy Statement.
Use Microsoft Intune to turn on cloud protection
Go to the Intune admin center (https://intune.microsoft.com) and sign in.
Choose Endpoint security > Antivirus.
In the AV policies section, either select an existing policy, or choose + Create Policy.
Task Steps Create a new policy 1. For Platform, select Windows 10, Windows 11, and Windows Server.
2. For Profile, select Microsoft Defender Antivirus.
3. On the Basics page, specify a name and description for the policy, and then choose Next.
4. In the Defender section, find Allow Cloud Protection, and set it to Allowed. Then choose Next.
5. Scroll down to Submit Samples Consent, and select one of the following settings:
- Send all samples automatically
- Send safe samples automatically
6. On the Scope tags step, if your organization is using scope tags, select the tags you want to use, and then choose Next.
7. On the Assignments step, select the groups, users, or devices that you want to apply this policy to, and then choose Next.
8. On the Review + create step, review the settings for your policy, and then choose Create.Edit an existing policy 1. Select the policy that you want to edit.
2. Under Configuration settings, choose Edit.
3. In the Defender section, find Allow Cloud Protection, and set it to Allowed.
4. Scroll down to Submit Samples Consent, and select one of the following settings:
- Send all samples automatically
- Send safe samples automatically
5. Select Review + save.
Tip
To learn more about Microsoft Defender Antivirus settings in Intune, see Antivirus policy for endpoint security in Intune.
Use Group Policy to turn on cloud protection
On your Group Policy management device, open the Group Policy Management Console, right-click the Group Policy Object you want to configure and select Edit.
In the Group Policy Management Editor, go to Computer configuration.
Select Administrative templates.
Expand the tree to Windows components > Microsoft Defender Antivirus > MAPS
Note
MAPS settings are equal to cloud-delivered protection.
Double-click Join Microsoft MAPS. Ensure the option is turned on and set to Basic MAPS or Advanced MAPS. Select OK.
You can choose to send basic or additional information about detected software:
Basic MAPS: Basic membership sends basic information to Microsoft about malware and potentially unwanted software that has been detected on your device. Information includes where the software came from (like URLs and partial paths), the actions taken to resolve the threat, and whether the actions were successful.
Advanced MAPS: In addition to basic information, advanced membership sends detailed information about malware and potentially unwanted software, including the full path to the software, and detailed information about how the software has affected your device.
Double-click Send file samples when further analysis is required. Ensure that the first option is set to Enabled and that the other options are set to either:
- Send safe samples (1)
- Send all samples (3)
Note
The Send safe samples (1) option means that most samples are sent automatically. Files that are likely to contain personal information prompt the user for additional confirmation. Setting the option to Always Prompt (0) lowers the protection state of the device. Setting it to Never send (2) means that the Block at First Sight feature of Microsoft Defender for Endpoint won't work.
Select OK.
Use PowerShell cmdlets to turn on cloud protection
The following cmdlets can turn on cloud protection:
Set-MpPreference -MAPSReporting Advanced
Set-MpPreference -SubmitSamplesConsent SendAllSamples
For more information on how to use PowerShell with Microsoft Defender Antivirus, see Use PowerShell cmdlets to configure and run Microsoft Defender Antivirus and Microsoft Defender Antivirus cmdlets. Policy CSP - Defender also has more information specifically on -SubmitSamplesConsent.
Important
You can set -SubmitSamplesConsent to SendSafeSamples (the default, recommended setting), NeverSend, or AlwaysPrompt.
The SendSafeSamples setting means that most samples are sent automatically. Files that are likely to contain personal information result in a prompt for the user to continue, and require confirmation.
The NeverSend and AlwaysPrompt settings lower the protection level of the device. Furthermore, the NeverSend setting means that the Block at First Sight feature of Microsoft Defender for Endpoint won't work.
Use Windows Management Instruction (WMI) to turn on cloud protection
Use the Set method of the MSFT_MpPreference class for the following properties:
MAPSReporting
SubmitSamplesConsent
For more information about allowed parameters, see Windows Defender WMIv2 APIs.
Turn on cloud protection on individual clients with the Windows Security app
Note
If the Configure local setting override for reporting Microsoft MAPS Group Policy setting is set to Disabled, then the Cloud-based protection setting in Windows Settings are greyed out and unavailable. Changes made through a Group Policy Object must first be deployed to individual endpoints before the setting is updated in Windows Settings.
Open the Windows Security app by selecting the shield icon in the task bar, or by searching the start menu for Windows Security.
Select the Virus & threat protection tile (or the shield icon on the left menu bar), and then, under Virus & threat protection settings, select Manage settings.
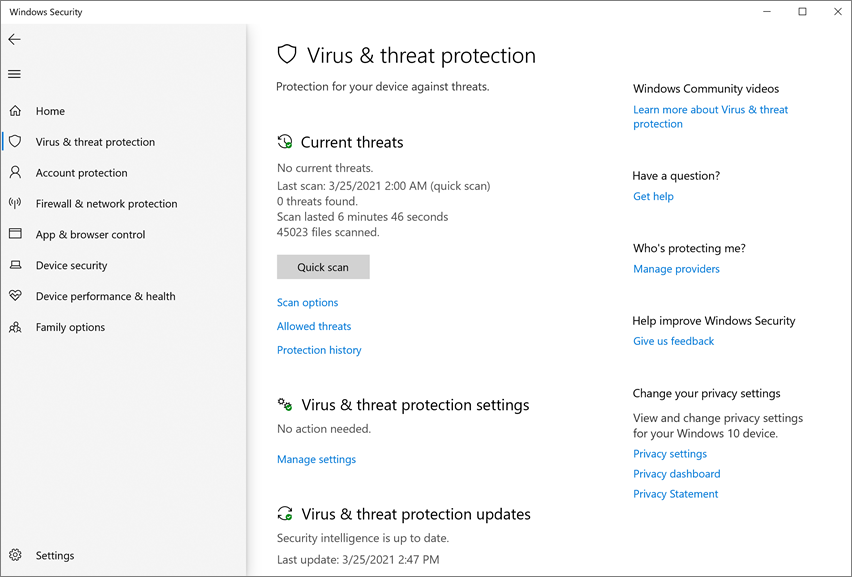
Confirm that Cloud-based Protection and Automatic sample submission are switched to On.
Note
If automatic sample submission has been configured with Group Policy, then the setting is greyed out and unavailable.

See also
Use Microsoft cloud protection in Microsoft Defender Antivirus
Use PowerShell cmdlets to manage Microsoft Defender Antivirus
Tip
If you're looking for Antivirus related information for other platforms, see:
- Set preferences for Microsoft Defender for Endpoint on macOS
- Microsoft Defender for Endpoint on Mac
- macOS Antivirus policy settings for Microsoft Defender Antivirus for Intune
- Set preferences for Microsoft Defender for Endpoint on Linux
- Microsoft Defender for Endpoint on Linux
- Configure Defender for Endpoint on Android features
- Configure Microsoft Defender for Endpoint on iOS features
Tip
Do you want to learn more? Engage with the Microsoft Security community in our Tech Community: Microsoft Defender for Endpoint Tech Community.
Feedback
Coming soon: Throughout 2024 we will be phasing out GitHub Issues as the feedback mechanism for content and replacing it with a new feedback system. For more information see: https://aka.ms/ContentUserFeedback.
Submit and view feedback for