Walkthrough: Test-first development with the Generate From Usage feature
Applies to: ![]() Visual Studio
Visual Studio ![]() Visual Studio for Mac
Visual Studio for Mac
Note
This article applies to Visual Studio 2017. If you're looking for the latest Visual Studio documentation, see Visual Studio documentation. We recommend upgrading to the latest version of Visual Studio. Download it here
This topic demonstrates how to use the Generate From Usage feature, which supports test-first development.
Test-first development is an approach to software design in which you first write unit tests based on product specifications, and then write the source code that is required to make the tests succeed. Visual Studio supports test-first development by generating new types and members in the source code when you first reference them in your test cases, before they are defined.
Visual Studio generates the new types and members with minimal interruption to your workflow. You can create stubs for types, methods, properties, fields, or constructors without leaving your current location in code. When you open a dialog box to specify options for type generation, the focus returns immediately to the current open file when the dialog box closes.
The Generate From Usage feature can be used with test frameworks that integrate with Visual Studio. In this topic, the Microsoft Unit Testing Framework is demonstrated.
Note
Your computer might show different names or locations for some of the Visual Studio user interface elements in this article. You may be using a different edition of Visual Studio or different environment settings. For more information, see Personalize the IDE.
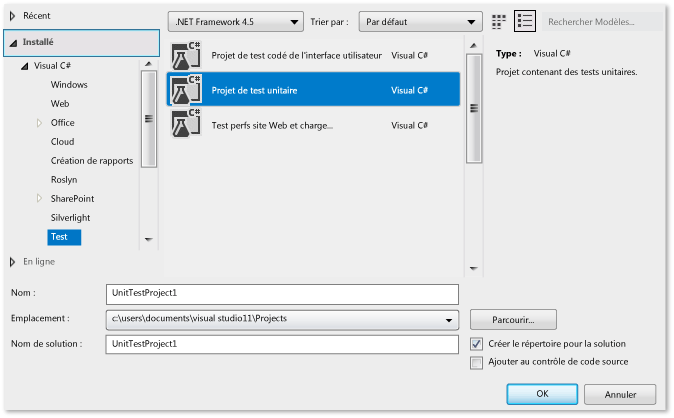
Create a Windows Class Library project and a Test project
In C# or Visual Basic, create a new Windows Class Library project. Name it
GFUDemo_VBorGFUDemo_CS, depending on which language you are using.In Solution Explorer, right-click the solution icon at the top, choose Add > New Project.
Create a new Unit Test Project (.NET Framework) project.
The following illustration shows the New Project dialog box for C# templates.
Add a reference to the Class Library project
In Solution Explorer, under your unit test project, right-click the References entry and choose Add Reference.
In the Reference Manager dialog box, select Projects and then select the class library project.
Choose OK to close the Reference Manager dialog box.
Save your solution. You are now ready to begin writing tests.
Generate a new class from a unit test
The test project contains a file that is named UnitTest1. Double-click this file in Solution Explorer to open it in the code editor. A test class and test method have been generated.
Locate the declaration for class
UnitTest1and rename it toAutomobileTest.Note
IntelliSense now provides two alternatives for IntelliSense statement completion: completion mode and suggestion mode. Use suggestion mode for situations in which classes and members are used before they are defined. When an IntelliSense window is open, you can press Ctrl+Alt+Space to toggle between completion mode and suggestion mode. See Use IntelliSense for more information. Suggestion mode will help when you are typing
Automobilein the next step.Locate the
TestMethod1()method and rename it toDefaultAutomobileIsInitializedCorrectly(). Inside this method, create a new instance of a class namedAutomobile, as shown in the following screenshots. A wavy underline appears, which indicates a compile-time error, and a Quick Actions error light bulb appears in the left margin, or directly below the squiggle if you hover over it.

Choose or click the Quick Actions light bulb. You'll see an error message that states that the type
Automobileis not defined. You are also presented with some solutions.Click Generate new type to open the Generate Type dialog box. This dialog box provides options that include generating the type in a different project.
In the Project list, click GFUDemo_VB or GFUDemo_CS to instruct Visual Studio to add the file to the class library project instead of the test project. If it's not already selected, choose Create new file and name it Automobile.cs or Automobile.vb.
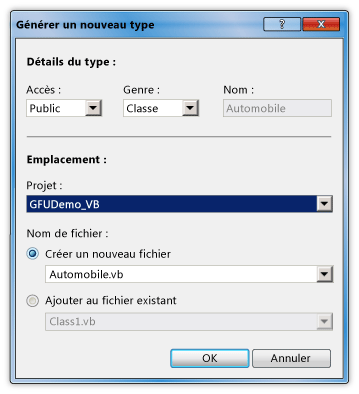
Click OK to close the dialog box and create the new file.
In Solution Explorer, look under the GFUDemo_VB or GFUDemo_CS project node to verify that the new Automobile.vb or Automobile.cs file is there. In the code editor, the focus is still in
AutomobileTest.DefaultAutomobileIsInitializedCorrectly, which enables you to continue to write your test with a minimum of interruption.
Generate a property stub
Assume that the product specification states that the Automobile class has two public properties named Model and TopSpeed. These properties must be initialized with default values of "Not specified" and -1 by the default constructor. The following unit test will verify that the default constructor sets the properties to their correct default values.
Add the following line of code to the
DefaultAutomobileIsInitializedCorrectlytest method.Assert.IsTrue((myAuto.Model == "Not specified") && (myAuto.TopSpeed == -1));Assert.IsTrue((myAuto.Model = "Not specified") And (myAuto.TopSpeed = -1))Because the code references two undefined properties on
Automobile, a wavy underline appears underModelandTopSpeed. Hover overModeland choose the Quick Actions error light bulb, then choose Generate property 'Automobile.Model'.Generate a property stub for the
TopSpeedproperty in the same way.In the
Automobileclass, the types of the new properties are correctly inferred from the context.
Generate a stub for a new constructor
Now we'll create a test method that will generate a constructor stub to initialize the Model and TopSpeed properties. Later, you'll add more code to complete the test.
Add the following additional test method to your
AutomobileTestclass.[TestMethod] public void AutomobileWithModelNameCanStart() { string model = "Contoso"; int topSpeed = 199; Automobile myAuto = new Automobile(model, topSpeed); }<TestMethod()> Public Sub AutomobileWithModelNameCanStart() Dim model As String = "Contoso" Dim topSpeed As Integer = 199 Dim myAuto As New Automobile(model, topSpeed) End SubClick the Quick Actions error light bulb under the red squiggle, and then click Generate constructor in 'Automobile'.
In the
Automobileclass file, notice that the new constructor has examined the names of the local variables that are used in the constructor call, found properties that have the same names in theAutomobileclass, and supplied code in the constructor body to store the argument values in theModelandTopSpeedproperties.After you generate the new constructor, a wavy underline appears under the call to the default constructor in
DefaultAutomobileIsInitializedCorrectly. The error message states that theAutomobileclass has no constructor that takes zero arguments. To generate an explicit default constructor that does not have parameters, click the Quick Actions error light bulb, and then click Generate constructor in 'Automobile'.
Generate a stub for a method
Assume that the specification states that a new Automobile can be put into a IsRunning state if its Model and TopSpeed properties are set to something other than the default values.
Add the following lines to the
AutomobileWithModelNameCanStartmethod.myAuto.Start(); Assert.IsTrue(myAuto.IsRunning == true);myAuto.Start() Assert.IsTrue(myAuto.IsRunning = True)Click the Quick Actions error light bulb for the
myAuto.Startmethod call and then click Generate method 'Automobile.Start'.Click the Quick Actions light bulb for the
IsRunningproperty and then click Generate property 'Automobile.IsRunning'.The
Automobileclass now contains a method namedStart()and a property namedIsRunning.
Run the tests
On the Test menu, choose Run > All Tests.
The Run > All Tests command runs all the tests in any test frameworks that are written for the current solution. In this case, there are two tests, and they both fail, as expected. The
DefaultAutomobileIsInitializedCorrectlytest fails because theAssert.IsTruecondition returnsFalse. TheAutomobileWithModelNameCanStarttest fails because theStartmethod in theAutomobileclass throws an exception.The Test Results window is shown in the following illustration.
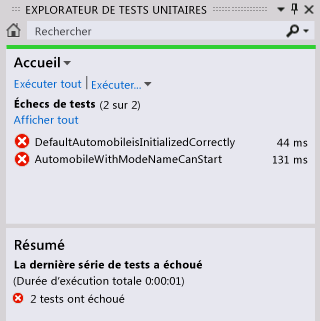
In the Test Results window, double-click on each test result row to go to the location of each test.
Implement the source code
Add the following code to the default constructor so that the
Model,TopSpeedandIsRunningproperties are all initialized to their correct default values of"Not specified",-1, andFalse(orfalsefor C#).public Automobile() { this.Model = "Not specified"; this.TopSpeed = -1; this.IsRunning = true; }Sub New() Model = "Not specified" TopSpeed = -1 IsRunning = True End SubWhen the
Startmethod is called, it should set theIsRunningflag to true only if theModelorTopSpeedproperties are set to something other than their default value. Remove theNotImplementedExceptionfrom the method body and add the following code.public void Start() { if (this.Model != "Not specified" || this.TopSpeed != -1) this.IsRunning = true; else this.IsRunning = false; }Sub Start() If Model <> "Not specified" Or TopSpeed <> -1 Then IsRunning = True Else IsRunning = False End If End Sub
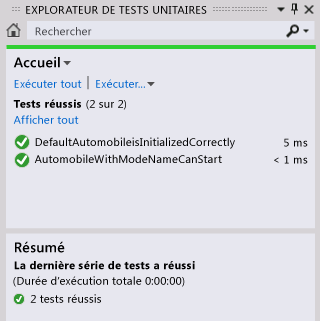
Run the tests again
On the Test menu, point to Run, and then click All Tests.
This time the tests pass. The Test Results window is shown in the following illustration.