Menambahkan Pemberitahuan Push ke Aplikasi iOS Anda
Gambaran Umum
Dalam tutorial ini, Anda menambahkan pemberitahuan push ke proyek mulai cepat iOS sehingga pemberitahuan push dikirim ke perangkat setiap kali rekaman dimasukkan.
Jika Anda tidak menggunakan proyek server mulai cepat yang diunduh, Anda akan memerlukan paket ekstensi pemberitahuan push. Untuk informasi selengkapnya, lihat Panduan bekerja dengan SDK server backend .NET untuk Azure Mobile Apps .
Simulator iOS tidak mendukung pemberitahuan push. Anda memerlukan perangkat iOS fisik dan keanggotaan Program Pengembang Apple.
Mengonfigurasi Notification Hub
Fitur Mobile Apps Azure App Service menggunakan Azure Notification Hubs untuk mengirim push, sehingga Anda akan mengonfigurasi hub pemberitahuan untuk aplikasi seluler Anda.
Di portal Azure, buka App Services, lalu pilih back end aplikasi Anda. Di bawah Pengaturan, pilih Dorong.
Untuk menambahkan sumber daya hub pemberitahuan ke aplikasi, pilih Sambungkan. Anda dapat membuat hub atau menyambungkan ke hub yang sudah ada.
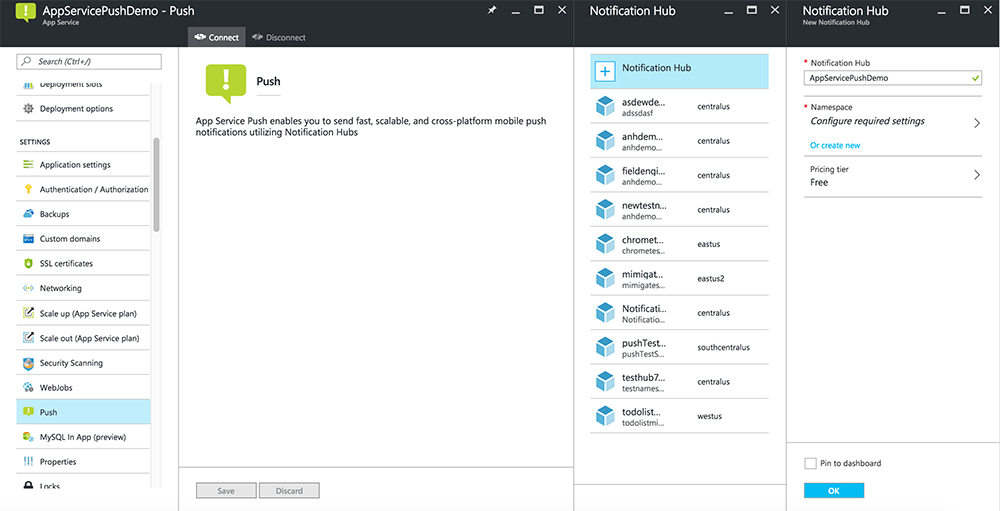
Sekarang Anda telah menyambungkan hub pemberitahuan ke proyek back-end Mobile Apps Anda. Nantinya Anda mengonfigurasi hub pemberitahuan ini untuk terhubung ke sistem pemberitahuan platform (PNS) untuk mendorong ke perangkat.
Mendaftarkan aplikasi untuk pemberitahuan push
- Daftarkan ID aplikasi untuk aplikasi Anda. Buat ID aplikasi eksplisit (bukan ID aplikasi kartubebas) dan, untuk ID Bundel, gunakan ID bundel yang tepat yang ada di proyek mulai cepat Xcode Anda. Sangat penting juga bahwa Anda memilih opsi Pemberitahuan Push .
- Selanjutnya, untuk mempersiapkan konfigurasi pemberitahuan push, buat sertifikat SSL "Pengembangan" atau "Distribusi".
Mengonfigurasi Azure untuk mengirim pemberitahuan push
- Di Mac Anda, luncurkan Akses Rantai Kunci. Di bilah navigasi kiri, di bawah Kategori, buka Sertifikat Saya. Temukan sertifikat SSL yang Anda unduh di bagian sebelumnya, lalu ungkapkan kontennya. Pilih hanya sertifikat (jangan pilih kunci privat). Kemudian ekspor.
- Di portal Azure, pilih Telusuri Semua>App Services. Kemudian pilih back end Mobile Apps Anda.
- Di bawah Pengaturan, pilih App Service Push. Kemudian pilih nama hub pemberitahuan Anda.
- Buka Apple Push Notification Services>Upload Certificate. Unggah file .p12, memilih Mode yang benar (tergantung pada apakah sertifikat SSL klien Anda dari sebelumnya adalah produksi atau kotak pasir). Simpan perubahan apa pun.
Layanan Anda sekarang dikonfigurasi untuk bekerja dengan pemberitahuan push di iOS.
Memperbarui backend untuk mengirim pemberitahuan push
Backend .NET (C#):
Di Visual Studio, klik kanan proyek server dan klik Kelola Paket NuGet, cari
Microsoft.Azure.NotificationHubs, lalu klik Instal. Ini menginstal pustaka Notification Hubs untuk mengirim pemberitahuan dari backend Anda.Dalam proyek Visual Studio backend, buka Pengontrol>TodoItemController.cs. Di bagian atas file, tambahkan pernyataan berikut
using:using Microsoft.Azure.Mobile.Server.Config; using Microsoft.Azure.NotificationHubs;Ganti metode
PostTodoItemdengan kode berikut:public async Task<IHttpActionResult> PostTodoItem(TodoItem item) { TodoItem current = await InsertAsync(item); // Get the settings for the server project. HttpConfiguration config = this.Configuration; MobileAppSettingsDictionary settings = this.Configuration.GetMobileAppSettingsProvider().GetMobileAppSettings(); // Get the Notification Hubs credentials for the Mobile App. string notificationHubName = settings.NotificationHubName; string notificationHubConnection = settings .Connections[MobileAppSettingsKeys.NotificationHubConnectionString].ConnectionString; // Create a new Notification Hub client. NotificationHubClient hub = NotificationHubClient .CreateClientFromConnectionString(notificationHubConnection, notificationHubName); // iOS payload var appleNotificationPayload = "{\"aps\":{\"alert\":\"" + item.Text + "\"}}"; try { // Send the push notification and log the results. var result = await hub.SendAppleNativeNotificationAsync(appleNotificationPayload); // Write the success result to the logs. config.Services.GetTraceWriter().Info(result.State.ToString()); } catch (System.Exception ex) { // Write the failure result to the logs. config.Services.GetTraceWriter() .Error(ex.Message, null, "Push.SendAsync Error"); } return CreatedAtRoute("Tables", new { id = current.Id }, current); }Menerbitkan ulang proyek server.
Node.js backend:
Siapkan proyek backend Anda.
Ganti skrip tabel todoitem.js dengan kode berikut:
var azureMobileApps = require('azure-mobile-apps'),
    promises = require('azure-mobile-apps/src/utilities/promises'),
    logger = require('azure-mobile-apps/src/logger');

var table = azureMobileApps.table();

// When adding record, send a push notification via APNS
table.insert(function (context) {
    // For details of the Notification Hubs JavaScript SDK,
    // see https://aka.ms/nodejshubs
    logger.info('Running TodoItem.insert');

    // Create a payload that contains the new item Text.
    var payload = "{\"aps\":{\"alert\":\"" + context.item.text + "\"}}";

    // Execute the insert; Push as a post-execute action when results are returned as a Promise.
    return context.execute()
        .then(function (results) {
            // Only do the push if configured
            if (context.push) {
                context.push.apns.send(null, payload, function (error) {
                    if (error) {
                        logger.error('Error while sending push notification: ', error);
                    } else {
                        logger.info('Push notification sent successfully!');
                    }
                });
            }
            return results;
        })
        .catch(function (error) {
            logger.error('Error while running context.execute: ', error);
        });
});

module.exports = table;
Saat mengedit file di komputer lokal Anda, terbitkan ulang proyek server.
Menambahkan pemberitahuan push ke aplikasi
Objective-C:
Di QSAppDelegate.m, impor iOS SDK dan QSTodoService.h:
#import <MicrosoftAzureMobile/MicrosoftAzureMobile.h>
#import "QSTodoService.h"
Di
didFinishLaunchingWithOptionsQSAppDelegate.m, sisipkan baris berikut tepat sebelumreturn YES;:UIUserNotificationSettings* notificationSettings = [UIUserNotificationSettings settingsForTypes:UIUserNotificationTypeAlert | UIUserNotificationTypeBadge | UIUserNotificationTypeSound categories:nil]; [[UIApplication sharedApplication] registerUserNotificationSettings:notificationSettings]; [[UIApplication sharedApplication] registerForRemoteNotifications];Di QSAppDelegate.m, tambahkan metode handler berikut. Aplikasi Anda sekarang diperbarui untuk mendukung pemberitahuan push.
// Registration with APNs is successful
- (void)application:(UIApplication *)application
didRegisterForRemoteNotificationsWithDeviceToken:(NSData *)deviceToken {

    QSTodoService *todoService = [QSTodoService defaultService];
    MSClient *client = todoService.client;

    [client.push registerDeviceToken:deviceToken completion:^(NSError *error) {
        if (error != nil) {
            NSLog(@"Error registering for notifications: %@", error);
        }
    }];
}

// Handle any failure to register
- (void)application:(UIApplication *)application didFailToRegisterForRemoteNotificationsWithError:
(NSError *)error {
    NSLog(@"Failed to register for remote notifications: %@", error);
}

// Use userInfo in the payload to display an alert.
- (void)application:(UIApplication *)application
        didReceiveRemoteNotification:(NSDictionary *)userInfo {
    NSLog(@"%@", userInfo);

    NSDictionary *apsPayload = userInfo[@"aps"];
    NSString *alertString = apsPayload[@"alert"];

    // Create alert with notification content.
    UIAlertController *alertController = [UIAlertController
                                    alertControllerWithTitle:@"Notification"
                                    message:alertString
                                    preferredStyle:UIAlertControllerStyleAlert];

    UIAlertAction *cancelAction = [UIAlertAction
                                    actionWithTitle:NSLocalizedString(@"Cancel", @"Cancel")
                                    style:UIAlertActionStyleCancel
                                    handler:^(UIAlertAction *action)
                                    {
                                        NSLog(@"Cancel");
                                    }];

    UIAlertAction *okAction = [UIAlertAction
                                actionWithTitle:NSLocalizedString(@"OK", @"OK")
                                style:UIAlertActionStyleDefault
                                handler:^(UIAlertAction *action)
                                {
                                    NSLog(@"OK");
                                }];

    [alertController addAction:cancelAction];
    [alertController addAction:okAction];

    // Get current view controller.
    UIViewController *currentViewController = [[[[UIApplication sharedApplication] delegate] window] rootViewController];
    while (currentViewController.presentedViewController)
    {
        currentViewController = currentViewController.presentedViewController;
    }

    // Display alert.
    [currentViewController presentViewController:alertController animated:YES completion:nil];

}
Cepat:
Tambahkan file ClientManager.swift dengan konten berikut. Ganti %AppUrl% dengan URL backend Azure Mobile App.
class ClientManager {
    static let sharedClient = MSClient(applicationURLString: "%AppUrl%")
}
Di ToDoTableViewController.swift, ganti
let clientbaris yang menginisialisasiMSClientdengan baris ini:let client = ClientManager.sharedClientDi AppDelegate.swift, ganti isi
func applicationsebagai berikut:func application(application: UIApplication, didFinishLaunchingWithOptions launchOptions: [NSObject: AnyObject]?) -> Bool { application.registerUserNotificationSettings( UIUserNotificationSettings(forTypes: [.Alert, .Badge, .Sound], categories: nil)) application.registerForRemoteNotifications() return true }Di AppDelegate.swift, tambahkan metode handler berikut. Aplikasi Anda sekarang diperbarui untuk mendukung pemberitahuan push.
func application(application: UIApplication,
    didRegisterForRemoteNotificationsWithDeviceToken deviceToken: NSData) {
    ClientManager.sharedClient.push?.registerDeviceToken(deviceToken) { error in
        print("Error registering for notifications: ", error?.description)
    }
}

func application(application: UIApplication,
    didFailToRegisterForRemoteNotificationsWithError error: NSError) {
    print("Failed to register for remote notifications: ", error.description)
}

func application(application: UIApplication,
    didReceiveRemoteNotification userInfo: [NSObject: AnyObject]) {

    print(userInfo)

    let apsNotification = userInfo["aps"] as? NSDictionary
    let apsString       = apsNotification?["alert"] as? String

    let alert = UIAlertController(title: "Alert", message: apsString, preferredStyle: .Alert)
    let okAction = UIAlertAction(title: "OK", style: .Default) { _ in
        print("OK")
    }
    let cancelAction = UIAlertAction(title: "Cancel", style: .Default) { _ in
        print("Cancel")
    }

    alert.addAction(okAction)
    alert.addAction(cancelAction)

    var currentViewController = self.window?.rootViewController
    while currentViewController?.presentedViewController != nil {
        currentViewController = currentViewController?.presentedViewController
    }

    currentViewController?.presentViewController(alert, animated: true) {}

}
Menguji pemberitahuan push
- Di Xcode, tekan Jalankan dan mulai aplikasi di perangkat iOS (perhatikan bahwa pendorongan tidak akan berfungsi pada simulator). Klik OK untuk menerima pemberitahuan push; permintaan ini terjadi saat pertama kali aplikasi berjalan.
- Di aplikasi, tambahkan item baru dan klik +.
- Verifikasi bahwa pemberitahuan diterima, lalu klik OK untuk menutup pemberitahuan. Anda sekarang telah berhasil menyelesaikan tutorial ini.
Lainnya
- Templat memberi Anda fleksibilitas untuk mengirim dorongan lintas platform dan dorongan yang dilokalkan. Cara Menggunakan Pustaka Klien iOS untuk Azure Mobile Apps menunjukkan cara mendaftarkan templat.