Menambahkan pemberitahuan push ke aplikasi Xamarin.Android Anda
Gambaran Umum
Dalam tutorial ini, Anda menambahkan pemberitahuan push ke proyek mulai cepat Xamarin.Android sehingga pemberitahuan push dikirim ke perangkat setiap kali rekaman dimasukkan.
Jika Anda tidak menggunakan proyek server mulai cepat yang diunduh, Anda akan memerlukan paket ekstensi pemberitahuan push. Untuk informasi selengkapnya, lihat panduan Bekerja dengan SDK server backend .NET untuk Azure Mobile Apps .
Prasyarat
Tutorial ini memerlukan penyiapan:
- Akun Google aktif. Anda dapat mendaftar akun Google di accounts.google.com.
- Komponen Klien Google Cloud Messaging.
Mengonfigurasi Notification Hub
Fitur Mobile Apps Azure App Service menggunakan Azure Notification Hubs untuk mengirim push, sehingga Anda akan mengonfigurasi hub pemberitahuan untuk aplikasi seluler Anda.
Di portal Azure, buka App Services, lalu pilih back end aplikasi Anda. Di bawah Pengaturan, pilih Dorong.
Untuk menambahkan sumber daya hub pemberitahuan ke aplikasi, pilih Sambungkan. Anda dapat membuat hub atau menyambungkan ke hub yang sudah ada.
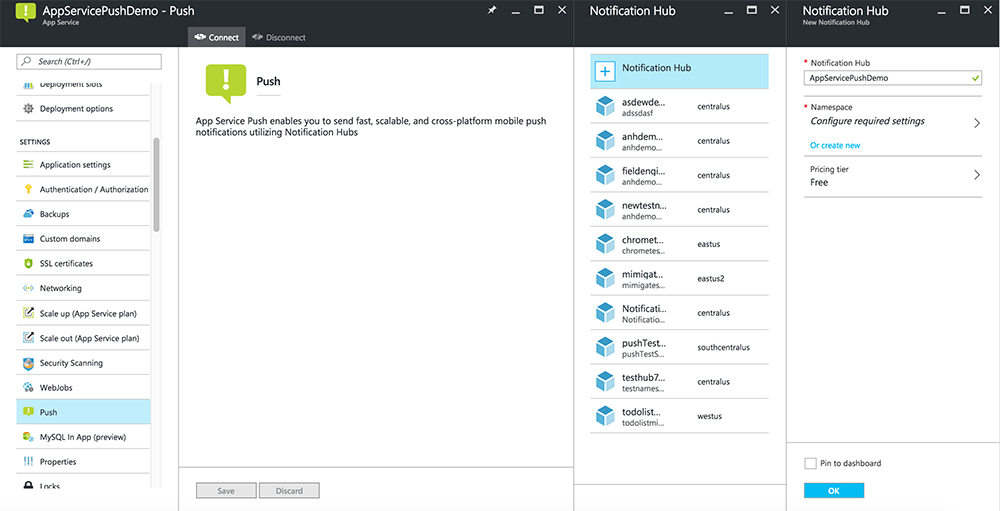
Sekarang Anda telah menyambungkan hub pemberitahuan ke proyek back-end Mobile Apps Anda. Nantinya Anda mengonfigurasi hub pemberitahuan ini untuk terhubung ke sistem pemberitahuan platform (PNS) untuk mendorong ke perangkat.
Mengaktifkan Firebase Cloud Messaging
Masuk ke Konsol Firebase. Buat proyek Firebase baru jika Anda belum memilikinya.
Setelah membuat proyek, pilih Tambahkan Firebase ke aplikasi Android Anda.

Di halaman Tambahkan Firebase ke aplikasi Android Anda, lakukan langkah-langkah berikut:
Untuk nama paket Android, salin nilai applicationId Anda di file build.gradle aplikasi. Contohnya,
com.fabrikam.fcmtutorial1app.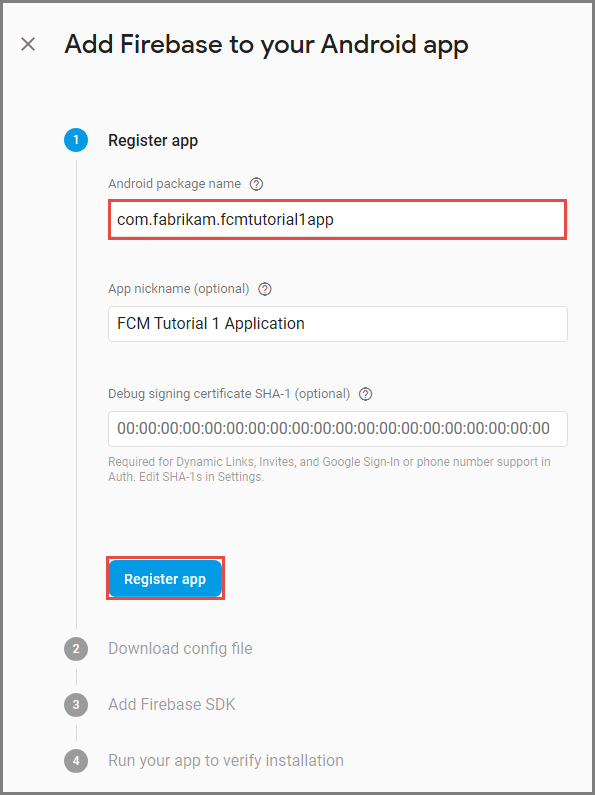
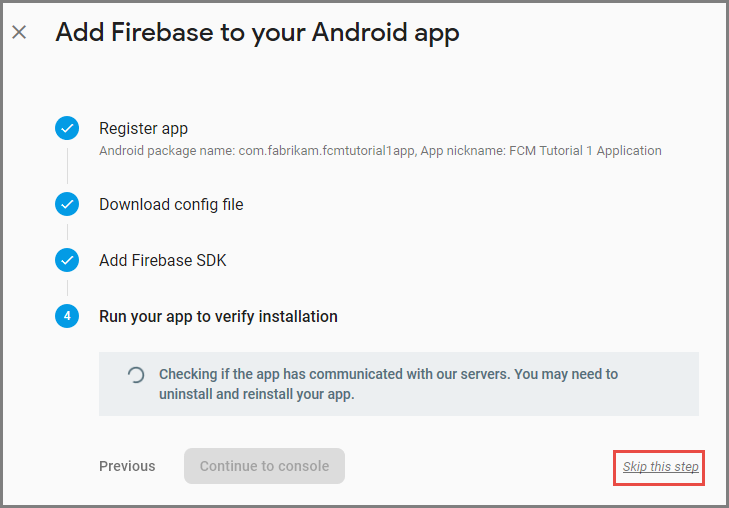
Pilih Daftarkan aplikasi.
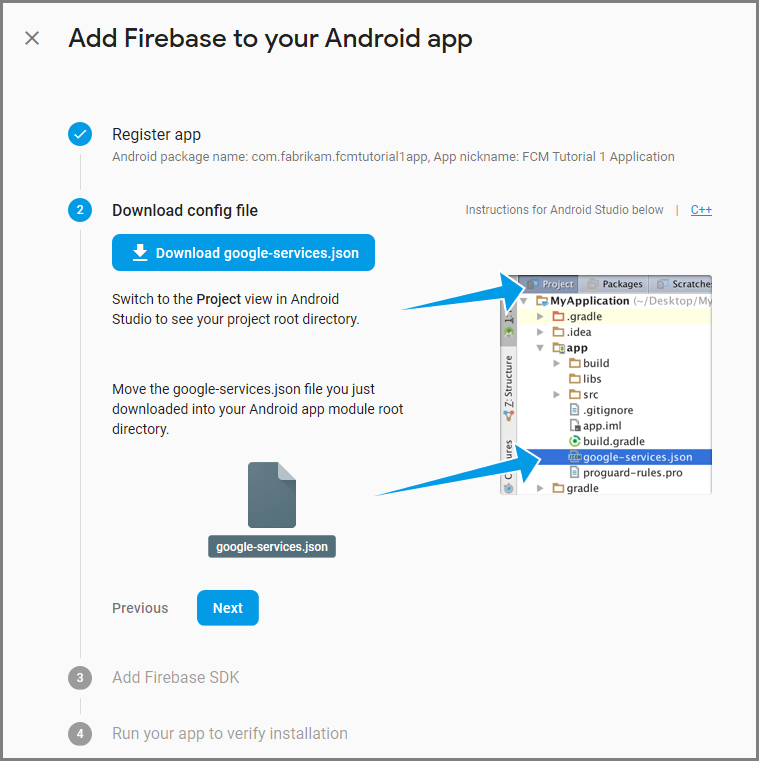
Pilih Unduh google-services.jsanda, simpan file ke folder aplikasi proyek Anda, lalu pilih Berikutnya.
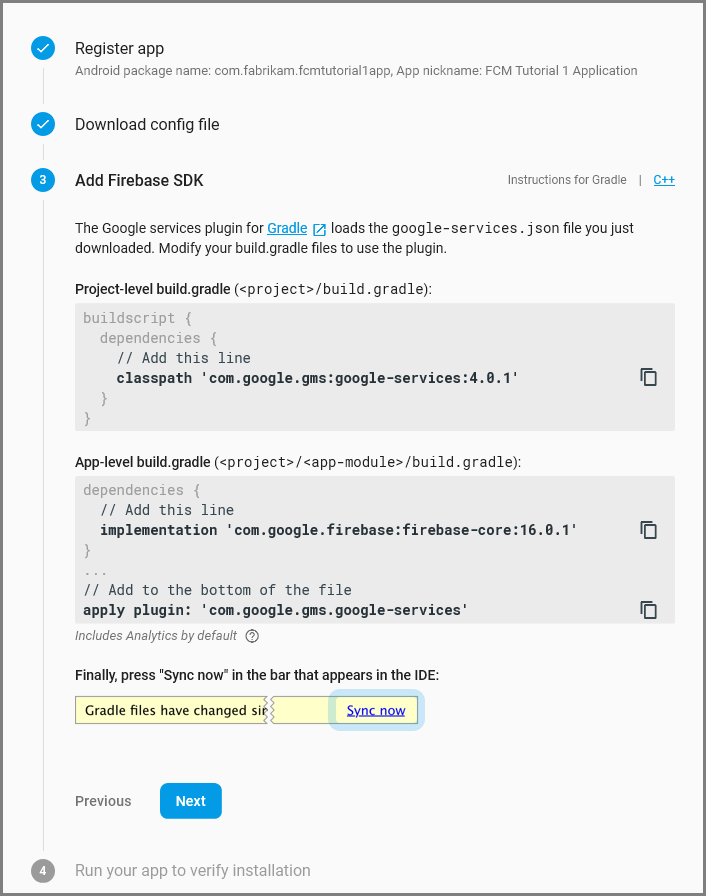
Buat perubahan konfigurasi berikut ke proyek Anda di Android Studio.
Di file build.gradle tingkat proyek Anda (<project>/build.gradle), tambahkan pernyataan berikut ke bagian dependensi.
classpath 'com.google.gms:google-services:4.0.1'Di file gradle build tingkat aplikasi Anda (<project>/<app-module>/build.gradle), tambahkan pernyataan berikut ke bagian dependensi.
implementation 'com.google.firebase:firebase-core:16.0.8'
implementation 'com.google.firebase:firebase-messaging:17.3.4'
Tambahkan baris berikut ke bagian akhir file build.gradle tingkat aplikasi setelah bagian dependensi.
apply plugin: 'com.google.gms.google-services'Pilih Sinkronkan sekarang pada toolbar.
Pilih Selanjutnya.
Pilih Lompati langkah ini.
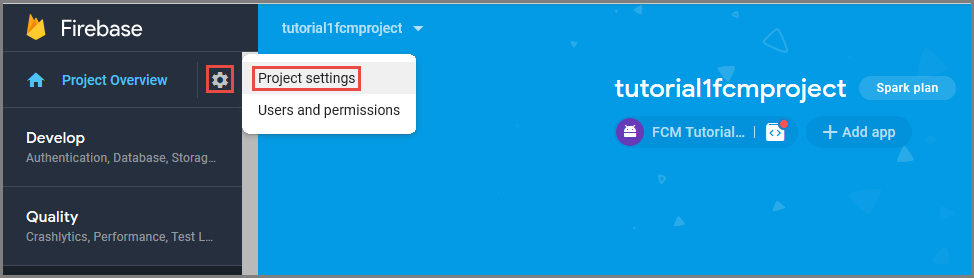
Di konsol Firebase, pilih cog untuk proyek Anda. Pilih Pengaturan Proyek.
Jika belum mengunduh file google-services.json ke dalam folder aplikasi proyek Android Studio Anda, Anda dapat melakukannya di halaman ini.
Alihkan ke tab Perpesanan Cloud di bagian atas.
Salin dan simpan Kunci Server untuk digunakan nanti. Gunakan nilai ini untuk mengonfigurasi hub Anda.
Mengonfigurasi Azure untuk mengirim permintaan push
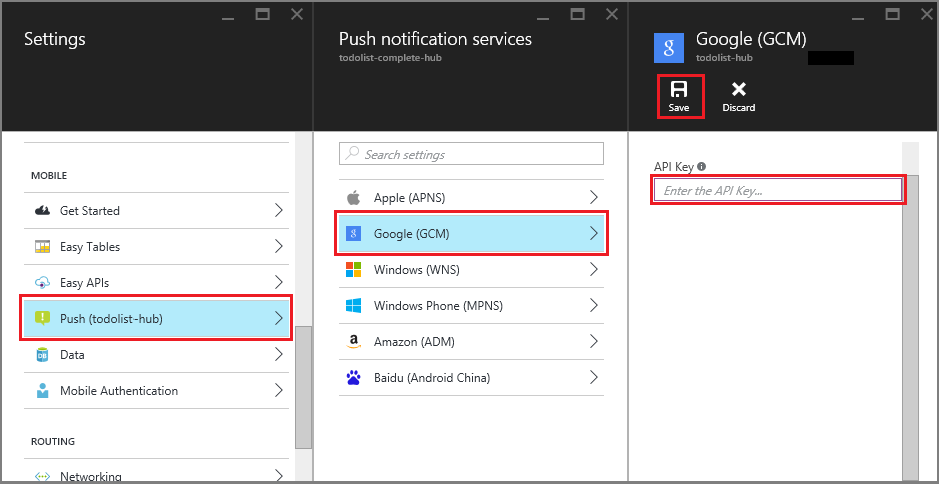
Di portal Azure, klik Telusuri Semua>App Services, lalu klik back end Mobile Apps Anda. Di bawah Pengaturan, klik App Service Push, lalu klik nama hub pemberitahuan Anda.
Buka Google (GCM), masukkan nilai Kunci Server yang Anda peroleh dari Firebase di prosedur sebelumnya, lalu klik Simpan.
Back end Mobile Apps sekarang dikonfigurasi untuk menggunakan Firebase Cloud Messaging. Ini memungkinkan Anda mengirim pemberitahuan push ke aplikasi yang berjalan di perangkat Android, dengan menggunakan hub pemberitahuan.
Memperbarui proyek server untuk mengirim pemberitahuan push
Di bagian ini, Anda memperbarui kode di proyek back-end Mobile Apps yang ada untuk mengirim pemberitahuan push setiap kali item baru ditambahkan. Proses ini didukung oleh fitur templat Azure Notification Hubs, yang memungkinkan dorongan lintas platform. Berbagai klien terdaftar untuk pemberitahuan push menggunakan templat, dan satu push universal dapat masuk ke semua platform klien.
Pilih salah satu prosedur berikut yang cocok dengan jenis proyek back-end Anda—baik back end .NET atau back endNode.js.
Proyek back-end .NET
Di Visual Studio, klik kanan proyek server. Lalu pilih Kelola Paket NuGet. Cari
Microsoft.Azure.NotificationHubs, kemudian pilih Instal. Proses ini menginstal pustaka Notification Hubs untuk mengirim pemberitahuan dari back end.Dalam proyek server, buka Pengontrol>TodoItemController.cs. Kemudian tambahkan pernyataan penggunaan berikut:
using System.Collections.Generic;
using Microsoft.Azure.NotificationHubs;
using Microsoft.Azure.Mobile.Server.Config;
Dalam metode PostTodoItem , tambahkan kode berikut setelah panggilan ke InsertAsync:
// Get the settings for the server project.
HttpConfiguration config = this.Configuration;
MobileAppSettingsDictionary settings =
    this.Configuration.GetMobileAppSettingsProvider().GetMobileAppSettings();

// Get the Notification Hubs credentials for the mobile app.
string notificationHubName = settings.NotificationHubName;
string notificationHubConnection = settings
    .Connections[MobileAppSettingsKeys.NotificationHubConnectionString].ConnectionString;

// Create a new Notification Hub client.
NotificationHubClient hub = NotificationHubClient
.CreateClientFromConnectionString(notificationHubConnection, notificationHubName);

// Send the message so that all template registrations that contain "messageParam"
// receive the notifications. This includes APNS, GCM, WNS, and MPNS template registrations.
Dictionary<string,string> templateParams = new Dictionary<string,string>();
templateParams["messageParam"] = item.Text + " was added to the list.";

try
{
    // Send the push notification and log the results.
    var result = await hub.SendTemplateNotificationAsync(templateParams);

    // Write the success result to the logs.
    config.Services.GetTraceWriter().Info(result.State.ToString());
}
catch (System.Exception ex)
{
    // Write the failure result to the logs.
    config.Services.GetTraceWriter()
        .Error(ex.Message, null, "Push.SendAsync Error");
}
Proses ini mengirimkan pemberitahuan templat yang berisi item. Teks saat item baru disisipkan.
Terbitkan ulang proyek server.
Node.js proyek back-end
Siapkan proyek backend Anda.
Ganti kode yang ada di todoitem.js dengan kode berikut:
var azureMobileApps = require('azure-mobile-apps'),
promises = require('azure-mobile-apps/src/utilities/promises'),
logger = require('azure-mobile-apps/src/logger');

var table = azureMobileApps.table();

table.insert(function (context) {
// For more information about the Notification Hubs JavaScript SDK,
// see https://aka.ms/nodejshubs.
logger.info('Running TodoItem.insert');

// Define the template payload.
var payload = '{"messageParam": "' + context.item.text + '" }';

// Execute the insert. The insert returns the results as a promise.
// Do the push as a post-execute action within the promise flow.
return context.execute()
    .then(function (results) {
        // Only do the push if configured.
        if (context.push) {
            // Send a template notification.
            context.push.send(null, payload, function (error) {
                if (error) {
                    logger.error('Error while sending push notification: ', error);
                } else {
                    logger.info('Push notification sent successfully!');
                }
            });
        }
        // Don't forget to return the results from the context.execute().
        return results;
    })
    .catch(function (error) {
        logger.error('Error while running context.execute: ', error);
    });
});

module.exports = table;
Proses ini mengirimkan pemberitahuan templat yang berisi item.text saat item baru disisipkan.
Ketika Anda mengedit file di komputer lokal Anda, terbitkan ulang proyek server.
Mengonfigurasi proyek klien untuk pemberitahuan push
Dalam tampilan Solusi (atau Penjelajah Solusi di Visual Studio), klik kanan folder Komponen, klik Dapatkan Komponen Lainnya... , cari komponen Klien Google Cloud Messaging dan tambahkan ke proyek.
Buka file proyek ToDoActivity.cs dan tambahkan pernyataan penggunaan berikut ke kelas :
using Gcm.Client;Di kelas ToDoActivity , tambahkan kode baru berikut:
// Create a new instance field for this activity.
static ToDoActivity instance = new ToDoActivity();

// Return the current activity instance.
public static ToDoActivity CurrentActivity
{
    get
    {
        return instance;
    }
}
// Return the Mobile Services client.
public MobileServiceClient CurrentClient
{
    get
    {
        return client;
    }
}
Ini memungkinkan Anda mengakses instans klien seluler dari proses layanan penangan push.
Tambahkan kode berikut ke metode OnCreate , setelah MobileServiceClient dibuat:
// Set the current instance of TodoActivity.
instance = this;

// Make sure the GCM client is set up correctly.
GcmClient.CheckDevice(this);
GcmClient.CheckManifest(this);

// Register the app for push notifications.
GcmClient.Register(this, ToDoBroadcastReceiver.senderIDs);
ToDoActivity Anda sekarang disiapkan untuk menambahkan pemberitahuan push.
Menambahkan kode pemberitahuan push ke aplikasi Anda
Buat kelas baru dalam proyek yang disebut
ToDoBroadcastReceiver.Tambahkan pernyataan penggunaan berikut ke kelas ToDoBroadcastReceiver :
using Gcm.Client;
using Microsoft.WindowsAzure.MobileServices;
using Newtonsoft.Json.Linq;
Tambahkan permintaan izin berikut antara pernyataan penggunaan dan deklarasi namespace :
[assembly: Permission(Name = "@PACKAGE_NAME@.permission.C2D_MESSAGE")]
[assembly: UsesPermission(Name = "@PACKAGE_NAME@.permission.C2D_MESSAGE")]
[assembly: UsesPermission(Name = "com.google.android.c2dm.permission.RECEIVE")]
//GET_ACCOUNTS is only needed for android versions 4.0.3 and below
[assembly: UsesPermission(Name = "android.permission.GET_ACCOUNTS")]
[assembly: UsesPermission(Name = "android.permission.INTERNET")]
[assembly: UsesPermission(Name = "android.permission.WAKE_LOCK")]
Ganti definisi kelas ToDoBroadcastReceiver yang ada dengan yang berikut ini:
[BroadcastReceiver(Permission = Gcm.Client.Constants.PERMISSION_GCM_INTENTS)]
[IntentFilter(new string[] { Gcm.Client.Constants.INTENT_FROM_GCM_MESSAGE },
    Categories = new string[] { "@PACKAGE_NAME@" })]
[IntentFilter(new string[] { Gcm.Client.Constants.INTENT_FROM_GCM_REGISTRATION_CALLBACK },
    Categories = new string[] { "@PACKAGE_NAME@" })]
[IntentFilter(new string[] { Gcm.Client.Constants.INTENT_FROM_GCM_LIBRARY_RETRY },
Categories = new string[] { "@PACKAGE_NAME@" })]
public class ToDoBroadcastReceiver : GcmBroadcastReceiverBase<PushHandlerService>
{
    // Set the Google app ID.
    public static string[] senderIDs = new string[] { "<PROJECT_NUMBER>" };
}
Dalam kode di atas, Anda harus mengganti
<PROJECT_NUMBER>dengan nomor project yang ditetapkan oleh Google saat memprovisikan aplikasi di portal developer Google.Dalam file proyek ToDoBroadcastReceiver.cs, tambahkan kode berikut yang menentukan kelas PushHandlerService :
// The ServiceAttribute must be applied to the class.
[Service]
public class PushHandlerService : GcmServiceBase
{
    public static string RegistrationID { get; private set; }
    public PushHandlerService() : base(ToDoBroadcastReceiver.senderIDs) { }
}
Perhatikan bahwa kelas ini berasal dari GcmServiceBase dan bahwa atribut Layanan harus diterapkan ke kelas ini.
Catatan
Kelas GcmServiceBase mengimplementasikan metode OnRegistered(), OnUnRegistered(), OnMessage() dan OnError(). Anda harus mengambil alih metode ini di kelas PushHandlerService .
Tambahkan kode berikut ke kelas PushHandlerService yang mengambil alih penanganan aktivitas OnRegistered .
protected override void OnRegistered(Context context, string registrationId)
{
    System.Diagnostics.Debug.WriteLine("The device has been registered with GCM.", "Success!");

    // Get the MobileServiceClient from the current activity instance.
    MobileServiceClient client = ToDoActivity.CurrentActivity.CurrentClient;
    var push = client.GetPush();

    // Define a message body for GCM.
    const string templateBodyGCM = "{\"data\":{\"message\":\"$(messageParam)\"}}";

    // Define the template registration as JSON.
    JObject templates = new JObject();
    templates["genericMessage"] = new JObject
    {
        {"body", templateBodyGCM }
    };

    try
    {
        // Make sure we run the registration on the same thread as the activity,
        // to avoid threading errors.
        ToDoActivity.CurrentActivity.RunOnUiThread(

            // Register the template with Notification Hubs.
            async () => await push.RegisterAsync(registrationId, templates));

        System.Diagnostics.Debug.WriteLine(
            string.Format("Push Installation Id", push.InstallationId.ToString()));
    }
    catch (Exception ex)
    {
        System.Diagnostics.Debug.WriteLine(
            string.Format("Error with Azure push registration: {0}", ex.Message));
    }
}
Metode ini menggunakan ID pendaftaran GCM yang dikembalikan untuk mendaftar ke Azure untuk pemberitahuan push. Tag hanya dapat ditambahkan ke pendaftaran setelah dibuat. Untuk informasi selengkapnya, lihat Cara: Menambahkan tag ke penginstalan perangkat untuk mengaktifkan push-to-tag.
Ganti metode OnMessage di PushHandlerService dengan kode berikut:
protected override void OnMessage(Context context, Intent intent)
{
    string message = string.Empty;

    // Extract the push notification message from the intent.
    if (intent.Extras.ContainsKey("message"))
    {
        message = intent.Extras.Get("message").ToString();
        var title = "New item added:";

        // Create a notification manager to send the notification.
        var notificationManager =
            GetSystemService(Context.NotificationService) as NotificationManager;

        // Create a new intent to show the notification in the UI.
        PendingIntent contentIntent =
            PendingIntent.GetActivity(context, 0,
            new Intent(this, typeof(ToDoActivity)), 0);

        // Create the notification using the builder.
        var builder = new Notification.Builder(context);
        builder.SetAutoCancel(true);
        builder.SetContentTitle(title);
        builder.SetContentText(message);
        builder.SetSmallIcon(Resource.Drawable.ic_launcher);
        builder.SetContentIntent(contentIntent);
        var notification = builder.Build();

        // Display the notification in the Notifications Area.
        notificationManager.Notify(1, notification);

    }
}
Ambil alih metode OnUnRegistered() dan OnError() dengan kode berikut.
protected override void OnUnRegistered(Context context, string registrationId)
{
    throw new NotImplementedException();
}

protected override void OnError(Context context, string errorId)
{
    System.Diagnostics.Debug.WriteLine(
        string.Format("Error occurred in the notification: {0}.", errorId));
}
Menguji pemberitahuan push di aplikasi Anda
Anda dapat menguji aplikasi dengan menggunakan perangkat virtual di emulator. Ada langkah-langkah konfigurasi tambahan yang diperlukan saat berjalan di emulator.
Perangkat virtual harus menetapkan Google API sebagai target di manajer Perangkat Virtual Android (AVD).

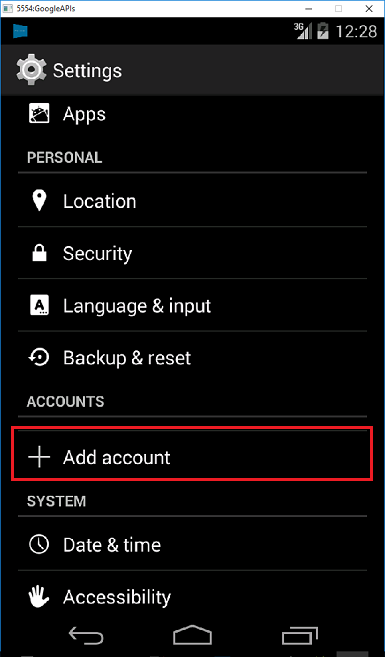
Tambahkan akun Google ke perangkat Android dengan mengeklikPengaturan>Aplikasi>Tambahkan akun, lalu ikuti perintah.
Jalankan aplikasi todolist seperti sebelumnya dan sisipkan item tugas baru. Kali ini, ikon pemberitahuan ditampilkan di area pemberitahuan. Anda dapat membuka laci pemberitahuan untuk melihat teks lengkap pemberitahuan.
