Exercise - Connect your simulated coffee machine to the application
To validate your scenario before connecting a physical device, use a device simulator that implements the behaviors defined in the device model.
Recall that in the IoT enabled coffee machines example, you'll connect a coffee machine simulator to IoT Central for monitoring telemetry such as water temperature and humidity, observe the state of the machine, set optimal temperature, receive warranty status, and send commands.
Here, you'll simulate a device with a C# application and connect it to the Azure IoT Central application.
Add the coffee machine to IoT Central
First, register the device:
- In your IoT Central application, navigate to Devices and then + New.
- On the Create a new device form, change the Device ID to ccm-001 and Device name to Connected Coffee Machine - 001. Make sure that Device template is Unassigned and Simulate this device is No, and then select Create.
The Connected Coffee Machine - 001 device now shows in the list of devices with a status of Registered and template Unassigned. In the previous unit, we looked at the C# application code and confirmed that the model ID is sent when provisioning the device. That allows IoT Central to assign the correct device template the first time the device connects.
Get connection information
To run the C# application, you need the following configuration values:
Select Connected Coffee Machine - 001 in the list of devices to view the device details.
Select Connect to open the Device connection groups panel.
Either keep this page open, or make a note of the ID scope, Device ID, and Primary key values.

Use the Azure Cloud Shell to set the environment variables used by the C# application.
export ID_SCOPE=<The ID scope you made a note of previously>
export DEVICE_ID=<The Device ID you made a note of previously>
export DEVICE_KEY=<The Primary key you made a note of previously>
Print the environment variables and confirm they're correctly defined.
printenv ID_SCOPE DEVICE_ID DEVICE_KEY
Create a C# application
The following steps show you how to create a client application that implements the coffee machine device simulator.
Tip
In this exercise, you create the C# app in the Azure Cloud Shell so that you don't have to install anything on your local machine.
Execute the following command in the Azure Cloud Shell to create a
coffee-makerfolder and navigate to it:mkdir ~/coffee-maker cd ~/coffee-makerExecute the following command in the Cloud Shell to download the source files in your
coffee-makerfolder:wget https://raw.githubusercontent.com/Azure-Samples/iot-central-docs-samples/main/monitor-manage-device-with-iotcentral/CoffeeMaker-csharp.csproj wget https://raw.githubusercontent.com/Azure-Samples/iot-central-docs-samples/main/monitor-manage-device-with-iotcentral/CoffeeMaker.cs wget https://raw.githubusercontent.com/Azure-Samples/iot-central-docs-samples/main/monitor-manage-device-with-iotcentral/Parameters.cs wget https://raw.githubusercontent.com/Azure-Samples/iot-central-docs-samples/main/monitor-manage-device-with-iotcentral/Program.csExecute the following command in the Cloud Shell to start the app:
dotnet runVerify that the app starts in the Cloud Shell window with the message Device successfully connected to Azure IoT Central along with Telemetry send: messages.
Congratulations! Your app is up and running and communicating with IoT Central!
Check your work
You've now worked with the Azure IoT Central application and connected the coffee machine to Azure IoT Central. You're well on your way to begin to monitor and manage your remote coffee machine. Here, you take a moment to validate your setup and connection by using the Connected Coffee Machine template that you defined earlier. You update the optimal temperature on the Properties form, run commands to update the state of your machine, and view your connected coffee machine telemetry.
Update properties to sync your application with the coffee machine
Use the Properties form you defined in the device template to send configuration data to the coffee machine from your application.
Navigate to the Devices page in your Azure IoT Central application.
Select ccm-001 from the list of devices to view the device details.
Select Properties to view the form.
Enter 95 as the optimal temperature. Then select Save.
When the property is changed, the property is marked as Pending: now in the UI until the coffee machine acknowledges the setting change. The property is then marked as Accepted: now.
Note
Successful updates in the setting indicate data flow and validate your connection. The telemetry measurements will respond to the update in optimal temperature.
Update cloud properties
Use the Properties form you defined in the device template to update configuration data for the coffee machine.
Navigate to the Devices page in your Azure IoT Central application.
Select ccm-001 from the list of devices to view the device details.
Select Properties to view the form.
Enter 99 as the Coffee Maker Max Temperature (°C) and 92 as the Coffee Maker Min Temperature (°C). Then select Save.
Cloud properties aren't synced with the device, they only exist in the IoT Central application.
Run commands on the coffee machine
Navigate to the Commands page for your device for the following exercise. To validate the commands setup, you remotely run commands on the coffee machine from IoT Central. If the commands are successful, confirmation messages are sent back from the coffee machine.
Start brewing remotely by selecting Run.
The coffee machine starts if these three conditions are satisfied:
- Cup detected
- Not in maintenance
- Not brewing already
Note
When you've successfully started brewing, the state of the machine changes to Brewing as indicated on the Telemetry page.
Look for confirmation messages in the console log of the simulated coffee machine.
Set up the device client.
Device successfully connected to Azure IoT Central
- Set handler for "SetMaintenanceMode" command.
- Set handler for "StartBrewing" command.
- Set handler to receive "OptimalTemperature" updates.
- Update "DeviceWarrantyExpired" reported property on the initial startup.
 * Property: Update - { "DeviceWarrantyExpired": True } is Completed.
Telemetry send: Temperature: 97ºC Humidity: 25.4% Cup Detected: Y Brewing: N Maintenance Mode: N
Telemetry send: Temperature: 94.3ºC Humidity: 22.4% Cup Detected: Y Brewing: N Maintenance Mode: N
 * Property: Received - { "OptimalTemperature": 95°C }.
 * Property: Update - {"OptimalTemperature ": 95°C } is InProgress.
Telemetry send: Temperature: 96.2ºC Humidity: 53.5% Cup Detected: N Brewing: N Maintenance Mode: N
 * Property: Update - {"OptimalTemperature ": 95°C } is Completed.
Telemetry send: Temperature: 95.9ºC Humidity: 35.3% Cup Detected: N Brewing: N Maintenance Mode: N
Telemetry send: Temperature: 96.4ºC Humidity: 75.5% Cup Detected: N Brewing: N Maintenance Mode: N
 * Start brewing command received
Telemetry send: Temperature: 94.2ºC Humidity: 86.3% Cup Detected: Y Brewing: Y Maintenance Mode: N
Telemetry send: Temperature: 94.8ºC Humidity: 85.4% Cup Detected: Y Brewing: Y Maintenance Mode: N
Telemetry send: Temperature: 96.7ºC Humidity: 93.7% Cup Detected: Y Brewing: Y Maintenance Mode: N
Set maintenance mode by choosing Run on the Commands page. The coffee machine will set to maintenance if it's not already in maintenance mode.
Look for confirmation messages in the console log of the coffee machine.
Note
As in real life, when the technician takes the machine offline to perform necessary repairs before switching it back online, the coffee machine continues to stay in the maintenance mode until you reboot the client code.
Set up the device client.
Device successfully connected to Azure IoT Central
- Set handler for "SetMaintenanceMode" command.
- Set handler for "StartBrewing" command.
- Set handler to receive "OptimalTemperature" updates.
- Update "DeviceWarrantyExpired" reported property on the initial startup.
 * Property: Update - { "DeviceWarrantyExpired": False } is Completed.
Telemetry send: Temperature: 96.8ºC Humidity: 39.2% Cup Detected: Y Brewing: N Maintenance Mode: N
Telemetry send: Temperature: 96.8ºC Humidity: 57.7% Cup Detected: Y Brewing: N Maintenance Mode: N
Telemetry send: Temperature: 97.2ºC Humidity: 45.2% Cup Detected: Y Brewing: N Maintenance Mode: N
 * Maintenance command received
Telemetry send: Temperature: 96ºC Humidity: 54.7% Cup Detected: Y Brewing: N Maintenance Mode: Y
Telemetry send: Temperature: 95.6ºC Humidity: 22.1% Cup Detected: Y Brewing: N Maintenance Mode: Y
Telemetry send: Temperature: 95.3ºC Humidity: 92% Cup Detected: Y Brewing: N Maintenance Mode: Y
 * Start brewing command received
 - Warning: The device is in maintenance mode.
Telemetry send: Temperature: 94.5ºC Humidity: 85.5% Cup Detected: Y Brewing: N Maintenance Mode: Y
Telemetry send: Temperature: 96.9ºC Humidity: 62.7% Cup Detected: Y Brewing: N Maintenance Mode: Y
Telemetry send: Temperature: 97.6ºC Humidity: 47.3% Cup Detected: Y Brewing: N Maintenance Mode: Y
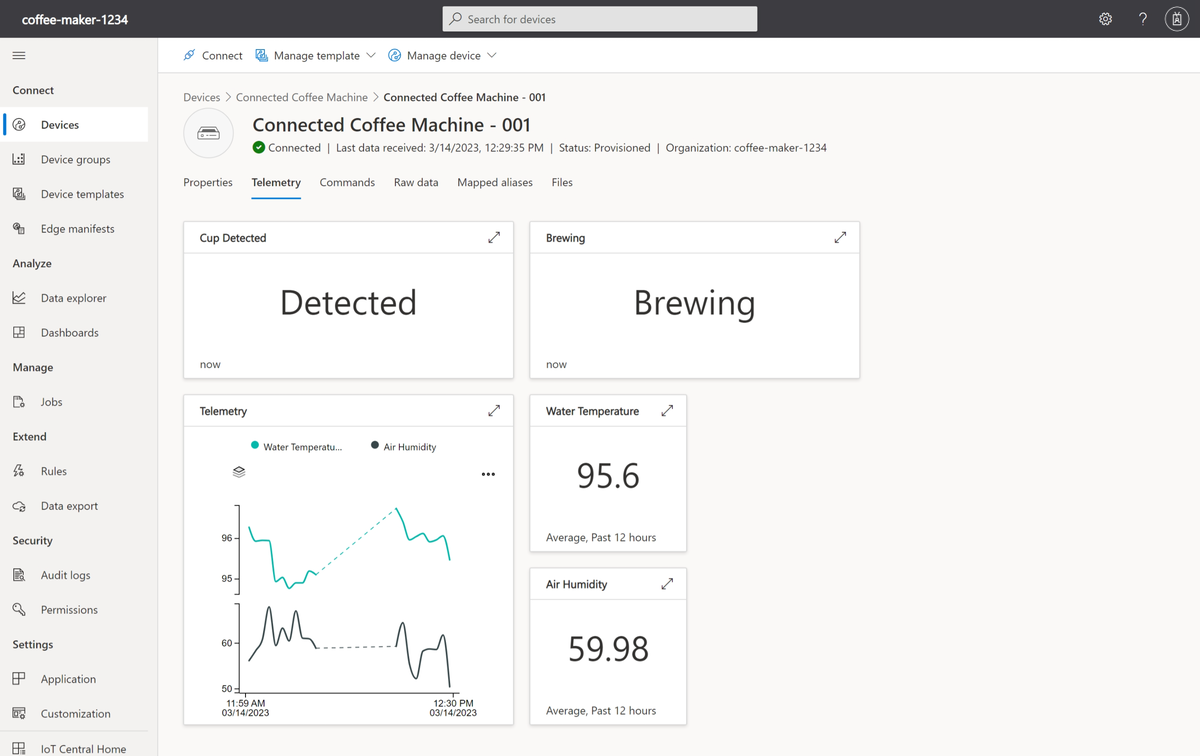
View the coffee machine telemetry
Navigate to the Telemetry page for the coffee machine. You defined this page when you created the device template:
Important
It's recommended that you run the C# application no more than 60 minutes or so, to prevent the application from sending you unwanted notifications/emails. Stopping the application when you're not working on the module also prevents you from exhausting the daily message quota. You can add a flag to define the running time of the application: dotnet run -n [TimeInSeconds].