チュートリアル: バックエンド サービス経由で Azure Notification Hubs を使用して Flutter アプリにプッシュ通知を送信する
 サンプルをダウンロードする
このチュートリアルでは、Azure Notification Hubs を使用して、Android と iOS を対象とする Flutter アプリケーションに通知をプッシュします。
ASP.NET Core Web API バックエンドは、最新かつ最適なインストール アプローチを使用して、クライアントのデバイス登録を処理するために使用されます。 また、サービスはクロスプラットフォームの方法でプッシュ通知を送信します。
これらの操作は、バックエンド操作に Notification Hubs SDK を使用して処理されます。 全体的なアプローチの詳細については、 アプリ バックエンドからの登録 に関するドキュメントを参照してください。
このチュートリアルでは、次の手順について説明します。
前提条件
作業を進めるためには、次が必要です。
- リソースを作成および管理できる Azure サブスクリプション。
- Flutter ツールキット (およびその前提条件)。
- Flutter プラグインと Dart プラグインがインストールされた Visual Studio Code。
- ライブラリの依存関係を管理するためにインストールされた CocoaPods。
- Android (物理デバイスまたはエミュレーター デバイス) または iOS (物理デバイスのみ) でアプリを実行する機能。
Android の場合は、次が必要です。
- 開発者が物理デバイスまたはエミュレーターのロックを解除しました (Google Play Services がインストールされた API 26 以降を実行しています)。
iOS の場合は、次が必要です。
- アクティブな Apple Developer アカウント。
- 開発者アカウント (iOS 13.0 以降を実行)に登録されている物理 iOS デバイス。
- キーチェーンにインストールされている .p12開発証明書を使用すると、物理デバイスでアプリを実行できます。
注意
iOS シミュレーターはリモート通知をサポートしていないため、iOS でこのサンプルを探索するときは物理デバイスが必要です。 ただし、このチュートリアルを完了するために 、Android と iOS の両方でアプリを実行する必要はありません。
この最初の原則の例の手順に従うことができますが、以前の経験はありません。 ただし、次の点に精通するとメリットがあります。
- Apple Developer Portal。
- ASP.NET Core。
- Google Firebase コンソール。
- Microsoft Azure と Azure Notification Hubs を使用して iOS アプリにプッシュ通知を送信する。
- クロスプラットフォーム開発のためのフラッターとダート。
- Android および iOS ネイティブ開発用の Kotlin と Swift。
提供される手順は macOS に固有です。 iOS の側面をスキップすることで、Windows をフォローすることができます。
プッシュ通知サービスと Azure Notification Hub を設定する
このセクションでは、 Firebase Cloud Messaging (FCM) と Apple Push Notification Services (APNS) を設定します。 その後、これらのサービスを操作するように通知ハブを作成して構成します。
Firebase プロジェクトを作成し、Android 用 Firebase Cloud Messaging を有効にする
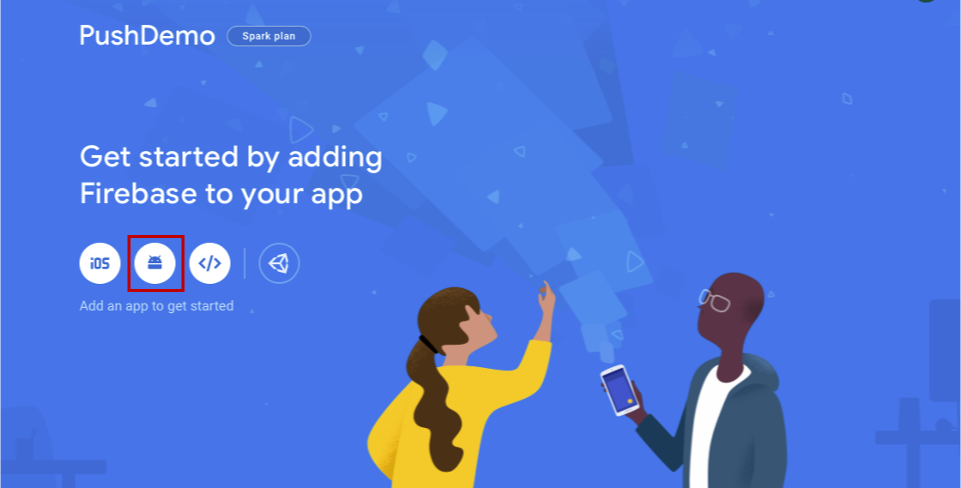
Firebase コンソールにサインインします。 プロジェクト名として PushDemo を入力して、新しい Firebase プロジェクトを作成 します。
注意
一意の名前が自動的に生成されます。 既定では、これは、指定した名前の小文字のバリエーションと、ダッシュで区切られた生成された番号で構成されます。 グローバルに一意である場合は、これを変更できます。
プロジェクトを作成したら、[ Firebase を Android アプリに追加する] を選択します。
[ Android アプリへの Firebase の追加] ページで、次の手順を実行します。
[Android パッケージ名] に、パッケージの名前を入力します。 (例:
com.<organization_identifier>.<package_name>)。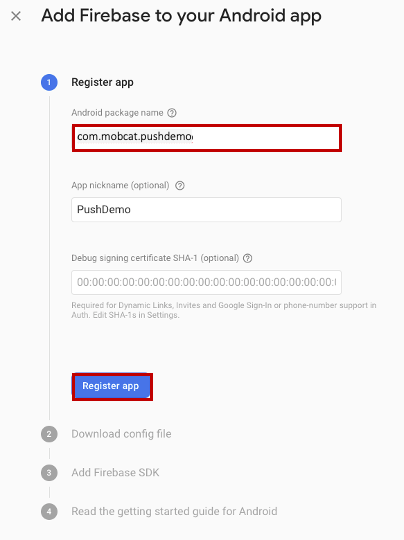
[ アプリの登録] を選択します。
[ ダウンロード google-services.json] を選択します。 次に、後で使用するためにファイルをローカル フォルダーに保存し、[ 次へ] を選択します。
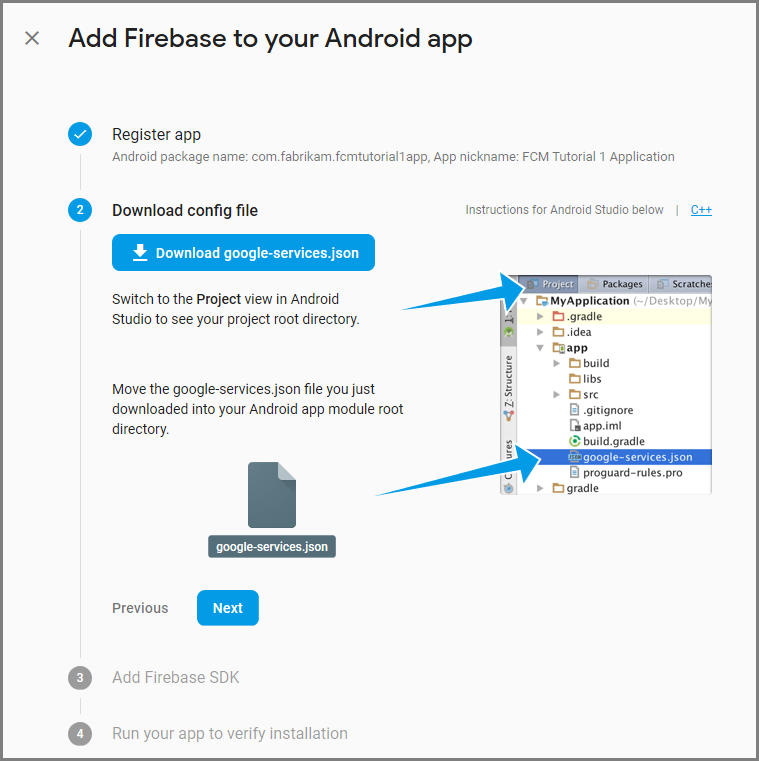
[次へ] を選択します。
[ コンソールに進む] を選択します
注意
インストールの確認チェックが原因で [コンソールに続行] ボタンが有効になっていない場合は、[この手順をスキップする] を選択します。
Firebase コンソールで、プロジェクトの歯車を選択します。 次に、[ プロジェクトの設定] を選択します。
![[プロジェクトの設定] を選択する](media/notification-hubs-firebase-console-project-settings.png)
注意
google-services.json ファイルをダウンロードしていない場合は、このページでダウンロードできます。
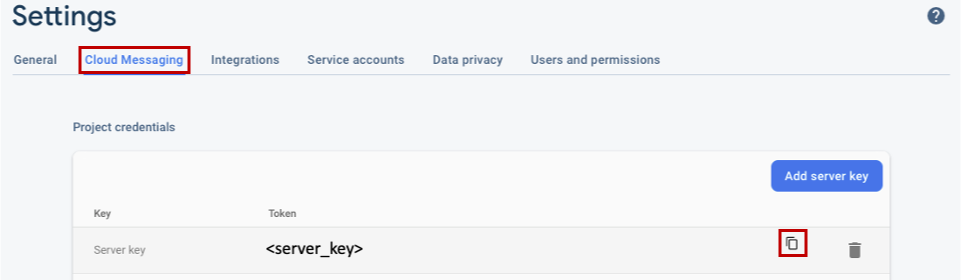
上部にある [ クラウド メッセージング ] タブに切り替えます。 後で使用するために 、サーバー キー をコピーして保存します。 この値を使用して、通知ハブを構成します。
プッシュ通知用に iOS アプリを登録する
iOS アプリにプッシュ通知を送信するには、Apple にアプリケーションを登録し、プッシュ通知にも登録します。
アプリをまだ登録していない場合は、Apple デベロッパー センターの iOS プロビジョニング ポータル を参照します。 Apple ID を使用してポータルにサインインし、[ 証明書]、[識別子] & [プロファイル] の順に移動し、[識別子] を選択 します。 クリック + して新しいアプリを登録します。
![[iOS プロビジョニング ポータル アプリ ID] ページ](media/notification-hubs-ios-appids.png)
[ 新しい識別子の登録 ] 画面で、[ アプリ ID ] ラジオ ボタンを選択します。 その後 [続行] を選択します。
![iOS プロビジョニング ポータルの [新しい ID の登録] ページ](media/notification-hubs-ios-appids-new.png)
新しいアプリの次の 3 つの値を更新し、[ 続行] を選択します。
説明: アプリのわかりやすい名前を入力します。
バンドル ID: com.organization_identifier<> フォームのバンドル ID を入力します。<>product_nameアプリ配布ガイドで説明されているようにします。 次のスクリーンショットでは、
mobcat値がorganization識別子として使用され、PushDemo 値が製品名として使用されています。![iOS プロビジョニング ポータルの [アプリ ID の登録] ページ](media/notification-hubs-new-appid-bundle.png)
プッシュ通知: [機能] セクションの [プッシュ通知] オプションをオンにします。
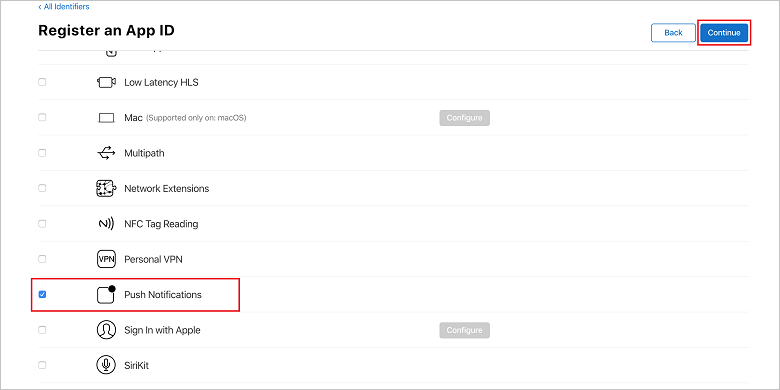
このアクションにより、アプリ ID が生成され、情報の確認が要求されます。 [ 続行] を選択し、[ 登録 ] を選択して新しいアプリ ID を確認します。
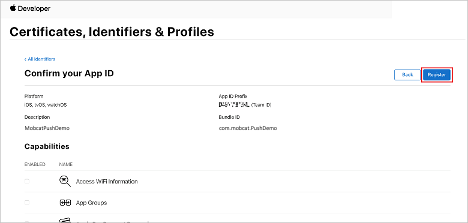
[登録] を選択すると、[証明書]、[識別子] & [プロファイル] ページに新しいアプリ ID が行項目として表示されます。
[ 証明書、識別子 & プロファイル] ページの [ 識別子] で、作成した [アプリ ID] 行項目を見つけます。 次に、その行を選択して、[ アプリ ID 構成の編集] 画面を 表示します。
Notification Hubs の証明書の作成
通知ハブが Apple Push Notification Services (APNS) と連携できるようにするために証明書が必要であり、次の 2 つの方法のいずれかで提供できます。
トークンベースの認証に使用できる p8 証明書の作成 (新しく推奨されるアプローチ)
新しいアプローチには、 APNS のトークンベース (HTTP/2) 認証に関する記事に記載されている多くの利点があります。 必要な手順は少なくなりますが、特定のシナリオでも必須です。 ただし、どちらの方法でもこのチュートリアルの目的で機能するため、両方の方法で手順が提供されています。
オプション 1: Notification Hub に直接アップロードできる p12 プッシュ証明書を作成する
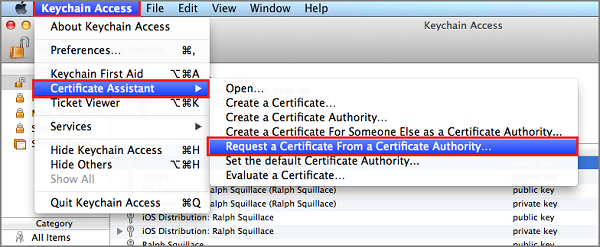
Mac で、キーチェーン アクセス ツールを実行します。 スタート パッドの Utilities フォルダーまたは Other フォルダーから開くことができます。
[ キーチェーン アクセス] を選択し、[ 証明書アシスタント] を展開して、[ 証明機関から証明書を要求する] を選択します。
注意
既定では、キーチェーン アクセスはリスト内の最初の項目を選択します。 [証明書] カテゴリに属していて、Apple Worldwide Developer Relations 証明機関がリストの最初の項目ではない場合、これは問題になる可能性があります。 CSR (証明書署名要求) を生成する前に、キー以外の項目または Apple Worldwide Developer Relations 証明機関 キーが選択されていることを確認します。
[ユーザー Email アドレス] を選択し、[共通名] の値を入力し、[ディスクに保存] を指定したことを確認してから、[続行] を選択します。 CA Email アドレスは不要であるため、空白のままにします。
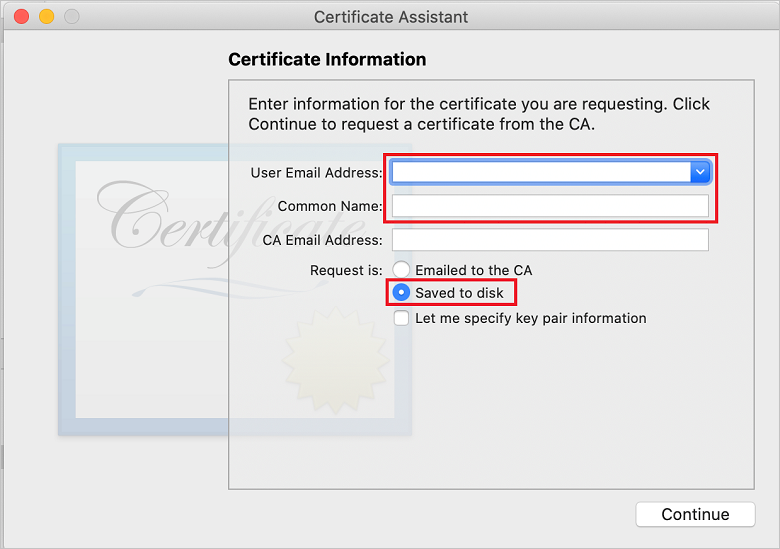
[名前を付けて保存] に証明書署名要求 (CSR) ファイルの名前を入力し、[場所] で場所を選択し、[保存] を選択します。
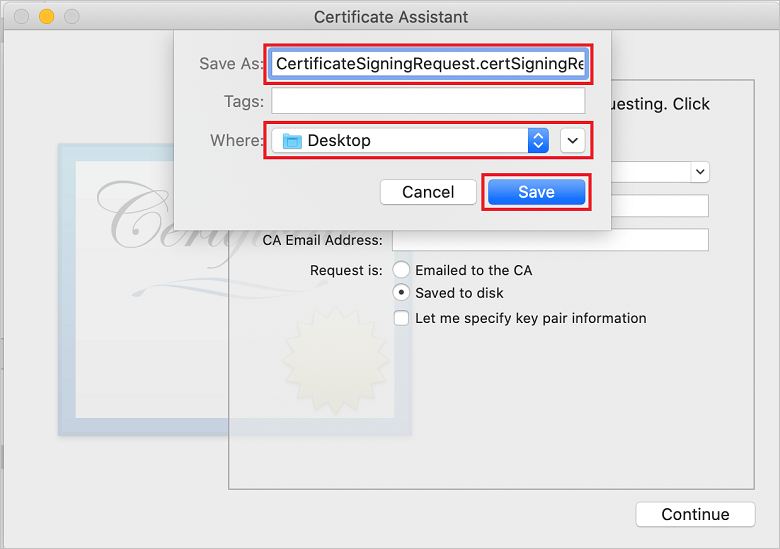
このアクションにより、選択した場所に CSR ファイル が保存されます。 既定の場所は Desktop です。 ファイルに対して選択した場所を思い出してください。
iOS プロビジョニング ポータルの [証明書、識別子 & プロファイル] ページに戻り、チェックされた [プッシュ通知] オプションまで下にスクロールし、[構成] を選択して証明書を作成します。
![[アプリ ID の編集] ページ](media/notification-hubs-edit-appid.png)
[Apple Push Notification service TLS/SSL Certificates]\(Apple プッシュ通知サービスの TLS/SSL 証明書\) ウィンドウが表示されます。 [開発 TLS/SSL 証明書] セクションの下にある [証明書の作成] ボタンを選択します。
![[アプリ ID の証明書の作成] ボタン](media/notification-hubs-appid-create-certificate.png)
[ 新しい証明書の作成] 画面が表示されます。
注意
このチュートリアルでは、開発証明書を使用します。 運用証明書を登録する場合も同じプロセスが使用されます。 通知を送信するときは、必ず同じ証明書の種類を使用してください。
[ ファイルの選択] を選択し、 CSR ファイルを保存した場所を参照し、証明書名をダブルクリックして読み込みます。 その後 [続行] を選択します。
ポータルで証明書が作成されたら、[ ダウンロード ] ボタンを選択します。 証明書を保存し、保存先の場所を覚えておいてください。

証明書がダウンロードされ、 ダウンロード フォルダー内 のコンピューターに保存されます。
![[ダウンロード] フォルダーで証明書ファイルを見つける](media/notification-hubs-certificate-downloaded.png)
注意
既定では、ダウンロードした開発証明書には aps_development.cer という名前が付けられます。
ダウンロードしたプッシュ証明書 のaps_development.cerをダブルクリックします。 このアクションにより、次の図に示すように、キーチェーンに新しい証明書がインストールされます。
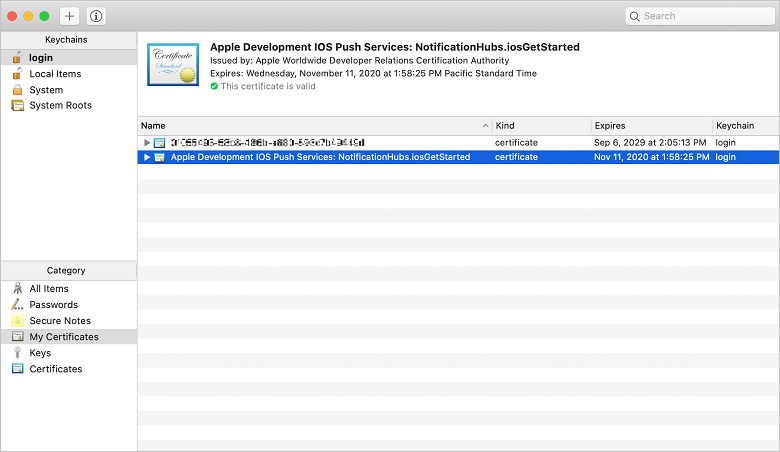
注意
証明書の名前は異なる場合がありますが、名前の先頭には Apple Development iOS Push Services が付き、適切なバンドル識別子が関連付けられます。
[キーチェーン アクセス] で、[制御 + ] [証明書] カテゴリで作成した新しいプッシュ証明書をクリックします。 [ エクスポート] を選択し、ファイルに名前を付け、 p12 形式を選択して、[保存] を選択 します。
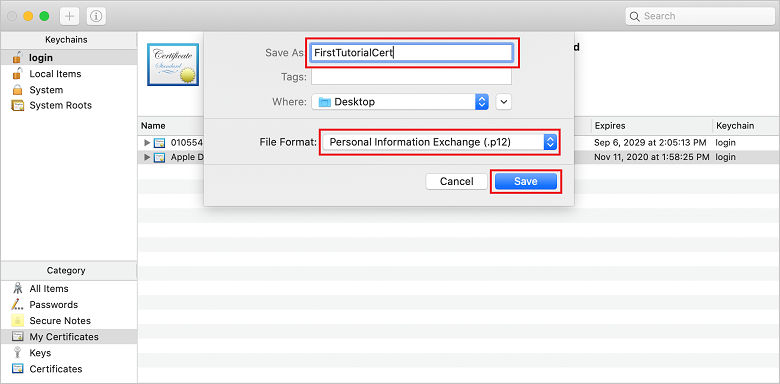
証明書をパスワードで保護することもできますが、パスワードは省略可能です。 パスワードの作成をバイパスする場合は、[ OK] をクリックします 。 エクスポートされた p12 証明書のファイル名と場所を書き留めます。 これらは、APN での認証を有効にするために使用されます。
注意
p12 ファイルの名前と場所は、このチュートリアルで説明されているものとは異なる場合があります。
オプション 2: トークンベースの認証に使用できる p8 証明書を作成する
次の詳細を書き留めます。
- アプリ ID プレフィックス (チーム ID)
- バンドル ID
[証明書]、[識別子] & [プロファイル] に戻り、[キー] をクリックします。
注意
APNS 用にキーが既に構成されている場合は、作成直後にダウンロードした p8 証明書を再利用できます。 その場合は、手順 3 から 5 を無視できます。
ボタン (または [キーの+作成] ボタン) をクリックして、新しいキーを作成します。
適切なキー名の値を指定し、Apple Push Notifications サービス (APNS) オプションをチェックしてから、[続行] をクリックし、次の画面で [登録] をクリックします。
[ ダウンロード ] をクリックし、 p8 ファイル ( プレフィックスが AuthKey_) をセキュリティで保護されたローカル ディレクトリに移動し、[ 完了] をクリックします。
注意
p8 ファイルは安全な場所に保管してください (バックアップを保存します)。 キーをダウンロードした後は、サーバーのコピーが削除されるため、再ダウンロードできません。
[ キー] で、作成したキー (または代わりに使用することを選択した場合は既存のキー) をクリックします。
[キー ID] の値をメモします。
Visual Studio Code などの適切なアプリケーションで p8 証明書を開きます。 キーの値をメモします ( -----BEGIN 秘密キー----- と -----END 秘密キー-----)。
-----BEGIN 秘密キー-----
<key_value>
-----END 秘密キー-----注意
これは、後で Notification Hub を構成するために使用されるトークン値です。
これらの手順の最後には、「APNS 情報を使用して 通知ハブを構成する」で後で使用するための次の情報が必要です。
- チーム ID (手順 1 を参照)
- バンドル ID (手順 1 を参照)
- キー ID (手順 7 を参照)
- トークン値 (手順 8 で取得した p8 キー値)
アプリケーションのプロビジョニング プロファイルを作成する
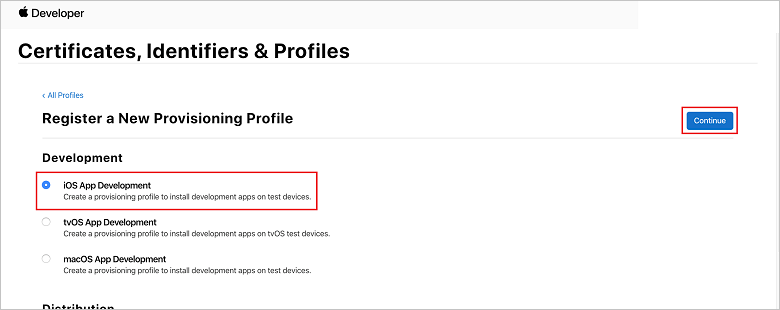
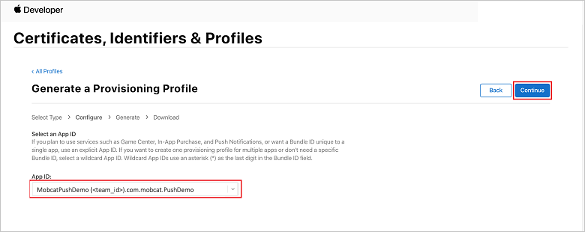
iOS プロビジョニング ポータルに戻り、[証明書]、[識別子] & [プロファイル] の順に選択し、左側のメニューから [プロファイル] を選択+して、新しいプロファイルを作成します。 [ 新しいプロビジョニング プロファイルの登録] 画面が表示されます。
プロビジョニング プロファイルの種類として [開発] の下にある [iOS アプリ開発] を選択し、[続行] を選択します。
次に、[アプリ ID] ドロップダウン リストから作成した アプリ ID を 選択し、[続行] を選択 します。
[ 証明書の選択 ] ウィンドウで、コード署名に使用する開発証明書を選択し、[ 続行] を選択します。
注意
この証明書は、 前の手順で作成したプッシュ証明書ではありません。 これは開発証明書です。 存在しない場合は、このチュートリアルの 前提条件 であるため、作成する必要があります。 開発者証明書は、 Apple 開発者ポータル、 Xcode 、または Visual Studio で作成できます。
[証明書、識別子 & プロファイル] ページに戻り、左側のメニューから [プロファイル] を選択し、 を選択+して新しいプロファイルを作成します。 [ 新しいプロビジョニング プロファイルの登録] 画面が表示されます。
[ 証明書の選択 ] ウィンドウで、作成した開発証明書を選択します。 その後 [続行] を選択します。
次に、テストに使用するデバイスを選択し、[ 続行] を選択します。
最後に、[プロビジョニング プロファイル名] でプロファイルの名前 を選択し、[ 生成] を選択します。
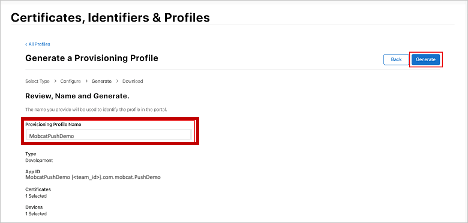
新しいプロビジョニング プロファイルが作成されたら、[ダウンロード] を選択 します。 保存先の場所を忘れないでください。
プロビジョニング プロファイルの場所を参照し、ダブルクリックして開発用コンピューターにインストールします。
通知ハブの作成
このセクションでは、通知ハブを作成し、 APNS を使用して認証を構成します。 p12 プッシュ証明書またはトークンベースの認証を使用できます。 既に作成した通知ハブを使用する場合は、手順 5 に進むことができます。
Azure にサインインします。
[ リソースの作成] をクリックし、 Notification Hub を検索して選択し、[ 作成] をクリックします。
次のフィールドを更新し、[ 作成] をクリックします。
基本的な詳細
サブスクリプション: ドロップダウン リストからターゲット サブスクリプション を選択します
リソース グループ: 新しいリソース グループを作成する (または既存の リソース グループ を選択する)名前空間の詳細
Notification Hub 名前空間:Notification Hub 名前空間のグローバルに一意の名前を入力します
注意
このフィールドに対して [ 新しい作成 ] オプションが選択されていることを確認します。
通知ハブの詳細
通知ハブ:通知ハブの名前を入力します
場所: ドロップダウン リストから適切な場所を選択する
価格レベル: 既定の [無料] オプションをそのまま使用する注意
Free レベルのハブの最大数に達していない限り。
Notification Hub がプロビジョニングされたら、そのリソースに移動します。
新しい 通知ハブに移動します。
一覧から [ アクセス ポリシー] を選択します ([ 管理] の下)。
ポリシー名の値とそれに対応する接続文字列の値をメモしておきます。
APNS 情報を使用して通知ハブを構成する
[ Notification Services]\(通知サービス\) で[Apple]\( Apple \) を選択し、[ Creating a Certificate for Notification Hubs]\(通知ハブの証明書の作成 \) セクションで前に選択したアプローチに基づいて適切な手順に従います。
注意
アプリケーション モードの運用は、ストアからアプリを購入したユーザーにプッシュ通知を送信する場合にのみ使用します。
オプション 1: .p12 プッシュ証明書を使用する
[Certificate] を選択します。
ファイル アイコンを選択します。
先ほどエクスポートした .p12 ファイルを選択し、[ 開く] を選択します。
必要に応じて、正しいパスワードを指定します。
[サンドボックス] モードを選択します。
[保存] を選択します。
オプション 2: トークンベースの認証を使用する
[ トークン] を選択します。
前に取得した次の値を入力します。
- キー ID
- バンドル ID
- チーム ID
- トークン
[ サンドボックス] を選択します。
[保存] を選択します。
FCM 情報を使用して通知ハブを構成する
- 左側のメニューの [設定] セクションで [Google (GCM/FCM)] を選択します。
- Google Firebase コンソールから入力したサーバー キーを入力します。
- ツールバーの [保存] を選択します。
ASP.NET Core Web API バックエンド アプリケーションを作成する
このセクションでは、デバイスの登録と Flutter モバイル アプリへの通知の送信を処理する ASP.NET Core Web API バックエンドを作成します。
Web プロジェクトを作成する
Visual Studio で、[ファイル] [新しいソリューション] の順に>選択します。
[.NET Core>アプリ>ASP.NET Core>API> Next] を選択します。
[新しい ASP.NET Core Web API の構成] ダイアログで、[.NET Core 3.1 のターゲット フレームワーク] を選択します。
[プロジェクト名] に「PushDemoApi」と入力し、[作成] を選択します。
デバッグを開始して (Command + Enter) テンプレート アプリをテストします。
注意
テンプレート化されたアプリは、 weatherForecastController を launchUrl として使用するように構成されています。 これは、[プロパティ] launchSettings.jsonで設定されます>。
[無効な開発証明書が見つかりました] というメッセージが表示された場合は、次のメッセージが表示されます。
[ はい ] をクリックして、これを修正するための 'dotnet dev-certs https' ツールの実行に同意します。 'dotnet dev-certs https' ツールでは、証明書のパスワードとキーチェーンのパスワードの入力を求められます。
新しい証明書をインストールして信頼するように求められたら、[はい] をクリックし、キーチェーンのパスワードを入力します。
Controllers フォルダーを展開し、WeatherForecastController.csを削除します。
WeatherForecast.csを削除します。
Secret Manager ツールを使用してローカル構成値を設定します。 シークレットをソリューションから切り離すことで、ソース管理に終わらないようにします。 ターミナルを開き、プロジェクト ファイルのディレクトリに移動し、次のコマンドを実行します。
dotnet user-secrets init
dotnet user-secrets set "NotificationHub:Name" <value>
dotnet user-secrets set "NotificationHub:ConnectionString" <value>
プレースホルダーの値を独自の通知ハブ名と接続文字列値に置き換えます。 通知 ハブの作成 セクションでメモしました。 それ以外の場合は、 Azure で検索できます。
NotificationHub:Name:
概要の上部にある「要点の概要」の「名前」を参照してください。NotificationHub:ConnectionString:
アクセス ポリシーの DefaultFullSharedAccessSignature を参照してください注意
運用環境のシナリオでは、Azure KeyVault などのオプションを確認して、接続文字列を安全に格納できます。 わかりやすくするために、シークレットは Azure App Service アプリケーション設定に追加されます。
API キーを使用してクライアントを認証する (省略可能)
API キーはトークンほど安全ではありませんが、このチュートリアルでは十分です。 API キーは、 ASP.NET ミドルウェアを使用して簡単に構成できます。
API キーをローカル構成値に追加します。
dotnet user-secrets set "Authentication:ApiKey" <value>注意
プレースホルダーの値を独自の値に置き換え、メモする必要があります。
コントロール + PushDemoApi プロジェクトをクリックし、[追加] メニューの [新しいフォルダー] を選択し、[フォルダー名として認証を使用して追加] をクリックします。
コントロール + [認証] フォルダーをクリックし、[追加] メニューから [新しいファイル...] を選択します。
[全般>空のクラス] を選択し、[名前]に「ApiKeyAuthOptions.cs」と入力し、[新規] をクリックして次の実装を追加します。
using Microsoft.AspNetCore.Authentication;

namespace PushDemoApi.Authentication
{
    public class ApiKeyAuthOptions : AuthenticationSchemeOptions
    {
        public const string DefaultScheme = "ApiKey";
        public string Scheme => DefaultScheme;
        public string ApiKey { get; set; }
    }
}
別の Empty クラスを ApiKeyAuthHandler.cs という名前の認証フォルダーに追加し、次の実装を追加します。
using System;
using System.Collections.Generic;
using System.Linq;
using System.Security.Claims;
using System.Text.Encodings.Web;
using System.Threading.Tasks;
using Microsoft.AspNetCore.Authentication;
using Microsoft.Extensions.Logging;
using Microsoft.Extensions.Options;

namespace PushDemoApi.Authentication
{
    public class ApiKeyAuthHandler : AuthenticationHandler<ApiKeyAuthOptions>
    {
        const string ApiKeyIdentifier = "apikey";

        public ApiKeyAuthHandler(
            IOptionsMonitor<ApiKeyAuthOptions> options,
            ILoggerFactory logger,
            UrlEncoder encoder,
            ISystemClock clock)
            : base(options, logger, encoder, clock) {}

        protected override Task<AuthenticateResult> HandleAuthenticateAsync()
        {
            string key = string.Empty;

            if (Request.Headers[ApiKeyIdentifier].Any())
            {
                key = Request.Headers[ApiKeyIdentifier].FirstOrDefault();
            }
            else if (Request.Query.ContainsKey(ApiKeyIdentifier))
            {
                if (Request.Query.TryGetValue(ApiKeyIdentifier, out var queryKey))
                    key = queryKey;
            }

            if (string.IsNullOrWhiteSpace(key))
                return Task.FromResult(AuthenticateResult.Fail("No api key provided"));

            if (!string.Equals(key, Options.ApiKey, StringComparison.Ordinal))
                return Task.FromResult(AuthenticateResult.Fail("Invalid api key."));

            var identities = new List<ClaimsIdentity> {
                new ClaimsIdentity("ApiKeyIdentity")
            };

            var ticket = new AuthenticationTicket(
                new ClaimsPrincipal(identities), Options.Scheme);

            return Task.FromResult(AuthenticateResult.Success(ticket));
        }
    }
}
注意
認証ハンドラーは、スキームの動作 (この場合はカスタム API キー スキーム) を実装する型です。
ApiKeyAuthenticationBuilderExtensions.cs という名前の認証フォルダーに別の Empty クラスを追加し、次の実装を追加します。
using System;
using Microsoft.AspNetCore.Authentication;

namespace PushDemoApi.Authentication
{
    public static class AuthenticationBuilderExtensions
    {
        public static AuthenticationBuilder AddApiKeyAuth(
            this AuthenticationBuilder builder,
            Action<ApiKeyAuthOptions> configureOptions)
        {
            return builder
                .AddScheme<ApiKeyAuthOptions, ApiKeyAuthHandler>(
                    ApiKeyAuthOptions.DefaultScheme,
                    configureOptions);
        }
    }
}
注意
この拡張メソッドを使用すると、ミドルウェアの構成コード が簡略化Startup.cs 、より読みやすく、一般的に簡単に従えます。
Startup.csで、ConfigureServices メソッドを更新して、サービスの呼び出しの下に API キー認証を構成します。AddControllers メソッド。
using PushDemoApi.Authentication; using PushDemoApi.Models; using PushDemoApi.Services; public void ConfigureServices(IServiceCollection services) { services.AddControllers(); services.AddAuthentication(options => { options.DefaultAuthenticateScheme = ApiKeyAuthOptions.DefaultScheme; options.DefaultChallengeScheme = ApiKeyAuthOptions.DefaultScheme; }).AddApiKeyAuth(Configuration.GetSection("Authentication").Bind); }引き続きStartup.csで、アプリの IApplicationBuilder で UseAuthentication および UseAuthorization 拡張メソッドを呼び出すように Configure メソッドを更新します。 UseRouting の後とアプリの前に、これらのメソッドが呼び出されていることを確認します。UseEndpoints。
public void Configure(IApplicationBuilder app, IWebHostEnvironment env)
{
    if (env.IsDevelopment())
    {
        app.UseDeveloperExceptionPage();
    }

    app.UseHttpsRedirection();

    app.UseRouting();

    app.UseAuthentication();

    app.UseAuthorization();

    app.UseEndpoints(endpoints =>
    {
        endpoints.MapControllers();
    });
}
注意
UseAuthentication を呼び出すと、(ConfigureServices から) 以前に登録された認証スキームを使用するミドルウェアが登録されます。 これは、認証されるユーザーに依存するミドルウェアの前に呼び出す必要があります。
依存関係の追加とサービスの構成
ASP.NET Coreでは、依存関係の挿入 (DI) ソフトウェア設計パターンがサポートされています。これは、クラスとその依存関係の間で制御の反転 (IoC) を実現するための手法です。
バックエンド操作に通知ハブと Notification Hubs SDK を使用することは、サービス内にカプセル化されます。 サービスが登録され、適切な抽象化によって利用できるようになります。
コントロール + [依存関係] フォルダーをクリックし、[NuGet パッケージの管理...] を選択します。
Microsoft.Azure.NotificationHubs を検索し、チェックされていることを確認します。
[ パッケージの追加] をクリックし、ライセンス条項に同意するように求められたら [ 同意 する] をクリックします。
コントロール + PushDemoApi プロジェクトをクリックし、[追加] メニューから [新しいフォルダー] を選択し、[フォルダー名としてモデルを使用して追加] をクリックします。
コントロール + [モデル] フォルダーをクリックし、[追加] メニューから [新しいファイル...] を選択します。
[全般>空のクラス] を選択し、[名前] に「PushTemplates.cs」と入力し、[新規] をクリックして次の実装を追加します。
namespace PushDemoApi.Models
{
    public class PushTemplates
    {
        public class Generic
        {
            public const string Android = "{ \"notification\": { \"title\" : \"PushDemo\", \"body\" : \"$(alertMessage)\"}, \"data\" : { \"action\" : \"$(alertAction)\" } }";
            public const string iOS = "{ \"aps\" : {\"alert\" : \"$(alertMessage)\"}, \"action\" : \"$(alertAction)\" }";
        }

        public class Silent
        {
            public const string Android = "{ \"data\" : {\"message\" : \"$(alertMessage)\", \"action\" : \"$(alertAction)\"} }";
            public const string iOS = "{ \"aps\" : {\"content-available\" : 1, \"apns-priority\": 5, \"sound\" : \"\", \"badge\" : 0}, \"message\" : \"$(alertMessage)\", \"action\" : \"$(alertAction)\" }";
        }
    }
}
注意
このクラスには、このシナリオで必要なジェネリック通知とサイレント通知のトークン化された通知ペイロードが含まれています。 ペイロードは、サービスを介して既存の インストール を更新することなく実験できるように、インストールの外部で定義されます。 この方法でのインストールの変更の処理は、このチュートリアルでは範囲外です。 運用環境では、 カスタム テンプレートを検討してください。
DeviceInstallation.cs という名前の Models フォルダーに別の Empty クラスを追加し、次の実装を追加します。
using System.Collections.Generic;
using System.ComponentModel.DataAnnotations;

namespace PushDemoApi.Models
{
    public class DeviceInstallation
    {
        [Required]
        public string InstallationId { get; set; }

        [Required]
        public string Platform { get; set; }

        [Required]
        public string PushChannel { get; set; }

        public IList<string> Tags { get; set; } = Array.Empty<string>();
    }
}
NotificationRequest.cs という名前の Models フォルダーに別の Empty クラスを追加し、次の実装を追加します。
using System;

namespace PushDemoApi.Models
{
    public class NotificationRequest
    {
        public string Text { get; set; }
        public string Action { get; set; }
        public string[] Tags { get; set; } = Array.Empty<string>();
        public bool Silent { get; set; }
    }
}
NotificationHubOptions.cs という名前の Models フォルダーに別の Empty クラスを追加し、次の実装を追加します。
using System.ComponentModel.DataAnnotations;

namespace PushDemoApi.Models
{
    public class NotificationHubOptions
    {
        [Required]
        public string Name { get; set; }

        [Required]
        public string ConnectionString { get; set; }
    }
}
PushDemoApi プロジェクトに Services という名前の新しいフォルダーを追加します。
INotificationService.cs という名前の [サービス] フォルダーに空のインターフェイスを追加し、次の実装を追加します。
using System.Threading; using System.Threading.Tasks; using PushDemoApi.Models; namespace PushDemoApi.Services { public interface INotificationService { Task<bool> CreateOrUpdateInstallationAsync(DeviceInstallation deviceInstallation, CancellationToken token); Task<bool> DeleteInstallationByIdAsync(string installationId, CancellationToken token); Task<bool> RequestNotificationAsync(NotificationRequest notificationRequest, CancellationToken token); } }空のクラスを NotificationHubsService.cs という名前の Services フォルダーに追加し、次のコードを追加して INotificationService インターフェイスを実装します。
using System;
using System.Collections.Generic;
using System.Linq;
using System.Threading;
using System.Threading.Tasks;
using Microsoft.Azure.NotificationHubs;
using Microsoft.Extensions.Logging;
using Microsoft.Extensions.Options;
using PushDemoApi.Models;

namespace PushDemoApi.Services
{
    public class NotificationHubService : INotificationService
    {
        readonly NotificationHubClient _hub;
        readonly Dictionary<string, NotificationPlatform> _installationPlatform;
        readonly ILogger<NotificationHubService> _logger;

        public NotificationHubService(IOptions<NotificationHubOptions> options, ILogger<NotificationHubService> logger)
        {
            _logger = logger;
            _hub = NotificationHubClient.CreateClientFromConnectionString(
                options.Value.ConnectionString,
                options.Value.Name);

            _installationPlatform = new Dictionary<string, NotificationPlatform>
            {
                { nameof(NotificationPlatform.Apns).ToLower(), NotificationPlatform.Apns },
                { nameof(NotificationPlatform.Fcm).ToLower(), NotificationPlatform.Fcm }
            };
        }

        public async Task<bool> CreateOrUpdateInstallationAsync(DeviceInstallation deviceInstallation, CancellationToken token)
        {
            if (string.IsNullOrWhiteSpace(deviceInstallation?.InstallationId) ||
                string.IsNullOrWhiteSpace(deviceInstallation?.Platform) ||
                string.IsNullOrWhiteSpace(deviceInstallation?.PushChannel))
                return false;

            var installation = new Installation()
            {
                InstallationId = deviceInstallation.InstallationId,
                PushChannel = deviceInstallation.PushChannel,
                Tags = deviceInstallation.Tags
            };

            if (_installationPlatform.TryGetValue(deviceInstallation.Platform, out var platform))
                installation.Platform = platform;
            else
                return false;

            try
            {
                await _hub.CreateOrUpdateInstallationAsync(installation, token);
            }
            catch
            {
                return false;
            }

            return true;
        }

        public async Task<bool> DeleteInstallationByIdAsync(string installationId, CancellationToken token)
        {
            if (string.IsNullOrWhiteSpace(installationId))
                return false;

            try
            {
                await _hub.DeleteInstallationAsync(installationId, token);
            }
            catch
            {
                return false;
            }

            return true;
        }

        public async Task<bool> RequestNotificationAsync(NotificationRequest notificationRequest, CancellationToken token)
        {
            if ((notificationRequest.Silent &&
                string.IsNullOrWhiteSpace(notificationRequest?.Action)) ||
                (!notificationRequest.Silent &&
                (string.IsNullOrWhiteSpace(notificationRequest?.Text)) ||
                string.IsNullOrWhiteSpace(notificationRequest?.Action)))
                return false;

            var androidPushTemplate = notificationRequest.Silent ?
                PushTemplates.Silent.Android :
                PushTemplates.Generic.Android;

            var iOSPushTemplate = notificationRequest.Silent ?
                PushTemplates.Silent.iOS :
                PushTemplates.Generic.iOS;

            var androidPayload = PrepareNotificationPayload(
                androidPushTemplate,
                notificationRequest.Text,
                notificationRequest.Action);

            var iOSPayload = PrepareNotificationPayload(
                iOSPushTemplate,
                notificationRequest.Text,
                notificationRequest.Action);

            try
            {
                if (notificationRequest.Tags.Length == 0)
                {
                    // This will broadcast to all users registered in the notification hub
                    await SendPlatformNotificationsAsync(androidPayload, iOSPayload, token);
                }
                else if (notificationRequest.Tags.Length <= 20)
                {
                    await SendPlatformNotificationsAsync(androidPayload, iOSPayload, notificationRequest.Tags, token);
                }
                else
                {
                    var notificationTasks = notificationRequest.Tags
                        .Select((value, index) => (value, index))
                        .GroupBy(g => g.index / 20, i => i.value)
                        .Select(tags => SendPlatformNotificationsAsync(androidPayload, iOSPayload, tags, token));

                    await Task.WhenAll(notificationTasks);
                }

                return true;
            }
            catch (Exception e)
            {
                _logger.LogError(e, "Unexpected error sending notification");
                return false;
            }
        }

        string PrepareNotificationPayload(string template, string text, string action) => template
            .Replace("$(alertMessage)", text, StringComparison.InvariantCulture)
            .Replace("$(alertAction)", action, StringComparison.InvariantCulture);

        Task SendPlatformNotificationsAsync(string androidPayload, string iOSPayload, CancellationToken token)
        {
            var sendTasks = new Task[]
            {
                _hub.SendFcmNativeNotificationAsync(androidPayload, token),
                _hub.SendAppleNativeNotificationAsync(iOSPayload, token)
            };

            return Task.WhenAll(sendTasks);
        }

        Task SendPlatformNotificationsAsync(string androidPayload, string iOSPayload, IEnumerable<string> tags, CancellationToken token)
        {
            var sendTasks = new Task[]
            {
                _hub.SendFcmNativeNotificationAsync(androidPayload, tags, token),
                _hub.SendAppleNativeNotificationAsync(iOSPayload, tags, token)
            };

            return Task.WhenAll(sendTasks);
        }
    }
}
注意
SendTemplateNotificationAsync に提供されるタグ式は、20 個のタグに制限されています。 ほとんどの演算子では 6 に制限されていますが、この場合、式には OR (||) のみが含まれます。 要求に 20 個を超えるタグがある場合は、複数の要求に分割する必要があります。 詳細については、 ルーティングとタグ式の ドキュメントを参照してください。
Startup.csで、ConfigureServices メソッドを更新して、NotificationHubsService を INotificationService のシングルトン実装として追加します。
using PushDemoApi.Models;
using PushDemoApi.Services;

public void ConfigureServices(IServiceCollection services)
{
    ...

    services.AddSingleton<INotificationService, NotificationHubService>();

    services.AddOptions<NotificationHubOptions>()
        .Configure(Configuration.GetSection("NotificationHub").Bind)
        .ValidateDataAnnotations();
}
通知 API を作成する
コントロール + Controllers フォルダーをクリックし、[追加] メニューから [新しいファイル...] を選択します。
[ASP.NET Core>Web API コントローラー クラス] を選択し、[名前] に「NotificationsController」と入力し、[新規] をクリックします。
注意
Visual Studio 2019 でフォローしている場合は、読み取り/書き込みアクションを含む API コントローラー テンプレートを選択します。
ファイルの先頭に次の名前空間を追加します。
using System.ComponentModel.DataAnnotations;
using System.Net;
using System.Threading;
using System.Threading.Tasks;
using Microsoft.AspNetCore.Authorization;
using Microsoft.AspNetCore.Mvc;
using PushDemoApi.Models;
using PushDemoApi.Services;
ControllerBase から派生し、ApiController 属性で修飾されるように、テンプレート化されたコントローラーを更新します。
[ApiController]
[Route("api/[controller]")]
public class NotificationsController : ControllerBase
{
    // Templated methods here
}
注意
Controller 基本クラスはビューのサポートを提供しますが、この場合は必要ないため、代わりに ControllerBase を使用できます。 Visual Studio 2019 でフォローしている場合は、この手順をスキップできます。
[ API キーを使用してクライアントを認証 する] セクションを完了する場合は、 NotificationsController も Authorize 属性で装飾する必要があります。
[Authorize]コンストラクターを更新して 、INotificationService の登録済みインスタンスを引数として受け入れ、読み取り専用メンバーに割り当てます。
readonly INotificationService _notificationService;

public NotificationsController(INotificationService notificationService)
{
    _notificationService = notificationService;
}
launchSettings.json ([プロパティ] フォルダー内) で、registrationsControllerRoute 属性で指定された URL と一致するように launchUrl
weatherforecastを api/notifications に変更します。デバッグを開始し (Command + Enter)、アプリが新しい NotificationsController で動作していることを検証し、 401 Unauthorized 状態を返します。
注意
Visual Studio がブラウザーでアプリを自動的に起動しない場合があります。 Postman を使用して、この時点から API をテストします。
新しい [ Postman ] タブで、要求を GET に設定します。 プレースホルダー <applicationUrl> を、プロパティ> launchSettings.jsonにある https applicationUrl に置き換えて、次のアドレスを入力します。
<applicationUrl>/api/notifications注意
既定のプロファイルの applicationUrl は 'https://localhost:5001' である必要があります。 IIS (Windows 上の Visual Studio 2019 の既定値) を使用している場合は、代わりに iisSettings 項目で指定された applicationUrl を使用する必要があります。 アドレスが正しくない場合は、404 応答が返されます。
[ API キーを使用してクライアントを認証 する] セクションを完了する場合は、 apikey 値を含めるように要求ヘッダーを構成してください。
キー 値 apikey <your_api_key> [ 送信 ] ボタンをクリックします。
注意
JSON コンテンツを含む 200 OK 状態が表示されます。
SSL 証明書検証の警告を受け取った場合は、設定で要求 SSL 証明書検証 Postman の設定をオフに切り替えることができます。
NotificationsController.csのテンプレート化されたクラス メソッドを次のコードに置き換えます。
[HttpPut]
[Route("installations")]
[ProducesResponseType((int)HttpStatusCode.OK)]
[ProducesResponseType((int)HttpStatusCode.BadRequest)]
[ProducesResponseType((int)HttpStatusCode.UnprocessableEntity)]
public async Task<IActionResult> UpdateInstallation(
    [Required]DeviceInstallation deviceInstallation)
{
    var success = await _notificationService
        .CreateOrUpdateInstallationAsync(deviceInstallation, HttpContext.RequestAborted);

    if (!success)
        return new UnprocessableEntityResult();

    return new OkResult();
}

[HttpDelete()]
[Route("installations/{installationId}")]
[ProducesResponseType((int)HttpStatusCode.OK)]
[ProducesResponseType((int)HttpStatusCode.BadRequest)]
[ProducesResponseType((int)HttpStatusCode.UnprocessableEntity)]
public async Task<ActionResult> DeleteInstallation(
    [Required][FromRoute]string installationId)
{
    var success = await _notificationService
        .DeleteInstallationByIdAsync(installationId, CancellationToken.None);

    if (!success)
        return new UnprocessableEntityResult();

    return new OkResult();
}

[HttpPost]
[Route("requests")]
[ProducesResponseType((int)HttpStatusCode.OK)]
[ProducesResponseType((int)HttpStatusCode.BadRequest)]
[ProducesResponseType((int)HttpStatusCode.UnprocessableEntity)]
public async Task<IActionResult> RequestPush(
    [Required]NotificationRequest notificationRequest)
{
    if ((notificationRequest.Silent &&
        string.IsNullOrWhiteSpace(notificationRequest?.Action)) ||
        (!notificationRequest.Silent &&
        string.IsNullOrWhiteSpace(notificationRequest?.Text)))
        return new BadRequestResult();

    var success = await _notificationService
        .RequestNotificationAsync(notificationRequest, HttpContext.RequestAborted);

    if (!success)
        return new UnprocessableEntityResult();

    return new OkResult();
}
API アプリを作成する
これで、バックエンド サービスをホストするための API アプリをAzure App Serviceに作成します。
Azure Portal にサインインします。
[ リソースの作成] をクリックし、 [ API アプリ] を検索して選択し、 [ 作成] をクリックします。
次のフィールドを更新し、[ 作成] をクリックします。
アプリ名:
API アプリのグローバルに一意の名前を入力しますサブスクリプション:
通知ハブを作成したのと同じターゲット サブスクリプション を選択します。リソース グループ:
通知ハブを作成したのと同じ リソース グループ を選択します。App Serviceプラン/場所:
新しいApp Serviceプランを作成する注意
既定のオプションから SSL サポートを含むプランに変更します。 それ以外の場合は、 http 要求がブロックされるのを防ぐために、モバイル アプリを操作するときに適切な手順を実行する必要があります。
Application Insights:
推奨されるオプションを保持するか (その名前を使用して新しいリソースが作成されます)、既存のリソースを選択します。API アプリがプロビジョニングされたら、そのリソースに移動します。
[概要] の上部にある [要点] の概要にある URL プロパティをメモしておきます。 この URL は、このチュートリアルの後半で使用する バックエンド エンドポイント です。
注意
URL では、前に指定した API アプリ名を という形式
https://<app_name>.azurewebsites.netで使用します。一覧から [ 構成] を選択します ( [設定] の下)。
以下の各設定について、[新しいアプリケーション設定] をクリックして [名前] と [値] を入力し、[OK] をクリックします。
名前 値 Authentication:ApiKey<api_key_value> NotificationHub:Name<hub_name_value> NotificationHub:ConnectionString<hub_connection_string_value> 注意
これらは、ユーザー設定で以前に定義した設定と同じです。 これらをコピーできる必要があります。 [Authentication:ApiKey] 設定は、[API キーを使用してクライアントを認証する] セクションを完了することを選択した場合にのみ必要です。 運用環境のシナリオでは、 Azure KeyVault などのオプションを確認できます。 これらは、この場合にわかりやすくするためにアプリケーション設定として追加されています。
すべてのアプリケーション設定が追加されたら、[ 保存]、[ 続行] の順にクリックします。
バックエンド サービスを発行する
次に、アプリを API アプリにデプロイして、すべてのデバイスからアクセスできるようにします。
注意
次の手順は、Visual Studio for Macに固有のものです。 Windows 上の Visual Studio 2019 でフォローしている場合、発行フローは異なります。 「Windows でAzure App Serviceに発行する」を参照してください。
まだ行っていない場合は、構成を [デバッグ] から [リリース ] に変更します。
コントロール + PushDemoApi プロジェクトをクリックし、[発行] メニューから [Azure に発行] を選択します。
要求された場合は、認証フローに従います。 前の 「API アプリの作成 」セクションで使用したアカウントを使用します。
前に作成したAzure App Service API アプリを発行ターゲットとして一覧から選択し、[発行] をクリックします。
ウィザードが完了すると、アプリが Azure に発行され、アプリが開きます。 まだ行っていない場合は 、URL を 書き留めておきます。 この URL は、このチュートリアルの後半で使用する バックエンド エンドポイント です。
発行された API の検証
Postman で新しいタブを開き、要求を PUT に設定し、以下のアドレスを入力します。 プレースホルダーを、前の バックエンド サービスの発行 セクションでメモしたベース アドレスに置き換えます。
https://<app_name>.azurewebsites.net/api/notifications/installations注意
ベース アドレスは、次の形式にする必要があります
https://<app_name>.azurewebsites.net/[ API キーを使用してクライアントを認証 する] セクションを完了することを選択した場合は、 apikey 値を含めるように要求ヘッダーを構成してください。
キー 値 apikey <your_api_key> [本文] の生のオプションを選択し、形式オプションの一覧から [JSON] を選択し、いくつかのプレースホルダー JSON コンテンツを含めます。
{}[送信] をクリックします。
注意
サービスから 422 UnprocessableEntity 状態を受け取る必要があります。
手順 1 から 4 をもう一度実行しますが、今回は要求エンドポイントを指定して検証し、 400 Bad Request 応答を受け取ります。
https://<app_name>.azurewebsites.net/api/notifications/requests
注意
クライアント モバイル アプリからのプラットフォーム固有の情報が必要になるため、有効な要求データを使用して API をテストすることはできません。
クロスプラットフォーム Flutter アプリケーションを作成する
このセクションでは、クロスプラットフォーム方式でプッシュ通知を実装する Flutter モバイル アプリケーションを構築します。
これにより、作成したバックエンド サービスを介して通知ハブを登録および登録解除できます。
アクションが指定され、アプリがフォアグラウンドに表示されると、アラートが表示されます。 それ以外の場合は、通知センターに通知が表示されます。
注意
通常は、明示的なユーザー登録/登録解除の入力なしで、アプリケーション ライフサイクルの適切な時点 (または最初の実行エクスペリエンスの一部として) に登録 (および登録解除) アクションを実行します。 ただし、この例では、この機能をより簡単に探索およびテストできるようにするために、明示的なユーザー入力が必要になります。
Flutter ソリューションを作成する
Visual Studio Code の新しいインスタンスを開きます。
コマンド パレットを開きます (Shift + コマンド + P)。
[ Flutter: New Project ] コマンドを選択し、 Enter キーを押します。
[プロジェクト名] に「push_demo」と入力し、[プロジェクトの場所] を選択します。
メッセージが表示されたら、[ パッケージの取得] を選択します。
コントロール + kotlin フォルダー (アプリ>src>メイン の下) をクリックし、[Finder で表示] を選択します。 次に、子フォルダー (kotlin フォルダーの下) の名前をそれぞれ 、
<your_organization>、およびpushdemoにcom変更します。注意
Visual Studio Code テンプレートを使用する場合、これらのフォルダーは既定で com (例:<project_name>) になります。 mobcat がorganizationに使用されていると仮定すると、フォルダー構造は次のように表示されます。
- kotlin
- Com
- mobcat
- pushdemo
- mobcat
- Com
- kotlin
Visual Studio Code に戻り、android>アプリ>build.gradle の applicationId 値を に
com.<your_organization>.pushdemo更新します。注意
your_organization プレースホルダーには、独自のorganization>名を<使用する必要があります。 たとえば、mobcat をorganizationとして使用すると、パッケージ名の値が com.mobcat.pushdemo になります。
srcdebug、src>>メイン、src>プロファイルで、AndroidManifest.xml ファイル内のパッケージ属性をそれぞれ更新します。 値が前の手順で使用した applicationId と 一致していることを確認します。
<manifest xmlns:android="http://schemas.android.com/apk/res/android" package="com.<your_organization>.pushdemo>"> ... </manifest>src>メイン
android:labelの AndroidManifest.xml ファイルの 属性を PushDemo に更新します。 次に、 属性をandroid:allowBackupの直下にandroid:label追加し、その値を false に設定 します。<application android:name="io.flutter.app.FlutterApplication" android:label="PushDemo" android:allowBackup="false" android:icon="@mipmap/ic_launcher"> ... </application>アプリ レベルの build.gradle ファイル (android>アプリ>build.gradle) を開き、(android セクションから) compileSdkVersion を更新して API 29 を使用します。 次に、 minSdkVersion と targetSdkVersion の値を ( defaultConfig セクションから) それぞれ 26 と 29 に更新します。
注意
API レベル 26 以上 を実行しているデバイスのみが、このチュートリアルの目的でサポートされていますが、古いバージョンを実行しているデバイスをサポートするように拡張できます。
コントロール + ios フォルダーをクリックし、[Xcode で開く] を選択します。
Xcode で、ランナー (フォルダーではなく上部にある xcodeproj) をクリックします。 次に、[ ランナー ] ターゲットを選択し、[ 全般 ] タブを選択します。 [すべての ビルド構成] が選択された状態で、 バンドル識別子 を に
com.<your_organization>.PushDemo更新します。注意
your_organization プレースホルダーには、独自のorganization>名を<使用する必要があります。 たとえば、mobcat をorganizationとして使用すると、バンドル識別子の値が com.mobcat.PushDemo になります。
[Info.plist] をクリックし、[バンドル名] の値を PushDemo に更新します
Xcode を閉じて Visual Studio Code に戻ります。
Visual Studio Code に戻り、pubspec.yaml を開き、http パッケージと flutter_secure_storageDart パッケージを依存関係として追加します。 次に、ファイルを保存し、メッセージが表示されたら [ パッケージの取得 ] をクリックします。
dependencies: flutter: sdk: flutter http: ^0.12.1 flutter_secure_storage: ^3.3.3ターミナルで、ディレクトリを ios フォルダーに変更します (Flutter プロジェクトの場合)。 次に、 pod install コマンドを実行して、新しいポッド ( flutter_secure_storage パッケージで必要) をインストールします。
コントロール + lib フォルダーをクリックし、ファイル名として main_page.dart を使用してメニューから [新しいファイル] を選択します。 次に、次のコードを追加します。
import 'package:flutter/material.dart';

class MainPage extends StatefulWidget {
  @override
  _MainPageState createState() => _MainPageState();
}

class _MainPageState extends State<MainPage> {
  @override
  Widget build(BuildContext context) {
    return Scaffold(
      body: SafeArea(
        child: Column(
          crossAxisAlignment: CrossAxisAlignment.stretch,
          children: <Widget>[],
        )
      )
    );
  }
}
メイン.dart で、テンプレート化されたコードを次のように置き換えます。
import 'package:flutter/material.dart'; import 'package:push_demo/main_page.dart'; final navigatorKey = GlobalKey<NavigatorState>(); void main() => runApp(MaterialApp(home: MainPage(), navigatorKey: navigatorKey));ターミナルで、各ターゲット プラットフォームでアプリをビルドして実行し、テンプレート化されたアプリがデバイスで実行されることをテストします。 サポートされているデバイスが接続されていることを確認します。
flutter run
クロスプラットフォーム コンポーネントを実装する
コントロール + lib フォルダーをクリックし、メニューから [フォルダー名] としてモデルを使用して [新しいフォルダー] を選択します。
コントロール + models フォルダーをクリックし、ファイル名として device_installation.dart を使用してメニューから [新しいファイル] を選択します。 次に、次のコードを追加します。
class DeviceInstallation { final String deviceId; final String platform; final String token; final List<String> tags; DeviceInstallation(this.deviceId, this.platform, this.token, this.tags); DeviceInstallation.fromJson(Map<String, dynamic> json) : deviceId = json['installationId'], platform = json['platform'], token = json['pushChannel'], tags = json['tags']; Map<String, dynamic> toJson() => { 'installationId': deviceId, 'platform': platform, 'pushChannel': token, 'tags': tags, }; }この例でサポートされているアクションの列挙を定義するpush_demo_action.dart という名前の models フォルダーに新しいファイルを追加します。
enum PushDemoAction {
  actionA,
  actionB,
}
services という名前のプロジェクトに新しいフォルダーを追加し、次の実装で device_installation_service.dart という名前のフォルダーに新しいファイルを追加します。
import 'package:flutter/services.dart';

class DeviceInstallationService {
  static const deviceInstallation = const MethodChannel('com.<your_organization>.pushdemo/deviceinstallation');
  static const String getDeviceIdChannelMethod = "getDeviceId";
  static const String getDeviceTokenChannelMethod = "getDeviceToken";
  static const String getDevicePlatformChannelMethod = "getDevicePlatform";

  Future<String> getDeviceId() {
    return deviceInstallation.invokeMethod(getDeviceIdChannelMethod);
  }

  Future<String> getDeviceToken() {
    return deviceInstallation.invokeMethod(getDeviceTokenChannelMethod);
  }

  Future<String> getDevicePlatform() {
    return deviceInstallation.invokeMethod(getDevicePlatformChannelMethod);
  }
}
注意
your_organization プレースホルダーには、独自のorganization>名を<使用する必要があります。 たとえば、mobcat をorganizationとして使用すると、com.mobcat.pushdemo/deviceinstallation の MethodChannel 名が生成されます。
このクラスは、基になるネイティブ プラットフォームとの連携をカプセル化して、必要なデバイス インストールの詳細を取得します。 MethodChannel は、基になるネイティブ プラットフォームとの双方向非同期通信を容易にします。 このチャネルに対応するプラットフォーム固有のは、後の手順で作成されます。
次の実装を使用して 、notification_action_service.dart という名前の別のファイルをそのフォルダーに追加します。
import 'package:flutter/services.dart';
import 'dart:async';
import 'package:push_demo/models/push_demo_action.dart';

class NotificationActionService {
  static const notificationAction =
      const MethodChannel('com.<your_organization>.pushdemo/notificationaction');
  static const String triggerActionChannelMethod = "triggerAction";
  static const String getLaunchActionChannelMethod = "getLaunchAction";

  final actionMappings = {
    'action_a' : PushDemoAction.actionA,
    'action_b' : PushDemoAction.actionB
  };

  final actionTriggeredController = StreamController.broadcast();

  NotificationActionService() {
    notificationAction
        .setMethodCallHandler(handleNotificationActionCall);
  }

  Stream get actionTriggered => actionTriggeredController.stream;

  Future<void> triggerAction({action: String}) async {

    if (!actionMappings.containsKey(action)) {
      return;
    }

    actionTriggeredController.add(actionMappings[action]);
  }

  Future<void> checkLaunchAction() async {
    final launchAction = await notificationAction.invokeMethod(getLaunchActionChannelMethod) as String;

    if (launchAction != null) {
      triggerAction(action: launchAction);
    }
  }

  Future<void> handleNotificationActionCall(MethodCall call) async {
    switch (call.method) {
      case triggerActionChannelMethod:
        return triggerAction(action: call.arguments as String);
      default:
        throw MissingPluginException();
        break;
    }
  }
}
注意
これは、厳密に型指定された列挙を使用してクロスプラットフォーム方式で処理できるように、通知アクションの処理を一元化するための簡単なメカニズムとして使用されます。 サービスを使用すると、基になるネイティブ プラットフォームが通知ペイロードでアクションをトリガーできるようになります。 また、一般的なコードでは、Flutter が処理する準備ができたら、アプリケーションの起動時にアクションが指定されたかどうかを振り返ってチェックすることもできます。 たとえば、通知センターからの通知をタップしてアプリを起動するとします。
次の実装を使用して、notification_registration_service.dart という名前のサービス フォルダーに新しいファイルを追加します。
import 'dart:convert';
import 'package:flutter/services.dart';
import 'package:http/http.dart' as http;
import 'package:push_demo/services/device_installation_service.dart';
import 'package:push_demo/models/device_installation.dart';
import 'package:flutter_secure_storage/flutter_secure_storage.dart';

class NotificationRegistrationService {
  static const notificationRegistration =
      const MethodChannel('com.<your_organization>.pushdemo/notificationregistration');

  static const String refreshRegistrationChannelMethod = "refreshRegistration";
  static const String installationsEndpoint = "api/notifications/installations";
  static const String cachedDeviceTokenKey = "cached_device_token";
  static const String cachedTagsKey = "cached_tags";

  final deviceInstallationService = DeviceInstallationService();
  final secureStorage = FlutterSecureStorage();

  String baseApiUrl;
  String apikey;

  NotificationRegistrationService(this.baseApiUrl, this.apikey) {
    notificationRegistration
        .setMethodCallHandler(handleNotificationRegistrationCall);
  }

  String get installationsUrl => "$baseApiUrl$installationsEndpoint";

  Future<void> deregisterDevice() async {
    final cachedToken = await secureStorage.read(key: cachedDeviceTokenKey);
    final serializedTags = await secureStorage.read(key: cachedTagsKey);

    if (cachedToken == null || serializedTags == null) {
      return;
    }

    var deviceId = await deviceInstallationService.getDeviceId();

    if (deviceId.isEmpty) {
      throw "Unable to resolve an ID for the device.";
    }

    var response = await http
        .delete("$installationsUrl/$deviceId", headers: {"apikey": apikey});

    if (response.statusCode != 200) {
      throw "Deregister request failed: ${response.reasonPhrase}";
    }

    await secureStorage.delete(key: cachedDeviceTokenKey);
    await secureStorage.delete(key: cachedTagsKey);
  }

  Future<void> registerDevice(List<String> tags) async {
    try {
      final deviceId = await deviceInstallationService.getDeviceId();
      final platform = await deviceInstallationService.getDevicePlatform();
      final token = await deviceInstallationService.getDeviceToken();

      final deviceInstallation =
          DeviceInstallation(deviceId, platform, token, tags);

      final response = await http.put(installationsUrl,
          body: jsonEncode(deviceInstallation),
          headers: {"apikey": apikey, "Content-Type": "application/json"});

      if (response.statusCode != 200) {
        throw "Register request failed: ${response.reasonPhrase}";
      }

      final serializedTags = jsonEncode(tags);

      await secureStorage.write(key: cachedDeviceTokenKey, value: token);
      await secureStorage.write(key: cachedTagsKey, value: serializedTags);
    } on PlatformException catch (e) {
      throw e.message;
    } catch (e) {
      throw "Unable to register device: $e";
    }
  }

  Future<void> refreshRegistration() async {
    final currentToken = await deviceInstallationService.getDeviceToken();
    final cachedToken = await secureStorage.read(key: cachedDeviceTokenKey);
    final serializedTags = await secureStorage.read(key: cachedTagsKey);

    if (currentToken == null ||
        cachedToken == null ||
        serializedTags == null ||
        currentToken == cachedToken) {
      return;
    }

    final tags = jsonDecode(serializedTags);

    return registerDevice(tags);
  }

  Future<void> handleNotificationRegistrationCall(MethodCall call) async {
    switch (call.method) {
      case refreshRegistrationChannelMethod:
        return refreshRegistration();
      default:
        throw MissingPluginException();
        break;
    }
  }
}
注意
このクラスは、 DeviceInstallationService の使用とバックエンド サービスへの要求をカプセル化して、必要な登録、登録解除、更新の登録アクションを実行します。 apiKey 引数は、[API キーを使用してクライアントを認証する] セクションを完了することを選択した場合にのみ必要です。
次の実装を使用して、config.dart という名前の lib フォルダーに新しいファイルを追加します。
class Config {
  static String apiKey = "API_KEY";
  static String backendServiceEndpoint = "BACKEND_SERVICE_ENDPOINT";
}
注意
これは、アプリ シークレットを定義する簡単な方法として使用されます。 プレースホルダーの値を独自の値に置き換えます。 バックエンド サービスを構築するときに、これらをメモしておく必要があります。 API アプリの URL は である
https://<api_app_name>.azurewebsites.net/必要があります。 apiKey メンバーは、「API キーを使用してクライアントを認証する」セクションを完了することを選択した場合にのみ必要です。これらのシークレットをソース管理にコミットしないように、gitignore ファイルにこれを追加してください。
クロスプラットフォーム UI を実装する
main_page.dart で、ビルド関数を次のように置き換えます。
@override
Widget build(BuildContext context) {
return Scaffold(
    body: Padding(
      padding: const EdgeInsets.symmetric(horizontal: 20.0, vertical: 40.0),
      child: Column(
        mainAxisAlignment: MainAxisAlignment.end,
        crossAxisAlignment: CrossAxisAlignment.stretch,
        children: <Widget>[
          FlatButton(
            child: Text("Register"),
            onPressed: registerButtonClicked,
          ),
          FlatButton(
            child: Text("Deregister"),
            onPressed: deregisterButtonClicked,
          ),
        ],
      ),
    ),
  );
}
必要なインポートを main_page.dart ファイルの先頭に追加します。
import 'package:push_demo/services/notification_registration_service.dart';
import 'config.dart';
NotificationRegistrationService への参照を格納するフィールドを _MainPageState クラスに追加します。
final notificationRegistrationService = NotificationRegistrationService(Config.backendServiceEndpoint, Config.apiKey);_MainPageState クラスで、Register ボタンとDeregister ボタン onPressed イベントのイベント ハンドラーを実装します。 対応する Register/Deregister メソッドを呼び出し、結果を示すアラートを表示します。
void registerButtonClicked() async {
    try {
      await notificationRegistrationService.registerDevice(List<String>());
      await showAlert(message: "Device registered");
    }
    catch (e) {
      await showAlert(message: e);
    }
  }

  void deregisterButtonClicked() async {
    try {
      await notificationRegistrationService.deregisterDevice();
      await showAlert(message: "Device deregistered");
    }
    catch (e) {
      await showAlert(message: e);
    }
  }

  Future<void> showAlert({ message: String }) async {
    return showDialog<void>(
      context: context,
      barrierDismissible: false,
      builder: (BuildContext context) {
        return AlertDialog(
          title: Text('PushDemo'),
          content: SingleChildScrollView(
            child: ListBody(
              children: <Widget>[
                Text(message),
              ],
            ),
          ),
          actions: <Widget>[
            FlatButton(
              child: Text('OK'),
              onPressed: () {
                Navigator.of(context).pop();
              },
            ),
          ],
        );
      },
    );
  }
ここで、メイン.dart で、ファイルの先頭に次のインポートが存在することを確認します。
import 'package:flutter/material.dart';
import 'package:push_demo/models/push_demo_action.dart';
import 'package:push_demo/services/notification_action_service.dart';
import 'package:push_demo/main_page.dart';
NotificationActionService のインスタンスへの参照を格納して初期化する変数を宣言します。
final notificationActionService = NotificationActionService();アクションがトリガーされたときにアラートの表示を処理する関数を追加します。
void notificationActionTriggered(PushDemoAction action) { showActionAlert(message: "${action.toString().split(".")[1]} action received"); } Future<void> showActionAlert({ message: String }) async { return showDialog<void>( context: navigatorKey.currentState.overlay.context, barrierDismissible: false, builder: (BuildContext context) { return AlertDialog( title: Text('PushDemo'), content: SingleChildScrollView( child: ListBody( children: <Widget>[ Text(message), ], ), ), actions: <Widget>[ FlatButton( child: Text('OK'), onPressed: () { Navigator.of(context).pop(); }, ), ], ); }, ); }メイン関数を更新して、NotificationActionServiceactionTriggered ストリームを監視し、アプリの起動時にキャプチャされたすべてのアクションのチェックします。
void main() async {
  runApp(MaterialApp(home: MainPage(), navigatorKey: navigatorKey,));
  notificationActionService.actionTriggered.listen((event) { notificationActionTriggered(event as PushDemoAction); });
  await notificationActionService.checkLaunchAction();
}
注意
これは、単にプッシュ通知アクションの受信と伝達を示す目的です。 通常、このような処理は、アラートを表示するのではなく、特定のビューに移動したり、データを更新したりするなど、サイレントモードで処理されます。
プッシュ通知用にネイティブ Android プロジェクトを構成する
Google Services JSON ファイルを追加する
コントロール + Android フォルダーをクリックし、[Android Studio で開く] を選択します。 次に、[ プロジェクト ] ビューに切り替えます (まだ表示されていない場合)。
Firebase コンソールで PushDemo プロジェクトを設定したときに、先ほどダウンロードしたgoogle-services.json ファイルを見つけます。 次に、アプリ モジュールのルート ディレクトリ (Android Android>>アプリ) にドラッグします。
ビルド設定とアクセス許可を構成する
[プロジェクト] ビューを Android に切り替えます。
AndroidManifest.xmlを開き、閉じるタグの前に application 要素の後に INTERNET とREAD_PHONE_STATEのアクセス許可を追加します。
<manifest>
    <application>...</application>
    <uses-permission android:name="android.permission.INTERNET" />
    <uses-permission android:name="android.permission.READ_PHONE_STATE" />
</manifest>
Firebase SDK を追加する
Android Studio で、プロジェクト レベルの build.gradle ファイル (Gradle Scripts>build.gradle (Project: android)) を開きます。 依存関係ノードに 'com.google.gms:google-services' クラスパス
buildscript>があることを確認します。buildscript { repositories { // Check that you have the following line (if not, add it): google() // Google's Maven repository } dependencies { // ... // Add the following line: classpath 'com.google.gms:google-services:4.3.3' // Google Services plugin } } allprojects { // ... repositories { // Check that you have the following line (if not, add it): google() // Google's Maven repository // ... } }注意
Android プロジェクトの作成時に Firebase コンソールに記載されている手順に従って、最新バージョンを参照していることを確認します。
アプリ レベルの build.gradle ファイル (Gradle Scripts>build.gradle (モジュール: アプリ)) で 、Google Services Gradle プラグインを適用します。 Android ノードのすぐ上にプラグインを適用します。
// ...

// Add the following line:
apply plugin: 'com.google.gms.google-services'  // Google Services plugin

android {
  // ...
}
同じファイルの 依存関係 ノードで、 Cloud Messaging Android ライブラリの依存関係を追加します。
dependencies {
    // ...
    implementation 'com.google.firebase:firebase-messaging:20.2.0'
}
注意
Cloud Messaging Android クライアントのドキュメントに従って、最新バージョンを参照していることを確認します。
変更を保存し、[ 今すぐ同期 ] ボタン (ツール バー プロンプトから) または [プロジェクトと Gradle ファイルの同期] をクリックします。
Android のプッシュ通知を処理する
Android Studio で、com.your_organization.pushdemo<> パッケージ フォルダー (アプリ>src>メイン>kotlin) をクリック + し、[新規作成] メニューから [パッケージ] を選択します。 名前として 「services 」と入力し、Return キーを押 します。
コントロール + [サービス] フォルダーをクリックし、[新規作成] メニューから [Kotlin ファイル/クラス] を選択します。 名前として 「DeviceInstallationService」 と入力し、Return キーを押 します。
次のコードを使用して DeviceInstallationService を実装します。
package com.<your_organization>.pushdemo.services

import android.annotation.SuppressLint
import android.content.Context
import android.provider.Settings.Secure
import com.google.android.gms.common.ConnectionResult
import com.google.android.gms.common.GoogleApiAvailability
import io.flutter.embedding.engine.FlutterEngine
import io.flutter.plugin.common.MethodCall
import io.flutter.plugin.common.MethodChannel

@SuppressLint("HardwareIds")
class DeviceInstallationService {

    companion object {
        const val DEVICE_INSTALLATION_CHANNEL = "com.<your_organization>.pushdemo/deviceinstallation"
        const val GET_DEVICE_ID = "getDeviceId"
        const val GET_DEVICE_TOKEN = "getDeviceToken"
        const val GET_DEVICE_PLATFORM = "getDevicePlatform"
    }

    private var context: Context
    private var deviceInstallationChannel : MethodChannel

    val playServicesAvailable
        get() = GoogleApiAvailability.getInstance().isGooglePlayServicesAvailable(context) == ConnectionResult.SUCCESS

    constructor(context: Context, flutterEngine: FlutterEngine) {
        this.context = context
        deviceInstallationChannel = MethodChannel(flutterEngine.dartExecutor.binaryMessenger, DEVICE_INSTALLATION_CHANNEL)
        deviceInstallationChannel.setMethodCallHandler { call, result -> handleDeviceInstallationCall(call, result) }
    }

    fun getDeviceId() : String
        = Secure.getString(context.applicationContext.contentResolver, Secure.ANDROID_ID)

    fun getDeviceToken() : String {
        if(!playServicesAvailable) {
            throw Exception(getPlayServicesError())
        }

        // TODO: Revisit once we have created the PushNotificationsFirebaseMessagingService
        val token = "Placeholder_Get_Value_From_FirebaseMessagingService_Implementation"

        if (token.isNullOrBlank()) {
            throw Exception("Unable to resolve token for FCM.")
        }

        return token
    }

    fun getDevicePlatform() : String = "fcm"

    private fun handleDeviceInstallationCall(call: MethodCall, result: MethodChannel.Result) {
        when (call.method) {
            GET_DEVICE_ID -> {
                result.success(getDeviceId())
            }
            GET_DEVICE_TOKEN -> {
                getDeviceToken(result)
            }
            GET_DEVICE_PLATFORM -> {
                result.success(getDevicePlatform())
            }
            else -> {
                result.notImplemented()
            }
        }
    }

    private fun getDeviceToken(result: MethodChannel.Result) {
        try {
            val token = getDeviceToken()
            result.success(token)
        }
        catch (e: Exception) {
            result.error("ERROR", e.message, e)
        }
    }

    private fun getPlayServicesError(): String {
        val resultCode = GoogleApiAvailability.getInstance().isGooglePlayServicesAvailable(context)

        if (resultCode != ConnectionResult.SUCCESS) {
            return if (GoogleApiAvailability.getInstance().isUserResolvableError(resultCode)){
                GoogleApiAvailability.getInstance().getErrorString(resultCode)
            } else {
                "This device is not supported"
            }
        }

        return "An error occurred preventing the use of push notifications"
    }
}
注意
このクラスは、チャネルに対応するプラットフォーム固有の を
com.<your_organization>.pushdemo/deviceinstallation実装します。 これは、 DeviceInstallationService.dart 内のアプリの Flutter 部分で定義されました。 この場合、呼び出しは共通コードからネイティブ ホストに対して行われます。 your_organizationを使用する場合は、必ず独自のorganizationに置き換えてください<。>このクラスは、通知ハブ登録ペイロードの一部として一意の ID ( Secure.AndroidId を使用) を提供します。
NotificationRegistrationService というサービス フォルダーに別の Kotlin ファイル/クラスを追加し、次のコードを追加します。
package com.<your_organization>.pushdemo.services

import io.flutter.embedding.engine.FlutterEngine
import io.flutter.plugin.common.MethodChannel

class NotificationRegistrationService {

    companion object {
        const val NOTIFICATION_REGISTRATION_CHANNEL = "com.<your_organization>.pushdemo/notificationregistration"
        const val REFRESH_REGISTRATION = "refreshRegistration"
    }

    private var notificationRegistrationChannel : MethodChannel

    constructor(flutterEngine: FlutterEngine) {
        notificationRegistrationChannel = MethodChannel(flutterEngine.dartExecutor.binaryMessenger, NotificationRegistrationService.NOTIFICATION_REGISTRATION_CHANNEL)
    }

    fun refreshRegistration() {
        notificationRegistrationChannel.invokeMethod(REFRESH_REGISTRATION, null)
    }
}
注意
このクラスは、チャネルに対応するプラットフォーム固有の を
com.<your_organization>.pushdemo/notificationregistration実装します。 これは、 NotificationRegistrationService.dart 内のアプリの Flutter 部分で定義されました。 この場合、呼び出しはネイティブ ホストから共通コードに対して行われます。 ここでも、your_organization>を使用する場所を問わず、独自のorganizationに置き換えてください<。NotificationActionService というサービス フォルダーに別の Kotlin File/Class を追加し、次のコードを追加します。
package com.<your_organization>.pushdemo.services

import io.flutter.embedding.engine.FlutterEngine
import io.flutter.plugin.common.MethodCall
import io.flutter.plugin.common.MethodChannel

class NotificationActionService {
    companion object {
        const val NOTIFICATION_ACTION_CHANNEL = "com.<your_organization>.pushdemo/notificationaction"
        const val TRIGGER_ACTION = "triggerAction"
        const val GET_LAUNCH_ACTION = "getLaunchAction"
    }

    private var notificationActionChannel : MethodChannel
    var launchAction : String? = null

    constructor(flutterEngine: FlutterEngine) {
        notificationActionChannel = MethodChannel(flutterEngine.dartExecutor.binaryMessenger, NotificationActionService.NOTIFICATION_ACTION_CHANNEL)
        notificationActionChannel.setMethodCallHandler { call, result -> handleNotificationActionCall(call, result) }
    }

    fun triggerAction(action: String) {
        notificationActionChannel.invokeMethod(NotificationActionService.TRIGGER_ACTION, action)
    }

    private fun handleNotificationActionCall(call: MethodCall, result: MethodChannel.Result) {
        when (call.method) {
            NotificationActionService.GET_LAUNCH_ACTION -> {
                result.success(launchAction)
            }
            else -> {
                result.notImplemented()
            }
        }
    }
}
注意
このクラスは、チャネルに対応するプラットフォーム固有の を
com.<your_organization>.pushdemo/notificationaction実装します。 これは、 NotificationActionService.dart 内のアプリの Flutter 部分で定義されました。 この場合、両方向で呼び出しを行うことができます。 your_organizationを使用する場合は、必ず独自のorganizationに置き換えてください<。>PushNotificationsFirebaseMessagingService という名前の com.your_organization.pushdemo<> パッケージに新しい Kotlin File/Class を追加し、次のコードを使用して を実装します。
package com.<your_organization>.pushdemo

import android.os.Handler
import android.os.Looper
import com.google.firebase.messaging.FirebaseMessagingService
import com.google.firebase.messaging.RemoteMessage
import com.<your_organization>.pushdemo.services.NotificationActionService
import com.<your_organization>.pushdemo.services.NotificationRegistrationService

class PushNotificationsFirebaseMessagingService : FirebaseMessagingService() {

    companion object {
        var token : String? = null
        var notificationRegistrationService : NotificationRegistrationService? = null
        var notificationActionService : NotificationActionService? = null
    }

    override fun onNewToken(token: String) {
        PushNotificationsFirebaseMessagingService.token = token
        notificationRegistrationService?.refreshRegistration()
    }

    override fun onMessageReceived(message: RemoteMessage) {
        message.data.let {
            Handler(Looper.getMainLooper()).post {
                notificationActionService?.triggerAction(it.getOrDefault("action", null))
            }
        }
    }
}
注意
このクラスは、アプリがフォアグラウンドで実行されているときに通知を処理する役割を担います。 onMessageReceived で受信した通知ペイロードにアクションが含まれている場合は、NotificationActionService で triggerAction を条件付きで呼び出します。 また、onNewToken 関数をオーバーライドして Firebase トークンが再生成されると、NotificationRegistrationService で refreshRegistration が呼び出されます。
もう一度、your_organization>を使用する場所を問わず、独自のorganizationに置き換えてください<。
AndroidManifest.xml (アプリ>src>メイン) で、意図フィルターを使用して、Application 要素の下部に PushNotificationsFirebaseMessagingService を
com.google.firebase.MESSAGING_EVENT追加します。<manifest> <application> <!-- EXISTING MANIFEST CONTENT --> <service android:name="com.<your_organization>.pushdemo.PushNotificationsFirebaseMessagingService" android:exported="false"> <intent-filter> <action android:name="com.google.firebase.MESSAGING_EVENT" /> </intent-filter> </service> </application> </manifest>DeviceInstallationService に戻り、次のインポートがファイルの先頭に存在することを確認します。
package com.<your_organization>.pushdemo
import com.<your_organization>.pushdemo.services.PushNotificationsFirebaseMessagingService
注意
your_organizationを独自のorganization値に置き換えます<。>
プレースホルダー テキスト Placeholder_Get_Value_From_FirebaseMessagingService_Implementation を更新して、 PushNotificationFirebaseMessagingService からトークン値を取得します。
fun getDeviceToken() : String {
    if(!playServicesAvailable) {
        throw Exception(getPlayServicesError())
    }

    // Get token from the PushNotificationsFirebaseMessagingService.token field.
    val token = PushNotificationsFirebaseMessagingService.token

    if (token.isNullOrBlank()) {
        throw Exception("Unable to resolve token for FCM.")
    }

    return token
}
MainActivity で、ファイルの先頭に次のインポートが存在することを確認します。
package com.<your_organization>.pushdemo

import android.content.Intent
import android.os.Bundle
import com.google.android.gms.tasks.OnCompleteListener
import com.google.firebase.iid.FirebaseInstanceId
import com.<your_organization>.pushdemo.services.DeviceInstallationService
import com.<your_organization>.pushdemo.services.NotificationActionService
import com.<your_organization>.pushdemo.services.NotificationRegistrationService
import io.flutter.embedding.android.FlutterActivity
注意
your_organizationを独自のorganization値に置き換えます<。>
DeviceInstallationService への参照を格納する変数を追加します。
private lateinit var deviceInstallationService: DeviceInstallationServiceprocessNotificationActions という名前の関数を追加して、意図に action という名前の余分な値があるかどうかをチェックします。 アプリの起動時にアクションが処理されている場合は、そのアクションを条件付きでトリガーするか、後で使用するために格納します。
 private fun processNotificationActions(intent: Intent, launchAction: Boolean = false) {
    if (intent.hasExtra("action")) {
        var action = intent.getStringExtra("action");

        if (action.isNotEmpty()) {
            if (launchAction) {
                PushNotificationsFirebaseMessagingService.notificationActionService?.launchAction = action
            }
            else {
                PushNotificationsFirebaseMessagingService.notificationActionService?.triggerAction(action)
            }
        }
    }
}
onNewIntent 関数をオーバーライドして processNotificationActions を呼び出します。
override fun onNewIntent(intent: Intent) {
    super.onNewIntent(intent)
    processNotificationActions(intent)
}
注意
MainActivity の LaunchMode が SingleTop に設定されているため、OnCreate 関数ではなく onNewIntent 関数を介してインテントが既存の Activity インスタンスに送信されるため、onCreate 関数と onNewIntent 関数の両方で受信インテントを処理する必要があります。
onCreate 関数をオーバーライドし、deviceInstallationService を DeviceInstallationService の新しいインスタンスに設定します。
override fun onCreate(savedInstanceState: Bundle?) {
    super.onCreate(savedInstanceState)

    flutterEngine?.let {
        deviceInstallationService = DeviceInstallationService(context, it)
    }
}
PushNotificationFirebaseMessagingServices で notificationActionService プロパティと notificationRegistrationService プロパティを設定します。
flutterEngine?.let {
  deviceInstallationService = DeviceInstallationService(context, it)
  PushNotificationsFirebaseMessagingService.notificationActionService = NotificationActionService(it)
  PushNotificationsFirebaseMessagingService.notificationRegistrationService = NotificationRegistrationService(it)
}
同じ関数で、条件に応じて FirebaseInstanceId.getInstance().instanceId を呼び出します。 OnCompleteListener を実装して、refreshRegistration を呼び出す前に PushNotificationFirebaseMessagingService で結果のトークン値を設定します。
if(deviceInstallationService?.playServicesAvailable) {
    FirebaseInstanceId.getInstance().instanceId
        .addOnCompleteListener(OnCompleteListener { task ->
            if (!task.isSuccessful)
                return@OnCompleteListener

            PushNotificationsFirebaseMessagingService.token = task.result?.token
            PushNotificationsFirebaseMessagingService.notificationRegistrationService?.refreshRegistration()
        })
}
onCreate では、関数の末尾で processNotificationActions を呼び出します。 このアクションがアプリの起動時に処理されていることを示すには、launchAction 引数に true を使用します。
processNotificationActions(this.intent, true)
注意
アプリを実行するたびに再登録し、デバッグ セッションから停止して、プッシュ通知の受信を続ける必要があります。
プッシュ通知用にネイティブ iOS プロジェクトを構成する
ランナー ターゲットと Info.plist を構成する
Visual Studio Code で、コントロール + ios フォルダーをクリックし、[Xcode で開く] を選択します。
Xcode で、[ランナー] (フォルダーではなく上部にある xcodeproj) をクリックし、[ランナー] ターゲットを選択し、[署名 & 機能] を選択します。 [すべてのビルド構成] が選択された状態で、チームの開発者アカウントを選択します。 [署名を自動的に管理する] オプションがオンになっていることを確認し、署名証明書とプロビジョニング プロファイルが自動的に選択されていることを確認します。
注意
新しい [プロビジョニング プロファイル] の値が表示されない場合は、[ Xcode>Preferences>アカウント ] を選択して署名 ID のプロファイルを更新し、[ 手動プロファイルのダウンロード ] ボタンを選択してプロファイルをダウンロードしてみてください。
[ + 機能] をクリックし、[ プッシュ通知] を検索します。 [プッシュ通知] をダブルクリックして、この機能を追加します。
Info.plist を開き、最小システム バージョンを 13.0 に設定します。
注意
このチュートリアルでは 、iOS 13.0 以降 を実行しているデバイスのみがサポートされていますが、古いバージョンを実行しているデバイスをサポートするように拡張できます。
Runner.entitlements を開き、APS 環境設定が開発に設定されていることを確認します。
iOS のプッシュ通知を処理する
コントロール + (ランナー プロジェクト内の) Runner フォルダーをクリックし、名前として [サービスを使用して新しいグループ] を選択します。
コントロール + [サービス] フォルダーをクリックし、[新しいファイル...] を選択します。次に、[Swift File]\(Swift ファイル\) を選択し、[Next]\(次へ\) をクリックします。 名前に DeviceInstallationService を指定し、[ 作成] をクリックします。
次のコードを使用して 、DeviceInstallationService.swift を実装します。
import Foundation

class DeviceInstallationService {

    enum DeviceRegistrationError: Error {
        case notificationSupport(message: String)
    }

    var token : Data? = nil

    let DEVICE_INSTALLATION_CHANNEL = "com.<your_organization>.pushdemo/deviceinstallation"
    let GET_DEVICE_ID = "getDeviceId"
    let GET_DEVICE_TOKEN = "getDeviceToken"
    let GET_DEVICE_PLATFORM = "getDevicePlatform"

    private let deviceInstallationChannel : FlutterMethodChannel

    var notificationsSupported : Bool {
        get {
            if #available(iOS 13.0, *) {
                return true
            }
            else {
                return false
            }
        }
    }

    init(withBinaryMessenger binaryMessenger : FlutterBinaryMessenger) {
        deviceInstallationChannel = FlutterMethodChannel(name: DEVICE_INSTALLATION_CHANNEL, binaryMessenger: binaryMessenger)
        deviceInstallationChannel.setMethodCallHandler(handleDeviceInstallationCall)
    }

    func getDeviceId() -> String {
        return UIDevice.current.identifierForVendor!.description
    }

    func getDeviceToken() throws -> String {
        if(!notificationsSupported) {
            let notificationSupportError = getNotificationsSupportError()
            throw DeviceRegistrationError.notificationSupport(message: notificationSupportError)
        }

        if (token == nil) {
            throw DeviceRegistrationError.notificationSupport(message: "Unable to resolve token for APNS.")
        }

        return token!.reduce("", {$0 + String(format: "%02X", $1)})
    }

    func getDevicePlatform() -> String {
        return "apns"
    }

    private func handleDeviceInstallationCall(call: FlutterMethodCall, result: @escaping FlutterResult) {
        switch call.method {
        case GET_DEVICE_ID:
            result(getDeviceId())
        case GET_DEVICE_TOKEN:
            getDeviceToken(result: result)
        case GET_DEVICE_PLATFORM:
            result(getDevicePlatform())
        default:
            result(FlutterMethodNotImplemented)
        }
    }

    private func getDeviceToken(result: @escaping FlutterResult) {
        do {
            let token = try getDeviceToken()
            result(token)
        }
        catch let error {
            result(FlutterError(code: "UNAVAILABLE", message: error.localizedDescription, details: nil))
        }
    }

    private func getNotificationsSupportError() -> String {

        if (!notificationsSupported) {
            return "This app only supports notifications on iOS 13.0 and above. You are running \(UIDevice.current.systemVersion)"
        }

        return "An error occurred preventing the use of push notifications."
    }
}
注意
このクラスは、チャネルに対応するプラットフォーム固有の
com.<your_organization>.pushdemo/deviceinstallationを実装します。 これは 、DeviceInstallationService.dart 内のアプリの Flutter 部分で定義されました。 この場合、呼び出しは共通コードからネイティブ ホストに対して行われます。 your_organizationは、使用する場所を問わず、必ず独自のorganizationに置き換えてください<。>このクラスは、通知ハブ登録ペイロードの一部として一意の ID ( UIDevice.identifierForVendor 値を使用) を提供します。
NotificationRegistrationService という名前の Services フォルダーに別の Swift ファイルを追加し、次のコードを追加します。
import Foundation

class NotificationRegistrationService {

    let NOTIFICATION_REGISTRATION_CHANNEL = "com.<your_organization>.pushdemo/notificationregistration"
    let REFRESH_REGISTRATION = "refreshRegistration"

    private let notificationRegistrationChannel : FlutterMethodChannel

    init(withBinaryMessenger binaryMessenger : FlutterBinaryMessenger) {
       notificationRegistrationChannel = FlutterMethodChannel(name: NOTIFICATION_REGISTRATION_CHANNEL, binaryMessenger: binaryMessenger)
    }

    func refreshRegistration() {
        notificationRegistrationChannel.invokeMethod(REFRESH_REGISTRATION, arguments: nil)
    }
}
注意
このクラスは、チャネルに対応するプラットフォーム固有の
com.<your_organization>.pushdemo/notificationregistrationを実装します。 これは、 NotificationRegistrationService.dart 内のアプリの Flutter 部分で定義されました。 この場合、呼び出しはネイティブ ホストから共通コードに対して行われます。 ここでも、your_organization>を使用する場所を問わず、独自のorganizationに置き換えてください<。NotificationActionService という名前の Services フォルダーに別の Swift ファイルを追加し、次のコードを追加します。
import Foundation

class NotificationActionService {

    let NOTIFICATION_ACTION_CHANNEL = "com.<your_organization>.pushdemo/notificationaction"
    let TRIGGER_ACTION = "triggerAction"
    let GET_LAUNCH_ACTION = "getLaunchAction"

    private let notificationActionChannel: FlutterMethodChannel

    var launchAction: String? = nil

    init(withBinaryMessenger binaryMessenger: FlutterBinaryMessenger) {
        notificationActionChannel = FlutterMethodChannel(name: NOTIFICATION_ACTION_CHANNEL, binaryMessenger: binaryMessenger)
        notificationActionChannel.setMethodCallHandler(handleNotificationActionCall)
    }

    func triggerAction(action: String) {
       notificationActionChannel.invokeMethod(TRIGGER_ACTION, arguments: action)
    }

    private func handleNotificationActionCall(call: FlutterMethodCall, result: @escaping FlutterResult) {
        switch call.method {
        case GET_LAUNCH_ACTION:
            result(launchAction)
        default:
            result(FlutterMethodNotImplemented)
        }
    }
}
注意
このクラスは、チャネルに対応するプラットフォーム固有の
com.<your_organization>.pushdemo/notificationactionを実装します。 これは、 NotificationActionService.dart 内のアプリの Flutter 部分で定義されています。 この場合、両方向で呼び出しを行うことができます。 your_organizationは、使用する場所を問わず、必ず独自のorganizationに置き換えてください<。>AppDelegate.swift で、前に作成したサービスへの参照を格納する変数を追加します。
var deviceInstallationService : DeviceInstallationService?
var notificationRegistrationService : NotificationRegistrationService?
var notificationActionService : NotificationActionService?
通知データを処理するための processNotificationActions という関数を追加します。 アプリの起動時にアクションが処理されている場合は、そのアクションを条件付きでトリガーするか、後で使用するために格納します。
func processNotificationActions(userInfo: [AnyHashable : Any], launchAction: Bool = false) {
    if let action = userInfo["action"] as? String {
        if (launchAction) {
            notificationActionService?.launchAction = action
        }
        else {
            notificationActionService?.triggerAction(action: action)
        }
    }
}
DeviceInstallationService のトークン値を設定する didRegisterForRemoteNotificationsWithDeviceToken 関数をオーバーライドします。 次に、 NotificationRegistrationService で refreshRegistration を呼び出します。
override func application(_ application: UIApplication, didRegisterForRemoteNotificationsWithDeviceToken deviceToken: Data) {
  deviceInstallationService?.token = deviceToken
  notificationRegistrationService?.refreshRegistration()
}
userInfo 引数を processNotificationActions 関数に渡して、didReceiveRemoteNotification 関数をオーバーライドします。
override func application(_ application: UIApplication, didReceiveRemoteNotification userInfo: [AnyHashable : Any]) {
    processNotificationActions(userInfo: userInfo)
}
didFailToRegisterForRemoteNotificationsWithError 関数をオーバーライドして、エラーをログに記録します。
override func application(_ application: UIApplication, didFailToRegisterForRemoteNotificationsWithError error: Error) {
    print(error);
}
注意
これは非常にプレースホルダーです。 運用環境のシナリオに対して適切なログ記録とエラー処理を実装する必要があります。
didFinishLaunchingWithOptions で、deviceInstallationService、notificationRegistrationService、および notificationActionService 変数をインスタンス化します。
let controller : FlutterViewController = window?.rootViewController as! FlutterViewController

deviceInstallationService = DeviceInstallationService(withBinaryMessenger: controller.binaryMessenger)
notificationRegistrationService = NotificationRegistrationService(withBinaryMessenger: controller.binaryMessenger)
notificationActionService = NotificationActionService(withBinaryMessenger: controller.binaryMessenger)
同じ関数で、条件付きで承認を要求し、リモート通知に登録します。
if #available(iOS 13.0, *) {
  UNUserNotificationCenter.current().requestAuthorization(options: [.alert, .sound, .badge]) {
      (granted, error) in

      if (granted)
      {
          DispatchQueue.main.async {
              let pushSettings = UIUserNotificationSettings(types: [.alert, .sound, .badge], categories: nil)
              application.registerUserNotificationSettings(pushSettings)
              application.registerForRemoteNotifications()
          }
      }
  }
}
launchOptions に remoteNotification キーが含まれている場合は、didFinishLaunchingWithOptions 関数の末尾で processNotificationActions を呼び出します。 結果の userInfo オブジェクトを渡し、launchAction 引数に true を使用します。 true 値は、アプリの起動時にアクションが処理されていることを示します。
if let userInfo = launchOptions?[.remoteNotification] as? [AnyHashable : Any] {
    processNotificationActions(userInfo: userInfo, launchAction: true)
}
ソリューションをテストする
バックエンド サービスを介した通知の送信をテストできるようになりました。
テスト通知を送信する
Postman で新しいタブを開きます。
POST の要求を設定し、次のアドレスを入力します。
https://<app_name>.azurewebsites.net/api/notifications/requests[ API キーを使用してクライアントを認証 する] セクションを完了する場合は、 apikey 値を含めるように要求ヘッダーを構成してください。
キー 値 apikey <your_api_key> [本文] の生のオプションを選択し、形式オプションの一覧から [JSON] を選択し、いくつかのプレースホルダー JSON コンテンツを含めます。
{
    "text": "Message from Postman!",
    "action": "action_a"
}
ウィンドウの右上にある [保存] ボタンの下にある [コード] ボタンを選択します。 要求は、 HTML 用に表示される場合の次の例のようになります ( apikey ヘッダーを含めたかどうかによって異なります)。
POST /api/notifications/requests HTTP/1.1
Host: https://<app_name>.azurewebsites.net
apikey: <your_api_key>
Content-Type: application/json

{
    "text": "Message from backend service",
    "action": "action_a"
}
ターゲット プラットフォーム (Android および iOS) の一方または両方で PushDemo アプリケーションを実行します。
注意
Android でテストしている場合は、デバッグで実行されていないことを確認するか、アプリケーションを実行してアプリがデプロイされている場合は、アプリを強制的に閉じて起動ツールから起動します。
PushDemo アプリで、[登録] ボタンをタップします。
Postman に戻り、[コード スニペットの生成] ウィンドウを閉じて (まだ行っていない場合)、[送信] ボタンをクリックします。
Postman で 200 OK 応答が返され、ActionA アクションが受信されたことを示すアラートがアプリに表示されることを検証します。
PushDemo アプリを閉じ、Postman でもう一度 [送信] ボタンをクリックします。
Postman で 200 OK 応答が返されることを確認します。 正しいメッセージを含む PushDemo アプリの通知領域に通知が表示されることを確認します。
通知をタップして、アプリが開き、 ActionA アクションがアラートを受信したことを 確認します。
Postman に戻り、前の要求本文を変更して、アクション値にaction_aするのではなく、action_bを指定するサイレント通知を送信します。
{ "action": "action_b", "silent": true }アプリがまだ開いている状態で、Postman の [送信] ボタンをクリックします。
Postman で 200 OK 応答を受け取り、ActionA アクションが受信したのではなく、ActionB アクションが受信されたことを示すアラートがアプリに表示されることを確認します。
PushDemo アプリを閉じ、Postman でもう一度 [送信] ボタンをクリックします。
Postman で 200 OK 応答が返され、サイレント通知が通知領域に表示されないかどうかを確認します。
トラブルシューティング
バックエンド サービスからの応答なし
ローカルでテストする場合は、バックエンド サービスが実行されていて、正しいポートが使用されていることを確認します。
Azure API アプリに対してテストを行う場合、サービスが実行され、デプロイされ、エラーなしで開始されたチェック。
クライアント経由でテストする場合は、Postman またはモバイル アプリ構成でベース アドレスを正しく指定したことをチェックしてください。 ベース アドレスは、ローカルでテストする場合は または https://localhost:5001/ であることをhttps://<api_name>.azurewebsites.net/示す必要があります。
デバッグ セッションを開始または停止した後に Android で通知を受信しない
デバッグ セッションを開始または停止した後に、もう一度登録してください。 デバッガーによって、新しい Firebase トークンが生成されます。 通知ハブのインストールも更新する必要があります。
バックエンド サービスからの 401 状態コードの受信
apikey 要求ヘッダーを設定していて、この値がバックエンド サービス用に構成したヘッダーと一致していることを確認します。
ローカルでテストするときにこのエラーが発生した場合は、クライアント構成で定義したキー値が、API で使用される Authentication:ApiKey ユーザー設定値と一致していることを確認します。
API アプリを使用してテストする場合は、クライアント構成ファイルのキー値が、 API アプリで使用している Authentication:ApiKey アプリケーション設定と一致していることを確認 します。
注意
バックエンド サービスをデプロイした後にこの設定を作成または変更した場合は、サービスを有効にするためにサービスを再起動する必要があります。
[API キーを使用してクライアントを認証する] セクションを完了しないことを選択した場合は、NotificationsController クラスに Authorize 属性を適用していないことを確認してください。
バックエンド サービスからの 404 状態コードの受信
エンドポイントと HTTP 要求メソッドが正しいことを検証します。 たとえば、エンドポイントは次のように示す必要があります。
- [PUT]
https://<api_name>.azurewebsites.net/api/notifications/installations - [DELETE]
https://<api_name>.azurewebsites.net/api/notifications/installations/<installation_id> - [POST]
https://<api_name>.azurewebsites.net/api/notifications/requests
または、ローカルでテストする場合:
- [PUT]
https://localhost:5001/api/notifications/installations - [DELETE]
https://localhost:5001/api/notifications/installations/<installation_id> - [POST]
https://localhost:5001/api/notifications/requests
クライアント アプリでベース アドレスを指定する場合は、 で終わることを /確認します。 ベース アドレスは、ローカルでテストする場合は または https://localhost:5001/ であることをhttps://<api_name>.azurewebsites.net/示す必要があります。
登録できず、通知ハブのエラー メッセージが表示される
テスト デバイスにネットワーク接続があることを確認します。 次に、HttpResponse の StatusCode プロパティ値を検査するブレークポイントを設定して、Http 応答の状態コードを確認します。
状態コードに基づいて、該当する場合は、前のトラブルシューティングの提案を確認してください。
それぞれの API のこれらの特定の状態コードを返す行にブレークポイントを設定します。 次に、ローカルでデバッグするときにバックエンド サービスを呼び出してみてください。
適切なペイロードを使用して 、Postman 経由でバックエンド サービスが期待どおりに動作していることを確認します。 対象のプラットフォームのクライアント コードによって作成された実際のペイロードを使用します。
プラットフォーム固有の構成セクションを確認して、ステップが見逃されていないことを確認します。 に対して適切な値が解決 installation id されていることを確認し、 token 適切なプラットフォームの変数を確認します。
デバイスのエラー メッセージの ID を解決できません
プラットフォーム固有の構成セクションを確認して、ステップが見逃されていないことを確認します。
関連リンク
- Azure Notification Hubs の概要
- macOS への Flutter のインストール
- Windows への Flutter のインストール
- バックエンド操作用の Notification Hubs SDK
- GitHub 上の Notification Hubs SDK
- アプリケーション バックエンドに登録する
- 登録管理
- タグの使用
- カスタム テンプレートの使用
次の手順
これで、基本的な Flutter アプリがバックエンド サービス経由で通知ハブに接続され、通知を送受信できるようになります。
このチュートリアルで使用する例を独自のシナリオに合わせて調整する必要がある可能性があります。 より堅牢なエラー処理、再試行ロジック、ログ記録の実装も推奨されます。
Visual Studio App Center は、トラブルシューティングに役立つ分析と診断を提供するモバイル アプリにすばやく組み込むことができます。