例: Azure ライブラリを使用して仮想マシンを作成する
この記事では、Python スクリプトで Azure SDK の管理ライブラリを使用し、Linux 仮想マシンを含んだリソース グループを作成する方法について説明します。
特に記載のない限り、この記事で使用されているコマンドはいずれも、Linux と macOS の bash および Windows のコマンド シェルで同じように動作します。
同等の Azure CLI コマンドは、この記事で一覧されています。 Azure portal を使用する場合は、Linux VM の作成と Windows VM の作成に関する記事を参照してください。
Note
コードによる仮想マシンの作成は、仮想マシンに必要なその他多くのリソースのプロビジョニングを伴う複数のステップから成るプロセスです。 このようなコードをコマンド ラインから実行するだけの場合は、az vm create コマンドを使用する方がはるかに簡単です。これにより、これらのセカンダリ リソースは、省略することを選択した設定には既定値を使用して、自動的にプロビジョニングされます。 必須の引数は、リソース グループ、VM 名、イメージ名、ログイン資格情報だけです。 詳細については、「Azure CLI を使用した仮想マシンの簡易作成」を参照してください。
1: ローカルの開発環境を設定する
まだ行っていない場合は、このコードを実行できる環境を設定します。 次のことをお試しください。
Python 仮想環境を構成します。 仮想環境は、ローカルまたは Azure Cloud Shell で作成し、そこでコードを実行できます。 仮想環境の使用を開始するには、必ず仮想環境をアクティブにします。
Conda 環境を使用します。
Visual Studio Code または GitHub Codespaces で Dev コンテナを使用します。
2: 必要な Azure ライブラリ パッケージをインストールする
この例で使用する管理ライブラリを列挙した requirements.txt ファイルを作成します。
azure-mgmt-resource
azure-mgmt-compute
azure-mgmt-network
azure-identity
次に、仮想環境がアクティブになっているターミナルまたはコマンド プロンプトで、requirements.txt にリストされている管理ライブラリをインストールします。
pip install -r requirements.txt
3: 仮想マシンを作成するコードを記述する
次のコードを使用して、provision_vm.py という名前の Python ファイルを作成します。 詳細はコメントで説明しています。
# Import the needed credential and management objects from the libraries.
import os

from azure.identity import DefaultAzureCredential
from azure.mgmt.compute import ComputeManagementClient
from azure.mgmt.network import NetworkManagementClient
from azure.mgmt.resource import ResourceManagementClient

print(
    "Provisioning a virtual machine...some operations might take a \
minute or two."
)

# Acquire a credential object.
credential = DefaultAzureCredential()

# Retrieve subscription ID from environment variable.
subscription_id = os.environ["AZURE_SUBSCRIPTION_ID"]


# Step 1: Provision a resource group

# Obtain the management object for resources.
resource_client = ResourceManagementClient(credential, subscription_id)

# Constants we need in multiple places: the resource group name and
# the region in which we provision resources. You can change these
# values however you want.
RESOURCE_GROUP_NAME = "PythonAzureExample-VM-rg"
LOCATION = "westus2"

# Provision the resource group.
rg_result = resource_client.resource_groups.create_or_update(
    RESOURCE_GROUP_NAME, {"location": LOCATION}
)

print(
    f"Provisioned resource group {rg_result.name} in the \
{rg_result.location} region"
)

# For details on the previous code, see Example: Provision a resource
# group at https://learn.microsoft.com/azure/developer/python/
# azure-sdk-example-resource-group

# Step 2: provision a virtual network

# A virtual machine requires a network interface client (NIC). A NIC
# requires a virtual network and subnet along with an IP address.
# Therefore we must provision these downstream components first, then
# provision the NIC, after which we can provision the VM.

# Network and IP address names
VNET_NAME = "python-example-vnet"
SUBNET_NAME = "python-example-subnet"
IP_NAME = "python-example-ip"
IP_CONFIG_NAME = "python-example-ip-config"
NIC_NAME = "python-example-nic"

# Obtain the management object for networks
network_client = NetworkManagementClient(credential, subscription_id)

# Provision the virtual network and wait for completion
poller = network_client.virtual_networks.begin_create_or_update(
    RESOURCE_GROUP_NAME,
    VNET_NAME,
    {
        "location": LOCATION,
        "address_space": {"address_prefixes": ["10.0.0.0/16"]},
    },
)

vnet_result = poller.result()

print(
    f"Provisioned virtual network {vnet_result.name} with address \
prefixes {vnet_result.address_space.address_prefixes}"
)

# Step 3: Provision the subnet and wait for completion
poller = network_client.subnets.begin_create_or_update(
    RESOURCE_GROUP_NAME,
    VNET_NAME,
    SUBNET_NAME,
    {"address_prefix": "10.0.0.0/24"},
)
subnet_result = poller.result()

print(
    f"Provisioned virtual subnet {subnet_result.name} with address \
prefix {subnet_result.address_prefix}"
)

# Step 4: Provision an IP address and wait for completion
poller = network_client.public_ip_addresses.begin_create_or_update(
    RESOURCE_GROUP_NAME,
    IP_NAME,
    {
        "location": LOCATION,
        "sku": {"name": "Standard"},
        "public_ip_allocation_method": "Static",
        "public_ip_address_version": "IPV4",
    },
)

ip_address_result = poller.result()

print(
    f"Provisioned public IP address {ip_address_result.name} \
with address {ip_address_result.ip_address}"
)

# Step 5: Provision the network interface client
poller = network_client.network_interfaces.begin_create_or_update(
    RESOURCE_GROUP_NAME,
    NIC_NAME,
    {
        "location": LOCATION,
        "ip_configurations": [
            {
                "name": IP_CONFIG_NAME,
                "subnet": {"id": subnet_result.id},
                "public_ip_address": {"id": ip_address_result.id},
            }
        ],
    },
)

nic_result = poller.result()

print(f"Provisioned network interface client {nic_result.name}")

# Step 6: Provision the virtual machine

# Obtain the management object for virtual machines
compute_client = ComputeManagementClient(credential, subscription_id)

VM_NAME = "ExampleVM"
USERNAME = "azureuser"
PASSWORD = "ChangePa$$w0rd24"

print(
    f"Provisioning virtual machine {VM_NAME}; this operation might \
take a few minutes."
)

# Provision the VM specifying only minimal arguments, which defaults
# to an Ubuntu 18.04 VM on a Standard DS1 v2 plan with a public IP address
# and a default virtual network/subnet.

poller = compute_client.virtual_machines.begin_create_or_update(
    RESOURCE_GROUP_NAME,
    VM_NAME,
    {
        "location": LOCATION,
        "storage_profile": {
            "image_reference": {
                "publisher": "Canonical",
                "offer": "UbuntuServer",
                "sku": "16.04.0-LTS",
                "version": "latest",
            }
        },
        "hardware_profile": {"vm_size": "Standard_DS1_v2"},
        "os_profile": {
            "computer_name": VM_NAME,
            "admin_username": USERNAME,
            "admin_password": PASSWORD,
        },
        "network_profile": {
            "network_interfaces": [
                {
                    "id": nic_result.id,
                }
            ]
        },
    },
)

vm_result = poller.result()

print(f"Provisioned virtual machine {vm_result.name}")
コード内の認証
この記事の後半では、Azure CLI を使用して Azure にサインインしてサンプル コードを実行します。 Azure サブスクリプションにリソース グループと、ネットワーク リソースおよびコンピューティング リソースを作成するアクセス許可がアカウントにある場合、コードは正常に実行されます。
運用スクリプトでこのようなコードを使用するには、認証にサービス プリンシパル ベースの方法を使用するように環境変数を設定します。 詳細については、「Azure サービスで Python アプリを認証する方法」を参照してください。 サブスクリプションの Contributor ロールなど、Azure の適切なロールを割り当てて、サブスクリプションでリソース グループやネットワーク リソースおよびコンピューティング リソースを作成するための十分なアクセス許可がサービス プリンシパルにあることを確認します。
コードで使用されているクラスの参照リンク
- DefaultAzureCredential (azure.identity)
- ResourceManagementClient (azure.mgmt.resource)
- NetworkManagementClient (azure.mgmt.network)
- ComputeManagementClient (azure.mgmt.compute)
4. スクリプトを実行します
実行していない場合、Azure CLI を使用して Azure にサインインします。
az loginAZURE_SUBSCRIPTION_ID環境変数を、サブスクリプション ID に設定します。 (az account show コマンドを実行すると、出力のidプロパティからお使いのサブスクリプション ID を取得できます。)次のスクリプトを実行します。
python provision_vm.py
プロビジョニング プロセスが完了するまでに数分かかります。
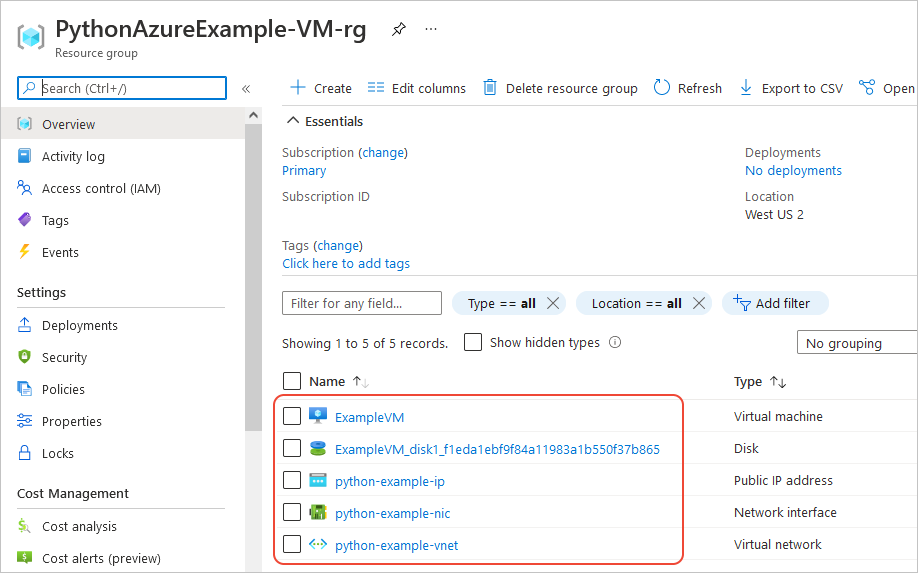
5. リソースを確認する
Azure portal を開き、「PythonAzureExample-VM-rg」リソース グループに移動して、仮想マシン、仮想ディスク、ネットワーク セキュリティ グループ、パブリック IP アドレス、ネットワーク インターフェイス、仮想ネットワークを書き留めます。
Azure CLI を使用して、VM が存在することを az vm list コマンドで確認することもできます。
az vm list --resource-group PythonAzureExample-VM-rg
対応する Azure CLI コマンド
rem Provision the resource group

az group create -n PythonAzureExample-VM-rg -l westus2

rem Provision a virtual network and subnet

az network vnet create -g PythonAzureExample-VM-rg -n python-example-vnet ^
    --address-prefix 10.0.0.0/16 --subnet-name python-example-subnet ^
    --subnet-prefix 10.0.0.0/24

rem Provision a public IP address

az network public-ip create -g PythonAzureExample-VM-rg -n python-example-ip ^
    --allocation-method Dynamic --version IPv4

rem Provision a network interface client

az network nic create -g PythonAzureExample-VM-rg --vnet-name python-example-vnet ^
    --subnet python-example-subnet -n python-example-nic ^
    --public-ip-address python-example-ip

rem Provision the virtual machine

az vm create -g PythonAzureExample-VM-rg -n ExampleVM -l "westus2" ^
    --nics python-example-nic --image UbuntuLTS --public-ip-sku Standard ^
    --admin-username azureuser --admin-password ChangePa$$w0rd24
容量制限に関するエラーが発生した場合は、別のサイズまたはリージョンで試行することができます。 詳細については、「SKU 利用不可のエラーを解決する」を参照してください。
6: リソースをクリーンアップする
この記事で作成した仮想マシンとネットワークを引き続き使用する場合は、リソースをそのままにしておきます。 そうでない場合は、az group delete コマンドを実行して、リソース グループを削除します。
リソース グループではサブスクリプションに継続的な料金は発生しませんが、仮想マシンなどのグループに含まれるリソースには引き続き料金が発生する可能性があります。 アクティブに使用していないグループをクリーン アップすることをお勧めします。 --no-wait 引数を使用すると、操作が完了するまで待機するのではなく、直ちにコマンドから戻ることができます。
az group delete -n PythonAzureExample-VM-rg --no-wait
コードから ResourceManagementClient.resource_groups.begin_delete メソッドを使用してリソース グループを削除することもできます。 「例: リソース グループを作成する」のコードでは、使用方法を示しています。
関連項目
- 例: リソース グループの作成
- 例: サブスクリプション内のリソース グループを一覧表示する
- 例: Azure Storage を作成する
- 例: Azure Storage を使用する
- 例: Web アプリを作成し、コードをデプロイする
- 例: データベースを作成し、クエリを実行する
- 仮想マシンで Azure Managed Disks を使用する
- Azure SDK for Python に関する簡単なアンケートを完了する
次のリソースには、Python を使用して仮想マシンを作成する例が、より広範囲にわたって紹介されています。
- Python を使用して Azure で Windows VM を作成および管理する この例を使用すると、
storage_profileパラメーターを変更することによって Linux VM を作成できます。 - Azure Virtual Machines 管理のサンプル - Python (GitHub)。 このサンプルでは、VM の起動と再起動、VM の停止と削除、ディスク サイズの増加、データ ディスクの管理などの多くの管理手順を紹介しています。
フィードバック
以下は間もなく提供いたします。2024 年を通じて、コンテンツのフィードバック メカニズムとして GitHub の issue を段階的に廃止し、新しいフィードバック システムに置き換えます。 詳細については、「https://aka.ms/ContentUserFeedback」を参照してください。
フィードバックの送信と表示