チュートリアル:バックエンド サービスからデバイスを構成する
デバイス ライフサイクルの一部として、必要に応じてバックエンド サービスから IoT デバイスを構成することがあります。 デバイスに必要な構成を送信するときに、それらのデバイスから状態とコンプライアンスの更新を受信する場合もあります。 たとえば、デバイスの目標動作温度範囲を設定する場合や、デバイスからファームウェアのバージョン情報を収集する場合などです。
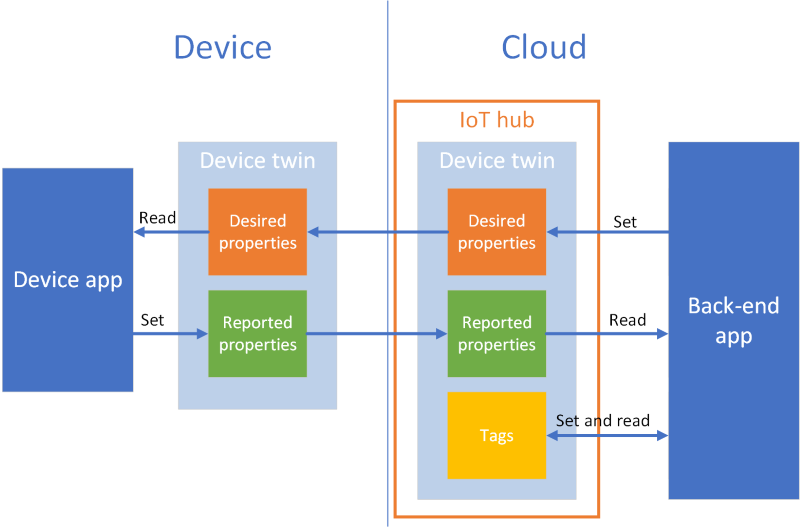
デバイスと IoT ハブ間で状態情報を同期するには、デバイス ツイン を使用します。 デバイス ツインは、特定のデバイスに関連付けられた JSON ドキュメントであり、IoT Hub によってクラウドに格納されます。また、デバイス ツインに対してクエリを実行することができます。 デバイス ツインには、必要なプロパティ、報告されたプロパティ、および タグ が含まれています。
- "必要なプロパティ" は、バックエンド アプリケーションによって設定され、デバイスから読み取られます。
- "報告されたプロパティ" は、デバイスによって設定され、バックエンド アプリケーションによって読み取られます。
- "タグ" はバックエンド アプリケーションによって設定され、デバイスに送信されることはありません。 タグはデバイスの整理に使用します。
このチュートリアルでは、必要なプロパティと報告されたプロパティを使って状態情報を同期する方法について説明します。
このチュートリアルでは、以下のタスクを実行します。
- IoT ハブを作成し、テスト デバイスを ID レジストリに追加する。
- 必要なプロパティを使用して、シミュレートされたデバイスに状態情報を送信する。
- 報告されたプロパティを使用して、シミュレートされたデバイスから状態情報を受信する。
Azure サブスクリプションをお持ちでない場合は、開始する前に 無料アカウント を作成してください。
前提条件
このチュートリアルでは、Azure CLI を使ってクラウド リソースを作成します。 既にデバイスが登録された IoT ハブがある場合は、これらの手順をスキップできます。 CLI コマンドを実行する方法は 2 つあります。
Azure Cloud Shell で Bash 環境を使用します。 詳細については、Azure Cloud Shell の Bash のクイックスタートに関するページを参照してください。

CLI リファレンス コマンドをローカルで実行する場合、Azure CLI をインストールします。 Windows または macOS で実行している場合は、Docker コンテナーで Azure CLI を実行することを検討してください。 詳細については、「Docker コンテナーで Azure CLI を実行する方法」を参照してください。
- az login コマンドを使用して、Azure CLI にサインインします。
- 初回使用時にインストールを求められたら、Azure CLI 拡張機能をインストールします。 拡張機能の詳細については、Azure CLI で拡張機能を使用する方法に関するページを参照してください。
- az version を実行し、インストールされているバージョンおよび依存ライブラリを検索します。 最新バージョンにアップグレードするには、az upgrade を実行します。
このチュートリアルで実行する 2 つのサンプル アプリケーションは、Node.js を使って書かれています。 開発用コンピューター上に Node.js v10.x.x 以降が必要です。
複数のプラットフォームに対応する Node.js を nodejs.org からダウンロードできます。
開発コンピューターに現在インストールされている Node.js のバージョンは、次のコマンドを使って確認できます。
node --version
Node.js 用 Azure IoT サンプルからサンプル Node.js プロジェクトをクローンまたはダウンロードします。
ポート 8883 がファイアウォールで開放されていることを確認してください。 このチュートリアルのデバイス サンプルでは、ポート 8883 を介して通信する MQTT プロトコルを使用しています。 このポートは、企業や教育用のネットワーク環境によってはブロックされている場合があります。 この問題の詳細と対処方法については、「IoT Hub への接続 (MQTT)」を参照してください。
Azure リソースの設定
このチュートリアルを完了するには、Azure サブスクリプションに、デバイスがデバイス ID レジストリに追加されている IoT ハブが含まれている必要があります。 デバイス ID レジストリにエントリがあることで、このチュートリアルで実行するシミュレートされたデバイスがハブに接続できます。
サブスクリプションで IoT ハブをまだ設定していない場合は、次の CLI スクリプトを使用して IoT ハブを設定できます。 このスクリプトでは、IoT ハブの名前に乱数を付加した tutorial-iot-hub という名前を使います。 この名前は、実行時に独自のグローバルに一意な名前に置き換えることができます。 このスクリプトで、米国中部リージョンにリソース グループとハブが作成されますが、より近いリージョンに変更することもできます。 このスクリプトで、IoT ハブ サービス接続文字列が取得されます。この文字列をバックエンド サンプルで使用して IoT ハブに接続します。
let "randomIdentifier=$RANDOM*$RANDOM"
hubname="tutorial-iot-hub-$randomIdentifier"
location=centralus

# Install the IoT extension if it's not already installed:
az extension add --name azure-iot

# Create a resource group:
az group create --name tutorial-iot-hub-rg --location $location

# Create your free-tier IoT hub. You can only have one free IoT hub per subscription.
# Change the sku to S1 to create a standard-tier hub if necessary.
az iot hub create --name $hubname --location $location --resource-group tutorial-iot-hub-rg --partition-count 2 --sku F1

# Make a note of the service connection string, you need it later:
az iot hub connection-string show --hub-name $hubname --policy-name service -o table
このチュートリアルでは、MyTwinDevice というシミュレートされたデバイスを使用します。 次のスクリプトで、このデバイスは ID レジストリに追加され、接続文字列が取得されます。
# Create the device in the identity registry:
az iot hub device-identity create --device-id MyTwinDevice --hub-name $hubname --resource-group tutorial-iot-hub-rg

# Retrieve the device connection string, you need this later:
az iot hub device-identity connection-string show --device-id MyTwinDevice --hub-name $hubname --resource-group tutorial-iot-hub-rg -o table
デバイスに状態情報を送信する
必要なプロパティを使用して、バックエンド アプリケーションからデバイスに状態情報を送信します。 このセクションでは、次の方法について説明します。
- 目的のプロパティを受信して処理するようにデバイスを構成する。
- バックエンド アプリケーションからデバイスに必要なプロパティを送信する。
必要なプロパティのサンプル
アプリケーションに適した方法で必要なプロパティを構成することができます。 この例では、fanOn という 1 つの最上位プロパティを使用し、その他のプロパティを個別のコンポーネントにグループ化します。 次の JSON スニペットは、このチュートリアルで使用する必要なプロパティの構造を示しています。 JSON は、desired.json ファイルにあります。
{
  "fanOn": "true",
  "components": {
    "system": {
      "id": "17",
      "units": "farenheit",
      "firmwareVersion": "9.75"
    },
    "wifi" : {
      "channel" : "6",
      "ssid": "my_network"
    },
    "climate" : {
      "minTemperature": "68",
      "maxTemperature": "76"
    }
  }
}
デバイス アプリケーションで必要なプロパティを受信する
必要なプロパティを受信するシミュレートされたデバイス サンプル コードを表示するには、ダウンロードしたサンプル Node.js プロジェクトの iot-hub/Tutorials/DeviceTwins フォルダーに移動します。 次にテキスト エディターで SimulatedDevice.js ファイルを開きます。
次のセクションでは、バックエンド アプリケーションから送信される必要なプロパティの変更に反応する、シミュレートされたデバイスで実行されるコードについて説明します。
デバイス ツイン オブジェクトを取得する
IoT ハブにデバイスを登録したとき、出力としてデバイス接続文字列を取得しました。 デバイス接続文字列は、デバイスがクラウドに登録された ID で認証するために使われます。 次のコードでは、デバイス接続文字列を使用して IoT ハブに接続します。
// Get the device connection string from a command line argument
var connectionString = process.argv[2];
次のコードでは、クライアント オブジェクトからツインを取得します。
// Get the device twin
client.getTwin(function(err, twin) {
  if (err) {
    console.error(chalk.red('Could not get device twin'));
  } else {
    console.log(chalk.green('Device twin created'));
ハンドラーを作成する
JSON 階層内のさまざまなレベルの更新に反応して必要なプロパティを更新するハンドラーを作成できます。 たとえば、このハンドラーは、バックエンド アプリケーションからデバイスに送信されるすべてのプロパティの変更を把握しています。 delta 変数には、ソリューションのバックエンドから送信された必要なプロパティが含まれています。
// Handle all desired property updates
twin.on('properties.desired', function(delta) {
    console.log(chalk.yellow('\nNew desired properties received in patch:'));
次のハンドラーは、必要なプロパティ fanOn に加えられた変更にのみ反応します。
// Handle changes to the fanOn desired property
twin.on('properties.desired.fanOn', function(fanOn) {
    console.log(chalk.green('\nSetting fan state to ' + fanOn));

    // Update the reported property after processing the desired property
    reportedPropertiesPatch.fanOn = fanOn ? fanOn : '{unknown}';
});
複数のプロパティのハンドラー
このチュートリアルの必要なプロパティの JSON の例では、components の climate ノードに minTemperature と maxTemperature という 2 つのプロパティが含まれています。
デバイスのローカルの twin オブジェクトには、必要なプロパティと報告されたプロパティの完全なセットが格納されています。 バックエンドから送信された delta で、必要なプロパティのサブセットのみが更新される可能性があります。 次のコード スニペットでは、シミュレートされたデバイスが minTemperature と maxTemperature のいずれかの更新を受信した場合に、ローカルの twin の値をもう一方の値に使用し、デバイスを構成します。
// Handle desired properties updates to the climate component
twin.on('properties.desired.components.climate', function(delta) {
    if (delta.minTemperature || delta.maxTemperature) {
      console.log(chalk.green('\nUpdating desired tempertures in climate component:'));
      console.log('Configuring minimum temperature: ' + twin.properties.desired.components.climate.minTemperature);
      console.log('Configuring maximum temperture: ' + twin.properties.desired.components.climate.maxTemperature);

      // Update the reported properties and send them to the hub
      reportedPropertiesPatch.minTemperature = twin.properties.desired.components.climate.minTemperature;
      reportedPropertiesPatch.maxTemperature = twin.properties.desired.components.climate.maxTemperature;
      sendReportedProperties();
    }
});
挿入、更新、削除操作を処理する
バックエンドから送信される必要なプロパティは、特定の必要なプロパティに対して実行されている操作を示していません。 コードで、ローカルに格納されている現在の必要なプロパティとハブから送信された変更のセットから、操作を推測する必要があります。
次のスニペットは、シミュレートされたデバイスが、必要なプロパティの components のリストに対して挿入、更新、および削除操作を処理する方法を示しています。 コンポーネントを削除する必要があることを示すために、null 値を使用する方法も確認できます。
// Keep track of all the components the device knows about
var componentList = {};

// Use this componentList list and compare it to the delta to infer
// if anything was added, deleted, or updated.
twin.on('properties.desired.components', function(delta) {
  if (delta === null) {
    componentList = {};
  }
  else {
    Object.keys(delta).forEach(function(key) {

      if (delta[key] === null && componentList[key]) {
        // The delta contains a null value, and the
        // device has a record of this component.
        // Must be a delete operation.
        console.log(chalk.green('\nDeleting component ' + key));
        delete componentList[key];

      } else if (delta[key]) {
        if (componentList[key]) {
          // The delta contains a component, and the
          // device has a record of it.
          // Must be an update operation.
          console.log(chalk.green('\nUpdating component ' + key + ':'));
          console.log(JSON.stringify(delta[key]));
          // Store the complete object instead of just the delta
          componentList[key] = twin.properties.desired.components[key];

        } else {
          // The delta contains a component, and the
          // device has no record of it.
          // Must be an add operation.
          console.log(chalk.green('\nAdding component ' + key + ':'));
          console.log(JSON.stringify(delta[key]));
          // Store the complete object instead of just the delta
          componentList[key] = twin.properties.desired.components[key];
        }
      }
    });
  }
});
バックエンド アプリケーションから必要なプロパティを送信する
これまでは、必要なプロパティの更新を受信するためにデバイスがハンドラーを実装する方法を見てきました。 このセクションでは、バックエンド アプリケーションからデバイスに必要なプロパティの変更を送信する方法について説明します。
必要なプロパティを受信するシミュレートされたデバイス サンプル コードを表示するには、ダウンロードしたサンプル Node.js プロジェクトの iot-hub/Tutorials/DeviceTwins フォルダーに移動します。 次に、テキスト エディターで ServiceClient.js ファイルを開きます。
次のコード スニペットは、デバイス ID レジストリに接続し、特定のデバイスのツインにアクセスする方法を示しています。
// Create a device identity registry object
var registry = Registry.fromConnectionString(connectionString);

// Get the device twin and send desired property update patches at intervals.
// Print the reported properties after some of the desired property updates.
registry.getTwin(deviceId, async (err, twin) => {
  if (err) {
    console.error(err.message);
  } else {
    console.log('Got device twin');
次のスニペットは、バックエンド アプリケーションがデバイスに送信するさまざまな必要なプロパティのパッチを示しています。
// Turn the fan on
var twinPatchFanOn = {
  properties: {
    desired: {
      patchId: "Switch fan on",
      fanOn: "false",
    }
  }
};

// Set the maximum temperature for the climate component
var twinPatchSetMaxTemperature = {
  properties: {
    desired: {
      patchId: "Set maximum temperature",
      components: {
        climate: {
          maxTemperature: "92"
        }
      }
    }
  }
};

// Add a new component
var twinPatchAddWifiComponent = {
  properties: {
    desired: {
      patchId: "Add WiFi component",
      components: {
        wifi: {
          channel: "6",
          ssid: "my_network"
        }
      }
    }
  }
};

// Update the WiFi component
var twinPatchUpdateWifiComponent = {
  properties: {
    desired: {
      patchId: "Update WiFi component",
      components: {
        wifi: {
          channel: "13",
          ssid: "my_other_network"
        }
      }
    }
  }
};

// Delete the WiFi component
var twinPatchDeleteWifiComponent = {
  properties: {
    desired: {
      patchId: "Delete WiFi component",
      components: {
        wifi: null
      }
    }
  }
};
次のスニペットは、バックエンド アプリケーションが必要なプロパティの更新をデバイスに送信する方法を示しています。
// Send a desired property update patch
async function sendDesiredProperties(twin, patch) {
  twin.update(patch, (err, twin) => {
    if (err) {
      console.error(err.message);
    } else {
      console.log(chalk.green(`\nSent ${twin.properties.desired.patchId} patch:`));
      console.log(JSON.stringify(patch, null, 2));
    }
  });
}
デバイスから状態情報を受信する
バックエンド アプリケーションは、デバイスからの状態情報を報告されたプロパティとして受信します。 デバイスは報告されたプロパティを設定し、ハブに送信します。 バックエンド アプリケーションは、ハブに格納されているデバイス ツインから、報告されたプロパティの現在の値を読み取ることができます。
デバイスから報告されたプロパティを送信する
報告されたプロパティ値の更新をパッチとして送信できます。 次のスニペットは、シミュレートされたデバイスが送信するパッチのテンプレートを示しています。 シミュレートされたデバイスは、パッチのフィールドを更新してからハブに送信します。
// Create a patch to send to the hub
var reportedPropertiesPatch = {
  firmwareVersion:'1.2.1',
  lastPatchReceivedId: '',
  fanOn:'',
  minTemperature:'',
  maxTemperature:''
};
シミュレートされたデバイスは、次の関数を使用して、報告されたプロパティを含むパッチをハブに送信します。
// Send the reported properties patch to the hub
function sendReportedProperties() {
  twin.properties.reported.update(reportedPropertiesPatch, function(err) {
    if (err) throw err;
    console.log(chalk.blue('\nTwin state reported'));
    console.log(JSON.stringify(reportedPropertiesPatch, null, 2));
  });
}
報告されたプロパティを処理する
バックエンド アプリケーションは、デバイス ツインを介して、デバイスの現在の報告されたプロパティ値にアクセスします。 次のスニペットは、バックエンド アプリケーションがシミュレーションされたデバイスの報告されたプロパティ値を読み取る方法を示しています。
// Display the reported properties from the device
function printReportedProperties(twin) {
  console.log("Last received patch: " + twin.properties.reported.lastPatchReceivedId);
  console.log("Firmware version: " + twin.properties.reported.firmwareVersion);
  console.log("Fan status: " + twin.properties.reported.fanOn);
  console.log("Min temperature set: " + twin.properties.reported.minTemperature);
  console.log("Max temperature set: " + twin.properties.reported.maxTemperature);
}
アプリケーションの実行
このセクションでは、2 つのサンプル アプリケーションを実行して、バックエンド アプリケーションが必要なプロパティの更新をシミュレートされたデバイス アプリケーションに送信するときを監視します。
シミュレートされたデバイスとバックエンド アプリケーションを実行するには、デバイスとサービス接続文字列が必要です。 このチュートリアルの冒頭でリソースの作成時に接続文字列をメモしました。
シミュレートされたデバイス アプリケーションを実行するには、シェルまたはコマンド プロンプト ウィンドウを開き、ダウンロードした Node.js プロジェクトの iot-hub/Tutorials/DeviceTwins フォルダーに移動します。 次のコマンドを実行します。
npm install
node SimulatedDevice.js "{your device connection string}"
バックエンド アプリケーションを実行するには、別のシェルまたはコマンド プロンプト ウィンドウを開きます。 次に、ダウンロードした Node.js プロジェクトの iot-hub/Tutorials/DeviceTwins フォルダーに移動します。 次のコマンドを実行します。
npm install
node ServiceClient.js "{your service connection string}"
必要なプロパティの更新を観察する
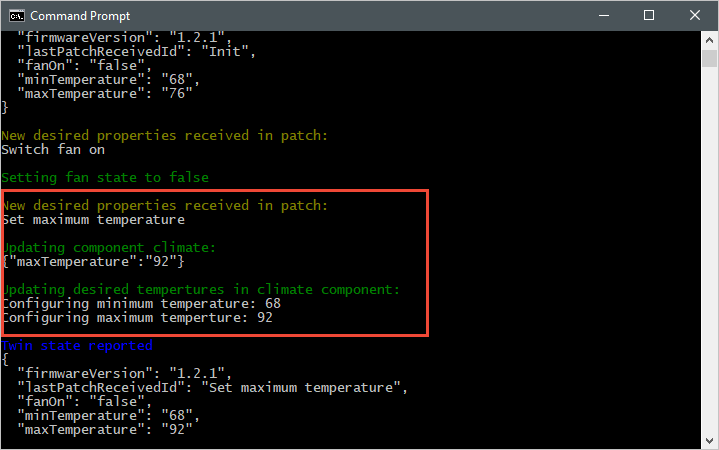
次のスクリーンショットは、シミュレートされたデバイス アプリケーションからの出力を示しています。必要なプロパティ maxTemperature の更新を処理する方法が強調表示されています。 最上位のハンドラーと climate コンポーネント ハンドラーの両方がどのように動作するかがわかります。
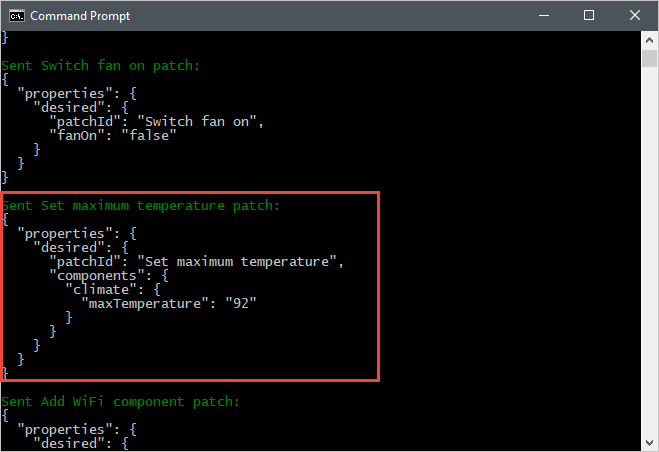
次のスクリーンショットは、バックエンド アプリケーションからの出力を示しています。必要なプロパティ maxTemperature に更新が送信される方法が強調表示されています。
報告されたプロパティの更新を観察する
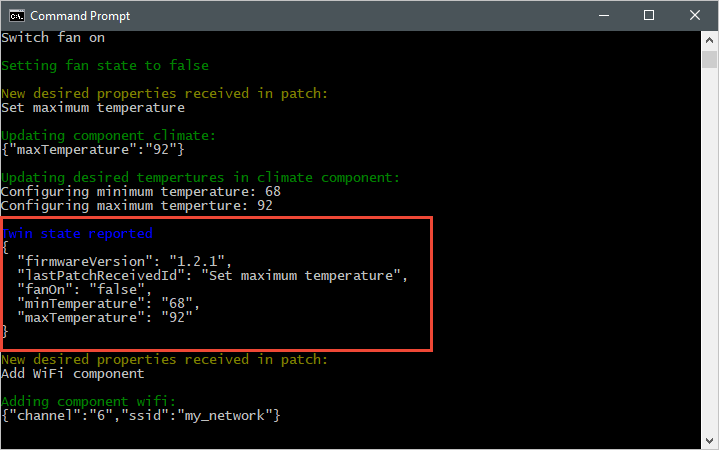
次のスクリーンショットは、シミュレートされたデバイス アプリケーションからの出力を示しています。報告されたプロパティの更新をハブに送信する方法が強調表示されています。
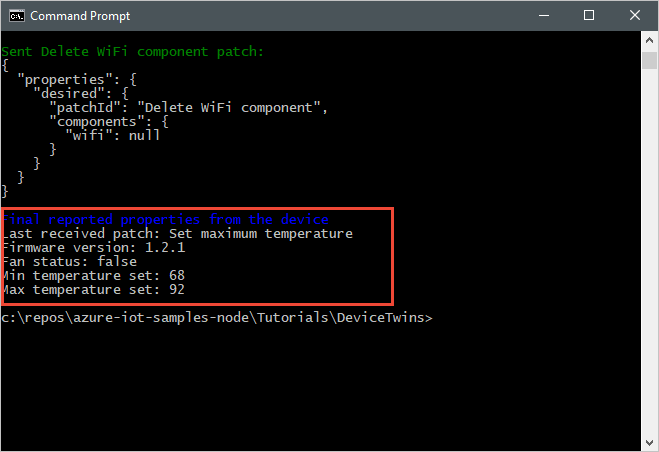
次のスクリーンショットは、バックエンド アプリケーションからの出力を示します。デバイスからレポートされたプロパティの更新を受信し、処理する方法が強調表示されています。
リソースをクリーンアップする
次のチュートリアルを実行する予定の場合は、後で再利用できるようにリソース グループと IoT ハブをそのままにしておきます。
IoT ハブが必要でなくなった場合は、ポータルを使用して IoT ハブとリソース グループを削除します。 これを行うには、IoT ハブを含む tutorial-iot-hub-rg リソース グループを選び、[削除] を選びます。
または、次の CLI を使用します。
# Delete your resource group and its contents
az group delete --name tutorial-iot-hub-rg
次のステップ
このチュートリアルでは、デバイスと IoT ハブ間の状態情報を同期する方法について説明しました。 デバイス ツインを使用してデバイスの更新プロセスを実装する方法については、次のチュートリアルに進んでください。