자습서: 유니버설 Windows 플랫폼 애플리케이션을 실행하는 특정 디바이스에 알림 전송
참고 항목
MPNS(Microsoft 푸시 알림 서비스)는 사용되지 않으며 더 이상 지원되지 않습니다.
개요
이 자습서에서는 Azure Notification Hubs를 사용하여 속보 알림을 브로드캐스트하는 방법을 보여줍니다. 이 자습서에서는 Windows Store 또는 Windows Phone 8.1(비 Silverlight) 애플리케이션에 대해 설명합니다. Windows Phone 8.1 Silverlight를 대상으로 하는 경우 Azure Notification Hubs를 사용하여 특정 Windows Phone 디바이스에 알림 푸시를 참조하세요.
이 자습서에서는 Azure Notification Hubs를 사용하여 UWP(유니버설 Windows 플랫폼) 애플리케이션을 실행하는 특정 Windows 디바이스에 알림을 푸시하는 방법을 알아봅니다. 자습서를 완료한 후 관심 있는 주요 뉴스 범주를 등록할 수 있습니다. 이러한 범주에 대해서만 푸시 알림을 받게 됩니다.
브로드캐스트 시나리오를 사용하도록 설정하려면 알림 허브에서 등록을 만들 때 하나 이상의 태그를 포함시킬 수 있습니다. 태그에 알림이 전송되면 태그에 대해 등록된 모든 디바이스에서 알림을 받게 됩니다. 태그에 대한 자세한 내용은 라우팅 및 태그 식을 참조하세요.
참고 항목
Windows Store 및 Windows Phone 프로젝트 버전 8.1 및 이전 버전은 Visual Studio 2019에서 지원되지 않습니다. 자세한 내용은 Visual Studio 2019 플랫폼 대상 지정 및 호환성을 참조하세요.
이 자습서에서는 다음 작업을 수행합니다.
- 모바일 앱에 범주 선택 추가
- 알림 등록
- 태그가 지정된 알림 보내기
- 앱 실행 및 알림 생성
필수 조건
이 자습서를 시작하기 전에 자습서: Azure Notification Hubs를 사용하여 유니버설 Windows 플랫폼 앱에 알림 보내기를 완료합니다.
앱에 범주 선택 추가
첫 번째 단계는 기존의 기본 페이지에 사용자가 등록할 범주를 선택할 수 있도록 하는 UI 요소를 추가하는 것입니다. 선택된 범주는 디바이스에 저장됩니다. 앱을 시작하면 디바이스 등록이 선택한 범주와 함께 태그로서 알림 허브에 생성됩니다.
MainPage.xaml 프로젝트 파일을 연 다음,
Grid요소에서 다음 코드를 복사합니다.<Grid> <Grid.RowDefinitions> <RowDefinition/> <RowDefinition/> <RowDefinition/> <RowDefinition/> <RowDefinition/> </Grid.RowDefinitions> <Grid.ColumnDefinitions> <ColumnDefinition/> <ColumnDefinition/> </Grid.ColumnDefinitions> <TextBlock Grid.Row="0" Grid.Column="0" Grid.ColumnSpan="2" TextWrapping="Wrap" Text="Breaking News" FontSize="42" VerticalAlignment="Top" HorizontalAlignment="Center"/> <ToggleSwitch Header="World" Name="WorldToggle" Grid.Row="1" Grid.Column="0" HorizontalAlignment="Center"/> <ToggleSwitch Header="Politics" Name="PoliticsToggle" Grid.Row="2" Grid.Column="0" HorizontalAlignment="Center"/> <ToggleSwitch Header="Business" Name="BusinessToggle" Grid.Row="3" Grid.Column="0" HorizontalAlignment="Center"/> <ToggleSwitch Header="Technology" Name="TechnologyToggle" Grid.Row="1" Grid.Column="1" HorizontalAlignment="Center"/> <ToggleSwitch Header="Science" Name="ScienceToggle" Grid.Row="2" Grid.Column="1" HorizontalAlignment="Center"/> <ToggleSwitch Header="Sports" Name="SportsToggle" Grid.Row="3" Grid.Column="1" HorizontalAlignment="Center"/> <Button Name="SubscribeButton" Content="Subscribe" HorizontalAlignment="Center" Grid.Row="4" Grid.Column="0" Grid.ColumnSpan="2" Click="SubscribeButton_Click"/> </Grid>솔루션 탐색기에서 프로젝트를 마우스 오른쪽 단추로 클릭하고 추가>클래스를 선택합니다. 새 항목 추가에서 클래스 이름을 알림으로 지정하고 추가를 선택합니다. 필요한 경우
public한정자를 클래스 정의에 추가합니다.새 파일에 다음
using문을 추가합니다.using Windows.Networking.PushNotifications; using Microsoft.WindowsAzure.Messaging; using Windows.Storage; using System.Threading.Tasks;다음 코드를 새
Notifications클래스에 복사합니다.private NotificationHub hub; public Notifications(string hubName, string listenConnectionString) { hub = new NotificationHub(hubName, listenConnectionString); } public async Task<Registration> StoreCategoriesAndSubscribe(IEnumerable<string> categories) { ApplicationData.Current.LocalSettings.Values["categories"] = string.Join(",", categories); return await SubscribeToCategories(categories); } public IEnumerable<string> RetrieveCategories() { var categories = (string) ApplicationData.Current.LocalSettings.Values["categories"]; return categories != null ? categories.Split(','): new string[0]; } public async Task<Registration> SubscribeToCategories(IEnumerable<string> categories = null) { var channel = await PushNotificationChannelManager.CreatePushNotificationChannelForApplicationAsync(); if (categories == null) { categories = RetrieveCategories(); } // Using a template registration to support notifications across platforms. // Any template notifications that contain messageParam and a corresponding tag expression // will be delivered for this registration. const string templateBodyWNS = "<toast><visual><binding template=\"ToastText01\"><text id=\"1\">$(messageParam)</text></binding></visual></toast>"; return await hub.RegisterTemplateAsync(channel.Uri, templateBodyWNS, "simpleWNSTemplateExample", categories); }이 클래스는 로컬 스토리지를 사용하여, 이 디바이스에서 받아야 할 뉴스의 범주를 저장합니다.
RegisterNativeAsync메서드를 호출하는 대신 템플릿 등록을 사용하여 범주에 등록하는RegisterTemplateAsync를 호출합니다.여러 템플릿을 등록하려는 경우 템플릿 이름을 입력합니다(예: simpleWNSTemplateExample). 업데이트하거나 삭제할 수 있는 템플릿 이름을 지정합니다. 토스트 알림과 타일에 대해 각각 하나씩 둘 이상의 템플릿을 등록할 수도 있습니다.
참고 항목
Notification Hubs를 사용하면 디바이스가 동일한 태그로 여러 템플릿을 등록할 수 있습니다. 이 경우 해당 태그를 대상으로 들어오는 메시지가 있으면 각 템플릿에 대해 하나씩 여러 개의 알림이 디바이스에 전달됩니다. 이 프로세스로 Windows 스토어 앱에 알림 메시지와 배지 둘 다로 표시하는 등 여러 시각적 알림에 동일한 메시지를 표시할 수 있습니다.
자세한 내용은 템플릿을 사용하세요.
App.xaml.cs 프로젝트 파일에서
App클래스에 다음 속성을 추가합니다.public Notifications notifications = new Notifications("<hub name>", "<connection string with listen access>");이 속성을 사용하여
Notifications인스턴스를 만들고 액세스합니다.코드에서
<hub name>과<connection string with listen access>자리 표시자를 알림 허브 이름과 앞서 얻었던 DefaultListenSharedAccessSignature의 연결 문자열로 바꿉니다.참고 항목
클라이언트 앱과 함께 배포되는 자격 증명은 일반적으로 안전하지 않기 때문에 클라이언트 앱과 함께 수신 대기 액세스용 키만 배포합니다. 수신 대기 액세스를 통해 앱에서 알림을 등록할 수 있지만, 기존 등록을 수정할 수 없으며 알림을 전송할 수도 없습니다. 안전한 백 엔드 서비스에서 알림을 보내고 기존 등록을 변경하는 데에는 모든 액세스 키가 사용됩니다.
MainPage.xaml.cs 파일에서 다음 줄을 추가합니다.
using Windows.UI.Popups;MainPage.xaml.cs 파일에서 다음 메서드를 추가합니다.
private async void SubscribeButton_Click(object sender, RoutedEventArgs e)
{
    var categories = new HashSet<string>();
    if (WorldToggle.IsOn) categories.Add("World");
    if (PoliticsToggle.IsOn) categories.Add("Politics");
    if (BusinessToggle.IsOn) categories.Add("Business");
    if (TechnologyToggle.IsOn) categories.Add("Technology");
    if (ScienceToggle.IsOn) categories.Add("Science");
    if (SportsToggle.IsOn) categories.Add("Sports");

    var result = await ((App)Application.Current).notifications.StoreCategoriesAndSubscribe(categories);

    var dialog = new MessageDialog("Subscribed to: " + string.Join(",", categories) + " on registration Id: " + result.RegistrationId);
    dialog.Commands.Add(new UICommand("OK"));
    await dialog.ShowAsync();
}
이 메서드는 범주 목록을 만들고
Notifications클래스를 사용하여 로컬 스토리지에 목록을 저장합니다. 또한 알림 허브에 해당 태그를 등록합니다. 범주가 변경되면 새 범주로 등록이 다시 생성됩니다.
이제 디바이스에서 로컬 스토리지에 범주 집합을 저장할 수 있습니다. 사용자가 범주 선택을 변경할 때마다 앱에 알림 허브가 등록됩니다.
알림 등록
이 섹션에서는 로컬 스토리지에 저장된 범주를 사용하여 시작 시 알림 허브에 등록합니다.
참고 항목
WNS(Windows 알림 서비스)에서 할당하는 채널 URI는 언제든지 변경될 수 있으므로 알림 실패를 피하려면 알림을 자주 등록해야 합니다. 이 예제에서는 앱이 시작될 때마다 알림을 등록합니다. 자주(하루 두 번 이상) 실행되는 앱에서는 이전 등록 이후 만 하루가 지나지 않은 경우 대역폭 유지를 위해 등록을 건너뛸 수 있습니다.
범주 기반 구독에
notifications클래스를 사용하려면 App.xaml.cs 파일을 연 다음,InitNotificationsAsync메서드를 업데이트합니다.// *** Remove or comment out these lines *** //var channel = await PushNotificationChannelManager.CreatePushNotificationChannelForApplicationAsync(); //var hub = new NotificationHub("your hub name", "your listen connection string"); //var result = await hub.RegisterNativeAsync(channel.Uri); var result = await notifications.SubscribeToCategories();이 프로세스는 앱이 시작될 때 로컬 스토리지에서 범주를 검색합니다. 그런 다음, 이러한 범주에 대한 등록을 요청합니다. Azure Notification Hubs를 사용하여 유니버설 Windows 플랫폼 앱에 알림 보내기 자습서의 일부로
InitNotificationsAsync메서드를 만들었습니다.MainPage.xaml.cs 프로젝트 파일에서
OnNavigatedTo메서드에 다음 코드를 추가합니다.protected override void OnNavigatedTo(NavigationEventArgs e) { var categories = ((App)Application.Current).notifications.RetrieveCategories(); if (categories.Contains("World")) WorldToggle.IsOn = true; if (categories.Contains("Politics")) PoliticsToggle.IsOn = true; if (categories.Contains("Business")) BusinessToggle.IsOn = true; if (categories.Contains("Technology")) TechnologyToggle.IsOn = true; if (categories.Contains("Science")) ScienceToggle.IsOn = true; if (categories.Contains("Sports")) SportsToggle.IsOn = true; }이 코드는 전에 저장한 범주의 상태를 기반으로 기본 페이지를 업데이트합니다.
이제 앱이 완료되었습니다. 디바이스에서 로컬 스토리지에 범주 세트를 저장할 수 있습니다. 사용자가 범주 선택을 변경하면 저장된 범주가 알림 허브에 등록하는 데 사용됩니다. 다음 섹션에서는 범주 알림을 이 앱에 보낼 수 있는 백 엔드를 정의합니다.
UWP 앱 실행
Visual Studio에서 F5를 선택하여 앱을 컴파일 및 시작합니다. 앱 UI는 구독할 범주를 선택하도록 하는 토글 집합을 제공합니다.
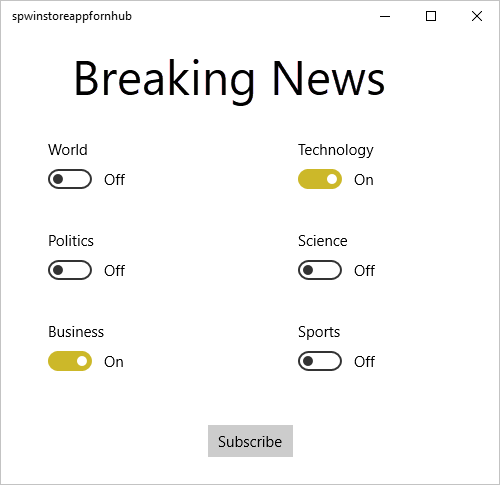
하나 이상의 범주 토글을 사용하도록 설정한 다음, 구독을 선택합니다.
앱은 선택한 범주를 태그로 변환하고 알림 허브에서 선택한 태그에 대한 새로운 디바이스 등록을 요청합니다. 대화 상자에 등록된 범주가 앱에 표시됩니다.

태그가 지정된 알림을 보내는 콘솔 앱 만들기
이 섹션에서는 .NET 콘솔 앱에서 태그가 지정된 템플릿 알림으로 속보를 보냅니다.
Visual Studio에서 다음과 같이 새로운 Visual C# 콘솔 애플리케이션을 만듭니다.
- 메뉴에서 파일>새로 만들기>프로젝트를 선택합니다.
- 새 프로젝트 만들기의 템플릿 목록에서 C#용 콘솔 앱(.NET Framework)을 선택하고 다음을 선택합니다.
- 앱의 이름을 입력합니다.
- 솔루션의 경우 솔루션에 추가를 선택하고 만들기를 선택하여 프로젝트를 만듭니다.
도구>NuGet 패키지 관리자>패키지 관리자 콘솔을 선택한 다음, 콘솔 창에서 다음 명령을 실행합니다.
Install-Package Microsoft.Azure.NotificationHubs이 작업은 Microsoft.Azure.NotificationHubs 패키지를 사용하여 Azure Notification Hubs SDK에 대한 참조를 추가합니다.
Program.cs 파일을 열고 다음
using문을 추가합니다.using Microsoft.Azure.NotificationHubs;Program클래스에서 다음 메서드를 추가하거나 이미 있으면 바꿉니다.private static async void SendTemplateNotificationAsync() { // Define the notification hub. NotificationHubClient hub = NotificationHubClient.CreateClientFromConnectionString("<connection string with full access>", "<hub name>"); // Apple requires the apns-push-type header for all requests var headers = new Dictionary<string, string> {{"apns-push-type", "alert"}}; // Create an array of breaking news categories. var categories = new string[] { "World", "Politics", "Business", "Technology", "Science", "Sports"}; // Send the notification as a template notification. All template registrations that contain // "messageParam" and the proper tags will receive the notifications. // This includes APNS, GCM/FCM, WNS, and MPNS template registrations. Dictionary<string, string> templateParams = new Dictionary<string, string>(); foreach (var category in categories) { templateParams["messageParam"] = "Breaking " + category + " News!"; await hub.SendTemplateNotificationAsync(templateParams, category); } }이 코드는 문자열 배열에 있는 6개의 각 태그에 대한 템플릿 알림을 보냅니다. 태그를 사용하면 등록된 범주의 알림만 디바이스에서 받습니다.
위의 코드에서
<hub name>및<connection string with full access>자리 표시자를 알림 허브 이름과 알림 허브의 대시보드에서 얻은 DefaultFullSharedAccessSignature의 연결 문자열로 바꿔야 합니다.Main()메서드에 다음 줄을 추가합니다.SendTemplateNotificationAsync(); Console.ReadLine();콘솔 앱을 시작합니다.
태그가 지정된 알림을 보내는 콘솔 앱 실행
이전 섹션에서 만든 앱을 실행합니다. 선택한 범주에 대한 알림이 알림 메시지로 나타납니다.
다음 단계
이 문서에서는 범주별로 속보를 브로드캐스트하는 방법에 대해 알아보았습니다. 백 엔드 애플리케이션은 해당 태그에 대한 알림을 수신하도록 등록한 디바이스에 태그가 지정된 알림을 푸시합니다. 사용하는 디바이스에 관계 없이 특정 사용자에게 알림을 푸시하는 방법을 알아보려면 다음 자습서를 계속 진행합니다.