Azure Event Hubs SDK for Unity
Note
This is a Sandbox project. The content in this article is unsupported, and therefore may be out of date or not in a working state. That said, we still think it was awesome enough to include here. Enjoy!
Azure Event Hubs for Gaming
Azure Event Hubs is a real-time custom event ingestion service that can collect and store millions of events per second. Events can then be analyzed in real-time using Azure Stream Analytics or stored to Azure Storage or Azure Data Lake Store for processing at a later time. Analysis of this data could reveal various insights about player's performance/behavior during the game as well as be utilized in creation of other types of metrics (e.g. daily/weekly/monthly active users, churn, user sessions, transactions etc.).
Important
This is an experimental Unity SDK for Azure Event Hubs. As such, please note that this SDK is not supported and is not provided by the Azure Event Hubs team. If you run into problems, please let us know using the GitHub Issues page for the SDK.


Requirements
- Unity 2018.1, .2, or .3
- Unity 2018.2 (or greater) is required for proper SSL support.
- If you are using Unity 2017, please check out our Unity 2017 SDK.
- Unity 2019.x and greater are not supported and will not work with these SDKs.
Compatibility
This has been tested with the following Unity exporters. Others wil likely work, however we haven't tested every possible platform and combination. Please let us know if you've had success!
- Windows/Mac Standalone
- iOS
- Android
- UWP (IL2CPP)
- Unity Editor
Import the SDK
To import the SDK into your own project, make sure you have downloaded the latest .unitypackage from GitHub. Then, do the following:
Open Unity and select Edit > Project Settings > Player to open the PlayerSettings panel.
Select .NET 4.x Equivalent from the Scripting Runtime Version dropdown and .NET Standard 2.0 from the Api Compatibility Level dropdown in the Configuration section.

Add the .unitypackage you downloaded in the first step to Unity by using the Assets > Import Package > Custom Package menu option.
In the Import Unity Package box that pops up, you can select which things you'd like to import. By default everything will be selected. If you don't care to use the sample, you can uncheck that box.
Click the Import button to add the items to your project.
With the package added, you can now use the normal API in your scripts as you would in any other application. Please take a look at the corresponding sample (also included in each .unitypackage) which demonstrates how to use each of the services to perform simple tasks.
Please refer to the Azure Event Hubs Docs for even more samples and tutorials on using the API.
Unity 2018.1 and SSL support
Due to a Unity 2018.1 limitation (fixed in 2018.2), HTTPS requests using the standard .NET networking stack (i.e. not using UnityWebRequest) will fail due to Mono's empty certificate store. To workaround this, you will need to setup a ServicePointManager.ServerCertificateValidationCallback property that returns true as shown below. This means that data transfer will happen in an insecure manner. We highly recommend upgrading your project to Unity 2018.2 if possible.
System.Net.ServicePointManager.ServerCertificateValidationCallback += (sender, cert, chain, error) => { return true; };
Try the Sample
To use the sample, you will need to have an Azure Event Hubs account with a valid Event Hubs connection string. You'll also need to create an event hub on this account. You can check the Event Hubs documentation here to understand how to complete this task.
To use the sample, do the following:
Download the Unity SDKs repo from GitHub (or import it from the .unitypackage and continue to step 4).
Unzip to a location on your hard drive.
Open Unity 2018.1 (or greater) and point it to the EventHubs directory inside the unzipped package.
In the Project window, double-click the EventHub scene inside the Assets\AzureSamples\EventHubs directory to open the main scene for the sample.
In this scene, select the EventHubsObject item in the Hierarchy window.
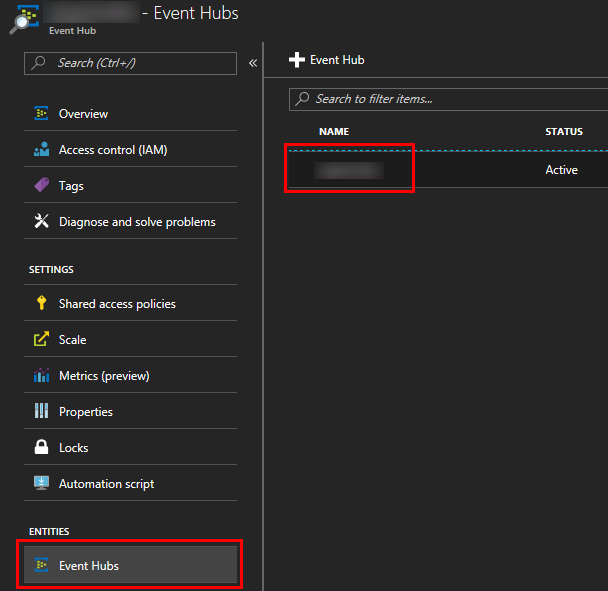
With EventHubsObject selected, you'll notice that there are two blank entries in the Inspector window, called Eh Connection String and Eh Entity Path. Fill in these entries with your own Event Hubs connection string and Event Hub name, respectively. You can find them both in the Azure Portal as shown below.

Run the project from within the Unity Editor by clicking the Play button. Alternatively, you can export to the platform of your choosing and run there.
To test that the events you are sending are correctly arriving to your Event Hubs account, you can use Event Hubs capture and monitor your Storage/Data Lake Store account. Alternatively, you can create a simple .NET console app with a class that implements the IEventProcessor interface, like the one described here.