Contribute to an open-source repository
After you identify an area where you can contribute, the next step is to prepare your contribution. We'll review here how you can communicate your intent to participate in a project, forge a pull request, and improve your chances of getting it accepted.
When it comes to contributing work to an open-source project, communication is a key success factor. You might find it uncomfortable to communicate with others on your proposed changes or improvements. Often, this dialogue will lead to discussions and compromises on your original vision.
Avoiding active communication with others who are involved in an open-source project means risking your time working on tasks that someone else is already working on. Or, you might work on features or improvements that don't align with the project's values or best practices. In either case, everyone's time is wasted. Conversely, committing to active communication ensures that your work will be well received and impactful.
How can you ensure success when you communicate with other project members about new features and changes? First, try to keep an open mind. Be open to feedback and practice patience. Open-source project maintainers most likely have a day job and a private life to tend to. If you don't get an answer immediately, wait a little longer before you ping the maintainers.
Communicate your intent to maintainers
You should always start by communicating your intent to contribute before you do any actual work. Unless indicated otherwise in the README file, the issue tracker is usually the best place for doing that.
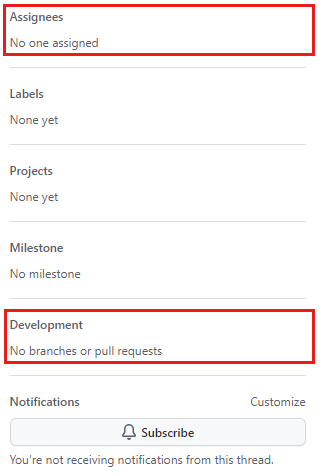
If you want to work on an existing issue, check that nobody is assigned to it by looking at the Assignees section. Also check the Linked pull requests section. A linked pull request means somebody is already working on it. Look through the comments to see if someone stated their interest to work on the issue. If everything's clear, post a comment on the issue to indicate your interest to work on it. That way, you're telling people who might come later that someone's working on the issue. Also, if needed, maintainers can reply to you with guidance and advice.
If you want to work on a new feature or a bug that's not already present in the issue tracker, create a new issue. Make sure to follow the issue template if one is proposed, and clearly express your intent to work on the issue. If it's a new feature proposition or if the issue requires many changes, make sure to get the maintainers' approval before you move on to the next step.
Create a pull request on a GitHub repository
After you've communicated your intent to help the project, you're now ready to start working on your actual contribution.
Your contribution will take the form of a pull request or PR. A pull request is a special place on GitHub that contains a few things:
- A title and description for your changes.
- One or more commits that constitute the changes you're proposing.
- Comments, where everyone can participate in a discussion about the changes.
- Code reviews, where you can find detailed feedback on your changes and eventually commit suggestions.
- Status checks that come, for example, from automated tests that the maintainers might have put in place. Status checks can serve different purposes. For example, they can ensure that your changes follow the project's rules, or that your changes don't break the code.
After a pull request is created, it can be updated with new commits, comments, or code reviews. This process continues until the project maintainers approve and merge the pull request or reject the changes and close the pull request. When your pull request is merged, it means that your changes have been integrated into the project's codebase.
Create a pull request step by step
Open the GitHub page of the project to which you want to contribute.
Select the Fork button to create a copy of the repository on your GitHub account. This step is necessary because, by default, you don't have the permissions to make any changes on a public repository unless it's your own copy. By forking the project, you're creating a copy where you can make changes.

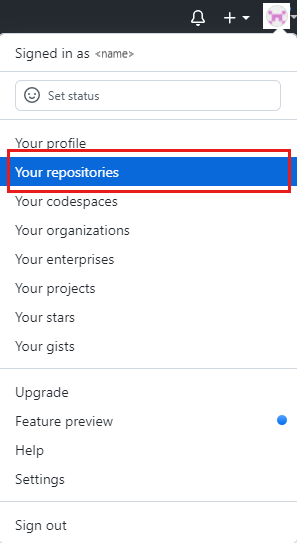
Select Your repositories from your account profile menu.
Select the repository fork.
Select the Code button to get information on how to "clone" the Git repository to your local machine.
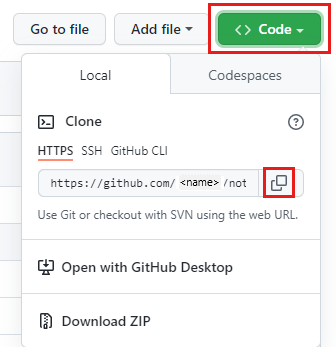
Select the clipboard icon to copy the repository URL, then enter in a terminal:
git clone <REPOSITORY_URL>This command will create a copy of the repository on your local machine.
Alternatively, you can use GitHub Desktop if you prefer to use an application. Or, you can use GitHub Codespaces if the option is proposed to you. If you're a Visual Studio Code user, GitHub Codespaces will feel familiar to you.
After the project has finished cloning, enter the project folder:
cd <PROJECT_FOLDER>(Optional) Create a new branch by using the following command:
git checkout -b <BRANCH_NAME>This step isn't mandatory, but is highly recommended. With a new branch, you can work on multiple contributions separately, each one using a different branch.
Make the desired changes to the project and commit them:
git add .
git commit -m "<COMMIT_MESSAGE>"
These commands will stage your changes for commit, then create a commit with the specified message. Be sure to describe your changes accurately in the commit message. It's also a good idea to check if there are mentions in the CONTRIBUTING file for commit-message conventions you need to follow.
Push your changes to the remote by using the command:
git push --set-upstream origin <BRANCH_NAME>This command creates a new branch on the upstream repository on GitHub (your fork), and pushes all your commits to it.
Note
When we talk about an upstream repository, we refer to the remote repository linked to your local repository. The
originis the default alias for the repository URL, which was created by Git in step 4.If you didn't create a branch previously, enter only
git push.Open your project fork on GitHub, and select the Compare & pull request button in the suggestion box that appears.

Fill in the title and description and select Create pull request.
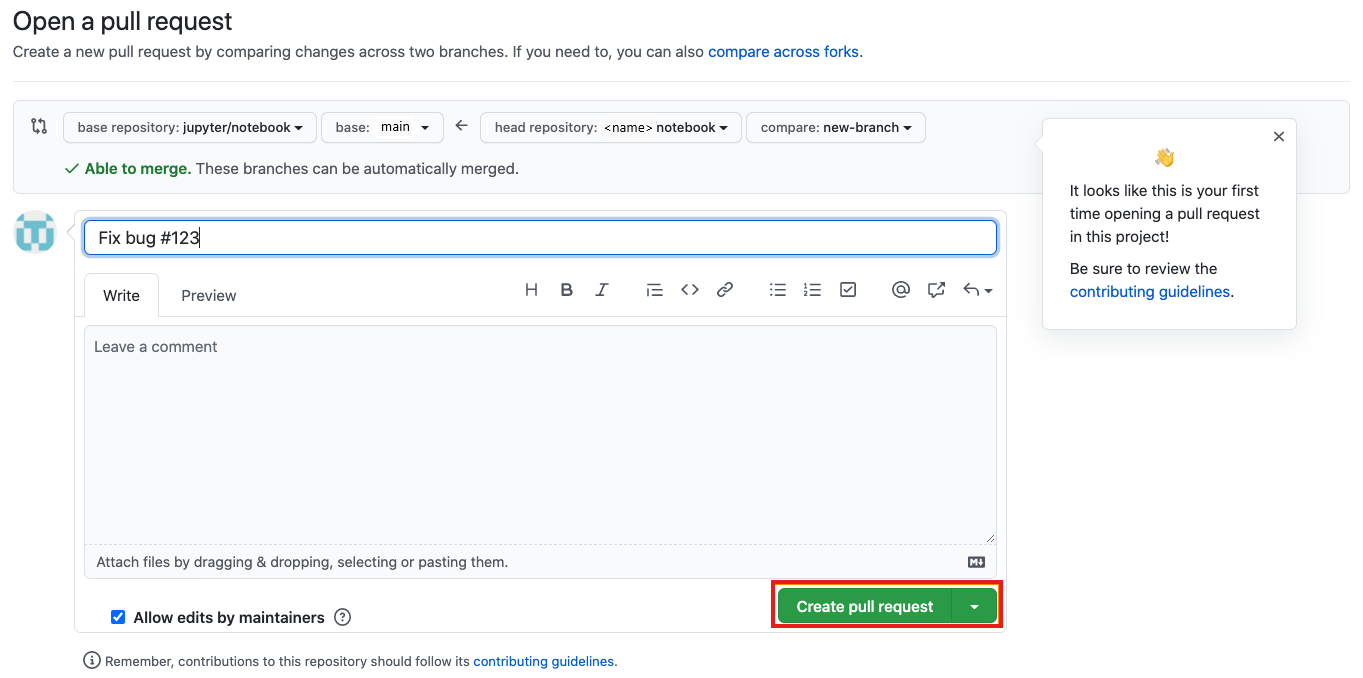
If there's a template for the pull request description, take the time to fill in all the required information. If there isn't one now, make sure to provide enough context for maintainers to understand what changes you're proposing and why. You should also link back to the related issue by mentioning its number by using
#<ISSUE_NUMBER>. You can find the issue number next to its title.
Pass the status checks
After you've created the pull request, you might see a section with status checks at the bottom, like this:
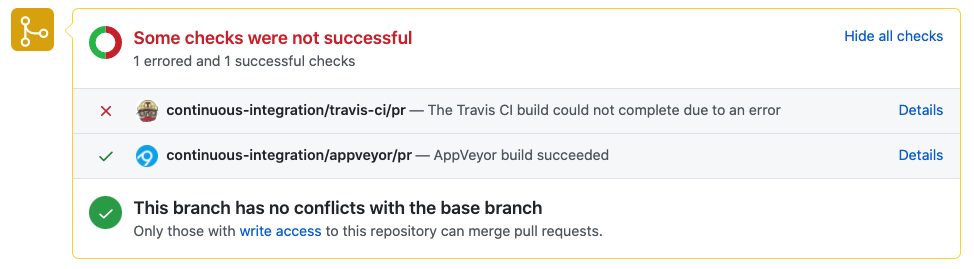
These status checks are automated checks that the maintainers have put in place to ensure a consistent quality of the project.
To get your pull request accepted, it needs to pass all automated checks. If one is failing like in the preceding screenshot, select the Details button to learn more about the failure and to find out what you need to do to fix it.
If you're unsure about what to do with a failing check, you can always use the comments to ask for the maintainers' guidance or help to fix it.
Ask for guidance or reviews on pull requests
You might be unsure about some changes you made and want to get the maintainers' opinions. The best way to do that is to comment directly on the pull requests. If you consider your changes a work-in-progress, you also have the option to create a draft pull request instead to ask for guidance or help from other contributors.

After the project maintainers come by your pull request, they can reply to the conversation or directly review your changes. There are multiple possible outcomes following a pull request review:
- Your changes are approved. Congratulations!
- Your pull request requires some changes. Don't get discouraged! Look closely at the feedback provided. If you make the requested changes, there's a good chance that your pull request will be accepted. If you push new commits to your branch, the pull request will automatically update with the new changes.
- The reviewer made some comments. It usually means that more details are needed about your changes or the motivation behind it.
Respond to comments on your pull request
Remember to always be respectful in all your exchanges and to follow the code of conduct. It's likely that before your changes can be accepted, there will be an ongoing discussion with the maintainers or other contributors.
Contributing to open source requires patience. Sometimes you don't get immediate feedback. Don't reach out to the maintainers privately via email, Twitter, or any other means hoping to get a faster answer. This behavior is considered harmful. Discussing things publicly also gives other contributors or passersby the opportunity to learn about the process behind the changes and the best practices to follow.