Exercise - Add a new Razor Page
In the previous unit, you obtained the source code for the Contoso Pizza project, and then you made some simple changes to the home page. In this unit, you'll add a new Razor page to the project.
Create the Pizza List page
To create a new Razor page, you'll use the .NET CLI.
Since the terminal is blocked by the
dotnet watchcommand, open another terminal by right-clicking on the ContosoPizza folder in the Explorer and select Open in Integrated Terminal.In the new terminal window, enter the following command:
dotnet new page --name PizzaList --namespace ContosoPizza.Pages --output PagesThe preceding command:
- Creates these two files in the
ContosoPizza.Pagesnamespace:- PizzaList.cshtml - the Razor page
- PizzaList.cshtml.cs - the accompanying
PageModelclass
- Stores both files in the project's Pages subdirectory.
- Creates these two files in the
In Pages/PizzaList.cshtml, add the following code inside the
@{ }code block:ViewData["Title"] = "Pizza List 🍕";This sets the
<title>element for the page.At the end of the file, add the following code:
<h1>Pizza List 🍕</h1>

<!-- New Pizza form will go here -->

<!-- List of pizzas will go here -->
This adds a heading to the page, as well as two HTML comment placeholders for functionality you'll add later.
Save the file. If you're using GitHub Codespaces, the file saves automatically.
Return to the terminal running
dotnet watchand press Ctrl+R to reload the app and detect the new files.
Add the Pizza List page to the navigation menu
This would be a good time to test the page, but the page can't be reached in the browser because it isn't yet linked in the navigation menu. You'll link it now.
Open Pages/Shared/_Layout.cshtml.
In the
<ul>element with thenavbar-navclass (starts on line 21), note the<li>elements that contain the links to the Home and Privacy pages. Add the following code to the end of the list, after the<li>element containing the Privacy link:<li class="nav-item"> <a class="nav-link text-dark" asp-area="" asp-page="/PizzaList">Pizza List 🍕</a> </li>This adds a link to the PizzaList page to the navigation menu.
Save the file. The browser tab with the app automatically refreshes to display the changes. If you're using GitHub Codespaces, the file saves automatically, but you'll need to refresh the browser tab manually.
Select the Pizza List 🍕 link in the navigation menu. The Pizza List page appears.
Register the PizzaService class with the dependency injection container
The Pizza List page depends on the PizzaService object to retrieve the list of pizzas. You'll use dependency injection to provide the PizzaService object to the page. First, register the PizzaService class with the container.
Open Program.cs.
In the section that adds services to the container, add the following code:
builder.Services.AddScoped<PizzaService>();This code registers the
PizzaServiceclass with the dependency injection container. TheAddScopedmethod indicates that a newPizzaServiceobject should be created for each HTTP request. Now thePizzaServicecan be injected into any Razor page.Save the file. If you're using GitHub Codespaces, the file saves automatically.
Display a list of pizzas
Let's modify the PageModel class for the Pizza List page to retrieve the list of pizzas from the PizzaService object and store it in a property.
Open Pages/PizzaList.cshtml.cs.
Add the following
usingstatements to the top of the file:using ContosoPizza.Models; using ContosoPizza.Services;These statements import the
PizzaandPizzaServicetypes you'll use in the page.Inside the
ContosoPizza.Pagesnamespace block, replace the entirePizzaListModelclass with the following code:public class PizzaListModel : PageModel { private readonly PizzaService _service; public IList<Pizza> PizzaList { get;set; } = default!; public PizzaListModel(PizzaService service) { _service = service; } public void OnGet() { PizzaList = _service.GetPizzas(); } }In the preceding code:
- A private readonly
PizzaServicenamed_serviceis created. This variable will hold a reference to aPizzaServiceobject.- The
readonlykeyword indicates that the value of the_servicevariable can't be changed after it's set in the constructor.
- The
- A
PizzaListproperty is defined to hold the list of pizzas.- The
IList<Pizza>type indicates that thePizzaListproperty will hold a list ofPizzaobjects. PizzaListis initialized todefault!to indicate to the compiler that it will be initialized later, so null safety checks aren't required.
- The
- The constructor accepts a
PizzaServiceobject.- The
PizzaServiceobject is provided by dependency injection.
- The
- An
OnGetmethod is defined to retrieve the list of pizzas from thePizzaServiceobject and store it in thePizzaListproperty.
Tip
If you need help understanding null safety, see Null safety in C#.
- A private readonly
Save the file. If you're using GitHub Codespaces, the file saves automatically.
Return to the terminal running
dotnet watchand press Ctrl+R to reload the app with the registered service and the new constructor forPizzaListModel.
Display the list of pizzas
Now that the page has access to the list of pizzas, you'll use that list to display the pizzas on the page.
Open Pages/PizzaList.cshtml.
Replace the
<!-- List of pizzas will go here -->comment with the following code:<table class="table mt-5"> <thead> <tr> <th scope="col">Name</th> <th scope="col">Price</th> <th scope="col">Size</th> <th scope="col">Gluten Free</th> <th scope="col">Delete</th> </tr> </thead> <tbody> @foreach (var pizza in Model.PizzaList) { <tr> <td>@pizza.Name</td> <td>@($"{pizza.Price:C}")</td> <td>@pizza.Size</td> <td>@(pizza.IsGlutenFree ? "✔️" : string.Empty)</td> <td> <form method="post" asp-page-handler="Delete" asp-route-id="@pizza.Id"> <button class="btn btn-danger">Delete</button> </form> </td> </tr> } </tbody> </table>In the preceding code:
- A
<table>element is created to display the list of pizzas. - A
<thead>element is created to hold the table header. - The
@foreachstatement inside the<tbody>iterates over the list of pizzas.- The
Modelproperty refers to thePizzaListModelobject that was created in the code-behind file. - The
PizzaListproperty refers to thePizzaListproperty that was defined in the code-behind file.
- The
- Each iteration of the
@foreachstatement creates a<tr>element to hold the pizza data:- Razor syntax is used to display the pizza data in the
<td>elements. This syntax is used to display the properties of thePizzaobject that's stored in thepizzavariable. Priceis formatted using C# string interpolation.- A ternary expression is used to display the value of the
IsGlutenFreeproperty as "✔️" or a blank cell. - A form is created to delete the pizza.
- The
asp-page-handlerattribute indicates that the form should be submitted to theDeletehandler in the code-behind file. You'll create that handler in a later unit. - The
asp-route-idattribute indicates that theIdproperty of thePizzaobject should be passed to theDeletehandler.
- The
- Razor syntax is used to display the pizza data in the
- A
Save the file. In the browser, the Pizza List page refreshes with the list of pizzas. If you're using GitHub Codespaces, the file saves automatically, but you'll need to refresh the browser tab manually.
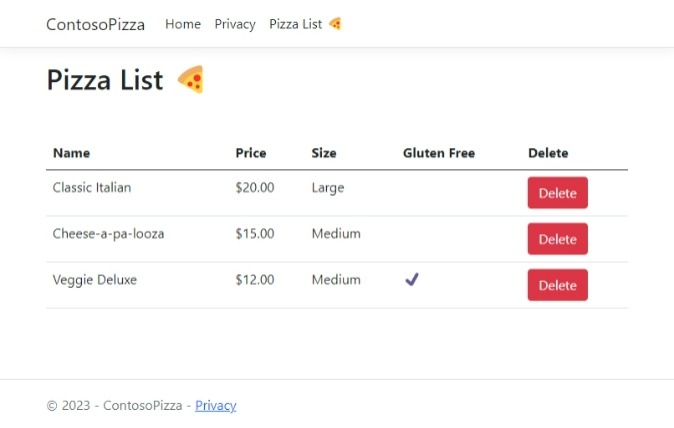
Good work! You've created a Razor page that displays a list of pizzas. In the next unit, you'll learn about tag helpers and page handlers.