Exercise - Add new pizza form
In this unit, you'll finish the Pizza List page by adding a form to create new pizzas. You'll also add page handlers to handle the form submission and deletion of pizzas.
Add a form to create new pizzas
Let's start by adding properties to the PizzaListModel class to represent the user's input. You'll add the appropriate page handler, too.
Open Pages\PizzaList.cshtml.cs and add the following property to the
PizzaListModelclass:[BindProperty] public Pizza NewPizza { get; set; } = default!;In the preceding code:
- A property named
NewPizzais added to thePizzaListModelclass.NewPizzais aPizzaobject.
- The
BindPropertyattribute is applied to theNewPizzaproperty.- The
BindPropertyattribute is used to bind theNewPizzaproperty to the Razor page. When an HTTP POST request is made, theNewPizzaproperty will be populated with the user's input.
- The
- The
NewPizzaproperty is initialized todefault!.- The
default!keyword is used to initialize theNewPizzaproperty tonull. This prevents the compiler from generating a warning about theNewPizzaproperty being uninitialized.
- The
- A property named
Now add the page handler for HTTP POST. In the same file, add the following method to the
PizzaListModelclass:public IActionResult OnPost() { if (!ModelState.IsValid || NewPizza == null) { return Page(); } _service.AddPizza(NewPizza); return RedirectToAction("Get"); }In the preceding code:
- The
ModelState.IsValidproperty is used to determine if the user's input is valid.- The validation rules are inferred from attributes (such as
RequiredandRange) on thePizzaclass in Models\Pizza.cs. - If the user's input is invalid, the
Pagemethod is called to re-render the page.
- The validation rules are inferred from attributes (such as
- The
NewPizzaproperty is used to add a new pizza to the_serviceobject. - The
RedirectToActionmethod is used to redirect the user to theGetpage handler, which will re-render the page with the updated list of pizzas.
- The
Save the file. If you're using GitHub Codespaces, the file saves automatically.
Return to the terminal running
dotnet watchand press Ctrl+R to reload the app.
Now that there's a page handler to handle the form submission, let's add the form to the Razor Page.
Open Pages\PizzaList.cshtml and replace the
<!-- New Pizza form will go here -->with the following code:<form method="post"> <div asp-validation-summary="ModelOnly" class="text-danger"></div> <div class="form-group"> <label asp-for="NewPizza.Name" class="control-label"></label> <input asp-for="NewPizza.Name" class="form-control" /> <span asp-validation-for="NewPizza.Name" class="text-danger"></span> </div> <div class="form-group"> <label asp-for="NewPizza.Size" class="control-label"></label> <select asp-for="NewPizza.Size" class="form-control" id="PizzaSize"> <option value="">-- Select Size --</option> <option value="Small">Small</option> <option value="Medium">Medium</option> <option value="Large">Large</option> </select> <span asp-validation-for="NewPizza.Size" class="text-danger"></span> </div> <div class="form-group form-check"> <label class="form-check-label"> <input class="form-check-input" asp-for="NewPizza.IsGlutenFree" /> @Html.DisplayNameFor(model => model.NewPizza.IsGlutenFree) </label> </div> <div class="form-group"> <label asp-for="NewPizza.Price" class="control-label"></label> <input asp-for="NewPizza.Price" class="form-control" /> <span asp-validation-for="NewPizza.Price" class="text-danger"></span> </div> <div class="form-group"> <input type="submit" value="Create" class="btn btn-primary" /> </div> </form>In the preceding code:
- The
asp-validation-summaryattribute is used to display validation errors for the entire model. - Each form field (
<input>and<select>elements) and each<label>is bound to the correspondingNewPizzaproperty using theasp-forattribute. - The
asp-validation-forattribute is used to display any validation errors for each form field. - The
@Html.DisplayNameFormethod is used to display the display name for theIsGlutenFreeproperty. This is a Razor helper method that's used to display the display name for a property. Doing the label this way ensures that the checkbox is selected when the user clicks the label. - A submit button labeled
Createis added to the form to post the form data to the server. At runtime, when the user selects this Create button, the browser sends the form as an HTTP POST request to the server.
- The
At the bottom of the page, add the following code:
@section Scripts {
<partial name="_ValidationScriptsPartial" />
}
This injects the client-side validation scripts into the page. The client-side validation scripts are used to validate the user's input before the form is submitted to the server.
Save the file. In the browser, the Pizza List page refreshes with the new form. If you're using GitHub Codespaces, the file saves automatically, but you'll need to refresh the browser tab manually.
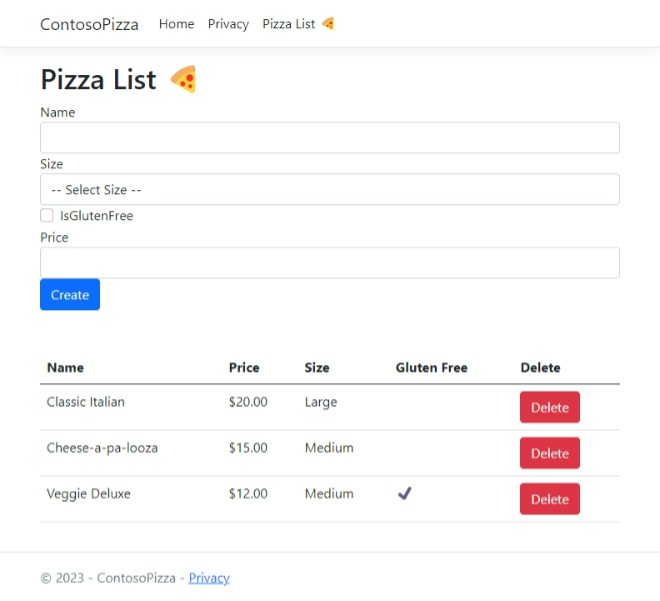
Enter a new pizza and select the Create button. The page should refresh and display the new pizza in the list.
Add a page handler to delete pizzas
There's one last piece to add to the Pizza List page: a page handler to delete pizzas. The buttons to delete pizzas are already on the page, but they don't do anything yet.
Back in Pages\PizzaList.cshtml.cs, add the following method to the
PizzaListModelclass:public IActionResult OnPostDelete(int id) { _service.DeletePizza(id); return RedirectToAction("Get"); }In the preceding code:
- The
OnPostDeletemethod is called when the user clicks the Delete button for a pizza.- The page knows to use this method because the
asp-page-handlerattribute on the Delete button in Pages\PizzaList.cshtml is set toDelete.
- The page knows to use this method because the
- The
idparameter is used to identify the pizza to delete.- The
idparameter is bound to theidroute value in the URL. This is accomplished with theasp-route-idattribute on the Delete button in Pages\PizzaList.cshtml.
- The
- The
DeletePizzamethod is called on the_serviceobject to delete the pizza. - The
RedirectToActionmethod is used to redirect the user to theGetpage handler, which will re-render the page with the updated list of pizzas.
- The
Save the file. If you're using GitHub Codespaces, the file saves automatically.
Test the Delete button for a pizza. The page should refresh and the selected pizza should be removed from the list.
Congratulations! You've successfully created a Razor Page that displays a list of pizzas, allows the user to add new pizzas, and also allows the user to delete pizzas.