Exercise - Connect a room environment monitor to Azure IoT Central
In this exercise, we'll build a high-level Azure Sphere application that connects and sends environment telemetry to Azure IoT Central.
Step 1: Create a new Azure IoT Central application
Open this link in a new window: Azure IoT Central.
Click Build a solution.
You'll need to sign with your Microsoft personal, work, or school account. If you do not have a Microsoft account, then you can create one for free by using the Create one! link.
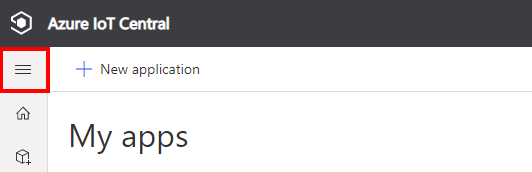
Expand the sidebar menu by clicking on the Menu icon.
Navigate to Build, and select Custom apps.
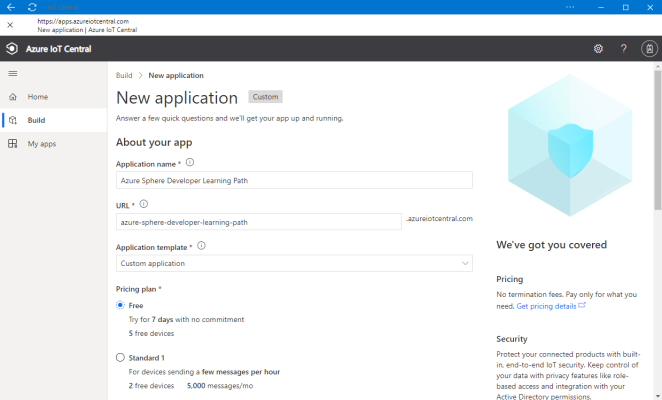
Specify the Application name, specify the URL, select the Free pricing plan, and complete the registration form.
Click Create.
Step 2: Establish trust between IoT Central and your Azure Sphere Tenant
If you're using Windows, open an Windows PowerShell command line. If you're using Linux, open Terminal.
Log in to your Azure Sphere tenant if you have not already done so.
azsphere loginMake a note of the current directory or change to the Azure-Sphere directory. You'll need the name of this directory in the next step.
Download the certificate authority (CA) certificate for your Azure Sphere tenant:
azsphere ca-certificate download --destination CAcertificate.cerThe output file must have the .cer extension.
Create an Enrollment Group
From IoT Central, go to Administration > Device Connection.
Click + Create an enrollment group
Name the enrollment group Azure Sphere
Select Certificates (X.509) from the Attestation type dropdown.
Click Save
Upload the Azure Sphere tenant CA certificate to Azure IoT Central and generate a verification code
Click + Manage primary.
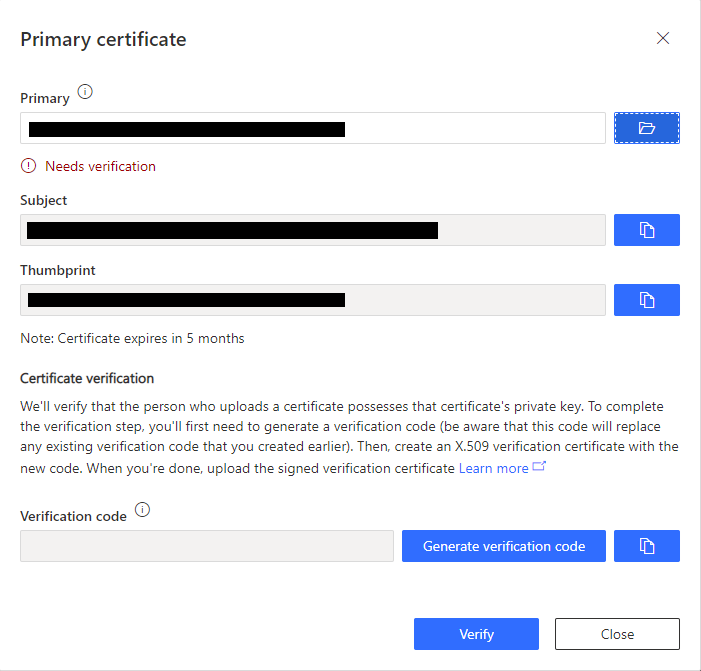
Click the folder icon next to the Primary box and navigate to the directory where you downloaded the certificate. If you don't see the .cer file in the list, make sure that the view filter is set to All files (*). Select the certificate and then click the gear icon next to the Primary box.
The Primary Certificate dialog box appears. The Subject and Thumbprint fields contain information about the current Azure Sphere tenant and primary root certificate.
Click the Generate verification code.
Copy the verification code to the clipboard.
Verify the tenant CA certificate
Return to the PowerShell Command Line or Linux Terminal.
Download a validation certificate that proves that you own the tenant CA certificate. Replace <code> in the command with the verification code from the previous step.
azsphere ca-certificate download-proof --destination ValidationCertification.cer --verification-code <code>The Azure Sphere Security Service signs the validation certificate with the verification code to prove that you own the Certificate Authority (CA).
Use the validation certificate to verify the tenant's identity
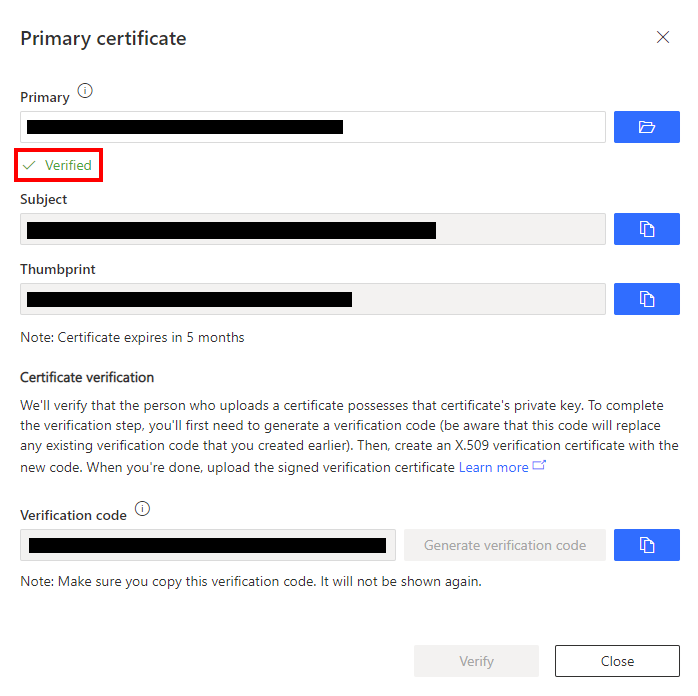
Return to Azure IoT Central and click Verify.
When prompted, select the validation certificate that you generated in the previous step. When the verification process is complete, the Primary Certificate dialog box displays the Verified message.
Click Close to dismiss the box.
Click Save.
After you complete these steps, any device that is claimed into your Azure Sphere tenant will automatically be enrolled in your Azure IoT Central application when it first connects.