Exercise – Create, review, and regenerate a user interface translation request
For this exercise, you will need one or more user interface (UI) files to submit for a translation request. Consult the Dynamics 365 Translation Service documentation to view supported products and their supported file formats.
In this exercise, you will:
Submit a translation request for UI files by using the Translation Service Dashboard.
Review the translation output.
Edit the generated XLIFF translation memory.
Regenerate the translation request with the new translation memory.
Review the regenerated request.
Create a translation request
To create a translation request, follow these steps:
Access the Translation Service Dashboard from a Lifecycle Services project or the Lifecycle Services home page.
Select the plus (+) icon in the menu bar to create a new translation request.

Enter the details of the request.
Field Description Request name Enter a name for the request. File type Select User interface. Product name Select a product name. If you accessed Translation Service from a Lifecycle Services project, this field is automatically filled in and is read-only. Product version Select a product version. If you accessed Translation Service from a Lifecycle Services project, this field shows the default product version information from the project. However, you can select a different version. Translation source language Select the language of the source files that you’re uploading. Translation target language Select one or more target languages by using the checkbox next to the language name. Note
Language names that are shown in bold type are general availability (GA) languages for Microsoft Dynamics 365 products. Dynamics 365 Translation Service uses machine translation models that are customized with terminologies from Microsoft Dynamics 365 products for those languages. For non-GA languages, the system uses general domain models. To take advantage of the Microsoft-trained machine translation models for Microsoft Dynamics 365 linguistic assets, make sure that you select English (United States) as the source language or the target language.
Verify that the request details are entered correctly and then select Create.
Create one zip file that contains all UI files in the source language that you want to translate from. The zip file can include different file types, if the file types are supported for the product, but it can't contain folders.
Under Upload files to translate, select the plus (+) icon to upload your file.
Under Upload XLIFF translation memory files, you can optionally upload translation memory files to be used for the request. If you have XLIFF TM files from a previous UI translation request, or if you used the Align tool to create an XLIFF TM file, then create a zip file that contains all translation memory files before you upload them. If you upload translation memory files, you can also create a custom machine translation system that is trained with them. Select No for this exercise.
After you've finished uploading your files, select Submit to start the translation process.

View the output of a translation request
After you submit the request, a new request ID will be created on the Translation Service Dashboard and an email notification will be sent. If you submitted the request with multiple target languages, each target language status will be displayed in a separate line with the same request ID.

Select the request ID of your request. The Request status tab shows the source files list that you uploaded with the summary of the request information.
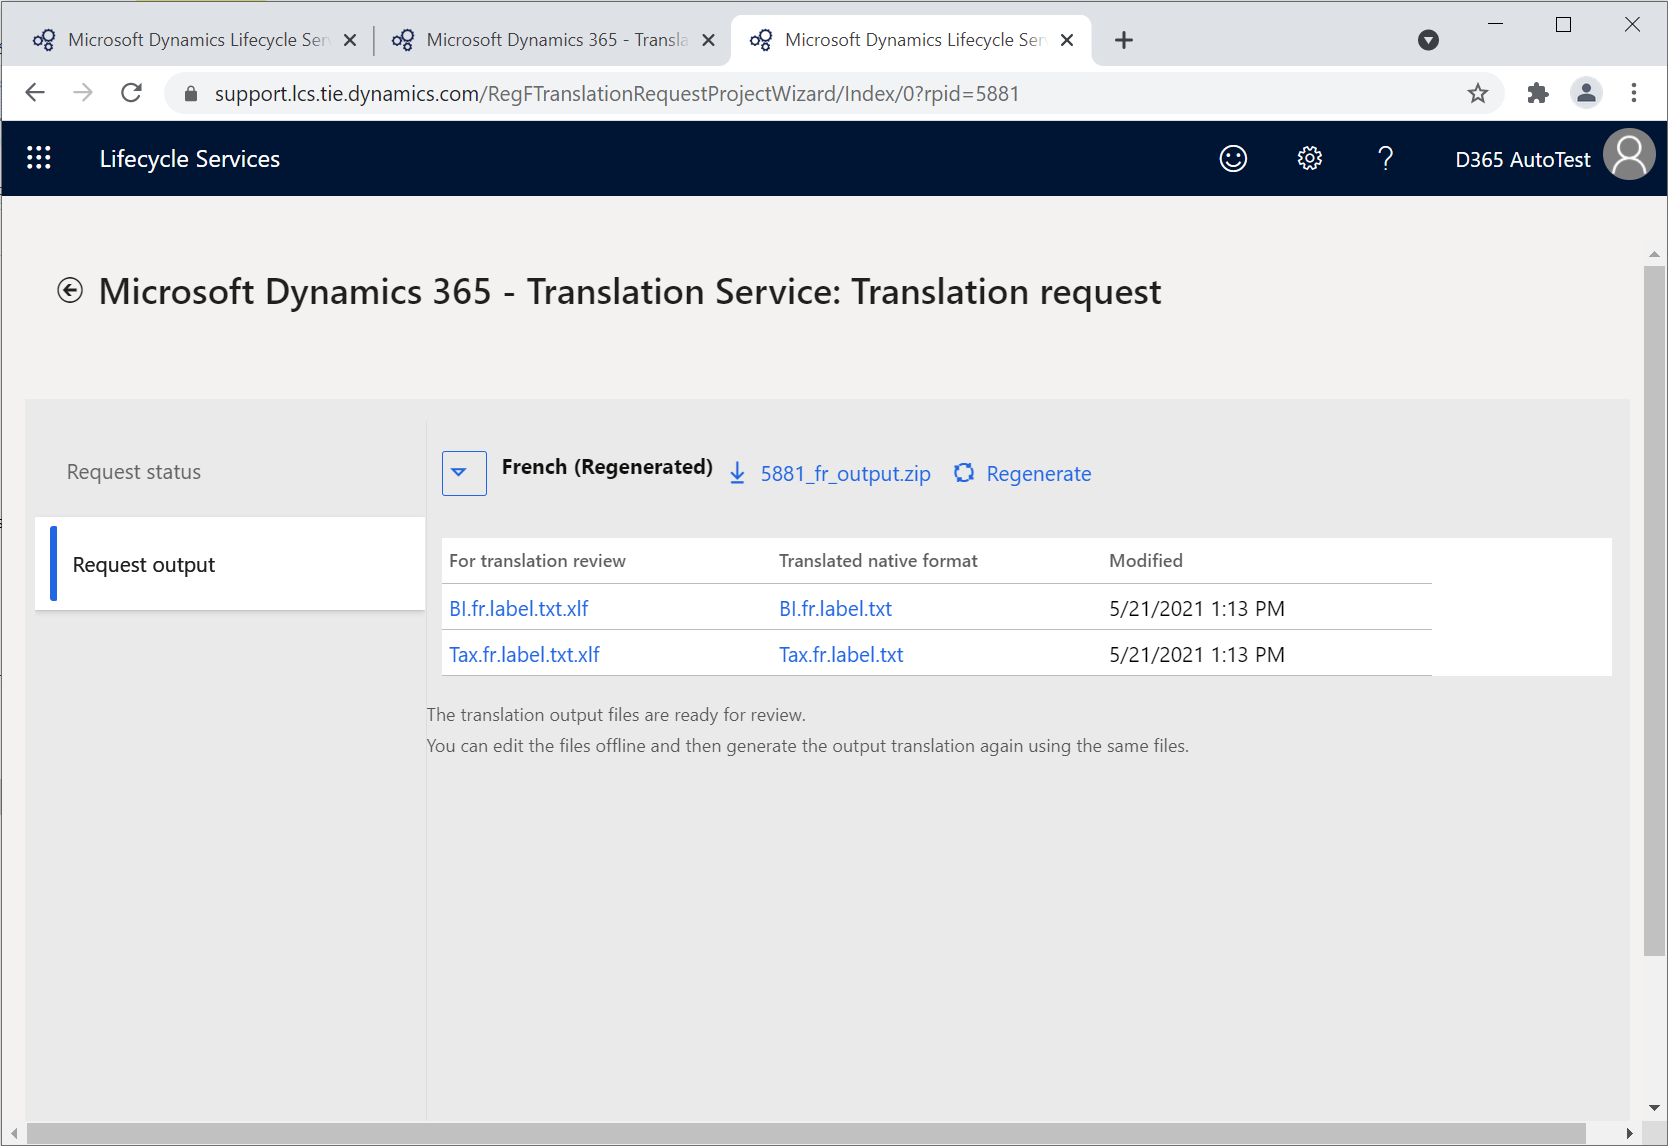
Select the Request output tab to view the output of your request. After the request has finished processing, you'll receive an email notification from Translation Service and a (Completed) status will display next to each target language.
Note
The processing time depends on the number of requests that are in the Dynamics 365 Translation Service queue and the word count in the source files that you submit. Additionally, if you create a custom machine translation system, the request could require extra time to train the custom model.
After the request has finished processing for a language, a download link with the files from the output of the request will appear beside the language name. Download the zip file and then extract it to view the folders inside. Two folders, For translation review and Translated native format, will display that contain the following file types:
For translation review - Contains XLIFF files for you to review and, as required, edit the translations. You can edit these files in the Multilingual Editor.
Translated native format - Contains the translations in native format. Native format means that the file is in the same format as the source file that you submitted.
Additionally, you can expand the dropdown list next to the language name to view a table that shows each individual file and reflects the folder structure of the zip file.


Review and edit the translations
We recommend that you use the free Multilingual Editor app, or any XLIFF editor of your preference, to review and edit the translations. This tool will allow you to potentially prevent unwanted changes from being made in the XLIFF file. The following example shows the Multilingual Editor app being used.
Under the For translation review column, select the file name to download the XLIFF file.
Open the file in Multilingual Editor. If you encounter an error when opening the file, ignore the message and select the Strings tab in the lower-left corner of the window.
To verify the translations, you can apply a filter to show only strings that are in the Needs Review state. This feature will filter for translations that were machine translated or recycled from a string with a different resource ID.
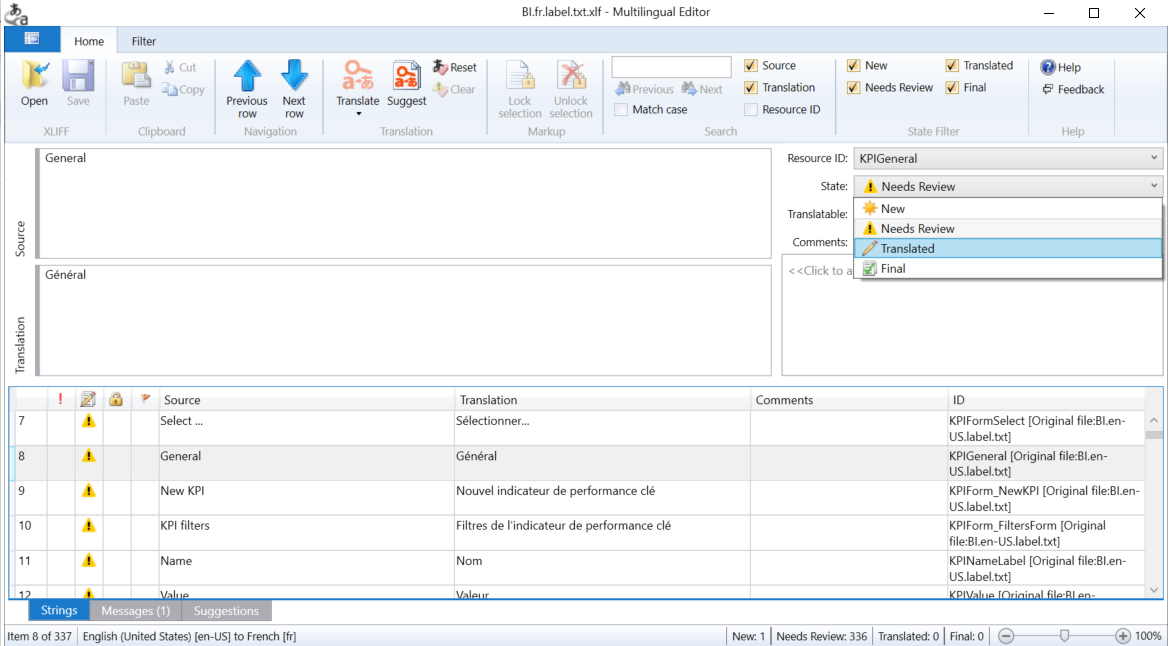
After you've reviewed and edited the translations and are confident that they are of expected quality, mark them as Translated, Final, or Signed off so that they can be used for future requests.

Regenerate a translation request
After you've finished reviewing and editing the translations in XLIFF, you will need to regenerate the translated native formats.
Select the Regenerate button next to the target language section. The File upload pane will open.

Zip (compress) the edited XLIFF files and then select Upload. Don't change the XLIFF file name that Translation Service originally provided.
In the prompt, confirm the upload. The Request output tab will refresh the content.
Expand the target language node that you regenerated to verify the Modified timestamp.
Download the zip file and then extract it. Open the translated native format files to view the regenerated translations.

