Development and deployment processes
An AOT package is a deployment and compilation unit of one or more models that can be applied to a finance and operations apps environment. A deployable package can consist of several models that contain the metadata, binaries, reports, and other resources. The deployable package is used for deployment of code and customizations to the sandbox, test, and production environments for the application.
Development and deployment process
Before you begin developing for finance and operations apps, make sure that you understand the developer and deployment process, which will help make these processes run smoothly.

All developers for the application work in an individual environment that includes the Visual Studio application. As a reminder, Visual Studio is the integrative development environment (IDE) that is used to develop for Dynamics 365. Deployable packages are created in Visual Studio and then deployed to sandbox, test, and production environments by using Lifecycle Services.
When finishing your code and customizations in Visual Studio, you must make a few considerations. If several developers are on one project, you should perform a Get Latest process to merge all new code that has been checked in by the other developers, and then perform a local build to ensure that your code will not disturb what is in the Azure DevOps repository.
When both processes have been performed, you can check in your code by using Team Explorer, which is connected to Azure DevOps. The code that is checked in will be built in Azure DevOps by using a build pipeline, and this will create a deployable package. Generally, you will not deploy your own code. By using Lifecycle Services, you can apply a deployable package by using the Apply updates tool.
Create a deployable package in Visual Studio
We recommend that you use a build environment to create a deployable package, though these can be created in a developer environment.
When code is complete and builds successfully, you can follow these steps to create a deployable package in Visual Studio:
In Visual Studio, select Extensions > Dynamics 365.
Select Deploy > Create Deployment Package.
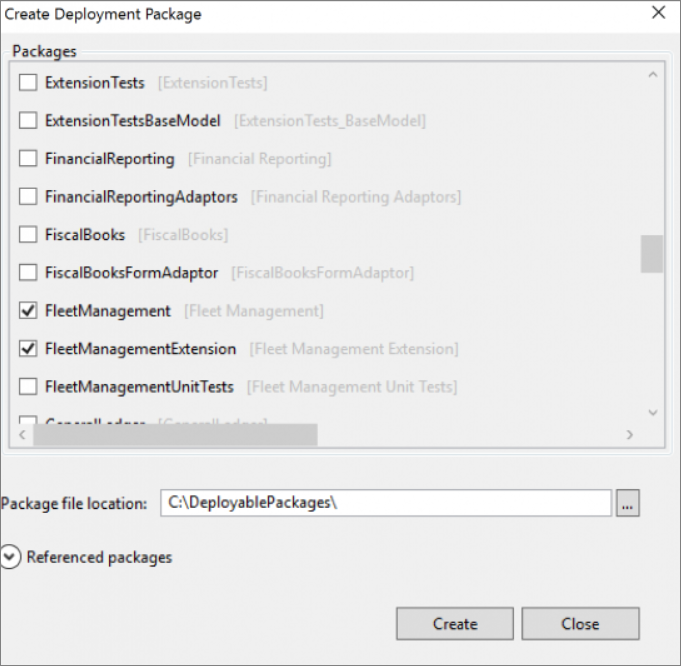
In the Create Deployment Package dialog, select the packages that contain the models that you want to deploy.
You can select the Referenced packages drop-down arrow to view all the dependent models of the models that are selected.
In the Package file location field, you can select the ellipsis '…' to select where you want to save the package file.
When you have selected all the models for the deployable package, select Create. A zip file will be saved to the location that you specified.
Production deployment
To deploy to production, customers can schedule a downtime that will determine when an update will be applied to the production environment by Microsoft. To schedule downtime to apply updates to the environment, the package must have been applied to at least one sandbox environment in the same project. You can submit a service request for this in Lifecycle Services.