Email integration
Microsoft Exchange Online
Both Microsoft Dataverse for Apps and Microsoft Exchange Online are online services and connecting them is a very straightforward configuration. To use Exchange Online with Dataverse for Apps, you must have an Exchange Online subscription
Important
Dataverse for Apps supports server-side synchronization with Exchange Online only in the same tenant. Connecting Dataverse with Exchange Online in a different tenant is not supported.
When you provision a Dataverse for Apps database, the default profile for the email connection to Exchange Online is automatically created. To verify this profile, navigate to Settings for the environment in Power platform Admin center then select Server Profiles in the Email section.
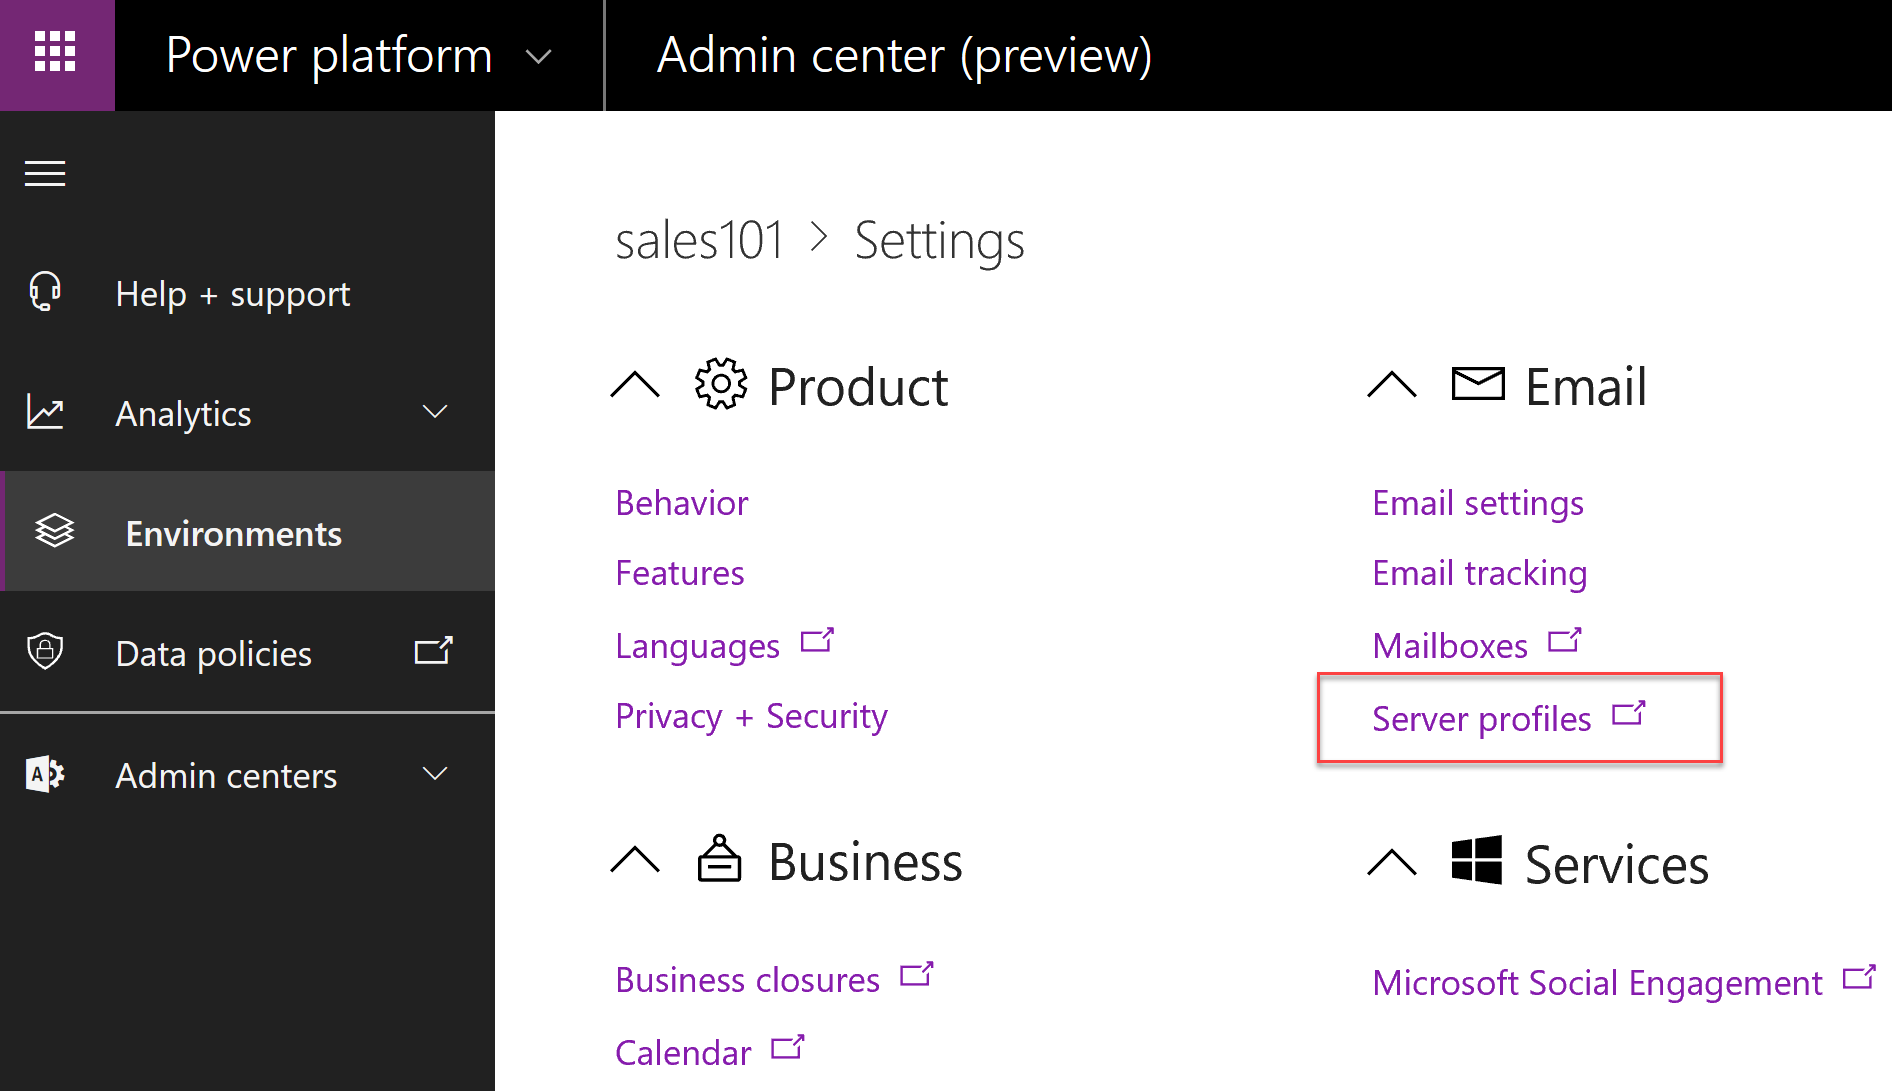
The Microsoft Exchange Online profile should be in the list of the active profiles. If the Microsoft Exchange Online profile is missing, verify you have an Exchange Online subscription and that it exists in the same tenant as your Dataverse for Apps subscription.
Connecting to Microsoft Exchange Online using any other server types like Exchange Server (Hybrid) or POP3/SMTP Server is not supported.
Once Microsoft Exchange Online profile is verified, it can be used as a default profile for the new mailboxes added to the system. If there are multiple email profiles present in the system, select Microsoft Exchange Online profile in the list and select Set as Default.
Advanced settings
The server profile form for the Microsoft Exchange Online profile allows for some additional settings in the Advanced section.
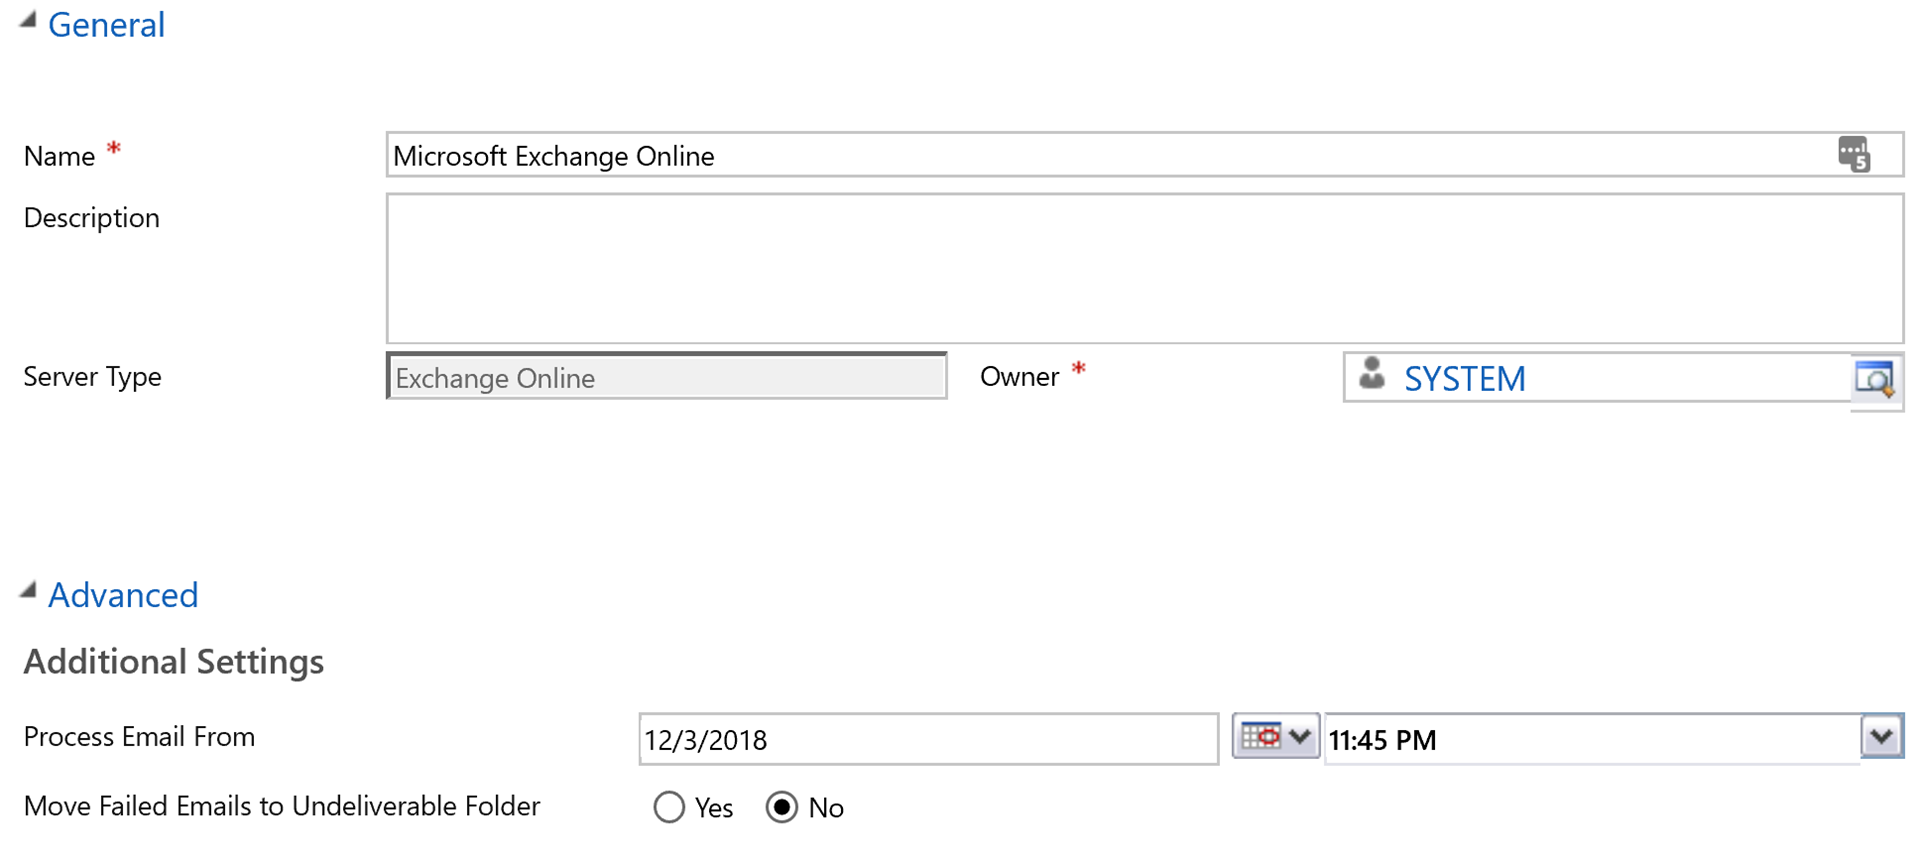
Process Email From option directs synchronization process only to process emails after the specified date and time for all mailboxes associated with this profile. This is useful if organization added Dataverse for Apps or Dynamics 365 Customer Engagement apps to their tenant after they have already been using Exchange Online, and you would like to track only some of the past emails in the context of the Dataverse apps. Note that only past emails that are still in the user’s inbox will be processed. Leaving the field blank will process all emails located in the users’ inboxes.
Move Failed Emails to Undeliverable Folder option will create Undeliverable folder in the users’ mailboxes and move emails that fail to be tracked in Dataverse to that folder. Note that enabling this option may move some received emails from the user’s inbox folder. For example, if the attachment size exceeds the maximum attachment limit set in the Dataverse for Apps.
Microsoft Exchange on-premises
For the mail processing in Dataverse for Apps you can connect your apps with Microsoft Exchange Server on-premises.
Before connecting you must ensure that the following prerequisites are met:
| Exchange Server | Only the following versions are supported: Exchange Server 2010 SP3, Exchange Server 2013 SP1, or Exchange Server 2016 |
|---|---|
| Authentication | Windows or Basic authentication must be enabled in Exchange Server |
| Application Impersonation | When connecting to the Exchange server on-premises, Dataverse needs to access users’ mailboxes. This is done by using a service account with the ApplicationImpersonation role. For more details, see Impersonation and EWS in Exchange. |
| Secured connection | Exchange server must support secure (https) connections |
| Exchange Web Services (EWS) | Exchange server must be accessible externally using EWS protocol. |
You may need to work with your Exchange Server administrator to ensure that all these prerequisites are met.
Create server profile
To connect to the Exchange Server, a new Email Server profile is required. To create new profile, navigate to Settings for the environment in the Power platform Admin center then select Server profiles in Email section.

In the list view, select New > Exchange Server (Hybrid) to create the profile.
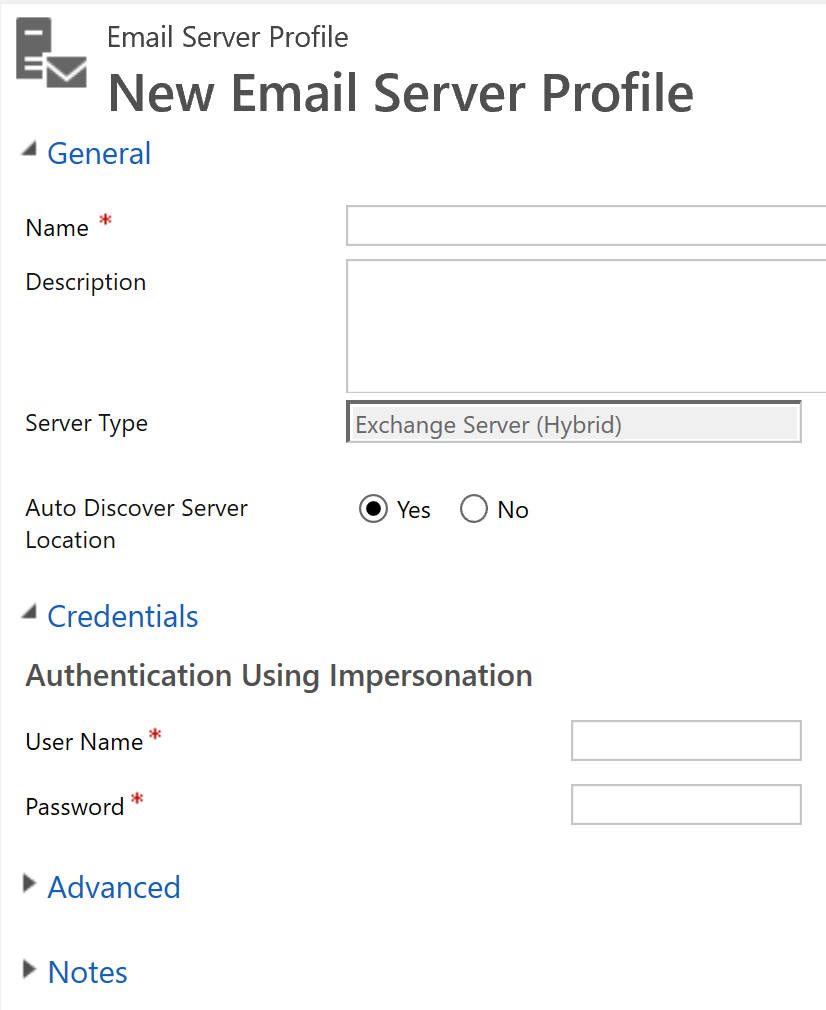
At a minimum, you need to specify the profile name and the credentials for the Exchange service account that was granted the ApplicationImpersonation role. For the properly configured standard Exchange Server on-premises deployments this is usually sufficient; however, you may need to review and adjust some of the advanced settings. See documentation for the details.
After the profile has been saved, you can use Test Connection command to verify the profile. If you’ve run Test Connection and have issues with the Exchange Server (Hybrid) profile connection, use the information in the Test Connection dialog box to diagnose and fix the connection.
Once the Microsoft Exchange (Hybrid) profile is verified, it can be used as a default profile for the new mailboxes added to the system. If there are multiple email profiles present in the system, select Microsoft Exchange (Hybrid) profile in the list and select Set as Default.
Other e-mail servers
Dataverse for Apps supports connections to mail servers using POP3 and SMTP protocols. This enables integrations with third-party email systems such as Gmail or Outlook.com.
Ability to use POP3/SMTP connections adds flexibility to Dataverse for Apps and Dynamics 365 Customer Engagement apps deployments.
Use Dataverse for Apps in the existing deployments where non-Microsoft communication technologies have already been in use.
Configure separate systems to send and receive emails, with separate authentication mechanisms; or configure just a single purpose server. For example, create for only inbound or only outbound.
Use third-party transactional systems for sending emails that have higher limits for volume email processing than Exchange Online.
Define and use non-standard communication ports.
When selecting and configuring the external system, you may also consider the following limitations:
Mail servers need to support basic authentication mechanism.
Only secure TLS/SSL connections are supported.
Fully qualified domain names must be used for the server locations, connections using IP addresses are not supported.
Anonymous connections are not supported.
Per user mailbox credentials must be used for POP3 connectivity, profile credentials are not allowed.
Does your deployment require compliance with the security standards such as FIPS 140-2? Dataverse for Apps is compliant with this standard but only some external systems are, for example Gmail or Yahoo! mail.
Only a limited number of configurations have been validated and tested by Microsoft. Refer to the Supported email service configuration to check if your specific POP3/SMTP configuration has been tested and supported.
Before configuring POP3/SMTP server profile, you need to have at least the following information:
Incoming and/or outgoing server locations
Incoming and/or outgoing port information (in case non-standard ports are used)
Whether to use credentials per user mailbox (specified by each user) or access the servers using credentials specified in the profile.
Create server profile
To connect to the POP3/SMTP server, a new email server profile is required. To create the new profile, navigate to Settings for the environment in Power platform Admin center then select Server profiles in Email section

In the list view, select New > POP3/SMTP Server to create the profile.

At a minimum, you need to specify the profile name, and incoming and/or outgoing server locations. Note that you do not have to define both locations. This will create a single purpose profile, either incoming or outgoing only. Depending on the external system you may need to define some additional parameters. See Connect to pop3 for smtp servers for more details.
There is no specific connectivity test for POP3/SMTP profile, but the mailboxes associated with the profile can be tested. After the profile has been created, it can be used as a default for new mailboxes or associated with the existing mailboxes for email processing. To use the profile as default when there are multiple email profiles are present in the system, select POP3/SMTP profile in the list and select Set as Default.