Exercise - Create and call a custom connector from a workflow in Azure Logic Apps
You have a Web API called Print Framer API that calculates a cost for a picture frame based on the dimensions you send to it. Developers throughout your company want to use this API in their Azure Logic Apps workflows, but there's currently no way to make that connection.
In this exercise, you'll create a custom connector for the Print Framer API and use it to send and receive data from a logic app workflow to a Web API. First, we need a logic app workflow.
Create a logic app workflow
In the Azure portal menu or from the Home page, under Azure services, select Create a resource. The Create a resource pane appears.
In the left menu pane, select Integration, then find and select Logic App.
On the Create Logic App pane, under Basics, enter the following values for each setting.
Setting Value Project Details Subscription Concierge Subscription Resource group Select Sandbox resource group Instance Details Logic App name Provide a unique name. Remember the name for later use. Publish Workflow Region Select a region near you. Enable log analytics No Plan Plan type Consumption Zone redundancy Zone redundancy Leave as default (disabled) The free sandbox allows you to create resources in a subset of the Azure global regions. Select a region from the following list when you create resources:
- West US 2
- South Central US
- Central US
- East US
- West Europe
- Southeast Asia
- Japan East
- Brazil South
- Australia Southeast
- Central India
Select Review + create, then select Create after validation succeeds.
After the portal creates your logic app resource, select Go to resource.
The Azure portal shows a gallery with frequently used triggers and workflow patterns.
Select Logic app designer in the left menu, then select Add a trigger.
Search for and select When an HTTP request is received.
The workflow designer now displays the trigger you selected.
Select Show all in the Advanced parameters section.
Select GET in the Method drop-down.
Enter
{height}/{width}as a literal string in the Relative path field.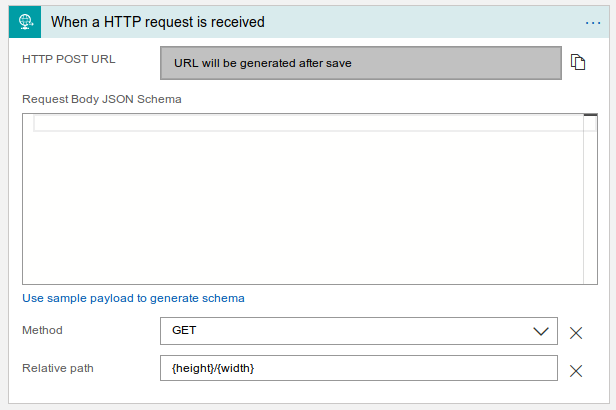
On the designer toolbar, select Save.
We now have a basic logic app workflow. Let's add a custom connector so that we can call our custom Print Framer API from our workflow.
Create a new Azure Logic Apps custom connector in the Azure portal
In the Azure portal menu or from the Home page, under Azure services, select Create a resource. The Create a resource pane appears.
In the search box, find and select Logic Apps Custom Connector.
On the Logic Apps Custom Connector pane, select Create.
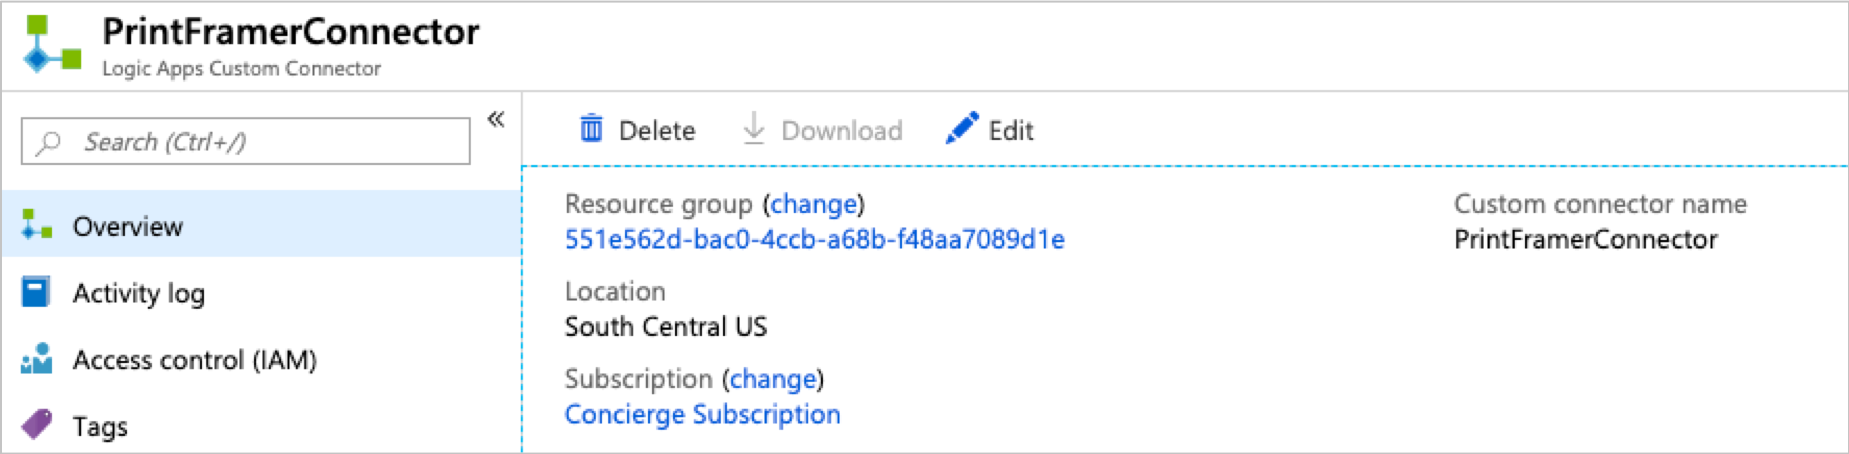
On the Create logic apps custom connector pane, under Basics, enter the following values for each setting.
Setting Value Project details Subscription Concierge Subscription Resource group Select Sandbox resource group Instance details Custom connector name PrintFramerConnector Region Select a region that's near you and also supported by the sandbox. Associate with integration service environment Leave unselected Select Review + create. After validation succeeds, select Create.
After deployment completes, select Go to resource.
Import the OpenAPI definition
Now use the OpenAPI file that you previously saved to define the custom connector.
In the Azure portal or from the Home page, select All resources, and then select PrintFramerConnector.
On the Overview page, select Edit.
In the Custom connectors section, select OpenAPI file, and then select Import. Open the JSON file that you saved in the last exercise.
Configure the custom connector
The OpenAPI file tells the custom connector about the operations that are available in the Web API. There are a few other properties you have to set for the custom connector.
In the General Information section, in the Description box, enter Obtain an estimate for a picture frame. You might have to scroll down to see this part of the configuration pane.
In the Host textbox, enter the Example URL that you noted earlier.
On the Security pane, make sure that No Authentication is selected.
Important
For this demonstration, it's OK to allow access to the API without any authentication. For real-world APIs, which contain sensitive data or require a paid subscription, authentication is essential.
On the Definition pane, in the Summary textbox, enter Estimate the cost of a picture frame.
Under Visibility, select Important.
At the top of the pane, select Update connector.
Add the custom connector to your logic app workflow
Now, you can use the custom connector in your logic app workflow.
In the Azure portal or from the Home page, under Azure resources, select All resources, and then select the logic app resource that you created in unit 3.
In the logic app resource menu, select Overview. On the Overview pane toolbar, select Edit.
On the designer, select New step > Add an action.
Under the Choose an operation search box, select Custom, and then select PrintFramerConnector.
Under Actions, select Estimate the cost of a picture frame.
In the Estimate the cost of a picture frame box, put your cursor in the Height field. From the dynamic content list that opens, select height.
The following screenshot illustrates this selection:

Return to the custom connector, and put your cursor in the Width field. From the dynamic content list, select width.
The height and width parameters received from each HTTP request that triggers our workflow are now bound to the height and width parameters that pass to the PrintFramerConnector.
Complete the workflow
Finally, the workflow needs a way to display the results. You can use the Response action to show the estimate:
In the workflow designer, select New step.
In the Choose an operation search box, enter Response, and then select the action named Response.
In the Body field, enter The approximate cost of your frame is:$.
In the dynamic content list that opens, select Body from the Estimate the cost of a picture frame section.
The following screenshot shows this selection:

When you're done, select Save to save your workflow.
Test the workflow
The workflow is now complete and will call the Web API using the custom connector. Now, you just have to send a request that triggers the workflow, which you can do by using the browser.
In the workflow designer, expand the When an HTTP request is received action.
Next to the HTTP GET URL field, select Copy URL.
Open a new browser tab and paste the URL into the address bar.
In the pasted URL, replace the {height} parameter with 10. Replace the {width} parameter with 4. Press Enter.
The browser pane displays an approximate cost.
Try entering other heights and widths.
Congratulations! You've created a logic app workflow that can call your in-house Print Framer API using a custom connector!