Write the UI tests
In this section, you help Andy and Amita write Selenium tests that verify the UI behaviors that Amita described.
Amita normally runs tests on Chrome, Firefox, and Microsoft Edge. Here, you do the same. The Microsoft-hosted agent that you'll use is preconfigured to work with each of these browsers.
Fetch the branch from GitHub
In this section, you fetch the selenium branch from GitHub. You then check out, or switch to, that branch. The contents of the branch will help you follow along with the tests that Andy and Amita write.
This branch contains the Space Game project that you worked with in previous modules. It also contains an Azure Pipelines configuration to start with.
In Visual Studio Code, open the integrated terminal.
To download a branch named
seleniumfrom the Microsoft repository, switch to that branch, and run the followinggit fetchandgit checkoutcommands:git fetch upstream selenium git checkout -B selenium upstream/seleniumTip
If you followed along with Amita's manual test in the previous unit, you may have run these commands already. If you already ran them in the previous unit, you may still run them again now.
Recall that upstream refers to the Microsoft GitHub repository. Your project's Git configuration understands the upstream remote because you set up that relationship. You set it up when you forked the project from the Microsoft repository and cloned it locally.
Shortly, you'll push this branch up to your GitHub repository, known as
origin.Optionally, in Visual Studio Code, open the azure-pipelines.yml file. Familiarize yourself with the initial configuration.
The configuration resembles the ones that you created in the previous modules in this learning path. It builds only the application's Release configuration. For brevity, it also omits the triggers, manual approvals, and tests that you set up in previous modules.
Note
A more robust configuration might specify the branches that participate in the build process. For example, to help verify code quality, you might run unit tests each time you push up a change on any branch. You might also deploy the application to an environment that performs more exhaustive testing. But you do this deployment only when you have a pull request, when you have a release candidate, or when you merge code to main.
For more information, see Implement a code workflow in your build pipeline by using Git and GitHub and Build pipeline triggers.
Write the unit test code
Amita is excited to learn to write code that controls the web browser.
She and Andy will work together to write the Selenium tests. Andy has already set up an empty NUnit project. Throughout the process, they refer to the Selenium documentation, a few online tutorials, and the notes that they took when Amita did the tests manually. At the end of this module, you'll find more resources to help get you through the process.
Let's review the process that Andy and Amita use to write their tests. You can follow along by opening HomePageTest.cs in the Tailspin.SpaceGame.Web.UITests directory in Visual Studio Code.
Define the HomePageTest class
Andy: The first thing we need to do is define our test class. We can choose to follow one of several naming conventions. Let's call our class HomePageTest. In this class, we'll put all of our tests that relate to the home page.
Andy adds this code to HomePageTest.cs:
public class HomePageTest
{
}
Andy: We need to mark this class as public so that it's available to the NUnit framework.
Add the IWebDriver member variable
Andy: Next, we need an IWebDriver member variable. IWebDriver is the programming interface that you use to launch a web browser and interact with webpage content.
Amita: I've heard of interfaces in programming. Can you tell me more?
Andy: Think of an interface as a specification or blueprint for how a component should behave. An interface provides the methods, or behaviors, of that component. But the interface doesn't provide any of the underlying details. You or someone else would create one or more concrete classes that implement that interface. Selenium provides the concrete classes that we need.
This diagram shows the IWebDriver interface and a few of the classes that implement this interface:
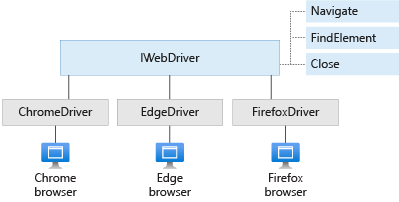
The diagram shows three of the methods that IWebDriver provides: Navigate, FindElement, and Close.
The three classes shown here, ChromeDriver, FirefoxDriver, and EdgeDriver, each implement IWebDriver and its methods. There are other classes, such as SafariDriver, that also implement IWebDriver. Each driver class can control the web browser that it represents.
Andy adds a member variable named driver to the HomePageTest class, like this code:
public class HomePageTest
{
    private IWebDriver driver;
}
Define the test fixtures
Andy: We want to run the entire set of tests on Chrome, Firefox, and Edge. In NUnit, we can use test fixtures to run the entire set of tests multiple times, one time for each browser that we want to test on.
In NUnit, you use the TestFixture attribute to define your test fixtures. Andy adds these three test fixtures to the HomePageTest class:
[TestFixture("Chrome")]
[TestFixture("Firefox")]
[TestFixture("Edge")]
public class HomePageTest
{
    private IWebDriver driver;
}
Andy: Next, we need to define a constructor for our test class. The constructor is called when NUnit creates an instance of this class. As its argument, the constructor takes the string that we attached to our test fixtures. Here's what the code looks like:
[TestFixture("Chrome")]
[TestFixture("Firefox")]
[TestFixture("Edge")]
public class HomePageTest
{
    private string browser;
    private IWebDriver driver;

    public HomePageTest(string browser)
    {
        this.browser = browser;
    }
}
Andy: We added the browser member variable so that we can use the current browser name in our setup code. Let's write the setup code next.
Define the Setup method
Andy: Next, we need to assign our IWebDriver member variable to a class instance that implements this interface for the browser we're testing on. The ChromeDriver, FirefoxDriver, and EdgeDriver classes implement this interface for Chrome, Firefox, and Edge, respectively.
Let's create a method named Setup that sets the driver variable. We use the OneTimeSetUp attribute to tell NUnit to run this method one time per test fixture.
[OneTimeSetUp]
public void Setup()
{
}
In the Setup method, we can use a switch statement to assign the driver member variable to the appropriate concrete implementation based on the browser name. Let's add that code now.
// Create the driver for the current browser.
switch(browser)
{
    case "Chrome":
    driver = new ChromeDriver(
        Environment.GetEnvironmentVariable("ChromeWebDriver")
    );
    break;
    case "Firefox":
    driver = new FirefoxDriver(
        Environment.GetEnvironmentVariable("GeckoWebDriver")
    );
    break;
    case "Edge":
    driver = new EdgeDriver(
        Environment.GetEnvironmentVariable("EdgeWebDriver"),
        new EdgeOptions
        {
            UseChromium = true
        }
    );
    break;
    default:
    throw new ArgumentException($"'{browser}': Unknown browser");
}
The constructor for each driver class takes an optional path to the driver software Selenium needs to control the web browser. Later, we'll discuss the role of the environment variables shown here.
In this example, the EdgeDriver constructor also requires additional options to specify that we want to use the Chromium version of Edge.
Define the helper methods
Andy: I know we'll need to repeat two actions throughout the tests:
- Finding elements on the page, such as the links that we click and the modal windows that we expect to appear
- Clicking elements on the page, such as the links that reveal the modal windows and the button that closes each modal
Let's write two helper methods, one for each action. We'll start with the method that finds an element on the page.
Write the FindElement helper method
When you locate an element on the page, it's typically in response to some other event, such as the page loading or the user entering information. Selenium provides the WebDriverWait class, which allows you to wait for a condition to be true. If the condition isn't true within the given time period, WebDriverWait throws an exception or error. We can use the WebDriverWait class to wait for a given element to be displayed and to be ready to receive user input.
To locate an element on the page, use the By class. The By class provides methods that let you find an element by its name, by its CSS class name, by its HTML tag, or in our case, by its id attribute.
Andy and Amita code up the FindElement helper method. It looks like this code:
private IWebElement FindElement(By locator, IWebElement parent = null, int timeoutSeconds = 10)
{
    // WebDriverWait enables us to wait for the specified condition to be true
    // within a given time period.
    return new WebDriverWait(driver, TimeSpan.FromSeconds(timeoutSeconds))
        .Until(c => {
            IWebElement element = null;
            // If a parent was provided, find its child element.
            if (parent != null)
            {
                element = parent.FindElement(locator);
            }
            // Otherwise, locate the element from the root of the DOM.
            else
            {
                element = driver.FindElement(locator);
            }
            // Return true after the element is displayed and is able to receive user input.
            return (element != null && element.Displayed && element.Enabled) ? element : null;
        });
}
Write the ClickElement helper method
Andy: Next, let's write a helper method that clicks links. Selenium provides a few ways to write that method. One of them is the IJavaScriptExecutor interface. With it, we can programmatically click links by using JavaScript. This approach works well because it can click links without first scrolling them into view.
ChromeDriver, FirefoxDriver, and EdgeDriver each implement IJavaScriptExecutor. We need to cast the driver to this interface and then call ExecuteScript to run the JavaScript click() method on the underlying HTML object.
Andy and Amita code up the ClickElement helper method. It looks like this code:
private void ClickElement(IWebElement element)
{
    // We expect the driver to implement IJavaScriptExecutor.
    // IJavaScriptExecutor enables us to execute JavaScript code during the tests.
    IJavaScriptExecutor js = driver as IJavaScriptExecutor;

    // Through JavaScript, run the click() method on the underlying HTML object.
    js.ExecuteScript("arguments[0].click();", element);
}
Amita: I like the idea of adding these helper methods. They seem general enough to use in almost any test. We can add more helper methods later as we need them.
Define the test method
Andy: Now, we're ready to define the test method. Based on the manual tests that we ran earlier, let's call this method ClickLinkById_ShouldDisplayModalById. It's a good practice to give test methods descriptive names that define precisely what the test accomplishes. Here, we want to click a link defined by its id attribute. Then we want to verify that the proper modal window appears, also by using its id attribute.
Andy adds starter code for the test method:
public void ClickLinkById_ShouldDisplayModalById(string linkId, string modalId)
{
}
Andy: Before we add more code, let's define what this test should do.
Amita: I can handle this part. We want to:
- Locate the link by its
idattribute and then click the link. - Locate the resulting modal.
- Close the modal.
- Verify that the modal was displayed successfully.
Andy: Great. We'll also need to handle a few other things. For example, we need to ignore the test if the driver couldn't be loaded, and we need to close the modal only if the modal was successfully displayed.
After refilling their coffee mugs, Andy and Amita add code to their test method. They use the helper methods that they wrote to locate page elements and click links and buttons. Here's the result:
public void ClickLinkById_ShouldDisplayModalById(string linkId, string modalId)
{
    // Skip the test if the driver could not be loaded.
    // This happens when the underlying browser is not installed.
    if (driver == null)
    {
        Assert.Ignore();
        return;
    }

    // Locate the link by its ID and then click the link.
    ClickElement(FindElement(By.Id(linkId)));

    // Locate the resulting modal.
    IWebElement modal = FindElement(By.Id(modalId));

    // Record whether the modal was successfully displayed.
    bool modalWasDisplayed = (modal != null && modal.Displayed);

    // Close the modal if it was displayed.
    if (modalWasDisplayed)
    {
        // Click the close button that's part of the modal.
        ClickElement(FindElement(By.ClassName("close"), modal));

        // Wait for the modal to close and for the main page to again be clickable.
        FindElement(By.TagName("body"));
    }

    // Assert that the modal was displayed successfully.
    // If it wasn't, this test will be recorded as failed.
    Assert.That(modalWasDisplayed, Is.True);
}
Amita: The coding looks great so far. But how do we connect this test to the id attributes that we collected earlier?
Andy: Great question. We'll handle that next.
Define test case data
Andy: In NUnit, you can provide data to your tests in a few ways. Here, we use the TestCase attribute. This attribute takes arguments that it later passes back to the test method when it runs. We can have multiple TestCase attributes that each test a different feature of our app. Each TestCase attribute produces a test case that's included in the report that appears at the end of a pipeline run.
Andy adds these TestCase attributes to the test method. These attributes describe the Download game button, one of the game screens, and the top player on the leaderboard. Each attribute specifies two id attributes: one for the link to click and one for the corresponding modal window.
// Download game
[TestCase("download-btn", "pretend-modal")]
// Screen image
[TestCase("screen-01", "screen-modal")]
// // Top player on the leaderboard
[TestCase("profile-1", "profile-modal-1")]
public void ClickLinkById_ShouldDisplayModalById(string linkId, string modalId)
{

...
Andy: For each TestCase attribute, the first parameter is the id attribute for the link to click on. The second parameter is the id attribute for the modal window that we expect to appear. You can see how these parameters correspond to the two-string arguments in our test method.
Amita: I do see that. With some practice, I think I can add my own tests. When can we see these tests running in our pipeline?
Andy: Before we push changes through the pipeline, let's first verify that the code compiles and runs locally. We'll commit and push changes to GitHub and see them move through the pipeline only after we verify that everything works. Let's run the tests locally now.