Exercise - Add unit tests to your application
In this unit, we'll add unit tests to the automated build that we created with Microsoft Azure Pipelines. Regression bugs are creeping into your team's code and breaking the leaderboard's filtering functionality. Specifically, the wrong game mode keeps appearing.
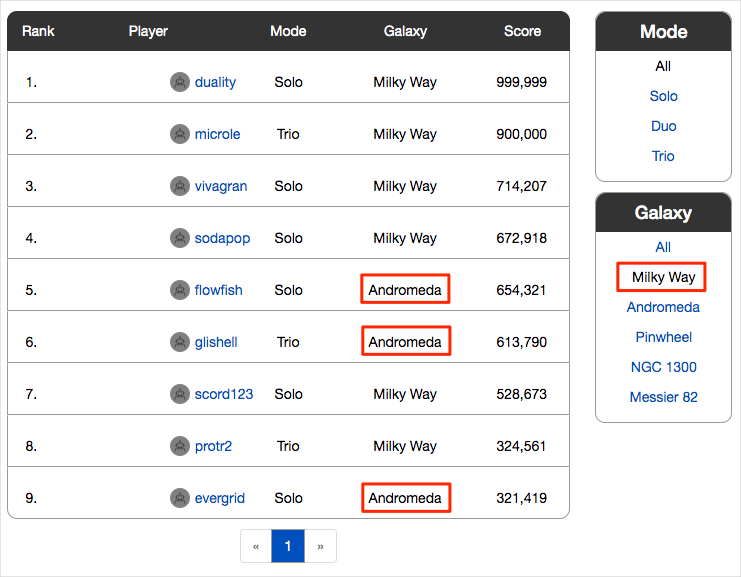
The following image illustrates the problem. When a user selects "Milky Way" to show only scores from that game map, they get results from other game maps, such as Andromeda.
The team wants to catch the error before it reaches the testers. Unit tests are a great way to automatically test for regression bugs.
Adding the unit tests at this point in the process will give the team a head start as they improve the Space Game web app. The application uses a document database to store high scores and player profiles. Right now, it uses local test data. Later, they plan to connect the app to a live database.
Many unit test frameworks are available for C# applications. We'll use NUnit because it's popular with the community.
Here's the unit test you're working with:
[TestCase("Milky Way")]
[TestCase("Andromeda")]
[TestCase("Pinwheel")]
[TestCase("NGC 1300")]
[TestCase("Messier 82")]
public void FetchOnlyRequestedGameRegion(string gameRegion)
{
    const int PAGE = 0; // take the first page of results
    const int MAX_RESULTS = 10; // sample up to 10 results

    // Form the query predicate.
    // This expression selects all scores for the provided game region.
    Expression<Func<Score, bool>> queryPredicate = score => (score.GameRegion == gameRegion);

    // Fetch the scores.
    Task<IEnumerable<Score>> scoresTask = _scoreRepository.GetItemsAsync(
        queryPredicate, // the predicate defined above
        score => 1, // we don't care about the order
        PAGE,
        MAX_RESULTS
    );
    IEnumerable<Score> scores = scoresTask.Result;

    // Verify that each score's game region matches the provided game region.
    Assert.That(scores, Is.All.Matches<Score>(score => score.GameRegion == gameRegion));
}
You can filter the leaderboard by any combination of game type and game map.
This test queries the leaderboard for high scores and verifies that each result matches the provided game map.
In an NUnit test method, TestCase provides inline data to use to test that method. Here, NUnit calls the FetchOnlyRequestedGameRegion unit test method, as follows:
FetchOnlyRequestedGameRegion("Milky Way");
FetchOnlyRequestedGameRegion("Andromeda");
FetchOnlyRequestedGameRegion("Pinwheel");
FetchOnlyRequestedGameRegion("NGC 1300");
FetchOnlyRequestedGameRegion("Messier 82");
Notice the call to the Assert.That method at the end of the test. An assertion is a condition or statement that you declare to be true. If the condition turns out to be false, that could indicate a bug in your code. NUnit runs each test method using the inline data you specify and records the result as a passing or failing test.
Many unit test frameworks provide verification methods that resemble natural language. These methods help make tests easy to read and help you map the tests to the application's requirements.
Consider the assertion made in this example:
Assert.That(scores, Is.All.Matches<Score>(score => score.GameRegion == gameRegion));
You might read this line as:
Assert that the game region of each returned score matches the provided game region.
Here's the process to follow:
- Fetch a branch from the GitHub repository that contains the unit tests.
- Run the tests locally to verify that they pass.
- Add tasks to your pipeline configuration to run the tests and collect the results.
- Push the branch to your GitHub repository.
- Watch your Azure Pipelines project automatically build the application and run the tests.
Fetch the branch from GitHub
Here, you'll fetch the unit-tests branch from GitHub and check out, or switch to, that branch.
This branch contains the Space Game project that you worked with in the previous modules and an Azure Pipelines configuration to start with.
In Visual Studio Code, open the integrated terminal.
Run the following
gitcommands to fetch a branch namedunit-testsfrom the Microsoft repository, and then switch to that branch.git fetch upstream unit-tests git checkout -B unit-tests upstream/unit-testsThe format of this command enables you to get starter code from the Microsoft GitHub repository, known as
upstream. Shortly, you'll push this branch to your GitHub repository, known asorigin.As an optional step, open the azure-pipelines.yml file in Visual Studio Code and familiarize yourself with the initial configuration. The configuration resembles the basic one you created in the Create a build pipeline with Azure Pipelines module. It builds only the application's Release configuration.
Run the tests locally
It's a good idea to run all tests locally before you submit any tests to the pipeline. You'll do that here.
In Visual Studio Code, open the integrated terminal.
Run
dotnet buildto build each project in the solution.dotnet build --configuration ReleaseRun the following
dotnet testcommand to run the unit tests:dotnet test --configuration Release --no-buildThe
--no-buildflag specifies not to build the project before running it. You don't need to build the project because you built it in the previous step.You should see that all five tests pass.
Starting test execution, please wait...
A total of 1 test files matched the specified pattern.

Passed!  - Failed:     0, Passed:     5, Skipped:     0, Total:     5, Duration: 57 ms
In this example, the tests took less than one second to run.
Notice that there were five total tests. Although we defined just one test method,
FetchOnlyRequestedGameRegion, that test is run five times, once for each game map as specified in theTestCaseinline data.Run the tests a second time. This time, provide the
--loggeroption to write the results to a log file.dotnet test Tailspin.SpaceGame.Web.Tests --configuration Release --no-build --logger trxYou see from the output that a TRX file is created in the TestResults directory.
A TRX file is an XML document that contains the results of a test run. It's a popular format for test results because Visual Studio and other tools can help you visualize the results.
Later, you'll see how Azure Pipelines can help you visualize and track your test results as they run through the pipeline.
Note
TRX files are not meant to be included in source control. A .gitignore file allows you to specify which temporary and other files you want Git to ignore. The project's .gitignore file is already set up to ignore anything in the TestResults directory.
As an optional step, in Visual Studio Code, open the DocumentDBRepository_GetItemsAsyncShould.cs file from the Tailspin.SpaceGame.Web.Tests folder and examine the test code. Even if you're not interested in building .NET apps specifically, you might find the test code useful because it resembles code you might see in other unit test frameworks.
Add tasks to your pipeline configuration
Here, you'll configure the build pipeline to run your unit tests and collect the results.
In Visual Studio Code, modify azure-pipelines.yml as follows:
trigger:
- '*'

pool:
  vmImage: 'ubuntu-20.04'
  demands:
  - npm

variables:
  buildConfiguration: 'Release'
  wwwrootDir: 'Tailspin.SpaceGame.Web/wwwroot'
  dotnetSdkVersion: '6.x'

steps:
- task: UseDotNet@2
  displayName: 'Use .NET SDK $(dotnetSdkVersion)'
  inputs:
    version: '$(dotnetSdkVersion)'

- task: Npm@1
  displayName: 'Run npm install'
  inputs:
    verbose: false

- script: './node_modules/.bin/node-sass $(wwwrootDir) --output $(wwwrootDir)'
  displayName: 'Compile Sass assets'

- task: gulp@1
  displayName: 'Run gulp tasks'

- script: 'echo "$(Build.DefinitionName), $(Build.BuildId), $(Build.BuildNumber)" > buildinfo.txt'
  displayName: 'Write build info'
  workingDirectory: $(wwwrootDir)

- task: DotNetCoreCLI@2
  displayName: 'Restore project dependencies'
  inputs:
    command: 'restore'
    projects: '**/*.csproj'

- task: DotNetCoreCLI@2
  displayName: 'Build the project - $(buildConfiguration)'
  inputs:
    command: 'build'
    arguments: '--no-restore --configuration $(buildConfiguration)'
    projects: '**/*.csproj'

- task: DotNetCoreCLI@2
  displayName: 'Run unit tests - $(buildConfiguration)'
  inputs:
    command: 'test'
    arguments: '--no-build --configuration $(buildConfiguration)'
    publishTestResults: true
    projects: '**/*.Tests.csproj'

- task: DotNetCoreCLI@2
  displayName: 'Publish the project - $(buildConfiguration)'
  inputs:
    command: 'publish'
    projects: '**/*.csproj'
    publishWebProjects: false
    arguments: '--no-build --configuration $(buildConfiguration) --output $(Build.ArtifactStagingDirectory)/$(buildConfiguration)'
    zipAfterPublish: true

- task: PublishBuildArtifacts@1
  displayName: 'Publish Artifact: drop'
  condition: succeeded()
This version introduces this
DotNetCoreCLI@2build task.- task: DotNetCoreCLI@2 displayName: 'Run unit tests - $(buildConfiguration)' inputs: command: 'test' arguments: '--no-build --configuration $(buildConfiguration)' publishTestResults: true projects: '**/*.Tests.csproj'This build task runs the
dotnet testcommand.Notice that this task doesn't specify the
--logger trxargument that you used when you ran the tests manually. ThepublishTestResultsargument adds that for you. This argument tells the pipeline to generate the TRX file to a temporary directory, accessible through the$(Agent.TempDirectory)built-in variable. It also publishes the task results to the pipeline.The
projectsargument specifies all C# projects that match "**/*.Tests.csproj." The "**" part matches all directories, and the "*.Tests.csproj" part matches all projects whose file name ends with ".Tests.csproj." Theunit-testsbranch contains just one unit test project, Tailspin.SpaceGame.Web.Tests.csproj. By specifying a pattern, you can run more test projects without the need to modify your build configuration.
Push the branch to GitHub
Here, you'll push your changes to GitHub and see the pipeline run. Recall that you're currently on the unit-tests branch.
In the integrated terminal, add azure-pipelines.yml to the index, commit the changes, and push the branch up to GitHub.
git add azure-pipelines.yml
git commit -m "Run and publish unit tests"
git push origin unit-tests
Watch Azure Pipelines run the tests
Here you see the tests run in the pipeline and then visualize the results from Microsoft Azure Test Plans. Azure Test Plans provides all the tools you need to successfully test your applications. You can create and run manual test plans, generate automated tests, and collect feedback from stakeholders.
In Azure Pipelines, trace the build through each of the steps.
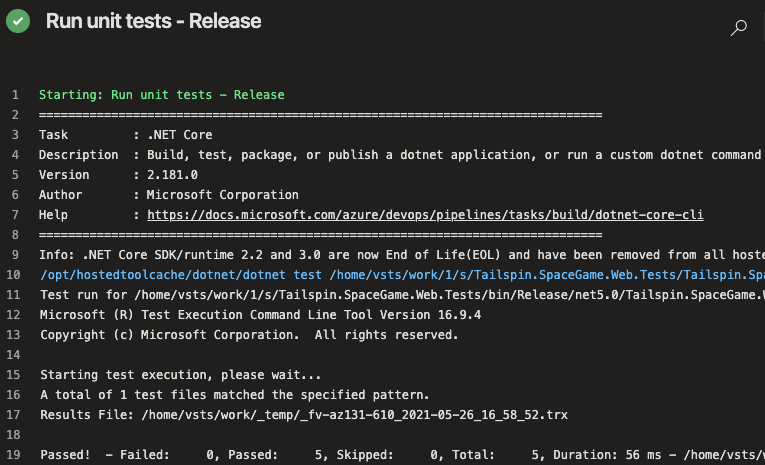
You see that the Run unit tests - Release task runs the unit tests just as you did manually from the command line.
Navigate back to the pipeline summary.
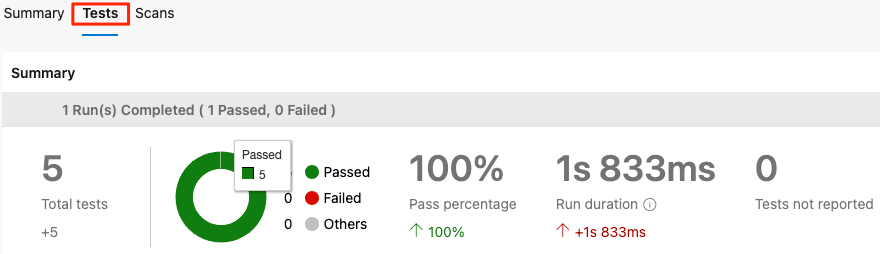
Move to the Tests tab.
You see a summary of the test run. All five tests have passed.
In Azure DevOps, select Test Plans, and then select Runs.
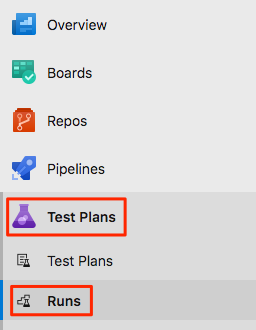
You see the most recent test runs, including the one you just ran.
Double-click the most recent test run.
You see a summary of the results.
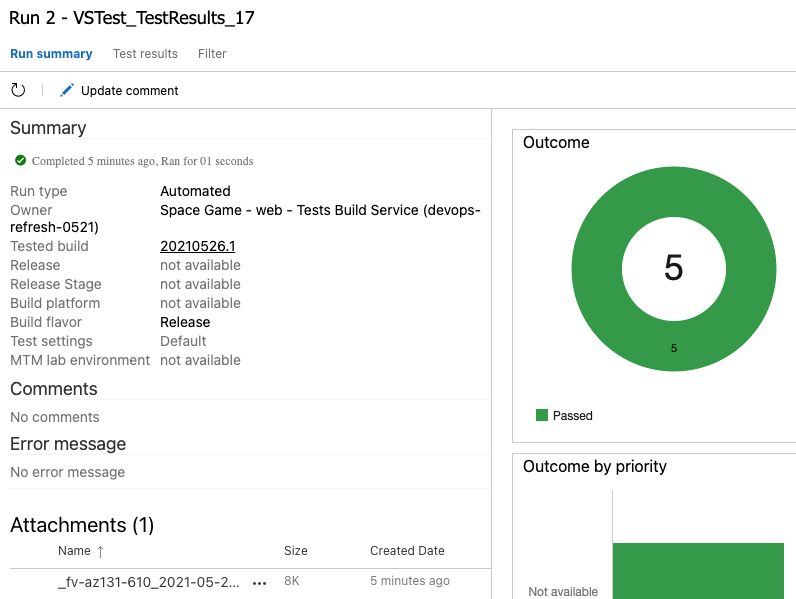
In this example, all five tests have passed. If any tests failed, you can go to the build task to get more details.
You can also download the TRX file to examine it through Visual Studio or another visualization tool.
Although you only added one test, it's a good start and it fixes the immediate problem. Now, the team has a place to add more tests and run them as they improve their process.
Merge your branch into main
In a real-world scenario, if you were happy with the results, you might merge the unit-tests branch to main, but for brevity, we'll skip that process for now.