Create an application by using Vue CLI
We want to create an application to allow someone to book a cruise to the moon for our fictitious company Relecloud. We'll use Vue CLI to bootstrap our application.
Install Vue CLI
Vue CLI is available through npm, the packaging tool that Node.js uses. The npm tool is automatically installed when you install Node.js. To ensure that you have npm and Node.js installed on your system, open a command or terminal window and run the following commands:
node -v
npm -v
Important
Vue CLI is typically installed globally via npm, which requires elevated permissions if you've installed Node.js directly. Using Node Version Manager (nvm) allows you to perform the installation as a regular user. You can install nvm on Linux, Windows Subsystem for Linux (WSL), or macOS, or install nvm-windows on Windows.
To install Vue CLI, open a command or terminal window and run the following command:
npm install -g @vue/cli
The installation of Vue CLI on your system takes a couple of minutes.
Bootstrap an application
The fastest way to bootstrap a Vue application is through Vue CLI. We'll now create a starter application by using Vue CLI.
In a command or terminal window, go to a folder where you want to store your application.
Create a Vue application by running the following command:
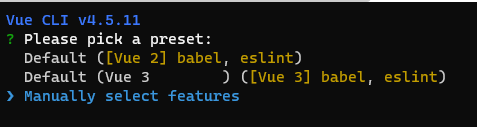
vue create relecloudWhen you're prompted, use the arrow keys to move to Manually select features, and then select the Enter key.
When you're prompted for features needed for your project, use the arrow keys to move to Babel, and select the Spacebar to disable it. Then use the arrow keys to move to Linter / Formatter, and select the Spacebar to disable it.
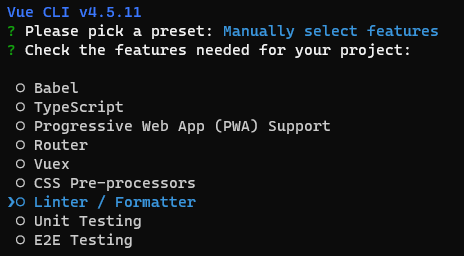
Select the Enter key to confirm the feature choice.
Note
For production projects, you might decide to add more features. These features are outside the scope of this module.
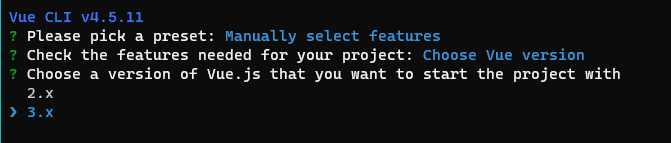
When you're prompted to choose a version of Vue.js, use the arrow keys to move to 3.x, and then select the Enter key.
When you're prompted to choose where you prefer to place configuration files, leave the default of In dedicated config files and select the Enter key.

When you're prompted to save this information as a preset, select the Enter key to accept the default of No.
Your project will now be created, and the necessary libraries will be installed. The process takes a few moments.
Explore the code
Let's explore the code that Vue CLI has created.
When the installation finishes, change directories into relecloud and open it in Visual Studio Code by running the following commands:
cd relecloud
code .
In Visual Studio Code, open package.json.
vueis listed as a dependency, and@vue/cli-serviceis listed as adevDependency.Note
The
@vue/cli-servicepart is responsible for building your application and running the development server.Note the two scripts:
- The
servescript will start the development server. - The
buildscript will create the JavaScript, HTML, or CSS when you're ready to publish your project.
- The
Open public/index.html, which will host the Vue application.
Open src/main.js and note the code that imports
Appfrom App.vue.Open src/App.vue, which contains the core component that we'll explore in the next unit.
Note
Visual Studio Code might prompt you with a suggested extension. We'll install the extension in a later module.
Note the src/components folder, which is where all components will be stored.
Run the development server
Let's start the development server and see the default page.
Open a new terminal window in Visual Studio Code by selecting Terminal > New Terminal.
In the integrated terminal, run the following command to start the development server:
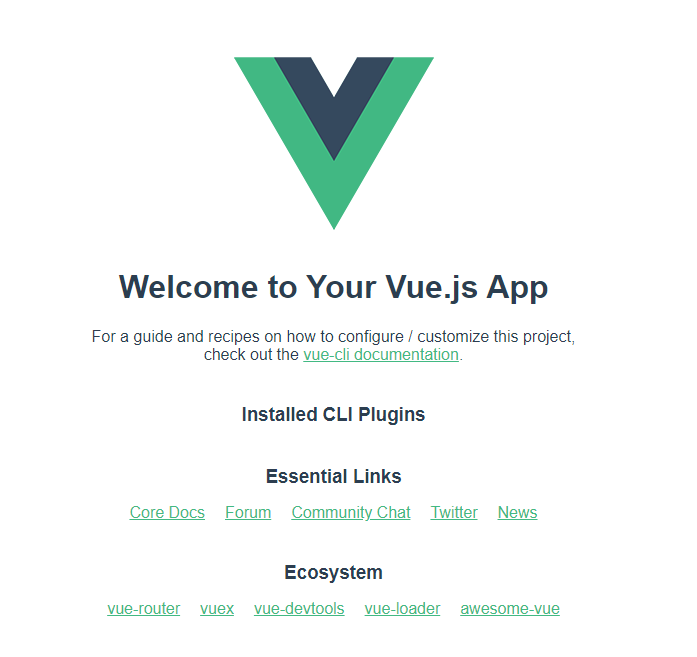
npm run serveOpen your browser and go to
http://localhost:8080.The default Vue application appears.
Congratulations! You've now created a Vue application by using Vue CLI.