Access SMB volumes from Microsoft Entra joined Windows virtual machines
You can use Microsoft Entra ID with the Hybrid Authentication Management module to authenticate credentials in your hybrid cloud. This solution enables Microsoft Entra ID to become the trusted source for both cloud and on-premises authentication, circumventing the need for clients connecting to Azure NetApp Files to join the on-premises AD domain.
Note
Using Microsoft Entra ID for authenticating hybrid user identities allows Microsoft Entra users to access Azure NetApp Files SMB shares. This means your end users can access Azure NetApp Files SMB shares without requiring a line-of-sight to domain controllers from Microsoft Entra hybrid joined and Microsoft Entra joined VMs. Cloud-only identities aren't currently supported. For more information, see Understand guidelines for Active Directory Domain Services site design and planning.

Requirements and considerations
Azure NetApp Files NFS volumes and dual-protocol (NFSv4.1 and SMB) volumes are not supported.
NFSv3 and SMB dual-protocol volumes with NTFS security style are supported.
You must have installed and configured Microsoft Entra Connect to synchronize your AD DS users with Microsoft Entra ID. For more information, see Get started with Microsoft Entra Connect by using express settings.
Verify the hybrid identities are synced with Microsoft Entra users. In the Azure portal under Microsoft Entra ID, navigate to Users. You should see that user accounts from AD DS are listed and the property, On-premises sync enabled shows "yes".
Note
After the initial configuration of Microsoft Entra Connect, when you add a new AD DS user, you must run the
Start-ADSyncSyncCyclecommand in the Administrator PowerShell to synchronize the new user to Microsoft Entra ID or wait for the scheduled sync to occur.You must have created an SMB volume for Azure NetApp Files.
You must have a Windows virtual machine (VM) with Microsoft Entra login enabled. For more information, see Log in to a Windows VM in Azure by using Microsoft Entra ID. Be sure to Configure role assignments for the VM to determine which accounts can log in to the VM.
DNS must be properly configured so the client VM can access your Azure NetApp Files volumes via the fully qualified domain name (FQDN).
Steps
The configuration process takes you through five process:
- Add the CIFS SPN to the computer account
- Register a new Microsoft Entra application
- Sync CIFS password from AD DS to the Microsoft Entra application registration
- Configure the Microsoft Entra joined VM to use Kerberos authentication
- Mount the Azure NetApp Files SMB volumes
Add the CIFS SPN to the computer account
- From your AD DS domain controller, open Active Directory Users and Computers.
- Under the View menu, select Advanced Features.
- Under Computers, right-click on the computer account created as part of the Azure NetApp Files volume then select Properties.
- Under Attribute Editor, locate
servicePrincipalName. In the Multi-valued string editor, add the CIFS SPN value using the CIFS/FQDN format.

Register a new Microsoft Entra application
- In the Azure portal, navigate to Microsoft Entra ID. Select App Registrations.
- Select + New registration.
- Assign a Name. Under select the Supported account type, choose Accounts in this organizational directory only (Single tenant).
- Select Register.

Configure the permissions for the application. From your App Registrations, select API Permissions then Add a permission.
Select Microsoft Graph then Delegated Permissions. Under Select Permissions, select openid and profile under OpenId permissions.

Select Add permission.
From API Permissions, select Grant admin consent for....

From Authentication, under App instance property lock, select Configure then deselect the checkbox labeled Enable property lock.

From Overview, make note of the Application (client) ID, which is required later.


Sync CIFS password from AD DS to the Microsoft Entra application registration
From your AD DS domain controller, open PowerShell.
Install the Hybrid Authentication Management module for synchronizing passwords.
Install-Module -Name AzureADHybridAuthenticationManagement -AllowClobber -ForceDefine the following variables:
$servicePrincipalName: The SPN details from mounting the Azure NetApp Files volume. Use the CIFS/FQDN format. For example:CIFS/NETBIOS-1234.CONTOSO.COM$targetApplicationID: Application (client) ID of the Microsoft Entra application.$domainCred: useGet-Credential(should be an AD DS domain administrator)$cloudCred: useGet-Credential(should be a Microsoft Entra Global Administrator)
$servicePrincipalName = CIFS/NETBIOS-1234.CONTOSO.COM
$targetApplicationID = 0c94fc72-c3e9-4e4e-9126-2c74b45e66fe
$domainCred = Get-Credential
$cloudCred = Get-Credential
Note
The
Get-Credentialcommand will initiate a pop-up Window where you can enter credentials.Import the CIFS details to Microsoft Entra ID:
Import-AzureADKerberosOnPremServicePrincipal -Domain $domain -DomainCredential $domainCred -CloudCredential $cloudCred -ServicePrincipalName $servicePrincipalName -ApplicationId $targetApplicationId
Configure the Microsoft Entra joined VM to use Kerberos authentication
Log in to the Microsoft Entra joined VM using hybrid credentials with administrative rights (for example: user@mydirectory.onmicrosoft.com).
Configure the VM:
- Navigate to Edit group policy > Computer Configuration > Administrative Templates > System > Kerberos.
- Enable Allow retrieving the Microsoft Entra Kerberos Ticket Granting Ticket during logon.
- Enable Define host name-to-Kerberos realm mappings. Select Show then provide a Value name and Value using your domain name preceded by a period. For example:
- Value name: KERBEROS.MICROSOFTONLINE.COM
- Value: .contoso.com


Mount the Azure NetApp Files SMB volumes
Log into to the Microsoft Entra joined VM using a hybrid identity account synced from AD DS.
Mount the Azure NetApp Files SMB volume using the info provided in the Azure portal. For more information, see Mount SMB volumes for Windows VMs.
Confirm the mounted volume is using Kerberos authentication and not NTLM authentication. Open a command prompt, issue the
klistcommand; observe the output in the cloud TGT (krbtgt) and CIFS server ticket information.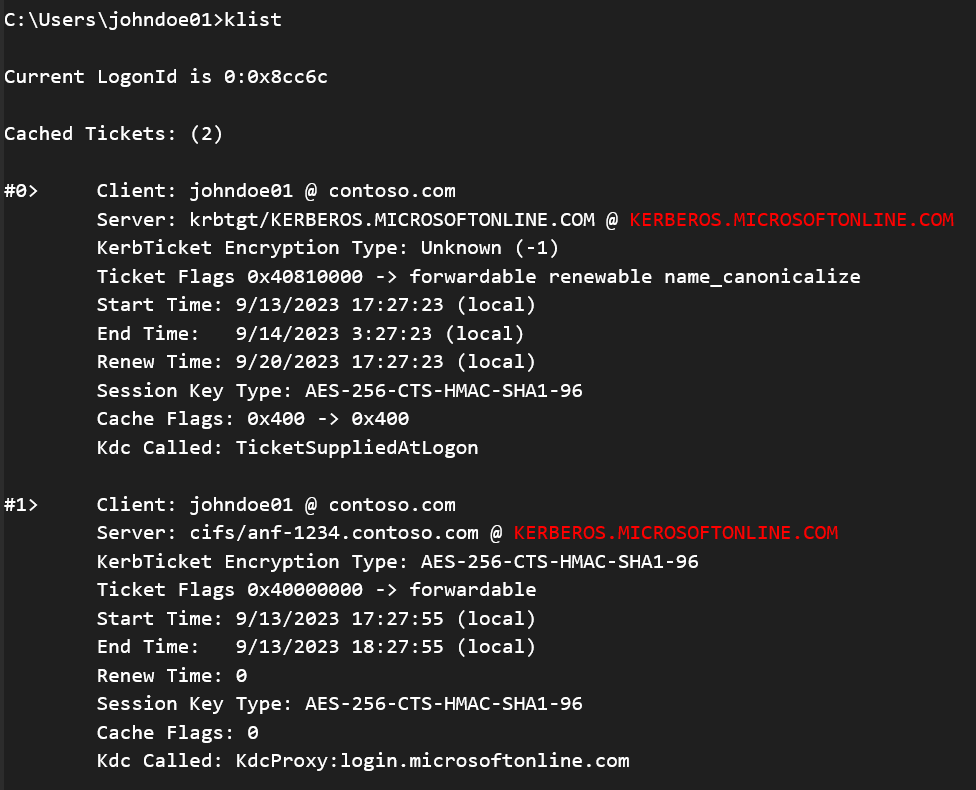

Further information
Tilbakemeldinger
Kommer snart: Gjennom 2024 faser vi ut GitHub Issues som tilbakemeldingsmekanisme for innhold, og erstatter det med et nytt system for tilbakemeldinger. Hvis du vil ha mer informasjon, kan du se: https://aka.ms/ContentUserFeedback.
Send inn og vis tilbakemelding for