Validate using an Avro schema when streaming events using Event Hubs .NET SDKs (AMQP)
In this quickstart, you learn how to send events to and receive events from an event hub with schema validation using the Azure.Messaging.EventHubs .NET library.
Note
Azure Schema Registry is a feature of Event Hubs, which provides a central repository for schemas for event-driven and messaging-centric applications. It provides the flexibility for your producer and consumer applications to exchange data without having to manage and share the schema. It also provides a simple governance framework for reusable schemas and defines relationship between schemas through a grouping construct (schema groups). For more information, see Azure Schema Registry in Event Hubs.
Prerequisites
If you're new to Azure Event Hubs, see Event Hubs overview before you do this quickstart.
To complete this quickstart, you need the following prerequisites:
- If you don't have an Azure subscription, create a free account before you begin.
- Microsoft Visual Studio 2022.
The Azure Event Hubs client library makes use of new features that were introduced in C# 8.0. You can still use the library with previous C# language versions, but the new syntax isn't available. To make use of the full syntax, we recommended that you compile with the .NET Core SDK 3.0 or higher and language version set to
latest. If you're using Visual Studio, versions before Visual Studio 2019 aren't compatible with the tools needed to build C# 8.0 projects. Visual Studio 2019, including the free Community edition, can be downloaded here.
Create an event hub
Follow instructions from the quickstart: Create an Event Hubs namespace and an event hub to create an Event Hubs namespace and an event hub. Then, follow instructions from Get the connection string to get a connection string to your Event Hubs namespace.
Note down the following settings that you'll use in the current quickstart:
- Connection string for the Event Hubs namespace
- Name of the event hub
Create a schema
Follow instructions from Create schemas using Schema Registry to create a schema group and a schema.
Create a schema group named contoso-sg using the Schema Registry portal. Use Avro as the serialization type and None for the compatibility mode.
In that schema group, create a new Avro schema with schema name:
Microsoft.Azure.Data.SchemaRegistry.example.Orderusing the following schema content.{ "namespace": "Microsoft.Azure.Data.SchemaRegistry.example", "type": "record", "name": "Order", "fields": [ { "name": "id", "type": "string" }, { "name": "amount", "type": "double" }, { "name": "description", "type": "string" } ] }
Add user to Schema Registry Reader role
Add your user account to the Schema Registry Reader role at the namespace level. You can also use the Schema Registry Contributor role, but that's not necessary for this quickstart.
- On the Event Hubs Namespace page, select Access control (IAM) on the left menu.
- On the Access control (IAM) page, select + Add -> Add role assignment on the menu.
- On the Assignment type page, select Next.
- On the Roles page, select Schema Registry Reader (Preview), and then select Next at the bottom of the page.
- Use the + Select members link to add your user account to the role, and then select Next.
- On the Review + assign page, select Review + assign.
Produce events to event hubs with schema validation
Create console application for event producer
- Start Visual Studio 2019.
- Select Create a new project.
- On the Create a new project dialog box, do the following steps: If you don't see this dialog box, select File on the menu, select New, and then select Project.
Select C# for the programming language.
Select Console for the type of the application.
Select Console Application from the results list.
Then, select Next.
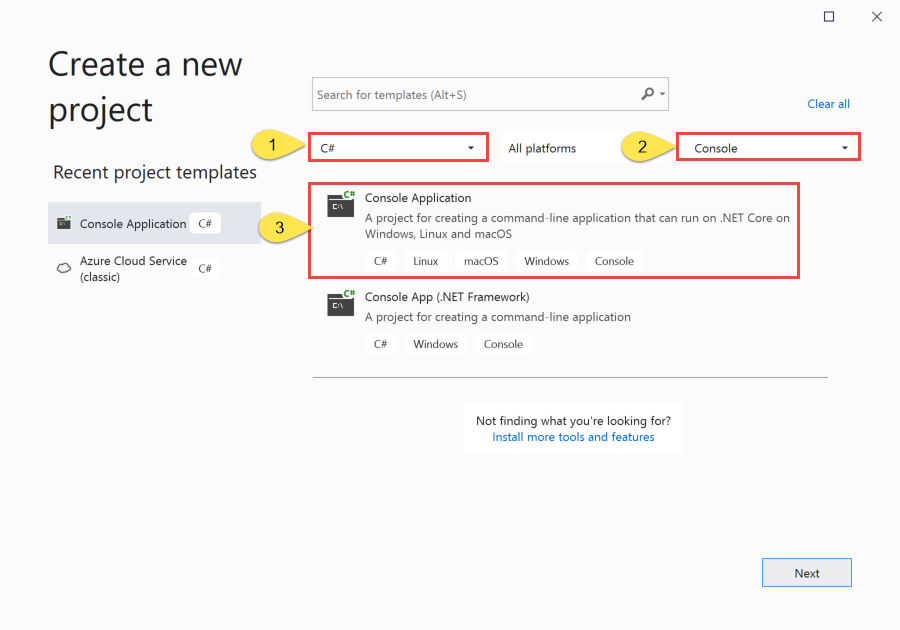
- Enter OrderProducer for the project name, SRQuickStart for the solution name, and then select OK to create the project.
Add the Event Hubs NuGet package
Select Tools > NuGet Package Manager > Package Manager Console from the menu.
Run the following commands to install Azure.Messaging.EventHubs and other NuGet packages. Press ENTER to run the last command.
Install-Package Azure.Messaging.EventHubs
Install-Package Azure.Identity
Install-Package Microsoft.Azure.Data.SchemaRegistry.ApacheAvro
Install-Package Azure.ResourceManager.Compute
Authenticate producer applications to connect to Azure via Visual Studio as shown here.
Sign-in to Azure using the user account that's a member of the
Schema Registry Readerrole at the namespace level. For information about schema registry roles, see Azure Schema Registry in Event Hubs.
Code generation using the Avro schema
- Use the same content you used to create the schema to create a file named
Order.avsc. Save the file in the project or solution folder. - Then you can use this schema file to generate code for .NET. You can use any external code generation tool such as avrogen for code generation. For example you can run
avrogen -s .\Order.avsc .to generate code. - Once you generate code, you'll see the file named
Order.csin the\Microsoft\Azure\Data\SchemaRegistry\examplefolder. For the above Avro schema, it generates the C# types inMicrosoft.Azure.Data.SchemaRegistry.examplenamespace. - Add the
Order.csfile to theOrderProducerproject.
Write code to serialize and send events to the event hub
Add the following code to the
Program.csfile. See the code comments for details. High-level steps in the code are:- Create a producer client that you can use to send events to an event hub.
- Create a schema registry client that you can use to serialize and validate data in an
Orderobject. - Create a new
Orderobject using the generatedOrdertype. - Use the schema registry client to serialize the
Orderobject toEventData. - Create a batch of events.
- Add the event data to the event batch.
- Use the producer client to send the batch of events to the event hub.
using Azure.Data.SchemaRegistry;
using Azure.Identity;
using Microsoft.Azure.Data.SchemaRegistry.ApacheAvro;
using Azure.Messaging.EventHubs;
using Azure.Messaging.EventHubs.Producer;

using Microsoft.Azure.Data.SchemaRegistry.example;

// connection string to the Event Hubs namespace
const string connectionString = "EVENTHUBSNAMESPACECONNECTIONSTRING";

// name of the event hub
const string eventHubName = "EVENTHUBNAME";

// Schema Registry endpoint
const string schemaRegistryEndpoint = "EVENTHUBSNAMESPACENAME.servicebus.windows.net";

// name of the consumer group
const string schemaGroup = "SCHEMAGROUPNAME";

// The Event Hubs client types are safe to cache and use as a singleton for the lifetime
// of the application, which is best practice when events are being published or read regularly.
EventHubProducerClient producerClient;

// Create a producer client that you can use to send events to an event hub
producerClient = new EventHubProducerClient(connectionString, eventHubName);

// Create a schema registry client that you can use to serialize and validate data.
var schemaRegistryClient = new SchemaRegistryClient(schemaRegistryEndpoint, new DefaultAzureCredential());

// Create an Avro object serializer using the Schema Registry client object.
var serializer = new SchemaRegistryAvroSerializer(schemaRegistryClient, schemaGroup, new SchemaRegistryAvroSerializerOptions { AutoRegisterSchemas = true });

// Create a new order object using the generated type/class 'Order'.
var sampleOrder = new Order { id = "1234", amount = 45.29, description = "First sample order." };
EventData eventData = (EventData)await serializer.SerializeAsync(sampleOrder, messageType: typeof(EventData));

// Create a batch of events
using EventDataBatch eventBatch = await producerClient.CreateBatchAsync();

// Add the event data to the event batch.
eventBatch.TryAdd(eventData);

// Send the batch of events to the event hub.
await producerClient.SendAsync(eventBatch);
Console.WriteLine("A batch of 1 order has been published.");
Replace the following placeholder values with the real values.
EVENTHUBSNAMESPACECONNECTIONSTRING- connection string for the Event Hubs namespaceEVENTHUBNAME- name of the event hubEVENTHUBSNAMESPACENAME- name of the Event Hubs namespaceSCHEMAGROUPNAME- name of the schema group
// connection string to the Event Hubs namespace
const string connectionString = "EVENTHUBSNAMESPACECONNECTIONSTRING";

// name of the event hub
const string eventHubName = "EVENTHUBNAME";

// Schema Registry endpoint
const string schemaRegistryEndpoint = "EVENTHUBSNAMESPACENAME.servicebus.windows.net";

// name of the consumer group
const string schemaGroup = "SCHEMAGROUPNAME";
Build the project, and ensure that there are no errors.
Run the program and wait for the confirmation message.
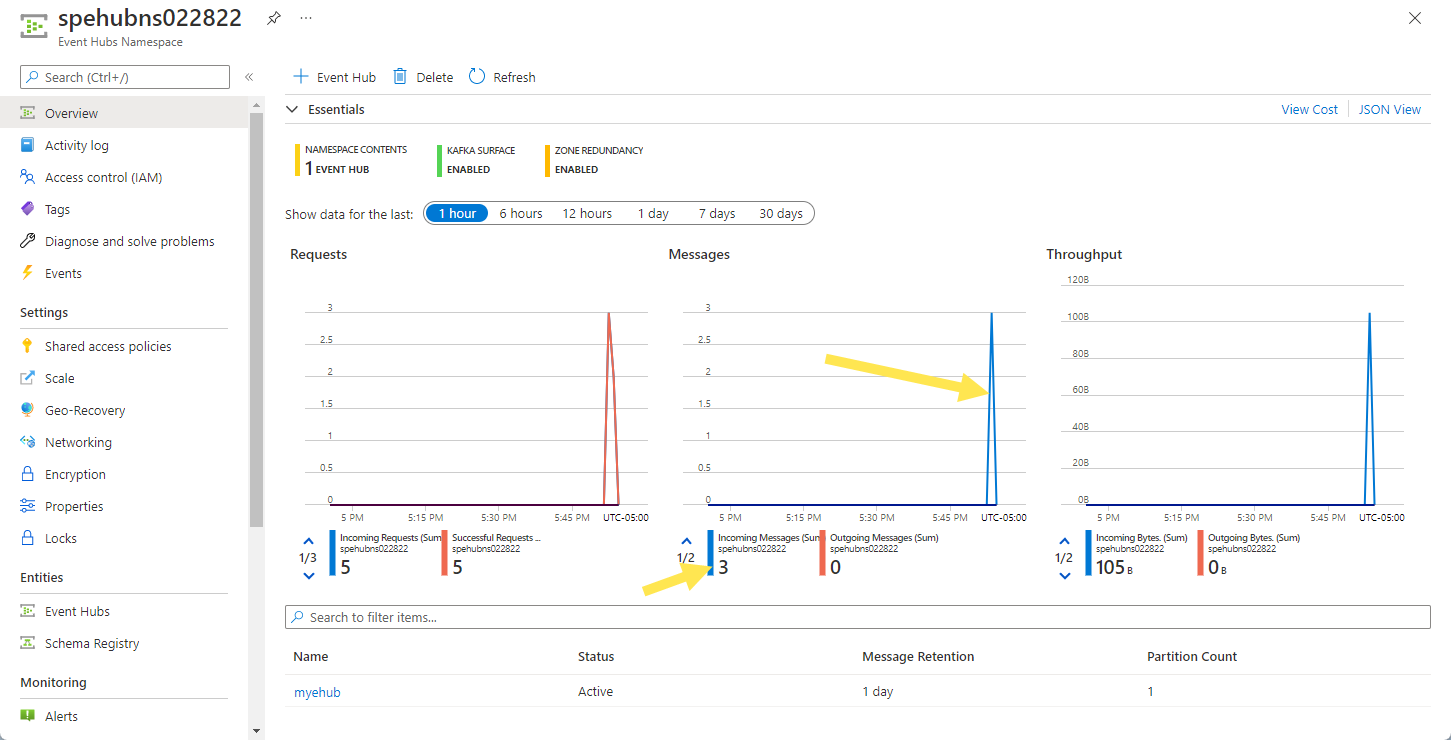
A batch of 1 order has been published.In the Azure portal, you can verify that the event hub has received the events. Switch to Messages view in the Metrics section. Refresh the page to update the chart. It may take a few seconds for it to show that the messages have been received.

Consume events from event hubs with schema validation
This section shows how to write a .NET Core console application that receives events from an event hub and use schema registry to deserialize event data.
Additional prerequisites
- Create the storage account to be used the event processor.
Create consumer application
- In the Solution Explorer window, right-click the SRQuickStart solution, point to Add, and select New Project.
- Select Console application, and select Next.
- Enter OrderConsumer for the Project name, and select Create.
- In the Solution Explorer window, right-click OrderConsumer, and select Set as a Startup Project.
Add the Event Hubs NuGet package
Select Tools > NuGet Package Manager > Package Manager Console from the menu.
In the Package Manager Console window, confirm that OrderConsumer is selected for the Default project. If not, use the drop-down list to select OrderConsumer.
Run the following command to install the required NuGet packages. Press ENTER to run the last command.
Install-Package Azure.Messaging.EventHubs
Install-Package Azure.Messaging.EventHubs.Processor
Install-Package Azure.Identity
Install-Package Microsoft.Azure.Data.SchemaRegistry.ApacheAvro
Install-Package Azure.ResourceManager.Compute
Authenticate producer applications to connect to Azure via Visual Studio as shown here.
Sign-in to Azure using the user account that's a member of the
Schema Registry Readerrole at the namespace level. For information about schema registry roles, see Azure Schema Registry in Event Hubs.Add the
Order.csfile you generated as part of creating the producer app to the OrderConsumer project.Right-click OrderConsumer project, and select Set as Startup project.
Write code to receive events and deserialize them using Schema Registry
Add the following code to the
Program.csfile. See the code comments for details. High-level steps in the code are:- Create a consumer client that you can use to send events to an event hub.
- Create a blob container client for the blob container in the Azure blob storage.
- Create an event processor client and register event and error handlers.
- In the event handler, create a schema registry client that you can use to deserialize event data into an
Orderobject. - Deserialize the event data into an
Orderobject using the serializer. - Print the information about the received order.
using Azure.Data.SchemaRegistry;
using Azure.Identity;
using Microsoft.Azure.Data.SchemaRegistry.ApacheAvro;
using Azure.Storage.Blobs;
using Azure.Messaging.EventHubs;
using Azure.Messaging.EventHubs.Consumer;
using Azure.Messaging.EventHubs.Processor;

using Microsoft.Azure.Data.SchemaRegistry.example;


// connection string to the Event Hubs namespace
const string connectionString = "EVENTHUBSNAMESPACECONNECTIONSTRING";

// name of the event hub
const string eventHubName = "EVENTHUBNAME";

// Schema Registry endpoint
const string schemaRegistryEndpoint = "EVENTHUBSNAMESPACENAME.servicebus.windows.net";

// name of the consumer group
const string schemaGroup = "SCHEMAGROUPNAME";

// connection string for the Azure Storage account
const string blobStorageConnectionString = "AZURESTORAGECONNECTIONSTRING";

// name of the blob container that will be userd as a checkpoint store
const string blobContainerName = "BLOBCONTAINERNAME";

// Create a blob container client that the event processor will use
BlobContainerClient storageClient = new BlobContainerClient(blobStorageConnectionString, blobContainerName);

// Create an event processor client to process events in the event hub
EventProcessorClient processor = new EventProcessorClient(storageClient, EventHubConsumerClient.DefaultConsumerGroupName, connectionString, eventHubName);

// Register handlers for processing events and handling errors
processor.ProcessEventAsync += ProcessEventHandler;
processor.ProcessErrorAsync += ProcessErrorHandler;

// Start the processing
await processor.StartProcessingAsync();

// Wait for 30 seconds for the events to be processed
await Task.Delay(TimeSpan.FromSeconds(30));

// Stop the processing
await processor.StopProcessingAsync();

static async Task ProcessEventHandler(ProcessEventArgs eventArgs)
{
    // Create a schema registry client that you can use to serialize and validate data.
    var schemaRegistryClient = new SchemaRegistryClient(schemaRegistryEndpoint, new DefaultAzureCredential());

    // Create an Avro object serializer using the Schema Registry client object.
    var serializer = new SchemaRegistryAvroSerializer(schemaRegistryClient, schemaGroup, new SchemaRegistryAvroSerializerOptions { AutoRegisterSchemas = true });

    // Deserialized data in the received event using the schema
    Order sampleOrder = (Order)await serializer.DeserializeAsync(eventArgs.Data, typeof(Order));

    // Print the received event
    Console.WriteLine($"Received order with ID: {sampleOrder.id}, amount: {sampleOrder.amount}, description: {sampleOrder.description}");

       await eventArgs.UpdateCheckpointAsync(eventArgs.CancellationToken);
    }

    static Task ProcessErrorHandler(ProcessErrorEventArgs eventArgs)
{
    // Write details about the error to the console window
    Console.WriteLine($"\tPartition '{eventArgs.PartitionId}': an unhandled exception was encountered. This was not expected to happen.");
    Console.WriteLine(eventArgs.Exception.Message);
    return Task.CompletedTask;
}
Replace the following placeholder values with the real values.
EVENTHUBSNAMESPACE-CONNECTIONSTRING- connection string for the Event Hubs namespaceEVENTHUBNAME- name of the event hubEVENTHUBSNAMESPACENAME- name of the Event Hubs namespaceSCHEMAGROUPNAME- name of the schema groupAZURESTORAGECONNECTIONSTRING- connection string for the Azure storage accountBLOBCONTAINERNAME- Name of the blob container
// connection string to the Event Hubs namespace
const string connectionString = "EVENTHUBSNAMESPACE-CONNECTIONSTRING";

// name of the event hub
const string eventHubName = "EVENTHUBNAME";

// Schema Registry endpoint
const string schemaRegistryEndpoint = "EVENTHUBSNAMESPACENAME.servicebus.windows.net";

// name of the consumer group
const string schemaGroup = "SCHEMAGROUPNAME";

// Azure storage connection string
const string blobStorageConnectionString = "AZURESTORAGECONNECTIONSTRING";

// Azure blob container name
const string blobContainerName = "BLOBCONTAINERNAME";
Build the project, and ensure that there are no errors.
Run the receiver application.
You should see a message that the events have been received.
Received order with ID: 1234, amount: 45.29, description: First sample order.These events are the three events you sent to the event hub earlier by running the sender program.
Samples
See the Readme article in our GitHub repository.
Clean up resources
Delete the Event Hubs namespace or delete the resource group that contains the namespace.
Next steps
Tilbakemeldinger
Kommer snart: Gjennom 2024 faser vi ut GitHub Issues som tilbakemeldingsmekanisme for innhold, og erstatter det med et nytt system for tilbakemeldinger. Hvis du vil ha mer informasjon, kan du se: https://aka.ms/ContentUserFeedback.
Send inn og vis tilbakemelding for