Protect your Kubernetes data plane hardening
This page describes how to use Microsoft Defender for Cloud's set of security recommendations dedicated to Kubernetes data plane hardening.
Tip
For a list of the security recommendations that might appear for Kubernetes clusters and nodes, see the Container recommendations section of the recommendations reference table.
Set up your workload protection
Microsoft Defender for Cloud includes a bundle of recommendations that are available once you've installed the Azure Policy for Kubernetes.
Prerequisites
- Add the Required FQDN/application rules for Azure policy.
- (For non AKS clusters) Connect an existing Kubernetes cluster to Azure Arc.
Enable Kubernetes data plane hardening
You can enable the Azure Policy for Kubernetes by one of two ways:
- Enable for all current and future clusters using plan/connector settings
- Deploy Azure Policy for Kubernetes on existing clusters
Enable Azure Policy for Kubernetes for all current and future clusters using plan/connector settings
Note
When you enable this setting, the Azure Policy for Kubernetes pods are installed on the cluster. Doing so allocates a small amount of CPU and memory for the pods to use. This allocation might reach maximum capacity, but it doesn't affect the rest of the CPU and memory on the resource.
Note
Enablement for AWS via the connector is not supported due to a limitation in EKS that requires the cluster admin to add permissions for a new IAM role on the cluster itself.
Enabling for Azure subscriptions or on-premises
When you enable Microsoft Defender for Containers, the "Azure Policy for Kubernetes" setting is enabled by default for the Azure Kubernetes Service, and for Azure Arc-enabled Kubernetes clusters in the relevant subscription. If you disable the setting on initial configuration, you can enable it afterwards manually.
If you disabled the "Azure Policy for Kubernetes" settings under the containers plan, you can follow the below steps to enable it across all clusters in your subscription:
Sign in to the Azure portal.
Navigate to Microsoft Defender for Cloud > Environment settings.
Select the relevant subscription.
On the Defender plans page, ensure that Containers is toggled to On.
Select Settings.

In the Settings & Monitoring page, toggle the "Azure Policy for Kubernetes" to On.


Enabling for GCP projects
When you enable Microsoft Defender for Containers on a GCP connector, the "Azure Policy Extension for Azure Arc" setting is enabled by default for the Google Kubernetes Engine in the relevant project. If you disable the setting on initial configuration, you can enable it afterwards manually.
If you disabled the "Azure Policy Extension for Azure Arc" settings under the GCP connector, you can follow the below steps to enable it on your GCP connector.
Deploy Azure Policy for Kubernetes on existing clusters
You can manually configure the Azure Policy for Kubernetes on existing Kubernetes clusters through the Recommendations page. Once enabled, the hardening recommendations become available (some of the recommendations require another configuration to work).
Note
For AWS it isn't possible to do onboarding at scale using the connector, but it can be installed on all existing clusters or on specific clusters using the recommendation Azure Arc-enabled Kubernetes clusters should have the Azure policy extension for Kubernetes extension installed.
To deploy the Azure Policy for Kubernetes to specified clusters:
From the recommendations page, search for the relevant recommendation:
Azure -
"Azure Kubernetes Service clusters should have the Azure Policy add-on for Kubernetes installed"GCP -
"GKE clusters should have the Azure Policy extension".AWS and On-premises -
"Azure Arc-enabled Kubernetes clusters should have the Azure policy extension for Kubernetes extension installed".
Tip
The recommendation is included in different security controls, and it doesn't matter which one you select in the next step.
From any of the security controls, select the recommendation to see the resources on which you can install the add-on.
Select the relevant cluster, and select Remediate.


View and configure the bundle of recommendations
Approximately 30 minutes after the Azure Policy for Kubernetes installation completes, Defender for Cloud shows the clusters’ health status for the following recommendations, each in the relevant security control as shown:
Note
If you're installing the Azure Policy for Kubernetes for the first time, these recommendations will appear as new additions in the list of recommendations.
Tip
Some recommendations have parameters that must be customized via Azure Policy to use them effectively. For example, to benefit from the recommendation Container images should be deployed only from trusted registries, you'll have to define your trusted registries. If you don't enter the necessary parameters for the recommendations that require configuration, your workloads will be shown as unhealthy.
| Recommendation name | Security Control | Configuration required |
|---|---|---|
| Container CPU and memory limits should be enforced | Protect applications against DDoS attack | Yes |
| Container images should be deployed only from trusted registries | Remediate vulnerabilities | Yes |
| Least privileged Linux capabilities should be enforced for containers | Manage access and permissions | Yes |
| Containers should only use allowed AppArmor profiles | Remediate security configurations | Yes |
| Services should listen on allowed ports only | Restrict unauthorized network access | Yes |
| Usage of host networking and ports should be restricted | Restrict unauthorized network access | Yes |
| Usage of pod HostPath volume mounts should be restricted to a known list | Manage access and permissions | Yes |
| Container with privilege escalation should be avoided | Manage access and permissions | No |
| Containers sharing sensitive host namespaces should be avoided | Manage access and permissions | No |
| Immutable (read-only) root filesystem should be enforced for containers | Manage access and permissions | No |
| Kubernetes clusters should be accessible only over HTTPS | Encrypt data in transit | No |
| Kubernetes clusters should disable automounting API credentials | Manage access and permissions | No |
| Kubernetes clusters should not use the default namespace | Implement security best practices | No |
| Kubernetes clusters should not grant CAPSYSADMIN security capabilities | Manage access and permissions | No |
| Privileged containers should be avoided | Manage access and permissions | No |
| Running containers as root user should be avoided | Manage access and permissions | No |
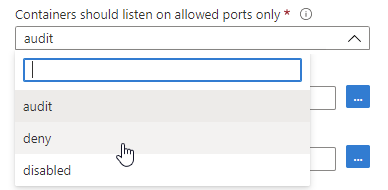
For recommendations with parameters that need to be customized, you need to set the parameters:
To set the parameters:
Sign in to the Azure portal.
Navigate to Microsoft Defender for Cloud > Environment settings.
Select the relevant subscription.
From Defender for Cloud's menu, select Security policy.
Select the relevant assignment. The default assignment is
ASC default.Open the Parameters tab and modify the values as required.
Select Review + save.
Select Save.

To enforce any of the recommendations:
Open the recommendation details page and select Deny:

The pane to set the scope opens.
Set the scope and select Change to deny.

To see which recommendations apply to your clusters:
Open Defender for Cloud's asset inventory page and set the resource type filter to Kubernetes services.
Select a cluster to investigate and review the available recommendations available for it.
When you view a recommendation from the workload protection set, the number of affected pods ("Kubernetes components") is listed alongside the cluster. For a list of the specific pods, select the cluster and then select Take action.

To test the enforcement, use the two Kubernetes deployments below:
One is for a healthy deployment, compliant with the bundle of workload protection recommendations.
The other is for an unhealthy deployment, noncompliant with any of the recommendations.
Deploy the example .yaml files as-is, or use them as a reference to remediate your own workload.
Healthy deployment example .yaml file
apiVersion: apps/v1
kind: Deployment
metadata:
  name: redis-healthy-deployment
  labels:
    app: redis
spec:
  replicas: 3
  selector:
    matchLabels:
      app: redis
  template:
    metadata:
      labels:
        app: redis
      annotations:
        container.apparmor.security.beta.kubernetes.io/redis: runtime/default
    spec:
      containers:
      - name: redis
        image: <customer-registry>.azurecr.io/redis:latest
        ports:
        - containerPort: 80
        resources:
          limits:
            cpu: 100m
            memory: 250Mi
        securityContext:
          privileged: false
          readOnlyRootFilesystem: true
          allowPrivilegeEscalation: false
          runAsNonRoot: true
          runAsUser: 1000
---
apiVersion: v1
kind: Service
metadata:
  name: redis-healthy-service
spec:
  type: LoadBalancer
  selector:
    app: redis
  ports:
  - port: 80
    targetPort: 80
Unhealthy deployment example .yaml file
apiVersion: apps/v1
kind: Deployment
metadata:
  name: redis-unhealthy-deployment
  labels:
    app: redis
spec:
  replicas: 3
  selector:
    matchLabels:
      app: redis
  template:
    metadata:
      labels:
        app: redis
    spec:
      hostNetwork: true
      hostPID: true
      hostIPC: true
      containers:
      - name: redis
        image: redis:latest
        ports:
        - containerPort: 9001
          hostPort: 9001
        securityContext:
          privileged: true
          readOnlyRootFilesystem: false
          allowPrivilegeEscalation: true
          runAsUser: 0
          capabilities:
            add:
              - NET_ADMIN
        volumeMounts:
        - mountPath: /test-pd
          name: test-volume
          readOnly: true
      volumes:
      - name: test-volume
        hostPath:
          # directory location on host
          path: /tmp
---
apiVersion: v1
kind: Service
metadata:
  name: redis-unhealthy-service
spec:
  type: LoadBalancer
  selector:
    app: redis
  ports:
  - port: 6001
    targetPort: 9001
Next steps
In this article, you learned how to configure Kubernetes data plane hardening.
For related material, see the following pages:
Tilbakemeldinger
Kommer snart: Gjennom 2024 faser vi ut GitHub Issues som tilbakemeldingsmekanisme for innhold, og erstatter det med et nytt system for tilbakemeldinger. Hvis du vil ha mer informasjon, kan du se: https://aka.ms/ContentUserFeedback.
Send inn og vis tilbakemelding for