6. Packaging & deploying to device or emulator
In the previous tutorial, you added a simple button that resets the chess piece to its original position. In this final section, you'll get the app ready to run on a HoloLens 2 or an Emulator. If you have a HoloLens 2, you can either stream from your computer or package the app to run directly on the device. If you don't have a device, you'll be packaging the app to run on the Emulator. By the end of this section, you'll have a deployed mixed reality app that you can play, complete with interactions and UI.
Objectives
- [Device only] Streaming to HoloLens 2 with holographic app remoting
- Packaging and deploying the app to a HoloLens 2 device or emulator
[Device Only] Streaming
Holographic Remoting means streaming data from a PC or standalone UWP device to the HoloLens 2, not switching the channel. A remoting host app receives an input data stream from a HoloLens, renders content in a virtual immersive view, and streams content frames back to HoloLens over Wi-Fi. Streaming lets you add remote immersive views into existing desktop PC software and has access to more system resources.
If you're going this route with the chess app, you'll need a few things:
- Install the Holographic Remoting Player from the Microsoft Store on your HoloLens 2 and run the app. Note your IP address displayed in the app.
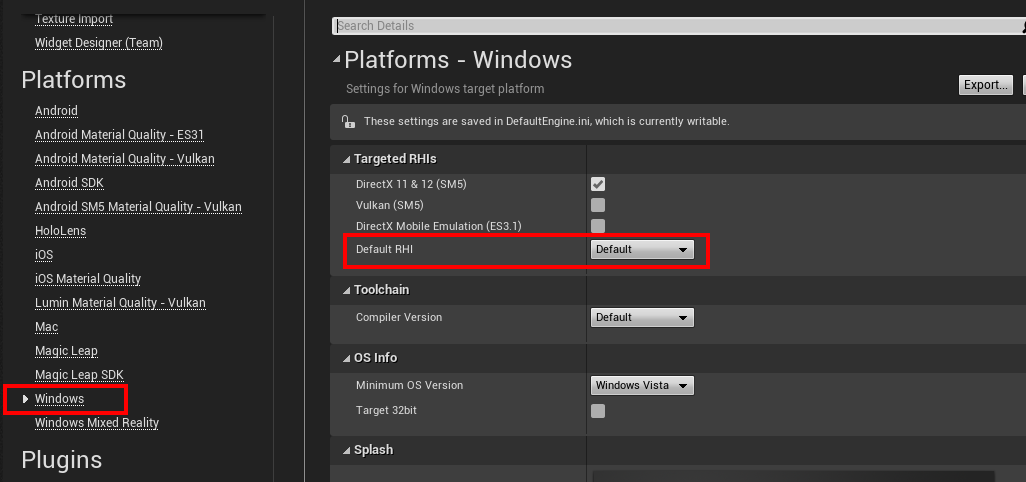
- Go to Edit > Project Settings and sure the Windows Default RHI is set to Default or D3D11:
Back in the Unreal editor, go to Edit > Project Settings and check Enable Remoting in the Open XR Holographic Remoting section.
Restart the editor, then enter your device's IP address (as displayed in the Holographic Remoting Player app), then click Connect.
Once you’re connected, click the drop-down arrow to the right of the Play button and select VR Preview. The app will run in the VR Preview window, which is streamed to the HoloLens headset.
Packaging and deploying the app via device portal
Note
If this is your first time packaging an Unreal app for HoloLens, you'll need to download supporting files from the Epic Launcher.
- Go to Editor Preferences > General > Source Code > Source Code Editor and check that Visual Studio 2019 is selected.
- Go to the Library tab in the Epic Games Launcher, select the dropdown arrow next to Launch >and click Options.
- Under Target Platforms, select HoloLens 2 and click Apply.

- Go to Edit > Project Settings.
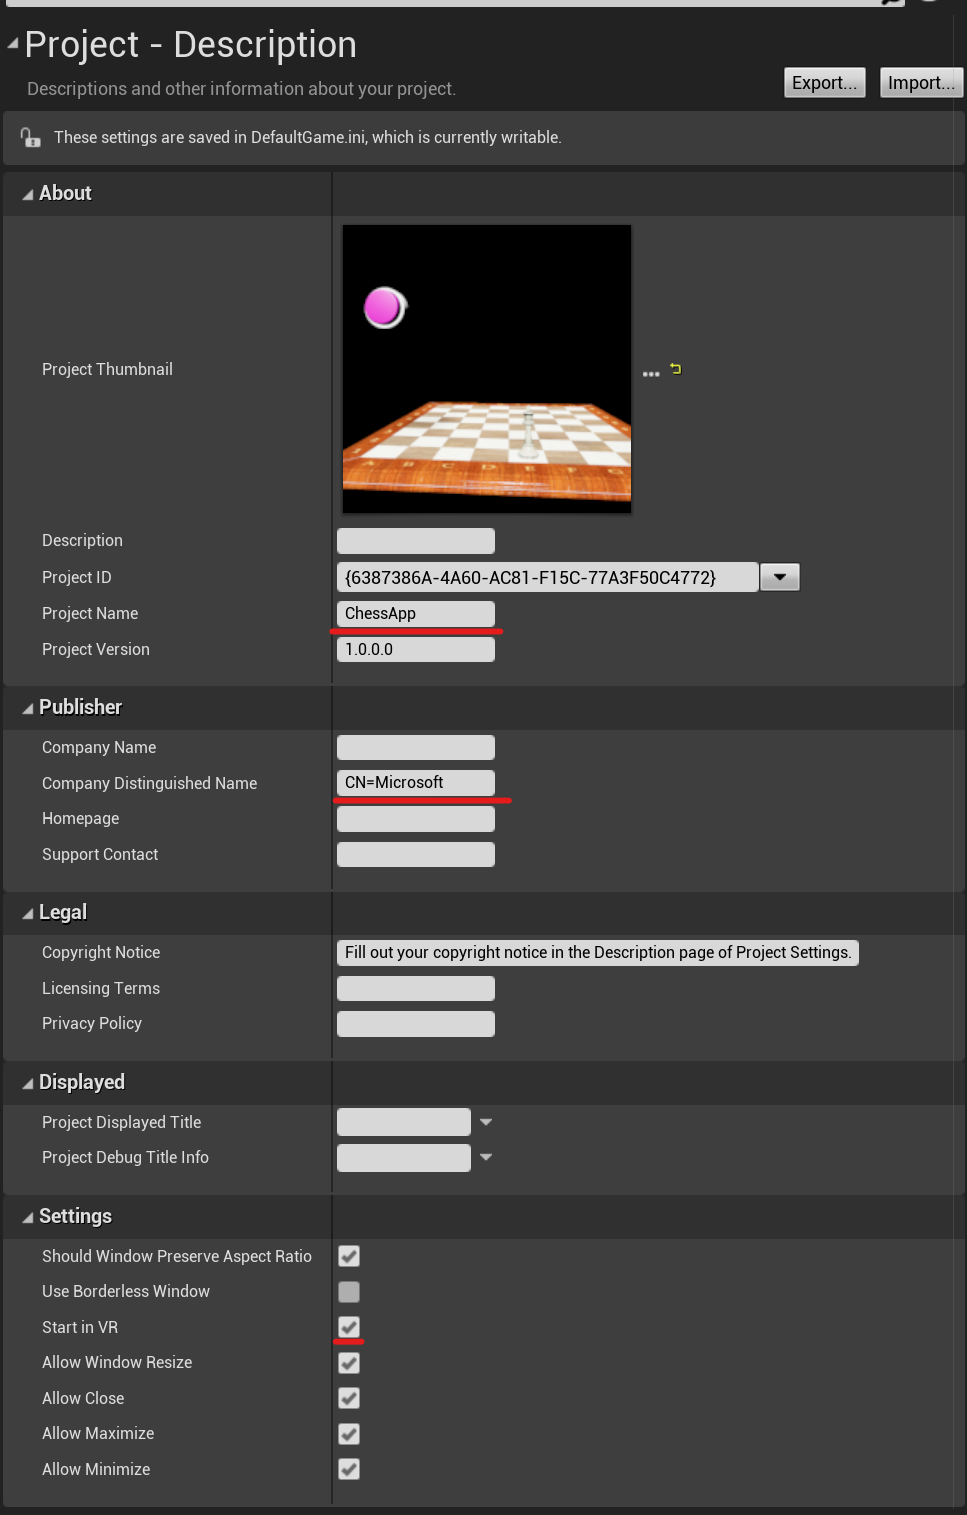
- Add a project name under Project > Description > About > Project Name.
- Add CN=YourCompanyName under Project > Description > Publisher > Company Distinguished Name.
- Select Start in VR under Project > Description > Settings.
Important
Leaving either of these fields blank will result in an error when you try and generate a new certificate in step 3.
Important
The publisher's name must be in LADPv3 Distinguished Names Format. A malformed publisher's name leads to the "Signing key not found. The app could not be digitally signed." error upon packaging.
Important
Not selecting "Start in VR" will lead your application trying to start in a slate
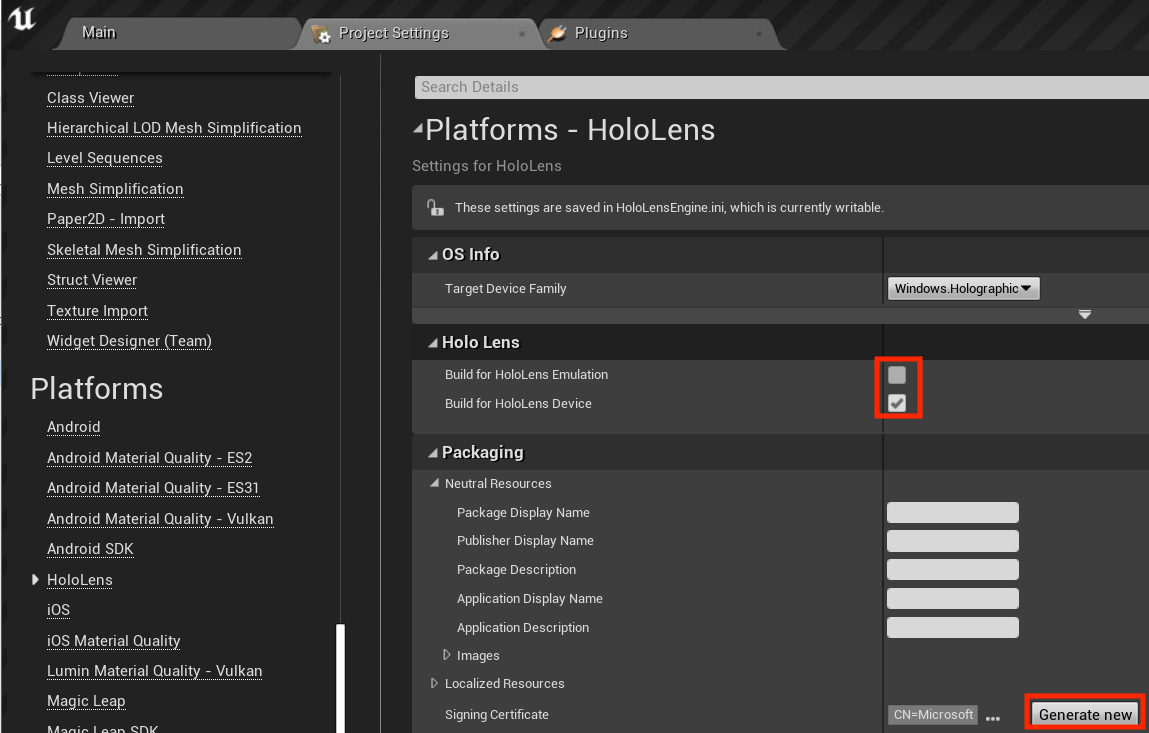
Enable Build for HoloLens Emulation and/or Build for HoloLens Device under Platforms > HoloLens.
Click Generate new in the Packaging section (next to Signing Certificate).
Important
If you're using an already generated certificate, then the certificate's publisher name must be the same as the application's publisher name. Otherwise it leads to the "Signing key not found. The app could not be digitally signed." error.
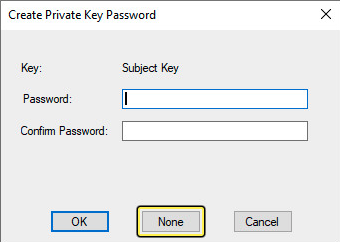
- Click None for testing purposes when you're prompted to create a Private Key Password.
Go to File > Package Project and select HoloLens.
- Create a new folder to save your package in and click Select Folder.
Open the Windows Device Portal once the app is packaged, go to Views > Apps and find the Deploy apps section.
Click Browse..., go to your ChessApp.appxbundle file and click Open.
- Check the box next to Allow me to select framework packages if you're installing the app on your device for the first time.
- In the next dialogue, include the appropriate VCLibs and appx files, arm64 for device and x64 for emulator. You can find the files under HoloLens inside the folder where you saved your package.
Click Install
- You can now go to All Apps and tap the newly installed app to run it, or start the app directly from the Windows Device Portal.
Congratulations! Your HoloLens mixed reality application is finished and ready to go. However, you're not at the end of the road. MRTK has lots of standalone features that you can add to your projects, including spatial mapping, gaze and voice input, and even QR codes. More information on these features can be found in the Unreal development overview.
Next Development Checkpoint
If you're following the Unreal development journey we've laid out, you're in the midst of exploring the MRTK core building blocks. From here, you can continue to the next building block:
Or jump to Mixed Reality platform capabilities and APIs:
You can always go back to the Unreal development checkpoints at any time.
Tilbakemeldinger
Kommer snart: Gjennom 2024 faser vi ut GitHub Issues som tilbakemeldingsmekanisme for innhold, og erstatter det med et nytt system for tilbakemeldinger. Hvis du vil ha mer informasjon, kan du se: https://aka.ms/ContentUserFeedback.
Send inn og vis tilbakemelding for