How to: Develop a WCF data service running on IIS
Important
WCF Data Services has been deprecated and will no longer be available for download from the Microsoft Download Center. WCF Data Services supported earlier versions of the Microsoft OData (V1-V3) protocol only and has not been under active development. OData V1-V3 has been superseded by OData V4, which is an industry standard published by OASIS and ratified by ISO. OData V4 is supported through the OData V4 compliant core libraries available at Microsoft.OData.Core. Support documentation is available at OData.Net, and the OData V4 service libraries are available at Microsoft.AspNetCore.OData.
RESTier is the successor to WCF Data Services. RESTier helps you bootstrap a standardized, queryable, HTTP-based REST interface in minutes. Like WCF Data Services before it, Restier provides simple and straightforward ways to shape queries and intercept submissions before and after they hit the database. And like Web API + OData, you still have the flexibility to add your own custom queries and actions with techniques you're already familiar with.
This article shows how to use WCF Data Services to create a data service that's based on the Northwind sample database that's hosted by an ASP.NET Web app running on Internet Information Services (IIS). For an example of how to create the same Northwind data service as an ASP.NET Web app that runs on the ASP.NET Development Server, see the WCF Data Services quickstart.
Note
To create the Northwind data service, first install the Northwind sample database on the local computer. To install the database, run the Transact-SQL script from Northwind and pubs sample databases for Microsoft SQL Server.
This article shows how to create a data service by using the Entity Framework provider. Other data services providers are available. For more information, see Data Services Providers.
After you create the service, you must explicitly provide access to data service resources. For more information, see How to: Enable Access to the Data Service.
Create the ASP.NET web application that runs on IIS
In Visual Studio, on the File menu, select New > Project.
In the New Project dialog box, select the Installed > [Visual C# or Visual Basic] > Web category.
Select the ASP.NET Web Application template.
Enter
NorthwindServiceas the name of the project.Click OK.
On the Project menu, select NorthwindService Properties.
Select the Web tab, and then select Use Local IIS Web Server.
Click Create Virtual Directory and then click OK.
From the command prompt with administrator privileges, execute one of the following commands (depending on the operating system):
32-bit systems:
"%windir%\Microsoft.NET\Framework\v3.0\Windows Communication Foundation\ServiceModelReg.exe" -i64-bit systems:
"%windir%\Microsoft.NET\Framework64\v3.0\Windows Communication Foundation\ServiceModelReg.exe" -i
This makes sure that Windows Communication Foundation (WCF) is registered on the computer.
From the command prompt with administrator privileges, execute one of the following commands (depending on the operating system):
32-bit systems:
"%windir%\Microsoft.NET\Framework\v4.0.30319\aspnet_regiis.exe" -i -enable64-bit systems:
"%windir%\Microsoft.NET\Framework64\v4.0.30319\aspnet_regiis.exe" -i -enable
This makes sure that IIS runs correctly after WCF has been installed on the computer. You might have to also restart IIS.
When the ASP.NET application runs on IIS7, you must also perform the following steps:
Open IIS Manager and navigate to the PhotoService application under Default Web Site.
In Features View, double-click Authentication.
On the Authentication page, select Anonymous Authentication.
In the Actions pane, click Edit to set the security principal under which anonymous users will connect to the site.
In the Edit Anonymous Authentication Credentials dialog box, select Application pool identity.
Important
When you use the Network Service account, you grant anonymous users all the internal network access associated with that account.
By using SQL Server Management Studio, the sqlcmd.exe utility, or the Transact-SQL Editor in Visual Studio, execute the following Transact-SQL command against the instance of SQL Server that has the Northwind database attached:
CREATE LOGIN [NT AUTHORITY\NETWORK SERVICE] FROM WINDOWS;
GO
This creates a login in the SQL Server instance for the Windows account used to run IIS. This enables IIS to connect to the SQL Server instance.
With the Northwind database attached, execute the following Transact-SQL commands:
USE Northwind
GO
CREATE USER [NT AUTHORITY\NETWORK SERVICE]
FOR LOGIN [NT AUTHORITY\NETWORK SERVICE] WITH DEFAULT_SCHEMA=[dbo];
GO
ALTER LOGIN [NT AUTHORITY\NETWORK SERVICE]
WITH DEFAULT_DATABASE=[Northwind];
GO
EXEC sp_addrolemember 'db_datareader', 'NT AUTHORITY\NETWORK SERVICE'
GO
EXEC sp_addrolemember 'db_datawriter', 'NT AUTHORITY\NETWORK SERVICE'
GO
This grants rights to the new login, which enables IIS to read data from and write data to the Northwind database.
Define the data model
In Solution Explorer, right-click the name of the ASP.NET project, and then click Add > New Item.
In the Add New Item dialog box, select ADO.NET Entity Data Model.
For the name of the data model, type
Northwind.edmx.In the Entity Data Model Wizard, select Generate from Database, and then click Next.
Connect the data model to the database by doing one of the following steps, and then click Next:
If you do not have a database connection already configured, click New Connection and create a new connection. For more information, see How to: Create Connections to SQL Server Databases. This SQL Server instance must have the Northwind sample database attached.
- or -
If you have a database connection already configured to connect to the Northwind database, select that connection from the list of connections.
On the final page of the wizard, select the check boxes for all tables in the database, and clear the check boxes for views and stored procedures.
Click Finish to close the wizard.
Create the data service
In Solution Explorer, right-click the name of your ASP.NET project, and then click Add > New Item.
In the Add New Item dialog box, select WCF Data Service.
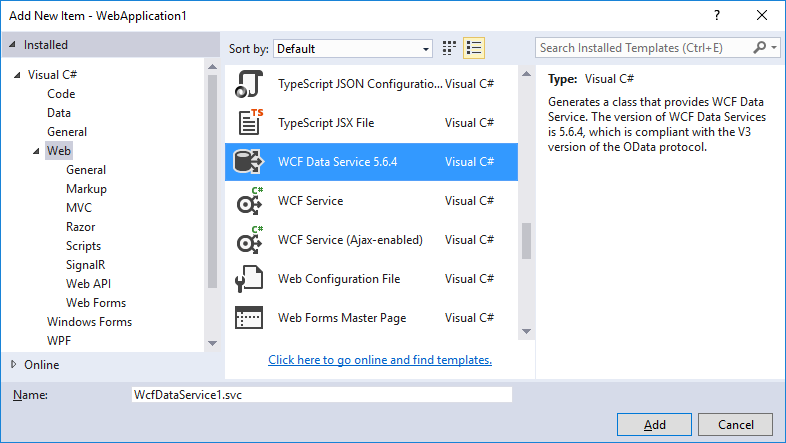
Note
The WCF Data Service template is available in Visual Studio 2015, but not in Visual Studio 2017 or later.
For the name of the service, enter
Northwind.Visual Studio creates the XML markup and code files for the new service. By default, the code-editor window opens. In Solution Explorer, the service has the name, Northwind, and the extension .svc.cs or .svc.vb.
In the code for the data service, replace the comment
/* TODO: put your data source class name here */in the definition of the class that defines the data service with the type that is the entity container of the data model, which in this case isNorthwindEntities. The class definition should look this the following:public class Northwind : DataService<NorthwindEntities>Public Class Northwind Inherits DataService(Of NorthwindEntities)